
책에 내용을 정리하며 공부한 내용을 추가했습니다.
이 장은 지난 5장에서 배운 스테레오 어노테이션과 다른 @Bean 메소드에 관해 설명합니다.
7.1 JavaConfig?
JavaConfig
DI 컨테이너을 불러올 설정을 자바의 클래스에 작성하기 위한 스프링의 기능.
@Configuration을 붙이면 JavaConfig 클래스로 인식됨
JavaConfig 클래스 불러오는 법.
AnnotationConfigApplicationContext 클래스의 생성자 인수로 지정
생성자인수로 여러 개의 JavaConfig클래스를 지정한다. AnnotationConfigApplication 클래스의 생성자 인수는 가변 인수이므로 원하는 수의 JavaConfig 클래스를 지정 가능
import org.springframework.context.annotation.AnnotationConfigApplicationContext;
import org.springframework.context.annotation.Bean;
import org.springframework.context.annotation.Configuration;

// 첫 번째 설정 클래스
@Configuration
class ConfigA {
    @Bean
    public ServiceA serviceA() {
        return new ServiceA();
    }
}

// 두 번째 설정 클래스
@Configuration
class ConfigB {
    @Bean
    public ServiceB serviceB() {
        return new ServiceB();
    }
}

// ServiceA 클래스
class ServiceA {
    public void doSomething() {
        System.out.println("ServiceA is doing something!");
    }
}

// ServiceB 클래스
class ServiceB {
    public void doAnotherThing() {
        System.out.println("ServiceB is doing another thing!");
    }
}

// 메인 클래스
public class MainApp {
    public static void main(String[] args) {
        // 여러 설정 클래스를 등록
        AnnotationConfigApplicationContext context =
                new AnnotationConfigApplicationContext(ConfigA.class, ConfigB.class);

        // 빈 가져오기
        ServiceA serviceA = context.getBean(ServiceA.class);
        ServiceB serviceB = context.getBean(ServiceB.class);

        // 메서드 호출
        serviceA.doSomething();
        serviceB.doAnotherThing();

        // 컨텍스트 닫기
        context.close();
    }
}
출력 결과
ServiceA is doing something!
ServiceB is doing another thing!@Impor로 지정
스프링에서 제공하는
@Import를 사용해서 한 JavaConfig 클래스에서 다른 JavaConfig를 클래스를 가져올 수 있음.
@Import를 활용하여 설정 클래스 통합
@Import 애노테이션으로 ConfigA와 ConfigB를 MainConfig에 포함시켰습니다.

이제 AnnotationConfigApplicationContext를 생성할 때 MainConfig만 등록하면 됩니다.
import org.springframework.context.annotation.AnnotationConfigApplicationContext;
import org.springframework.context.annotation.Bean;
import org.springframework.context.annotation.Configuration;
import org.springframework.context.annotation.Import;
// 첫 번째 설정 클래스
@Configuration
class ConfigA {
@Bean
public ServiceA serviceA() {
return new ServiceA();
}
}
// 두 번째 설정 클래스
@Configuration
class ConfigB {
@Bean
public ServiceB serviceB() {
return new ServiceB();
}
}
// 설정 클래스들을 묶는 메인 설정 클래스
@Configuration
@Import({ConfigA.class, ConfigB.class})
class MainConfig {
}
// ServiceA 클래스
class ServiceA {
public void doSomething() {
System.out.println("ServiceA is doing something!");
}
}
// ServiceB 클래스
class ServiceB {
public void doAnotherThing() {
System.out.println("ServiceB is doing another thing!");
}
}
// 메인 클래스
public class MainApp {
public static void main(String[] args) {
// 메인 설정 클래스만 등록
AnnotationConfigApplicationContext context =
new AnnotationConfigApplicationContext(MainConfig.class);
// 빈 가져오기
ServiceA serviceA = context.getBean(ServiceA.class);
ServiceB serviceB = context.getBean(ServiceB.class);
// 메서드 호출
serviceA.doSomething();
serviceB.doAnotherThing();
// 컨텍스트 닫기
context.close();
}
}
출력결과
ServiceA is doing something!
ServiceB is doing another thing!
컴포넌트 스캔
@ComponentScan은 Spring Framework에서 자동으로 클래스를 빈(Bean)으로 등록하는 기능을 제공합니다.
7.2 @Bean 메서드?
@Bean 메소드는 Bean을 정의하는 방법 중 하나.
- @Bean 메서드는 Spring에서 객체를 빈으로 등록하는 역할
- @Configuration 클래스 내에서 사용하며, 반환값이 스프링 컨테이너에서 관리되는 빈
- 의존성 주입도 가능하며, 메서드 이름이 빈의 이름으로 사용.
출처 : 그림이 보이는 스프링6
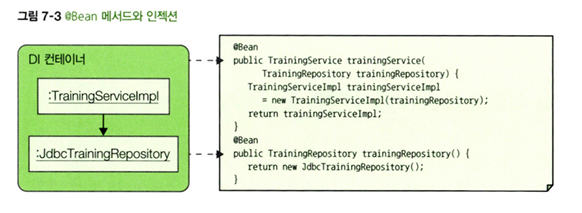
7.3 @Bean 인젝션
@Bean 메소드로 Bean을 정의할 때 인젝션하는 부분도 @Bean메드 안에 작성할 수 있다.
7.4 적절한 Bean 정의 방법 선택
| Bean정의방법 | 장점 | 단점 |
|---|---|---|
| 스테레오 어노테이션 | 대량의 Bean 정의를 간결하게 할 수 있음. | 개발자가 작성한 클래스에 Bean 정의를 할 수 있음(라이브러리 클래스는에는 Bean정의 불가 |
| @Bean 메서드 | 라이브러리가 제공하는 클래스에도 Bean정의를 할 수 있음. | 대량의 Bean정의 불가 |
7.5 라이브러리의 클래스를 Bean으로 정의하기
ex)HikariDataSource는 HikariCP에서 제공하는 DataSource 구현체입니다. 이를 Spring의 @Bean으로 등록하려면 아래와 같이 설정합니다.
- @Bean 메서드를 작성하고 HikariDataSource 클래스의 객체를 반환한다는 것을 알 수 있습니다.
@Configuration
public class DataSourceConfig {

    @Bean
    public HikariDataSource dataSource() {
        HikariConfig hikariConfig = new HikariConfig();

        // 데이터베이스 연결 정보 설정
        hikariConfig.setJdbcUrl("jdbc:mysql://localhost:3306/mydb");
        hikariConfig.setUsername("root");
        hikariConfig.setPassword("password");
        hikariConfig.setDriverClassName("com.mysql.cj.jdbc.Driver");

        // HikariCP 연결 풀 옵션 설정
        hikariConfig.setMaximumPoolSize(10);  // 최대 풀 사이즈 설정
        hikariConfig.setMinimumIdle(5);       // 최소 유휴 커넥션 설정
        hikariConfig.setIdleTimeout(30000);   // 유휴 타임아웃 설정 (ms)

        // HikariDataSource 반환
        return new HikariDataSource(hikariConfig);
    }
}
문제를 해결하면서 나온 문제를 기록하는 노트