날짜 : 21.07.13
참고 강의
0. boiler-plate 수정
앞으로의 사용성 증대를 위해 boiler-plate를 수정하여 구축하였다.
git 주소
- 많은 코드를 수정할 때에는 꼭 git pull을 사용하기
1. 비디오 업로드 페이지
1) [components] - [views] - [VideoUploadPage] - [VideoUploadPage.js] 생성
import React from 'react';

function VideoUploadPage(){
  return(

  )

}

export default VideoUploadPage;
2) [NavBar] - [Sections] - [RightMenu.js] 수정
if와 else로 로그인을 했을 경우와 아닌 경우를 분리하였다.
로그인을 한 경우만 이용 가능하므로 else에 추가
function RightMenu(props) {
  ...
  ...

  if (user.userData && !user.userData.isAuth) {
    return (
      ...
      ...
  } else {
    return (
      <Menu mode={props.mode}>
        <Menu.Item key="upload">
          <a href="/video/upload">Video</a>
        </Menu.Item>
        <Menu.Item key="logout">
          <a onClick={logoutHandler}>Logout</a>
        </Menu.Item>
      </Menu>
    )
  }
}

export default withRouter(RightMenu);- 결과화면

3) [components] - [App.js] 수정
import VideoUploadPage from './views/VideoUploadPage/VideoUploadPage';

//null   Anyone Can go inside
//true   only logged in user can go inside
//false  logged in user can't go inside

function App() {
  return (
    <Suspense fallback={(<div>Loading...</div>)}>
      <NavBar />
      <div style={{ paddingTop: '69px', minHeight: 'calc(100vh - 80px)' }}>
        <Switch>
            ...
  	    ...
          <Route exact path="/video/upload" component={Auth(VideoUploadPage, true)} />
        </Switch>
      </div>
      <Footer />
    </Suspense>
  );
}

export default App;
4) [VideoUploadPage] - [VideoUploadPage.js]에 UI 생성
프론트엔드에서 사용되므로 cd clinet 후 설치
npm install react-dropzone --save
- VideoUploadPage.js 코드
import React from 'react';
import { Typography, Button, Form, message, Input, Icon } from 'antd';
import Dropzone from 'react-dropzone';

const { TextArea } = Input;
const { Title } = Typography;
function VideoUploadPage() {
    return (
        <div style={{ maxWidth: '700px', margin: '2rem auto' }}>
            <div style={{ textAlign: 'center', marginBottom: '2rem' }}>
                <Title level={2}>Upload Video</Title>
            </div>

            <Form onSubmit>
                <div style={{ display: 'flex', justifyContent: 'space-between' }}>
                    {/* Drop Zone */}
                    <Dropzone
                        onDrop
                        multiple
                    >
                        maxSize{({ getRootProps, getInputProps }) => (
                            <div style={{
                                width: '300px', height: '240px', border: '1px solid lightgray', display: 'flex',
                                alignItems: 'center', justifyContent: 'center'
                            }} {...getRootProps()}>
                                <input {...getRootProps()} />
                                <Icon type="plus" style={{ fontSize: '3rem' }} />
                            </div>
                        )}
                    </Dropzone>

                    {/* Thumbnail */}
                    <div>
                        <img src alt />
                    </div>

                </div>

                <br />
                <br />

                <label>Title</label>
                <Input
                    onChange
                    value
                />

                <br />
                <br />

                <label>Description</label>
                <TextArea
                    onChange
                    value
                />

                <br />
                <br />

                <select onChange>
                    <option key value></option>
                </select>

                <br />
                <br />

                <select onChange>
                    <option key value></option>
                </select>

                <br />
                <br />

                <Button type="primary" size="large" onClick>
                    Submit
                </Button>

            </Form>
        </div>
    )
}

export default VideoUploadPage;
5) UI 활성화
// private option
const PrivateOpitons = [
    { value: 0, label: "Private" },
    { value: 1, label: "Public" }
]
// category option
const CategoryOptions = [
    { value: 0, label: "Film & Animation" },
    { value: 1, label: "Autos & Vehicles" },
    { value: 2, label: "Music" },
    { value: 3, label: "Pets & Animals" },
]

function VideoUploadPage() {
    const [VideoTitle, setVideoTitle] = useState("");
    const [Description, setDescription] = useState("");
    const [Private, setPrivate] = useState(0);
    const [Category, setCategory] = useState("Film & Animation");

    const onTitleChange = (e) =>{
        setVideoTitle(e.currentTarget.value)
    }

    const onDescriptonChange = (e) =>{
        setDescription(e.currentTarget.value)
    }

    const onPrivateChange = (e) =>{
        setPrivate(e.currentTarget.value)
    }

    const onCategoryChange = (e) =>{
        setCategory(e.currentTarget.value)
    }

    return (
      ...
      ...
                <label>Title</label>
                <Input
                    onChange={onTitleChange}
                    value={VideoTitle}
                />

                <br />
                <br />

                <label>Description</label>
                <TextArea
                    onChange={onDescriptonChange}
                    value={Description}
                />

                <br />
                <br />

                <select onChange = {onPrivateChange}>
                    {PrivateOpitons.map((item, index) => (
                        <option key={index} value={item.value}>{item.label}</option>
                    ))}
                </select>

                <br />
                <br />

                <select onChange = {onCategoryChange}>
                    {CategoryOptions.map((item, index) => (
                        <option key={index} value={item.value}>{item.label}</option>
                    ))}

                </select>
	...
    	...
    )
}

export default VideoUploadPage;
- 결과 화면
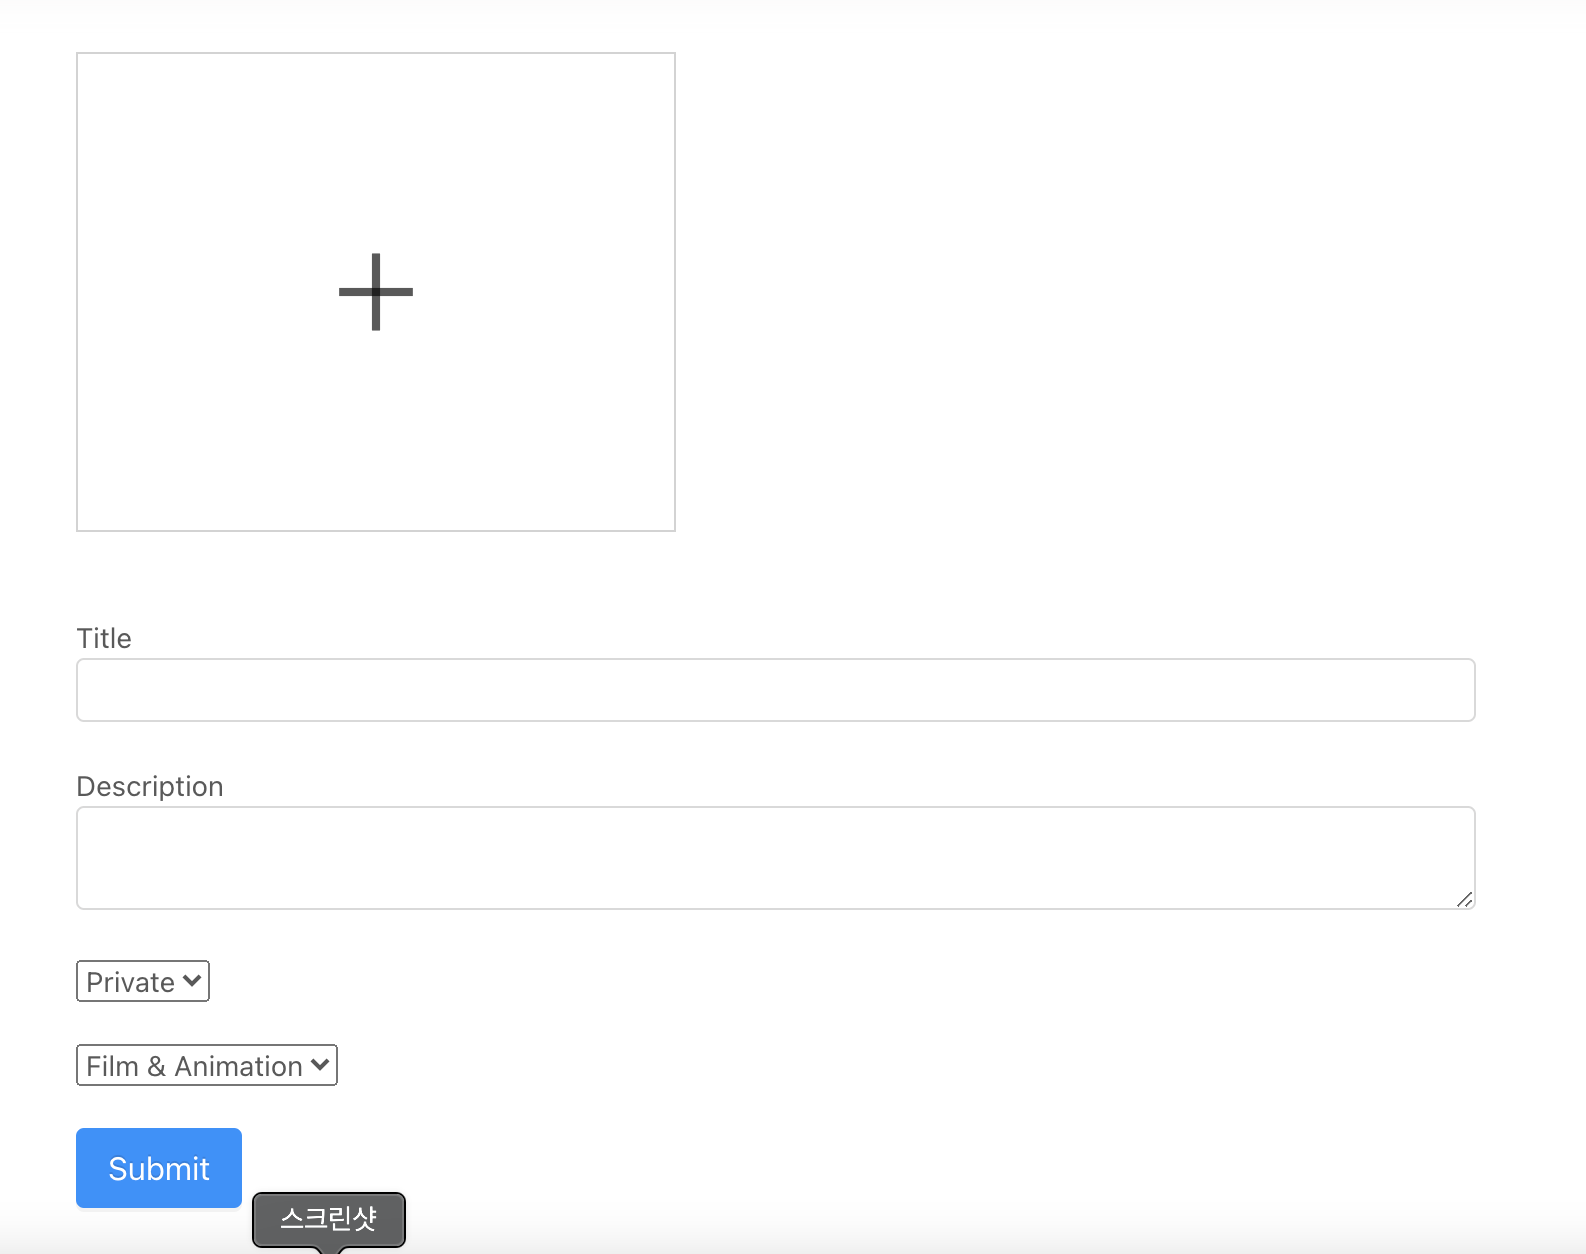
onChange를 생성하기 전에는 드롭다운과 text입력이 불가능하였지만 onChange로 event를 발생시켜 가능하게 만들어주었다.
2. 서버에 비디오 저장하기
1) onDrop function 생성
const onDrop = (files) => {
        let formData = new FormData;
        const config = {
            header: { 'content-type': 'multipart/form-data' }
        }

        formData.append("file", files[0])

        Axios.post('/api/video/uploadfiles', formData, config)
        .then(response=>{
            if(response.data.success){

            }else{
                alert('비디오 업로드를 실패하였습니다.')
            }
        })
    }

	return(
      ...
      ...
      <Dropzone
          onDrop={onDrop}
          multiple={false}
          maxSize={800000000}
      >
          ...
          ...

    )
2) server 디렉토리에 multer 설치
npm install multer --save3) multer 사용([server] - [routes] - [video.js]
destination : 파일을 어디에 저장할지(uploads)
-> root에 uploads 폴더 생성하기
filename : 어떠한 파일 이름으로 저장할지
fileFilter : 파일 확장자 명시
const express = require('express');
const router = express.Router();
// const { Video } = require("../models/Video");

const { auth } = require("../middleware/auth");
const multer = require('multer');

// Storage Multer Config
let storage = multer.diskStorage({
    destination: (req, file, cb) => {
        cb(null, 'uploads/')
    },
    filename: (req, file, cb) => {
        cb(null, `${Date.now()}_${file.originalname}`)
    },
    fileFilter: (req, file, cb) => {
        const ext = path.extname(file.originalname)
        if (ext !== '.mp4') {
            return cb(res.status(400).end('only jpg, png, mp4 is allowed'), false);
        }
        cb(null, true)
    }
})

const upload = multer({ storage: storage }).single("file")

//=================================
//             Video
//=================================

router.post('/uploadfiles',(req,res)=>{
    //비디오를 서버에 저장
    upload(req, res, err => {
        if(err){
            return res.json({success: false, err})
        }
        return res.json({success: true, url:res.req.file.path, fileName: res.req.file.filename})
    })
})

module.exports = router;
4) [server] - [index.js] 에 route 추가
app.use('/api/video', require('./routes/video'));5) 확인
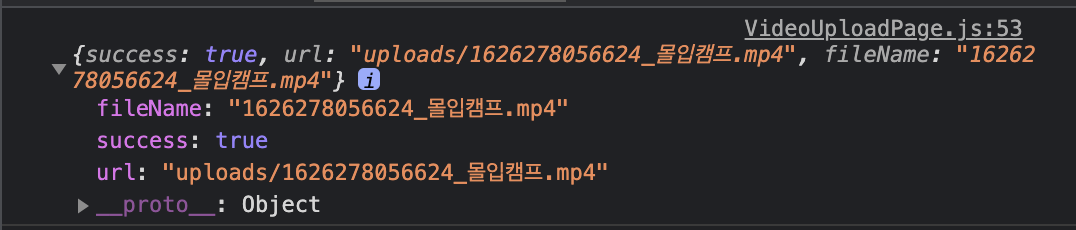
![]
Full Code
Walang Github
Walang Notion

나의 색으로 가득하게