React-4
비주얼 테스트로 더 쉽게 개발하기
비주얼 테스트 : 화면을 구성하는 컴포넌트들을 독립적으로 관리하고 변화를 살펴볼 수 있는 방법 (Ex:error 발생한경우, 정상작동 하는경우 두가지를 한꺼번에)

스토리 북 : 비주얼 테스트를 위한 도구
스토리 북 사용 방법 :
-
설치
yarn add --dev @storybook/react
-
package.json에 스토리북 실행 명령어 추가
"script": {
"storybook": "start-storybook -p 9001 -c .storybook",
"start": "react-scripts start",
"build": "react-scripts build",
"test" : "react-scripts test",
"eject" : "react-scripts eject",
},
// scripts 블록은 npm ,yarn 에서 실행할 명령어를 정의하는 곳
// "storybook" :스토리북 서버를 9001 포트를 통해 실행 시킬 수 있도록 설정 -
스토리 파일 만들기
./src/stories/InputStory.jsx

import React from 'react';
import { storieOf } from '@storybook/react';
//스토리를 스토리북 도구에 추가해주는 storiesOf 함수 추가

import Input from '../03/Input';

storiesOf('Input'// 스토리북 도구에 표시할 스토리 이름
          ,module)
  .add('기본 설정'//스토리북 도구에 표시할 메뉴 이름
, () => <Input name="name"/>);- 스토리북 config.js 스토리 연결하기
스토리를 스토리북에 연결할려면 프로젝트 루트 폴더에 .storybook 이름의 폴더가 존재해야 합니다. 만든 뒤 config.js라는 이름의 설정 파일을 생성하여 작성합시다.
import { configure } from '@storybook/react';

function loadStories() {
  require('../src/stories/InputStory');
  //loadStories() 함수 안에서 require() 함수로 임포트 했습니다.
}
configure(loadStories, module);
스토리북 스마트하게 사용하기
스토리북 자동 추가
./.storybook/config.js 파일
import { configure } from '@storybook/react';
import interopRequireDefault
 from 'babel-runtime/helpers/interopRequireDefault';

function loadStories() {
  const context = require.context('../src/stories', true, /Story\.jsx$/);
  //require.context() 함수로 src/stories 폴더의 스토리 목록을 가져옵니다.
  //웹팩에서 context는 "모듈의 경로를 해석하기 위한 기준이 되는
  //base 디렉토리"를 의미한다
  context.keys().forEach((srcFile) => {
    interopRequireDefault(context(srcFile));
  });
  //interopRequireDefault는 context() 함수로 임포트한 파일 중
  //default 항목을 임포트한다.
}
configure(loadStories,module);
스토리북 확장 도구 사용하기 addon-actions, addon-jsx
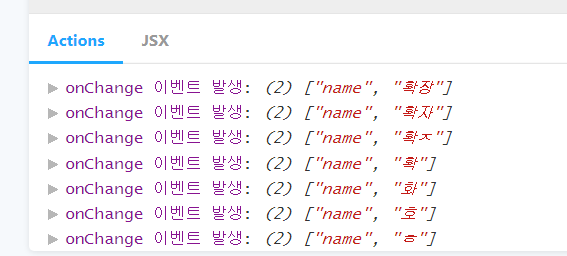
addon-actions : 스토리북에서 발생하는 특정 이벤트에 로그를 출력하게 해줍니다.(onChange,onClick,on...)
addon-jsx : 스토리북에서 JSX 코드를 확인 가능합니다.

설치과정
yarn add --dev @storybook/addons @storybook/addon-actions
yarn add --dev storybook/addon-jsx
확장도구 추가 방법
./.storybook/addons.js
import '@storybook/addon-actions/register';
import '@storybook/addon-jsx/register';
addon-jsx 의 경우 새로운 예제 추가 함수(addWithJSX)를 storyOf() 함수에 추가하므로 config.js 또한 수정해주어야 합니다.
./.storybook/config.jsx


import { configure } from '@storybook/react';
import interopRequireDefault from
'babel-runtime/helpers/interopRequireDefault';
import JSXAddon from 'storybook-addon-jsx';

function loadStories() {
  const context = require.context('../src/stories', true, /Story\.jsx$/);
  context.keys().forEach((srcFile) => {
    interopRequireDefault(context(srcFile));
  });
}
setAddon(JSXAddon);
configure(loadStories,module);
확장도구 사용
import React from 'react';
import {storiesOf} from '@storybook/react;
import {action} from '@storybook/addon-actions'; //actions 사용하기위한 import
import Input from '../03/Input';

storiesOf('Input', module)
.addWithJSX('기본 설정', ()=> <Input name="name" />)
.addWithJSX('onChange 예제', ()=> <Input name="name" onChange={action('onChange 이벤트 발생')} />)
스타일 컴포넌트 만들기
react-with-style는
- 스타일 클래스 이름 압축을 지원합니다. (my-custom-title > a123wrs)
- 서버 출력 라이브러리를 지원합니다.
-
라이브러리 설치
yarn add react-with-styles aphrodite react-with-styles-interface-aphrodite
-
테마 파일 만들기
./src/04/Theme.js
export default {
  // 색상
  color: {
    primary: '#03a9f4', // 주 색상
    secondary: '#795548', // 부 색상
    white: '#FFFFFF',
    gray: '#CCCCCC',
    default: '#999999', // 기본 문자 색상
    error: '#FF0000', // 오류 색상
  },
  // 폰트 사이즈
  size: {
    xg: 24,
    lg: 18,
    md: 14,
    sm: 12,
    xs: 10,
  },
  lineHeight: {
    xg: '60px',
    lg: '54px',
    md: '36px',
    sm: '24px',
    xs: '18px',
  },
  // 길이 단위
  unit: 4,
  // 반응형 미디어 속성
  responsive,
};
- 공용 스타일 컴포넌트 함수 만들기
./src/04/withStyles.js
import ThemedStyleSheet from 'react-with-styles/lib/ThemedStyleSheet';
//react-with-styles의 테마 관리자 import
import aphroditeInterface from 'react-with-styles-interface-aphrodite';
//서버 출력을 도와주는 아프로디테 라이브러리의 react-with-styles 버전을 import
import { css, withStyles, withStylesPropTypes } from 'react-with-styles';
//react-with-styles에서 사용하는 함수 import
import Theme from './Theme';

ThemedStyleSheet.registerTheme(Theme);
//Theme 파일을 적용시킵니다
ThemedStyleSheet.registerInterface(aphroditeInterface);
//아프로디테를 react-with-styles의 테마 관리자에 적용합니다.

export { css, withStyles, withStylesPropTypes, ThemedStyleSheet };
export default withStyles;- Text 예제 컴포넌트 만들기, withStyles() 함수로 react-with-styles 사용해보기
Text 예제에서 프로퍼티에 따라 다양한 스타일 변경 예제를 만들었습니다. 스토리북에서 프로퍼티로 값을 주게 된다면 지정해둔 css가 적용됩니다.
import React, { PureComponent } from 'react';
import PropTypes from 'prop-types';
import withStyles, { css } from './withStyles';

class Text extends PureComponent {
  render() {
    const { children, styles, large, xlarge, small, xsmall, primary, secondary } = this.props;
    return (
      <span
        {...css(
          styles.default,
          xsmall && styles.xsmall,
          small && styles.small,
          large && styles.large,
          xlarge && styles.xlarge,
          secondary && styles.secondary,
          primary && styles.primary,
        )}
      >
        {children}
      </span>
    );
  }
}

Text.propTypes = {
  children: PropTypes.node.isRequired,
  large: PropTypes.bool,
  xlarge: PropTypes.bool,
  small: PropTypes.bool,
  xsmall: PropTypes.bool,
  primary: PropTypes.bool,
  secondary: PropTypes.bool,
};

export default withStyles(({ color, size }) => ({
  default: {
    color: color.default,
    fontSize: size.md,
  },
  large: {
    fontSize: size.lg,
  },
  xlarge: {
    fontSize: size.xg,
  },
  small: {
    fontSize: size.sm,
  },
  xsmall: {
    fontSize: size.xs,
  },
  primary: {
    color: color.primary,
  },
  secondary: {
    color: color.secondary,
  },
}))(Text);
./src/stories/TextStory.jsx
import React from 'react';
import { storiesOf } from '@storybook/react';

import Text from '../04/Text';

storiesOf('Text', module)
  .addWithJSX('기본 설정', () => <Text>안녕하세요</Text>)
  .addWithJSX('기본 설정', () => <Text>안녕하세요</Text>)
  .addWithJSX('large 예제', () => <Text large>안녕하세요</Text>)
  .addWithJSX('xlarge 예제', () => <Text xlarge>안녕하세요</Text>)
  .addWithJSX('small 예제', () => <Text small>안녕하세요</Text>)
  .addWithJSX('xsmall 예제', () => <Text xsmall>안녕하세요</Text>)
  .addWithJSX('primary 예제', () => <Text primary>안녕하세요</Text>)
  .addWithJSX('secondary 예제', () => <Text secondary>안녕하세요</Text>)
  .addWithJSX('primary와 large 함께 쓰는 예제', () => (
    <Text primary large>
      안녕하세요
    </Text>
  ));
테스트 위주 개발 방법 사용해보기
작성한 코드가 제대로 기능하는지 확인하기 위해 작성하는 코드를 테스트 코드라하고 수행 기능을 작성하기 전에 테스트 코드부터 작성하는 개발 방법을 '테스트 위주 개발'이라고 합니다. 팀원과 협업시 내가 작성한 코드를 다른 사람이 수정했을 때 '원 기능이 고장나지 않도록' 보호 할수 있습니다.
create-react-app에서 기본으로 제공하는 jest의 사용 방법을 알아봅시다.
jest의 경우 파일 이름이 .test.js, .spec.js로 끝나는 파일이나 src/__tests__폴더에 작성된 모든 .js .jsx 확장파 파일을 테스트 환경에서 실행시킵니다.
enzyme 라이브러리
테스트 과정에서 작성된 컴포넌트의 기능만을 손쉽게 검사해주는 도구입니다.
차량 타이어 내구성 검사를 할때 차 전체를 검사하지 않고 타이어만 분리하여 검사하는 것과 원리가 같습니다.
-
enzyme 설치
yarn add --dev enzyme enzyme-adapter-react-16.3 react-test-renderer
-
테스트 환경에 enzyme 추가하기
./src/setupTests.js
import { configure } from 'enzyme';
import Adapter from 'enzyme-adapter-react-16.3';

configure({adapter : new Adapter()});
// 테스트 환경에 enzyme 을 새 버전 생명주기 함수와 함께 추가합니다.- 간편한 출력 테스트를 도와주는 shallow()함수
shallow 함수는 자식 컴포넌트를 생성하거나 출력하는 과정을 건너뛰고 현재 컴포넌트의 생명주기만을 테스트합니다.
./src/__test__/Input_spec.jsx
import React from 'react';
import { shallow } from 'enzyme';

import Input from '../../03/Input';
describe('<Input>', () => {
  it('renders without crashing', () => {
    expert(() => {
      shallow(<Input name="test_name" />); // shallow 함수안에 컴포넌트 삽입
    }).not.toThrow(); // jest의 toThrow() 함수를 사용하여 입력 컴포넌트가 출력 되는
    //동안 오류가 발생하는지 검사하고, 오류가 발생하지 않으면 테스트 통과
  });
});- expect() 함수로 결괏값 검증하기
jest의 검사 함수인 expect()는 특정 변수를 비교하거나 함수를 실행하여 발생한 결괏값을 검증합니다.
// expect 함수를 사용하여 shallow() 함수가 반환하는 객체의 개수를 검증하는 예제
import React from 'react';
import { shallow } from 'enzyme';

import Input from '../../03/Input';
it('renders without crashing', ...)

  it('has one element', () => {
    const wrapper = shallow(<Input name="test_name" />);
    expect(wrapper.length).toEqual(1); // toEqual 함수를 통해 반환된 객체의 수 비교
    expect(wrapper).toHaveLength(1); // toHaveLength() 함수를 사용하요 . length 비교
  });
- 경고 메시지를 오류로 인식하도록 설정하기
./src/setupTests.js
import { configure } from 'enzyme';
import Adapter from 'enzyme-adapter-react-16.3';

configure({adapter : new Adapter()});
afterEach(() => {
console.error.mockClear();
});//console.error() 함수 객체에 spyOn() 함수로 추가된 가상의 감지 코드를 제거합니다.
beforeEach(() => {
  jest.spyOn(console, 'error').mockImplementation((e) => {
    // 감시 함수 spyOn()을 사용하여 console 객체의 error() 함수를
    // 실제 기능 대신 mock...에 정의된 함수가 실행되도록 합니다.
    throw new Error(e);
    //console.error() 함수를 실행할 때 전달된 인자로 오류를 발생하도록 합니다.
  });
});
enzyme 라이브러리 능숙하게 사용하기
1. find() 함수로 엘리먼트 출력 검사하기
find() 함수를 이용하여 컴포넌트의 render 함수에서 출력해야 하는 항목이 제대로 갖춰져 있는지 검사가 가능합니다.
./src/__test__/Input_spec.jsx
import React from 'react';
import { shallow } from 'enzyme';

import Input from '../../03/Input';
describe('<Input>', () => {
  it('renders without crashing', () => {
    expert(() => {
      shallow(<Input name="test_name" />);
    }).not.toThrow();
  });

  describe('contains <input>', () => {
    it('renders one input', () => {
      const wrapper = shallow(<Input name="test_name" />);
      // shallow() 함수는 컴포넌트를 출력한뒤 컴포넌트를 검사할 수 있는 enzyme 객체를 반환합니다.
      expect(wrapper.find('input')).toHaveLength(1);
      //find함수의 인자로 input을 전달하여 출력된 DOM에서 input 엘리먼트를 찾습니다.
      expect(wrapper.find('label')).toHaveLength(1);
    });
  });
});
2. prop(),props() 함수로 프로퍼티에 전달된 값 검증하기
toBe() 함수의 경우 기본 값을 비교하거나 객체 인스턴스의 참조 ID를 확인합니다.
Object.is를 호출하여 값을 비교하기에 완전 항등 연산자(===)보다 테스트에 좋습니다.
... describe('<Input>', () => {
  ...
  	it('assigns the prop value and type', () => {
		const expectValue = '123';
    	const wrapper = shallow(<Input name="test_name"
                                  value={expectedValue} />);
    	expect(wrapper.find('input').prop('value')).toBe(expectedValue);
    //prop함수를 사용하여 value의 프로퍼티값과 컴포넌트에 전달된 값을 검증합니다
    	const { type, value } = wrapper.find('input').props();
    //props의 경우 객체로 반환합니다.
    	expect(value).toBe(expectedValue);
        expect(type).toBe('text');
    //props로 반환된 프로퍼티값을 검증합니다. 앞서 추출한 값과 같으며 검증 표현법이 다릅니다.
     });
  });
3. setProps() 함수로 변경된 프로퍼티값 전달하기
Input_spec.jsx
...
describe('<Input>',() => {
...
  it('renders errorMessage' , () => {
    const wrapper = shallow(<Input name="test_name" />);
    expect(wrapper.find('.error')).toHaveLength(0);
    const expectedErrorMesaage = '옳지 못한 값이 입력되었습니다';
    wrapper.setProps({ errorMessage: expectedErrorMessage });
  //setProps을 통해 errorMessage 를 프로퍼티 값으로 넣고 에러 생겼는지 검증합니다.
    expect(wrapper.find('span').prop('className')).toBe('error');
    expect(wrapper.find('.error')).toHaveLength(1);
    expect(wrapper.html()).toContain(expectedErrorMessage);
  });
});
4. simulate()함수로 가상의 이벤트 검사하기
simulate() 함수는 가상의 이벤트를 작동시킬 수 있습니다. 이를 이용하여 이벤트에 반응하는 콜백 함수가 정상 작동하는지 확인합니다. Input 컴포넌트의 onChange()콜백 함수를 호출해보겠습니다.
Input_spec.jsx
...
describe('<Input>',() => {
...
  it('calls back onChange on input change' , () => {
  const changeStub = jest.fn();
  // jest는 감시함수 fn을 제공하여 생성된 함수의 호출을 감시하는 방법을 제공합니다.
  const wrapper = shallow(<Input name="test_name" onChange={changeStub }/>);
  // 생성된 감시 함수를 onChange 프로퍼티에 할당
  expect(changeStub).not.toHaveBeenCalled();
  //이벤트 재현 시점을 기준으로 이벤트 실행 이전에는 콜백 함수가 호출되지 않은 상태를 expect() 함수의 호출 검증 메소드 toHaveBeenCalled()로 검증합니다.
  const expectedTargetValue = 'updated input';
  wrapper.find('input').simulate('change', { target: { value: expectedTargetValue} });
  //simulate() 함수를 이용해 상황을 재현하고 실제 브라우저에 전달할 값 target.value 즉 객체로 전달해줍니다.
  expect(changeStub).toHaveBeenCalledTimes(1);
  //호출 횟수 검증
  expect(changeStub).toHaveBeenCalledWith('test_name', expectedTargetValue);
  //호출 인자 검사
}
5. mount() 함수로 전체 출력하기
mount() 함수는 withStyles() 함수와 같은 하이어오더 컴포넌트를 출력할 때 사용합니다.
./src/__test__/04/Text_spec.jsx

import React from 'react';
import { shallow } from 'enzyme';

import Text from '../../04/Text';

describe('<Text>', () => {
	it('renders without crashing', () => {
      expect(() => {
        shallow(<Text>테스트</Text>);
      }).not.toThrow();
    });
  	it('contains <span>', () => {
		expect(shallow(<Text>테스트</Text>).find('span')).toHaveLength(1);
    });
});
// 실행시 expect(shallow(<Text>테스트</Text>).find... 에 화살표 표시를 하여 오류 메시지 출력
// 오류가 출력되는 이유는 하이어오더와 연관이 있습니다. mount 함수를 통해 하이어오더 컴포넌트를 검증
6. 테스트 환경에 Aphrodite 라이브러리 추가 및 인젝션 함수 건너뛰기
./src/setupTests.js
import { configure } from 'enzyme';
import Adapter from 'enzyme-adapter-react-16.3';

import * as Aphrodite from 'aphrodite';
import * as AphroditeNoImportant from 'aphrodite/no-important';

Aphrodite.StyleSheetTestUtils.suppressStyleInjection();
AphroditeNoImportant.StyleSheetTestUtils.suppressStyleInjection();
//아프로디테의 DOM 함수 호출 과정을 중지시킵니다.
..../src/__test__/04/Text_spec.jsx
import React from 'react';
import { shallow,mount } from 'enzyme';
import Text from '../../04/Text';
describe('<Text>', () => {
it('renders without crashing', () => {
expect(() => {
shallow(<Text>테스트</Text>);
}).not.toThrow();
});
it('contains <span>', () => {
expect(mount(<Text>테스트</Text>).find('span')).toHaveLength(1);
//mount 함수로 변경시 문제없이 진행완료
});
});8. dive 함수로 하위 컴포넌트 출력하기
shallow,dive,mount 함수로 출력한 컴포넌트
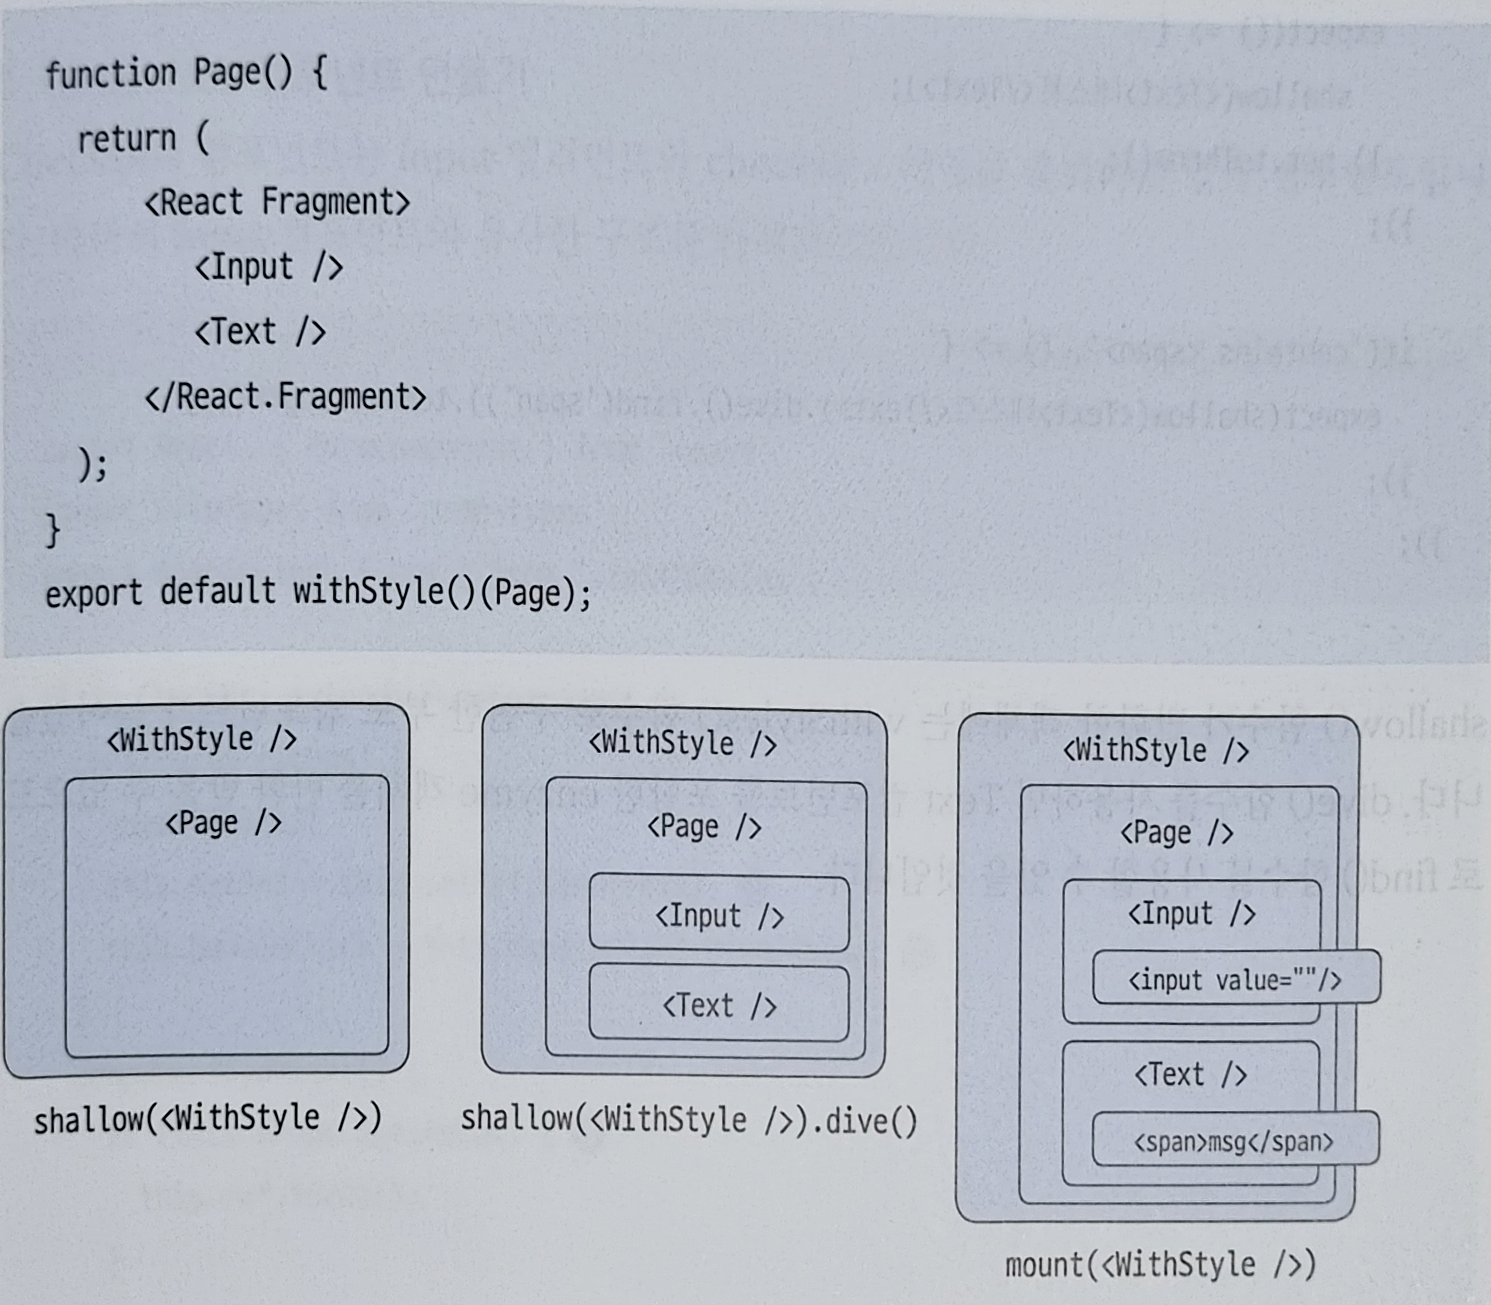
mount이 가장 내용이 많기에 성능에 영향을 줄 가능성이 높습니다.
이럴땐 특정 하위 컴포넌트만 불러오도록 가능한 dive 함수를 이용하는것이 좋습니다.
dive 함수는 enzyme에 포함되므로 shallow함수에 바로 점 연산자를 붙여 사용가능합니다.
./src/__test__/04/Text_spec.jsx

import React from 'react';
import { shallow,mount } from 'enzyme';

import Text from '../../04/Text';

describe('<Text>', () => {
	it('renders without crashing', () => {
      expect(() => {
        shallow(<Text>테스트</Text>);
      }).not.toThrow();
    });
  	it('contains <span>', () => {
		expect(shllow(<Text>테스트</Text>).dive().find('span')).toHaveLength(1);
      //mount 함수로 변경시 문제없이 진행완료
    });
});
Check 컴포넌트 만들며 복습
./src/04/CheckBox.jsx
import React, { PureComponent } from 'react';
import PropTypes from 'prop-types';
import withStyles, { css } from './withStyles';

class CheckBox extends PureComponent {
  constructor(props) {
    super(props);
    this.setRef = this.setRef.bind(this);
    this.handleClick = this.handleClick.bind(this);
  }
  componentDidMount() {
    if (this.props.autoFocus) {
      this.ref.focus();
    }
  }
  handleClick(e) {
    const { name, onChange } = this.props;
    onChange(name, e.target.checked);
  }
  setRef(ref) {
    this.ref = ref;
  }
  render() {
    const { errorMessage, label, children, styles, checked } = this.props;

    return (
      <label>
        {label}
        <div>
          <input
            ref={this.setRef}
            type="checkbox"
            checked={checked && 'checked'}
            onClick={this.handleClick}
          />
          {children}
        </div>
        {errorMessage && (
          <div>
            <span {...css(styles.errorText)}>{errorMessage}</span>
          </div>
        )}
      </label>
    );
  }
}

CheckBox.propTypes = {
  name: PropTypes.string.isRequired,
  autoFocus: PropTypes.bool,
  checked: PropTypes.bool,
  onChange: PropTypes.func,
};
CheckBox.defaultProps = {
  autoFocus: false,
  checked: false,
  onChange: () => {},
};
export default withStyles(({ color, size }) => ({
  errorText: {
    fontSize: size.sm,
    color: color.error,
  },
}))(CheckBox);
스토리
./src/stories/CheckBoxStory.jsx
import React from 'react';
import { storiesOf } from '@storybook/react';
import { action } from '@storybook/addon-actions';

import CheckBox from '../04/CheckBox';
import Text from '../04/Text';

storiesOf('CheckBox', module)
  .addWithJSX('기본 설정', () => <CheckBox name="agree" />)
  .addWithJSX('children 예제', () => (
    <CheckBox name="agree">
      <Text>동의합니다.</Text>
    </CheckBox>
  ))
  .addWithJSX('label 예제', () => (
    <CheckBox name="agree" label="이름">
      <Text>동의합니다.</Text>
    </CheckBox>
  ))
  .addWithJSX('onChange 예제', () => (
    <CheckBox name="agree" onChange={action('onChange 이벤트 발생')}>
      <Text>동의합니다.</Text>
    </CheckBox>
  ))
  .addWithJSX('checked 예제', () => (
    <CheckBox name="agree" label="이름" checked>
      <Text>동의합니다.</Text>
    </CheckBox>
  ))
  .addWithJSX('errorMessage 예제', () => (
    <CheckBox name="agree" label="이름" errorMessage="동의가 필요합니다.">
      <Text>동의합니다.</Text>
    </CheckBox>
  ))
  .addWithJSX('autoFocus 예제', () => (
    <CheckBox name="agree" label="이름" autoFocus>
      <Text>동의합니다.</Text>
    </CheckBox>
  ));
테스트 코드 작성
import React from 'react';
import { shallow } from 'enzyme';

import CheckBox from '../../04/CheckBox';
// describe 여러 테스트  케이스 묶기
describe('<CheckBox>', () => {
  it('renders without crashing', () => {
    expect(() => {
      shallow(<CheckBox name="required">테스트</CheckBox>);
    }).not.toThrow();
  });

  it('displays errorMessage', () => {
    const errorMessage = '오류 메시지';
    const errorHtml = shallow(
      <CheckBox name="name" errorMessage={errorMessage}>
        테스트
      </CheckBox>,
    )
      .dive()
      .find('span')
      .html(); //enzyme의 html 함수를 사용하여 출력된 HTML을 문자열로 변환합니다.
    expect(errorHtml).toContain(errorMessage);
    //expect() 함수가 반환한 toContain() 함수를 사용하여 HTML에 오류 메시지가 포함되어 있는지 검증합니다.
  });

  it('calls back onChange on clicked', () => {
    const changeStub = jest.fn();
    expect(changeStub).toHaveBeenCalledTimes(0);
    const input = shallow(
      <CheckBox name="test_name" onChange={changeStub}>
        테스트
      </CheckBox>,
    )
      .dive()
      .find('input');
    expect(input).toHaveLength(1);
    input.simulate('click', { target: { checked: true } });
    expect(changeStub).toHaveBeenCalledTimes(1);
    expect(changeStub).toHaveBeenCalledWith('test_name', true);
    input.simulate('click', { target: { checked: false } });
    expect(changeStub).toHaveBeenCalledWith('test_name', false);
  });
});