
Nginx를 사용할 때 보안을 강화하기 위해 nginx/version 정보를 헤더에서 제거하는 방법을 찾게 되었습니다. Nginx의 기본 설정에서 server_tokens off; 옵션을 활성화하면 버전 정보는 제거되지만, 여전히 nginx라는 서버 이름이 표시되는 문제가 남아 있었습니다. 이를 해결하기 위해 몇 가지 추가적인 단계를 거쳤으며, 아래에서 그 과정과 최종 Dockerfile 설정을 공유합니다.
헤더에서 버전 정보 제거하기
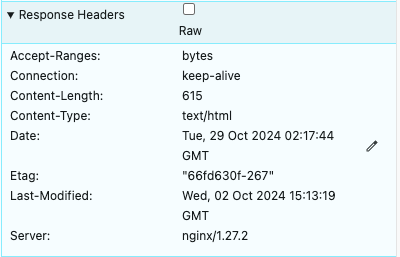
기본적으로 Nginx의 server_tokens off; 옵션은 버전 정보만 제거할 수 있습니다. 예를 들어, server_tokens off; 옵션을 추가한 후의 헤더 변경은 다음과 같습니다.
Before
After
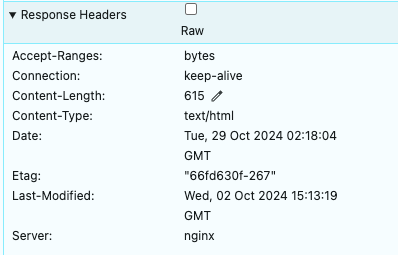
이처럼 server_tokens off;는 버전 정보는 제거하지만 서버 이름 nginx는 여전히 표시됩니다.
헤더에서 Server 정보 완전히 제거하기
보안 목적상, 서버가 Nginx임을 숨기고자 headers-more-nginx-module 모듈을 설치했습니다. 이를 통해 HTTP 응답 헤더에서 Nginx의 서버 정보를 완전히 삭제할 수 있었습니다. 아래는 이를 적용하기 전과 후의 헤더 차이를 보여주는 예시입니다.
Before

After
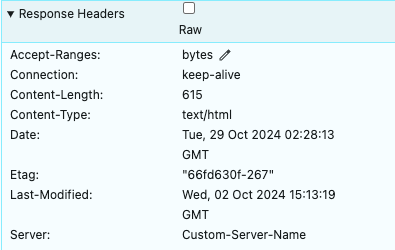
이처럼 headers-more-nginx-module과 more_set_headers 옵션을 활용하면 헤더에서 서버 정보를 제거하는 데 성공할 수 있습니다. 하지만 이러한 설정만으로는 Nginx가 기본적으로 제공하는 에러 페이지에서 표시되는 텍스트까지는 제거할 수 없었습니다.
에러 페이지의 Nginx 문자열 제거 가능성
일부 에러 페이지는 커스텀 에러 페이지로 설정하여 Nginx 기본 페이지 대신 사용자 정의 페이지로 대체할 수 있습니다. 하지만 HTTPS 포트로 HTTP 요청이 들어왔을 때 발생하는 400 Bad Request: The plain HTTP request was sent to HTTPS port와 같은 경우에는 여전히 Nginx 기본 에러 페이지가 표시됩니다. server_tokens off; 옵션을 적용하면 버전 정보는 숨길 수 있지만, 여전히 하단에 nginx 텍스트가 나타납니다.
이 문제를 해결하기 위해 Nginx 소스 코드 자체를 수정할 수 있는지 검토하게 되었습니다. 해당 텍스트는 nginx/src/http/ngx_http_special_response.c 파일에 있는 <center>nginx</center> 부분에서 생성되는 것을 확인했고, 이를 커스텀 문자열로 변경하여 Nginx 에러 페이지를 수정해 보기로 결정했습니다.
Dockerfile을 통한 커스텀 Nginx 빌드
다음 Dockerfile은 Nginx 소스 코드를 수정하여 에러 페이지의 Nginx 문자열을 커스텀 문자열로 변경하는 과정을 보여줍니다. 이를 통해 에러 페이지에서도 Nginx 기본 텍스트를 완전히 제거할 수 있었습니다.
# 베이스 이미지는 Ubuntu 사용
FROM ubuntu:22.04

# 필요한 패키지 설치
RUN apt-get update && \
    apt-get install -y \
    build-essential \
    libpcre3 \
    libpcre3-dev \
    zlib1g \
    zlib1g-dev \
    libssl-dev \
    wget \
    curl \
    git

# Nginx 소스 코드 다운로드
RUN wget http://nginx.org/download/nginx-1.27.2.tar.gz && \
    tar -zxvf nginx-1.27.2.tar.gz && \
    rm nginx-1.27.2.tar.gz

# Nginx 소스 코드 수정
RUN cd nginx-1.27.2 && \
    sed -i 's/<center>nginx<\/center>/<center>Custom string<\/center>/g' src/http/ngx_http_special_response.c

# Nginx 컴파일 및 설치
RUN cd nginx-1.27.2 && \
    ./configure --prefix=/etc/nginx \
                --sbin-path=/usr/sbin/nginx \
                --modules-path=/usr/lib/nginx/modules \
                --conf-path=/etc/nginx/nginx.conf \
                --error-log-path=/var/log/nginx/error.log \
                --http-log-path=/var/log/nginx/access.log \
                --pid-path=/var/run/nginx.pid \
                --lock-path=/var/run/nginx.lock \
                --with-http_ssl_module \
                --with-http_v2_module \
                --with-http_realip_module \
                --with-http_addition_module \
                --with-http_sub_module \
                --with-http_dav_module \
                --with-http_flv_module \
                --with-http_mp4_module \
                --with-http_gunzip_module \
                --with-http_gzip_static_module \
                --with-http_random_index_module \
                --with-http_secure_link_module \
                --with-http_stub_status_module \
                --with-http_auth_request_module \
                --with-threads \
                --with-stream \
                --with-stream_ssl_module \
                --with-stream_ssl_preread_module \
                --with-cc-opt='-g -O2 -fdebug-prefix-map=/data/builder/debuild/nginx-1.27.2/debian/debuild-base/nginx-1.27.2=. -specs=/usr/share/dpkg/no-pie-compile.specs -Wformat -Werror=format-security -fstack-protector-strong -Wdate-time -D_FORTIFY_SOURCE=2 -DTCP_FASTOPEN=23' \
                --with-ld-opt='-Wl,-Bsymbolic-functions -Wl,-z,relro -Wl,-z,now -specs=/usr/share/dpkg/no-pie-link.specs' && \
    make && \
    make install

# 불필요한 파일 정리
RUN rm -rf /nginx-1.27.2 && \
    apt-get remove -y build-essential wget git && \
    apt-get autoremove -y && \
    apt-get clean && \
    rm -rf /var/lib/apt/lists/*

# 포트 노출
EXPOSE 80 443

# Nginx 실행
CMD ["nginx", "-g", "daemon off;"]
Before

After
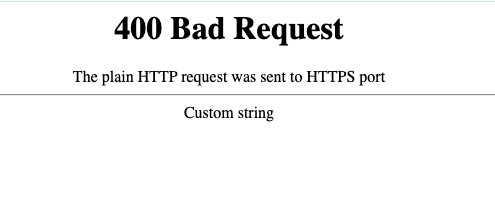
이와 같은 커스텀 빌드를 통해 Nginx 기본 에러 페이지에서도 커스텀 문자열을 표시할 수 있었습니다. 이를 통해 보안을 강화하고 서버 정보가 불필요하게 노출되지 않도록 할 수 있습니다.