📖시큐리티 기초
전 시간에 이어서..
최신버전으로 바꿔서 해보자!
📌Security 패키지
📍WebSecurityConfig 클래스
❗ authorizeRequests 는 스프링 3버전 부터 없어질 예정이지만 authorizeHttpRequests를 쓰면 에러메세지 출력이 안되기 때문에 어쩔 수 없이 써야한다.
package com.Security.auth;
import org.springframework.beans.factory.annotation.Autowired;
import org.springframework.context.annotation.Bean;
import org.springframework.context.annotation.Configuration;
import org.springframework.security.config.Customizer;
import org.springframework.security.config.annotation.authentication.builders.AuthenticationManagerBuilder;
import org.springframework.security.config.annotation.web.builders.HttpSecurity;
import org.springframework.security.config.annotation.web.configuration.EnableWebSecurity;
import org.springframework.security.core.userdetails.User;
import org.springframework.security.core.userdetails.UserDetailsService;
import org.springframework.security.crypto.bcrypt.BCryptPasswordEncoder;
import org.springframework.security.crypto.password.PasswordEncoder;
import org.springframework.security.provisioning.InMemoryUserDetailsManager;
import org.springframework.security.web.SecurityFilterChain;
import org.springframework.security.web.access.expression.WebExpressionAuthorizationManager;
@Configuration
@EnableWebSecurity
public class WebSecurityConfig {
// 아이디, 비밀번호, 역할 설정
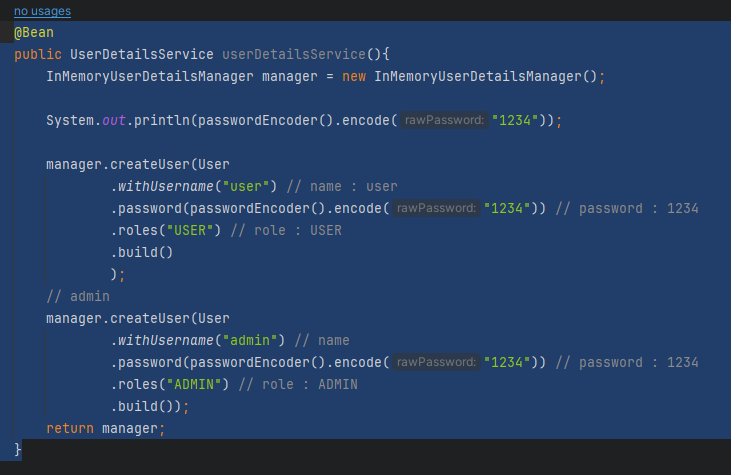
@Bean
public UserDetailsService userDetailsService(){
InMemoryUserDetailsManager manager = new InMemoryUserDetailsManager();
// member
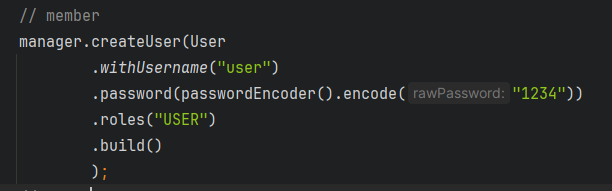
manager.createUser(User
.withUsername("user")
.password(passwordEncoder().encode("1234"))
.roles("USER")
.build() // 👉 빌드업 패턴!
);
// admin
manager.createUser(User
.withUsername("admin")
.password(passwordEncoder().encode("1234"))
.roles("ADMIN")
.build()); // 👉 빌드업 패턴!
return manager;
}
// passwordEncoder() 추가
@Bean
public PasswordEncoder passwordEncoder(){
return new BCryptPasswordEncoder();
}
// url 요청에 대한 허용 여부 설정
@Bean
public SecurityFilterChain filterChain(HttpSecurity http) throws Exception {
http
.authorizeRequests(auth -> auth
.requestMatchers("/").permitAll()
.requestMatchers("/guest/**", "/css/**", "/js/**", "/img/**").permitAll()
.requestMatchers("/member/**").hasAnyRole("USER", "ADMIN")
.requestMatchers("/admin/**").hasRole("ADMIN")
.anyRequest().authenticated() // 👉 빌드업 패턴!
)
.formLogin(formLogin -> formLogin.permitAll())
.logout(logout -> logout.permitAll());
return http.build();
}
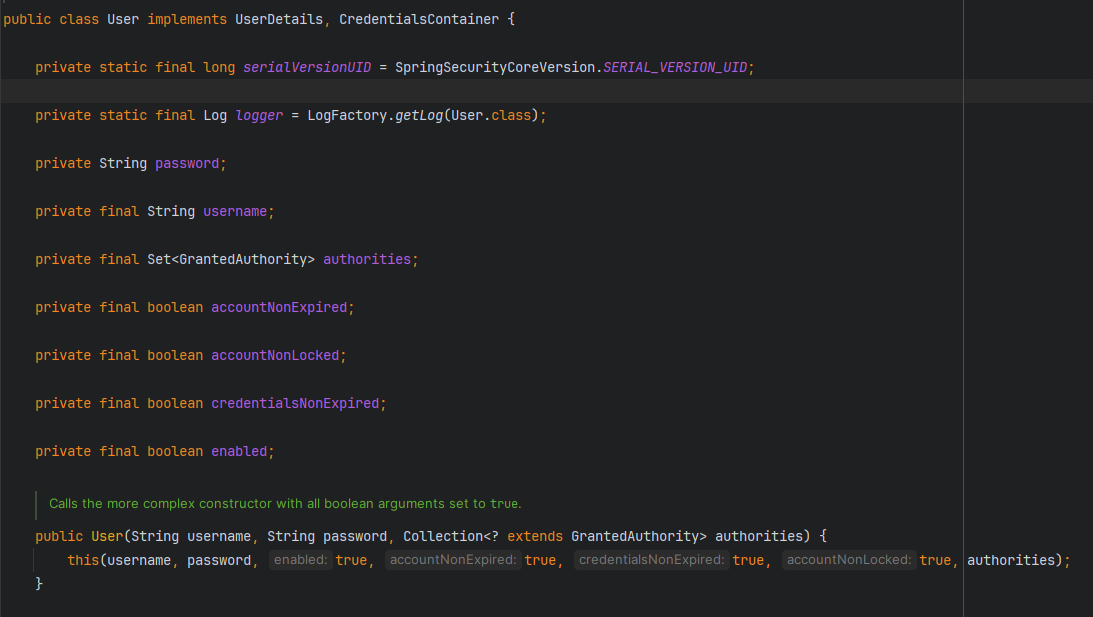
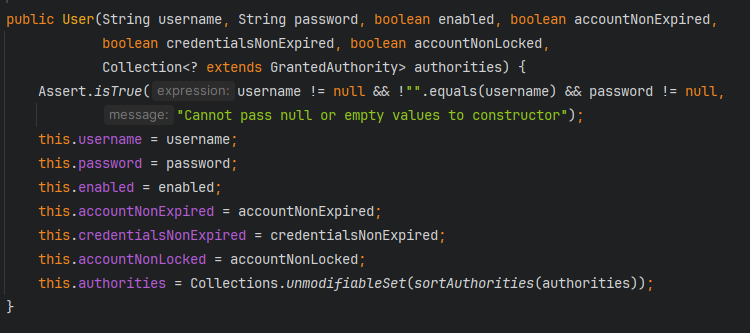
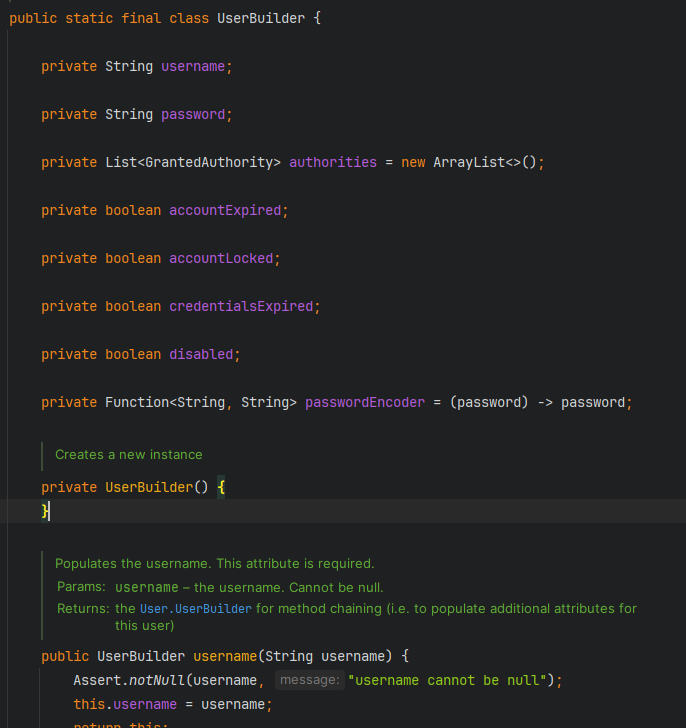
}🔥빌더 패턴이란🔥
객체 디자인 패턴으로, 특징 보안에 신경을 쓴 패턴이다
Class outer{
	Class inner{ // 내부 클래스(상속이 아님)
    	메소드(객채리턴
        	.객채리턴
            .객체리턴
            ...)
    }
}
위에서 쓴
User로 감을 잡아보자
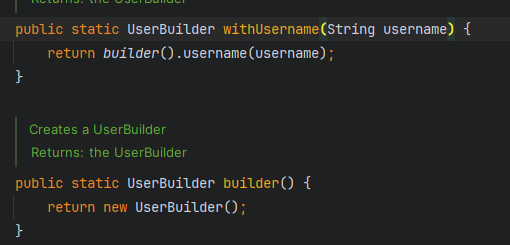
👉 생성자 오버로딩
👉final class UserBuilder상속 불가 클래스,public class User implements UserDetails, CredentialsContainer안에 내부 클래스 형태로 있다.
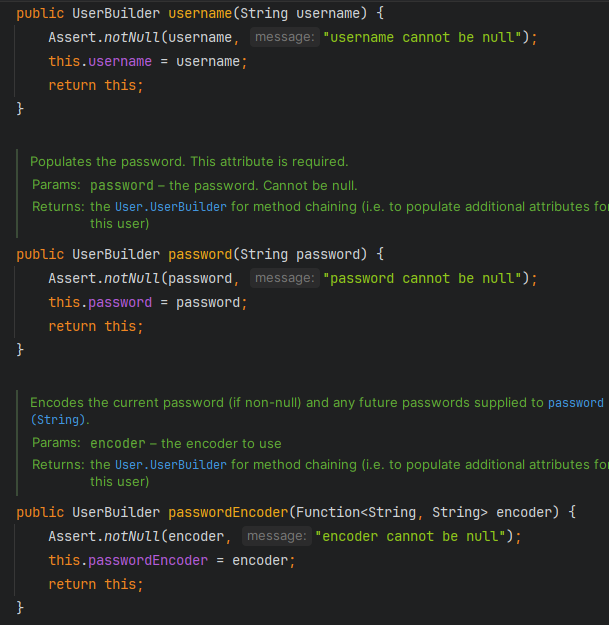
👉UserBuilder로 계속UserBuilder객체를 리턴하므로.이 계속 붙을 수 있다. 객체 이어달리기, 객체 쌓기 (순서는 상관없다)
📍결과
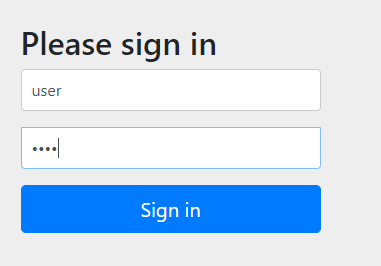
guest
👉 원래는 로그인 없이 jsp로 가야하지만 .anyRequest().authenticated() 로 어떤 요청이던 인증을 받아야 한다
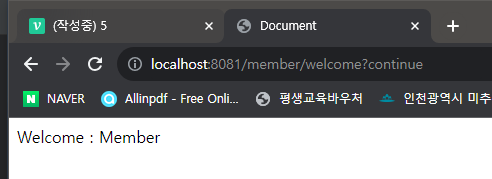
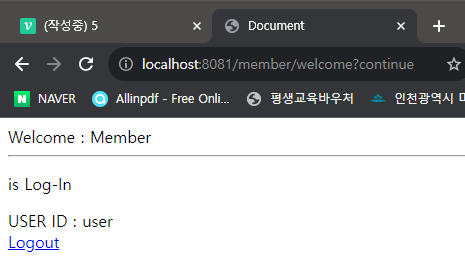
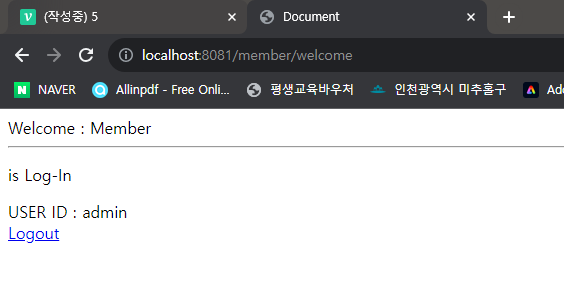
member
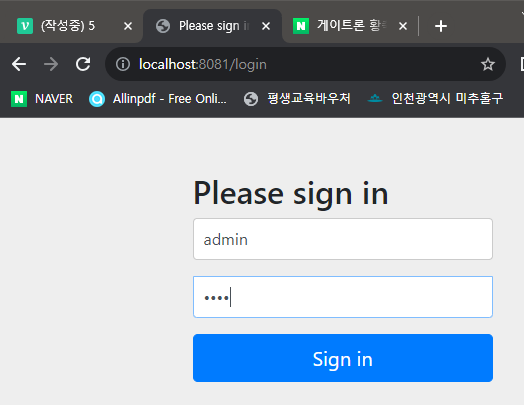
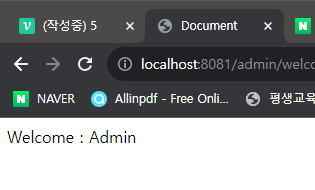
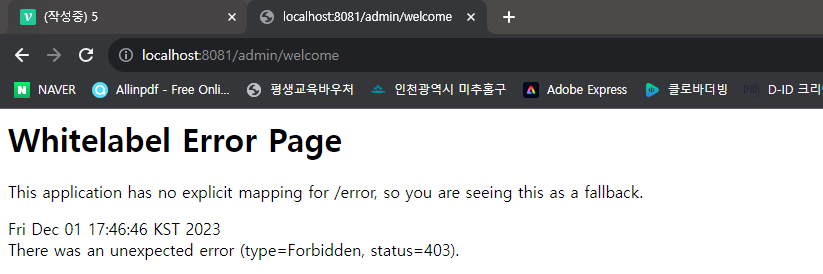
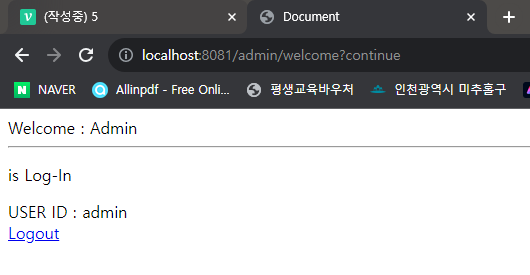
admin

📖시큐리티 커스텀 로그인 폼과 에러 페이지
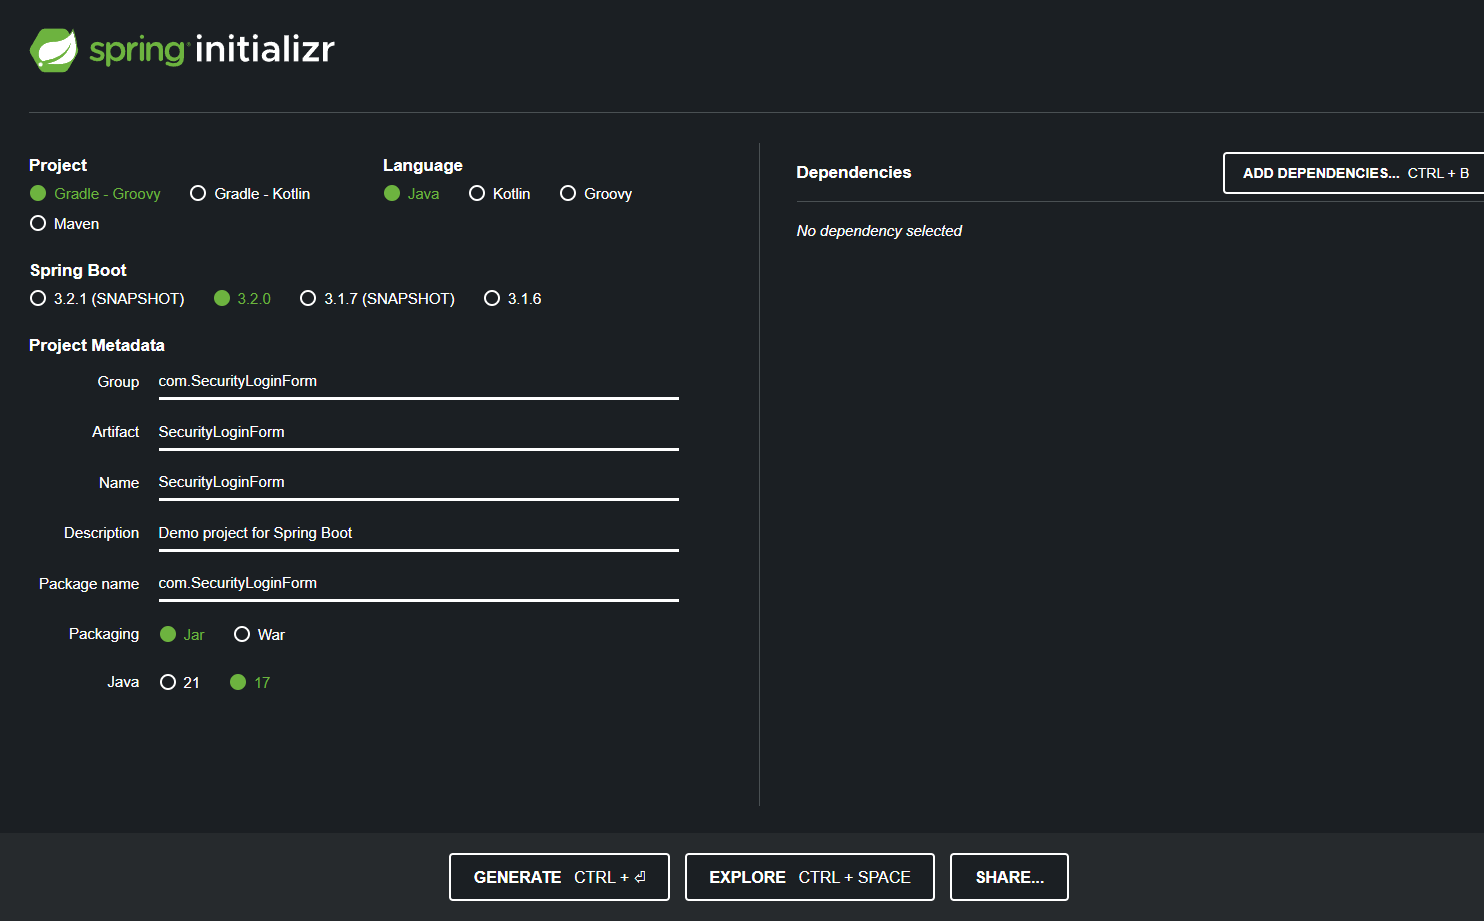
📌프로젝트 생성
❗ 설정한 데로 폴더 밖으로 빼는거 잘 하자..
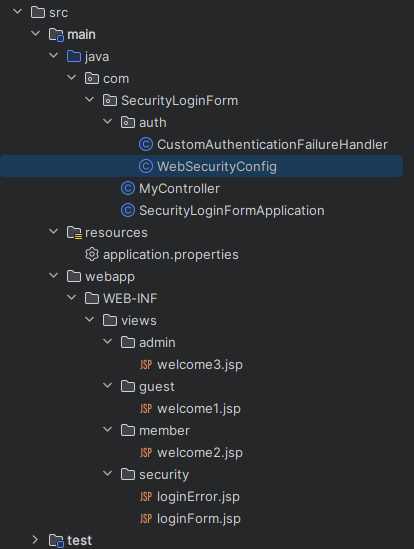
📍SecurityLoginForm 패키지
👉 Security 프로젝트 복붙해서 만들자
MyController 클래스 추가
package com.SecurityLoginForm;

import org.springframework.stereotype.Controller;
import org.springframework.web.bind.annotation.RequestMapping;
import org.springframework.web.bind.annotation.ResponseBody;

@Controller
public class MyController {

    @RequestMapping("/")
    public @ResponseBody String root(){
        return "Security Login/Error";
    }

    @RequestMapping("/guest/welcome")
    public String welcome1(){
        return "guest/welcome1";
    }
    @RequestMapping("/member/welcome")
    public String welcome2(){
        return "member/welcome2";
    }
    @RequestMapping("/admin/welcome")
    public String welcome3(){
        return "admin/welcome3";
    }
    @RequestMapping("/loginForm")
    public String loginForm(){
        return "security/loginForm";
    }
    @RequestMapping("/loginError")
    public String loginError(){
        return "security/loginError";
    }
}
WebSecurityConfig 클래스 수정/추가
package com.SecurityLoginForm.auth;

import org.springframework.beans.factory.annotation.Autowired;
import org.springframework.context.annotation.Bean;
import org.springframework.context.annotation.Configuration;
import org.springframework.http.HttpMethod;
import org.springframework.security.config.Customizer;
import org.springframework.security.config.annotation.web.builders.HttpSecurity;
import org.springframework.security.config.annotation.web.configuration.EnableWebSecurity;
import org.springframework.security.config.annotation.web.configurers.AbstractHttpConfigurer;
import org.springframework.security.core.userdetails.User;
import org.springframework.security.core.userdetails.UserDetailsService;
import org.springframework.security.crypto.bcrypt.BCryptPasswordEncoder;
import org.springframework.security.crypto.password.PasswordEncoder;
import org.springframework.security.provisioning.InMemoryUserDetailsManager;
import org.springframework.security.web.SecurityFilterChain;

@Configuration
@EnableWebSecurity
public class WebSecurityConfig {

    // 에러 처리를 위한 핸들러
    @Autowired
    public CustomAuthenticationFailureHandler customAuthenticationFailureHandler;

    // url 요청에 대한 허용 여부 설정
    @Bean // Bean으로 스프링 컨테이너에 등록
    // SecurityFilterChain 👉 보안 필터 체인(사슬처럼 연결)
    // HttpSecurity http 매개변수 👉 스프링 프레임워크에서 기본 제공
    // HttpSecurity 👉 보안 필터를 줄줄이 연결해서 세팅
    // SecurityFilterChain에 우리가 원하는 보안 설정이 등록
    public SecurityFilterChain filterChain(HttpSecurity http) throws Exception {
        // http 👉 authorizeRequests(인증 요청) 정의를 하겠다
        //1. "/" 누구나 들어오게 허용
        //2. "/guest/**", "/css/**", "/js/**", "/img/**", "/WEB-INF/views/**" 이 들어오게 허용
        //3. "/member/**"  role 👉 USER or ADMIN만 허용
        //4. "/admin/**" role 👉  ADMIN만 허용
        http
                .authorizeRequests(auth -> auth
                        .requestMatchers("/").permitAll()
                        .requestMatchers("/guest/**", "/css/**", "/js/**", "/img/**", "/WEB-INF/views/**").permitAll()
                        .requestMatchers("/member/**").hasAnyRole("USER", "ADMIN")
                        .requestMatchers("/admin/**").hasRole("ADMIN"))
                // 로그인 설정
                // 1. 로그인 화면 /loginForm(Url) 👉 Controller "/loginForm"
                // 2. 로그인 확인을 위해 사용되는 URL "/login" or "/j_spring_security_check" 👉 form action URL
                // 3. 로그인 실패시 CustomAuthenticationFailureHandler 핸들러가 지시하는데로 하겠다.
                // 4. 2번이 로그인이 올바른지 확인을 하기 위해서 username을 View로 가져온다. name="j_username"
                // 5. 2번이 로그인이 올바른지 확인을 하기 위해서 password를 View로 가져온다. name="j_password"
                // 로그인은 누구나 허용
                .formLogin(formLogin -> formLogin
                        .loginPage("/loginForm")                        // default : /login
                        .loginProcessingUrl("/j_spring_security_check")
                        //.failureUrl("/loginError")   // default : /login?error, error에 값 넣기
                        //.defaultSuccessUrl("/")
                        //.failureUrl("/loginFrom>error")
                        .failureHandler(customAuthenticationFailureHandler)
                        .usernameParameter("j_username")                // default : j_username
                        .passwordParameter("j_password")                // default : j_password
                        .permitAll())
                // 로그 아웃에 대한 설정을 한다.
                // 1. logoutUrl 👉 "/logout" 사용. 스프링 시큐리티가 알아서 로그 아웃을 시켜준다.
                // 2. logoutSuccessUrl 👉 로그 아웃이 문제 없이 성공하면 URL "/" 이동
                // 3. 누구나 허용한다.
                .logout(logout -> logout
                        .logoutUrl("/logout") // default
                        .logoutSuccessUrl("/")
                        .permitAll());

        // httpSecurity가 제공하는 csrf를 막는 기능을 사용하지 않는다
        // csrf를 사용한다면 차단을 심하게해서 어디가 문제 인지 모를 수 있다. 쉽게하려고 풀은 것
        // 쇼핑몰은 사용한 상태로 만들 예정이다.
        http.csrf(csrf -> csrf.disable());

        // 위에 설정을 빌드 👉 객체로 만들어서 리턴
        return http.build();
    }

    // 아이디, 비밀번호, 역할 설정
    @Bean // Bean 메소드 등록 UserDetailsService 객체 -> 스프링 시큐리티에서 활용
    public UserDetailsService userDetailsService(){
        // InMemoryUserDetailsManager에 UserDetailsService(userDetailsService) 매니저 하는 클래스
        // 객체 생성 👉 매니저  User 1개 이상
        InMemoryUserDetailsManager manager = new InMemoryUserDetailsManager();
        // 등록 1번 member를 매니저에 추가
        manager.createUser(User
                .withUsername("user") // name : user
                .password(passwordEncoder().encode("1234")) // password : 1234
                .roles("USER") // role : USER
                .build()
                );
        // admin
        manager.createUser(User
                .withUsername("admin") // name
                .password(passwordEncoder().encode("1234")) // password : 1234
                .roles("ADMIN") // role : ADMIN
                .build());
        // 매니저를 리턴 👉 스프링 컨테이너에 등록
        return manager;
    }

    // passwordEncoder() 추가 👉 비밀번호를 암호화(해쉬) 하기위해 스프링 컨테이너에 등록한다
    @Bean
    public PasswordEncoder passwordEncoder(){ // 부모
        return new BCryptPasswordEncoder(); // 자식 👉 어케스팅, 실객체 BCryptPasswordEncoder
    }


}
CustomAuthenticationFailureHandler 클래스 생성
package com.SecurityLoginForm.auth;
import jakarta.servlet.ServletException;
import jakarta.servlet.http.HttpServletRequest;
import jakarta.servlet.http.HttpServletResponse;
import org.springframework.context.annotation.Configuration;
import org.springframework.security.authentication.BadCredentialsException;
import org.springframework.security.authentication.CredentialsExpiredException;
import org.springframework.security.authentication.DisabledException;
import org.springframework.security.authentication.InternalAuthenticationServiceException;
import org.springframework.security.core.AuthenticationException;
import org.springframework.security.web.authentication.AuthenticationFailureHandler;
import org.springframework.stereotype.Controller;
import java.io.IOException;
@Configuration
public class CustomAuthenticationFailureHandler implements AuthenticationFailureHandler {
// 부모가 가지고 있는 메소드를 오버라이딩
@Override
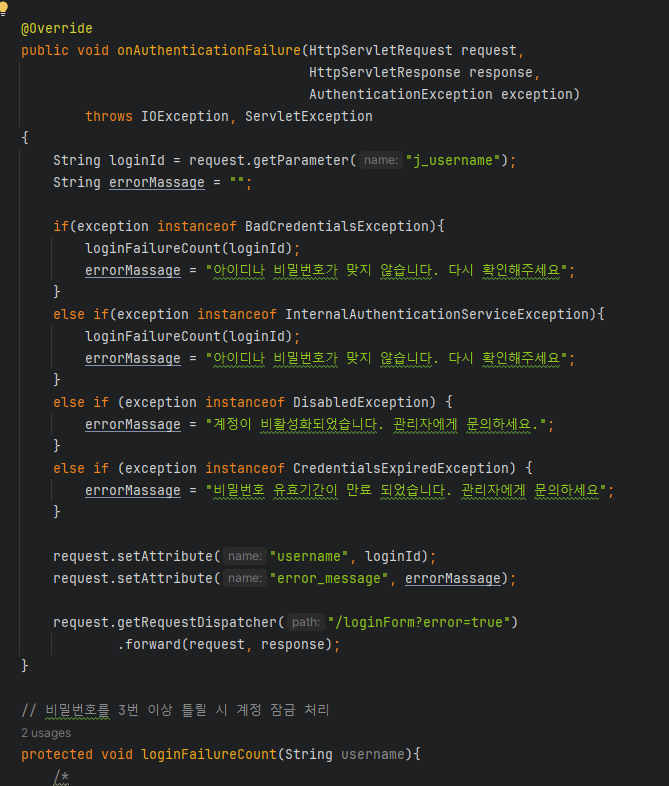
public void onAuthenticationFailure(HttpServletRequest request,
HttpServletResponse response,
AuthenticationException exception)
throws IOException, ServletException
{
// 여기에 진입하는 순간 로그인에 실패 한 것
// 실패 확인 시작
// 요청 온 파라미터 중 j_username을 변수 loginId 에 대입
String loginId = request.getParameter("j_username");
String errorMassage = "";
// AuthenticationException 예외에서 👉 instanceof
// AuthenticationException 안에 실 객체 BadCredentialsException가 있으면 true, 없으면 false
// AuthenticationException 부모의 자식 BadCredentialsException
if(exception instanceof BadCredentialsException){
loginFailureCount(loginId); // 추후 사용
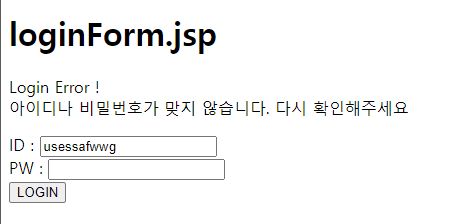
errorMassage = "아이디나 비밀번호가 맞지 않습니다. 다시 확인해주세요";
}
// 위와 같은 내용
else if(exception instanceof InternalAuthenticationServiceException){
loginFailureCount(loginId);
errorMassage = "아이디나 비밀번호가 맞지 않습니다. 다시 확인해주세요";
}
// 위와 같은 내용
else if (exception instanceof DisabledException) {
errorMassage = "계정이 비활성화되었습니다. 관리자에게 문의하세요.";
}
// 위와 같은 내용
else if (exception instanceof CredentialsExpiredException) {
errorMassage = "비밀번호 유효기간이 만료 되었습니다. 관리자에게 문의하세요";
}
request.setAttribute("username", loginId);
request.setAttribute("error_message", errorMassage);
// 먼저(forward) request, response 보내고 /loginForm?error=true URL 요청
// <c:if test="${param.error != null}"> 에 전달 되어 ${error_message} 출력
request.getRequestDispatcher("/loginForm?error=true")
.forward(request, response);
}
// 비밀번호를 3번 이상 틀릴 시 계정 잠금 처리
protected void loginFailureCount(String username){
/*
// 틀린 횟수 업데이트
userDao.countFailur(username);
// 틀린 횟수 조회
int cnt = userDao.checkFailureCount(username);
if(cnt == 3){
//계정 잠금 처리
userDao.disabledUsername(username);
}
*/
}
}
welcome2.jsp 추가
<%@ page language="java" contentType="text/html; charset=UTF-8"
pageEncoding="UTF-8" %>
<%@ taglib prefix="c" uri="http://java.sun.com/jsp/jstl/core" %>
<!DOCTYPE html>
<html lang="ko">
<head>
<meta http-equiv="Content-Type" content="text/html"; charset="UTF-8">
<title>Document</title>
</head>
<body>
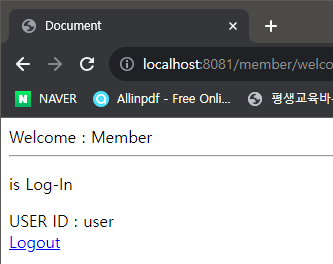
Welcome : Member
<hr>
<c:if test="${not empty pageContext.request.userPrincipal }">
<p> is Log-In </p>
</c:if>
<c:if test="${empty pageContext.request.userPrincipal }">
<p> is Log-Out </p>
</c:if>
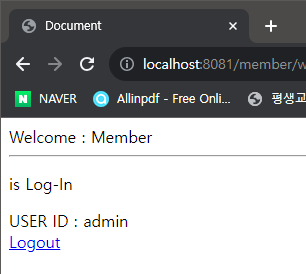
USER ID : ${pageContext.request.userPrincipal.name} <br />
<a href = "/logout">Logout</a> <br />
</body>
</html>welcome3.jsp 추가
<%@ page language="java" contentType="text/html; charset=UTF-8"
pageEncoding="UTF-8" %>
<%@ taglib prefix="c" uri="http://java.sun.com/jsp/jstl/core" %>
<!DOCTYPE html>
<html lang="ko">
<head>
<meta http-equiv="Content-Type" content="text/html"; charset="UTF-8">
<title>Document</title>
</head>
<body>
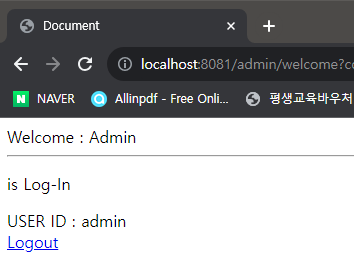
Welcome : Admin
<hr>
<c:if test="${not empty pageContext.request.userPrincipal }">
<p> is Log-In </p>
</c:if>
<c:if test="${empty pageContext.request.userPrincipal }">
<p> is Log-Out </p>
</c:if>
USER ID : ${pageContext.request.userPrincipal.name} <br />
<a href = "/logout">Logout</a> <br />
</body>
</html>loginForm.jsp
<%@ page language="java" contentType="text/html; charset=UTF-8"
pageEncoding="UTF-8" %>
<%@ taglib prefix="c" uri="http://java.sun.com/jsp/jstl/core" %>
<!DOCTYPE html>
<html lang="ko">
<head>
<meta http-equiv="Content-Type" content="text/html"; charset="UTF-8">
<title>Document</title>
</head>
<body>
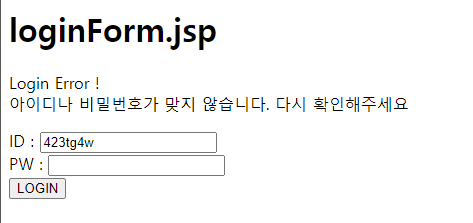
<h1>loginForm.jsp</h1>
<c:url value="j_spring_security_check" var="loginUrl"/>
<form action="${loginUrl}" method="post" />
<c:if test="${param.error != null}">
<p>
Login Error ! <br />
${error_message}
</p>
</c:if>
ID : <input type="text" name="j_username" value="${username}"> <br />
PW : <input type="password" name="j_password"> <br />
<input type="submit" value="LOGIN"> <br />
</form>
</body>
</html>loginError.jsp
<%@ page language="java" contentType="text/html; charset=UTF-8"
  pageEncoding="UTF-8" %>
<%@ taglib prefix="c" uri="http://java.sun.com/jsp/jstl/core" %>
<!DOCTYPE html>
<html lang="ko">
<head>
    <meta http-equiv="Content-Type" content="text/html"; charset="UTF-8">
    <title>Document</title>
</head>
<body>
    <h1>loginError.jsp</h1>
    로그인 실패 <br><p>

    <a href = loginForm>로그인 페이지로 가기</a>
</body>
</html>
📍결과
/guest/welcome
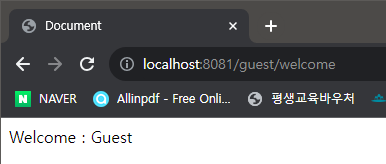 👉 로그인 없이 접근이 가능하다
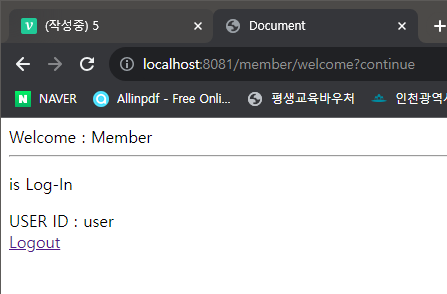
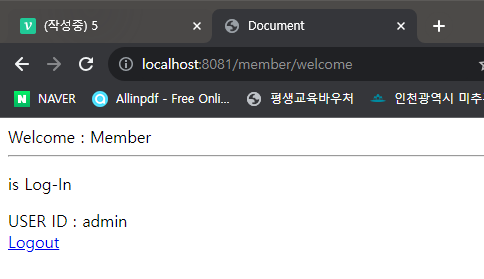
/member/welcome

 👉 로그인 실패
 👉 로그인 성공
 👉
👉 admin 접근
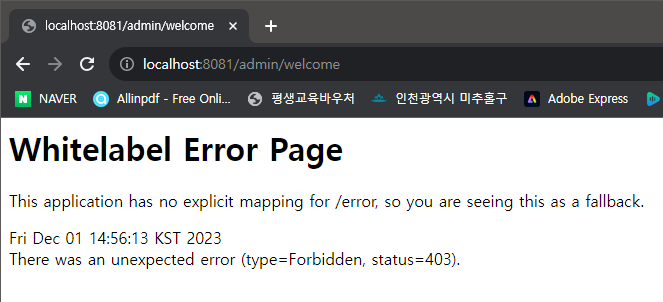
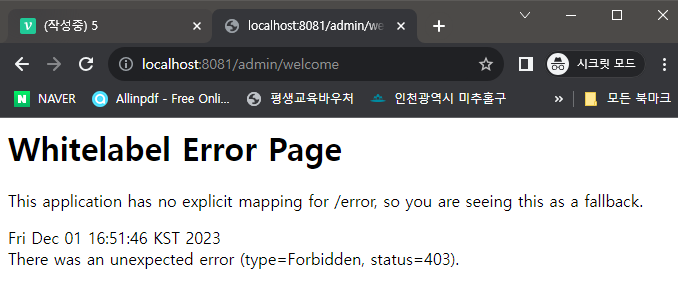
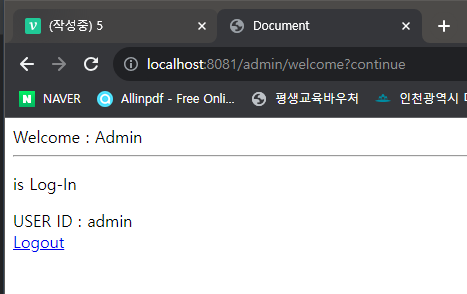
/admin/welcome
 👉 로그인 실패
 👉 로그인 성공
 👉
👉 member 접근
❓어떤 구조로 실행?
1. WebSecurityConfig
@Configuration
@EnableWebSecurity
각종 설정 + 웹 시큐리티 가능한 클래스이며
에러처리 핸들러를 추가했다.2. CustomAuthenticationFailureHandler
@Configuration으로 설정이며 스프링 컨테이너에 올라간다.AuthenticationFailureHandler을 오버라이딩 해서 원하는 형식으로 에러 체크
📖시큐리티 태그 라이브러리 사용하기
Spring Security Taglibs
의존성implementation 'org.springframework.security:spring-security-taglibs'추가
📌뷰에 태그 라이브러리 적용
타임리프에서 쓰는 경우가 있다.
전 프로젝트 이어서 작성
📍welcome2/3.jsp 변경
❗ <%@ taglib prefix="sec" uri="http://www.springframework.org/security/tags" %> 추가
<%@ page language="java" contentType="text/html; charset=UTF-8"
  pageEncoding="UTF-8" %>
<%@ taglib prefix="c" uri="http://java.sun.com/jsp/jstl/core" %>
<%@ taglib prefix="sec" uri="http://www.springframework.org/security/tags" %>
<!DOCTYPE html>
<html lang="ko">
<head>
    <meta http-equiv="Content-Type" content="text/html"; charset="UTF-8">
    <title>Document</title>
</head>
<body>
    Welcome : Member

    <hr>

    <sec:authorize access="isAuthenticated()">
        <p> is Log-In </p>
    </sec:authorize>

    <sec:authorize access="!isAuthenticated()">
        <p> is Log-Out </p>
    </sec:authorize>

    USER ID : <sec:authentication property="name"/> <br />

    <c:url value="/logout" var="logoutUrl"/>
    <a href = "${logoutUrl}">Logout</a> <br />

</body>
</html>
📍결과
📖시큐리티 데이터베이스 사용하기
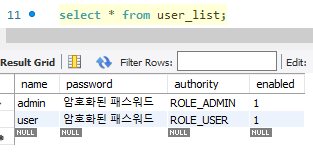
📌데이터베이스 테이블 생성
create table user_list(
	name varchar(20) primary key,
    password varchar(100),
    authority varchar(20),
    enabled int
);

insert into user_list values('user', '암호화된 패스워드', 'ROLE_USER', 1);
insert into user_list values('admin', '암호화된 패스워드', 'ROLE_ADMIN', 1);
📌프로젝트 생성
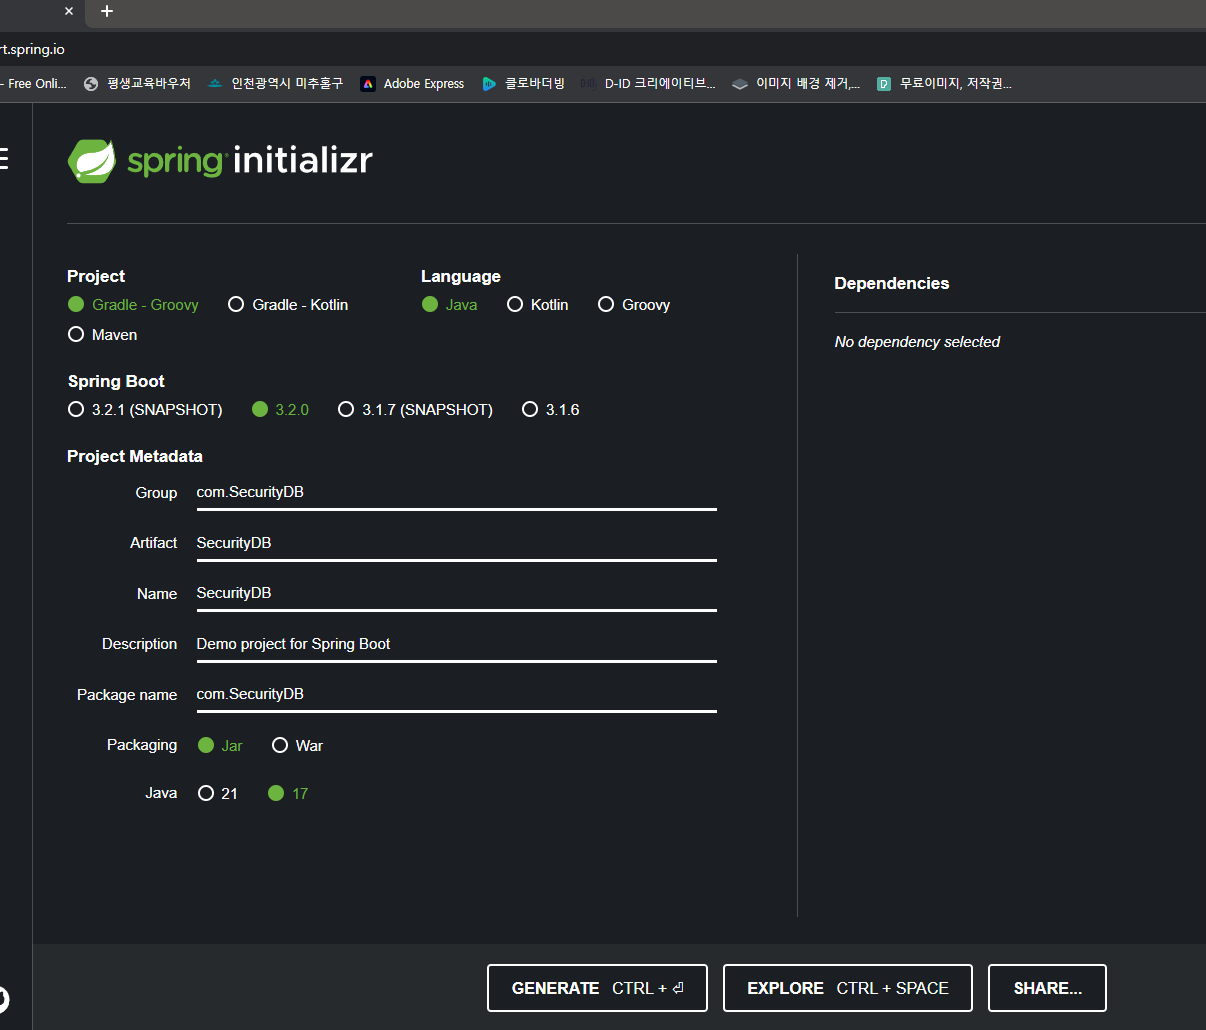
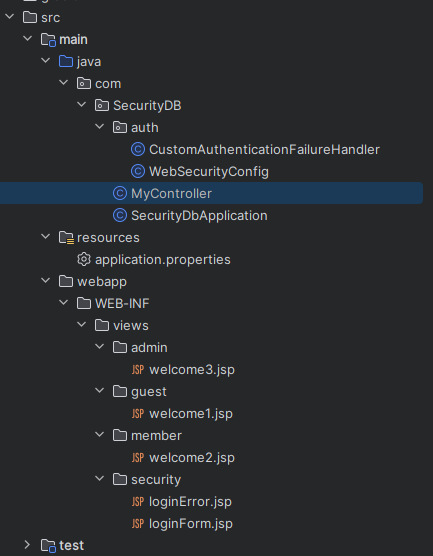
📍SecurityDB 패키지
WebSecurityConfig 변경
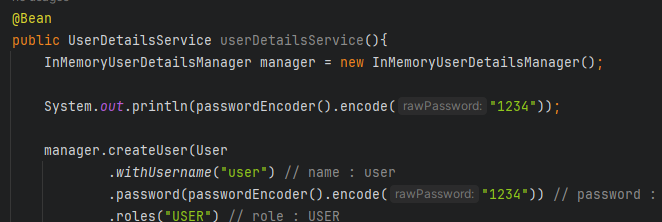 👉
👉 System.out.println(passwordEncoder().encode("1234")); 를 추가해 암호화된 1234를 출력한다
 👉 매번 바뀜, 암호화란 이런 것. 이걸 그대로 데이터 베이스에 등록해야한다. 바뀐 것으로 등록하면 당연히 안된다.
📍데이터베이스 암호 UPDATE
UPDATE `jdbc`.`user_list` SET `password` = '$2a$10$YRnHZLHnGPjRz2N5wlmRu.kkQGvQK3/ms8hovMwnV2mtQJ.W/BPnu' WHERE (`name` = 'admin');
UPDATE `jdbc`.`user_list` SET `password` = '$2a$10$YRnHZLHnGPjRz2N5wlmRu.kkQGvQK3/ms8hovMwnV2mtQJ.W/BPnu' WHERE (`name` = 'user');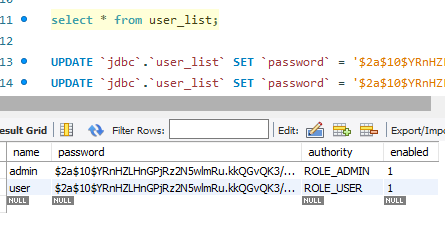
👉 지금은 수동적으로 했지만, 회원가입시에 암호화된 비밀번호가 데이터베이스에 자동으로 등록 되도록 해야한다.
WebSecurityConfig 변경
👉 로그인 정보와 비밀번호는 암호화했으므로 삭제해준다
    @Autowired
    private DataSource dataSource;
👉 쿼리문 날리는 DataSource
    @Bean
    public PasswordEncoder passwordEncoder(){
        return new BCryptPasswordEncoder();
    }
👉 따로 클래스를 만들어서 @Autowired 하자
Encoder 클래스 생성
package com.SecurityDB.auth;

import org.springframework.context.annotation.Bean;
import org.springframework.context.annotation.Configuration;
import org.springframework.security.crypto.bcrypt.BCryptPasswordEncoder;
import org.springframework.security.crypto.password.PasswordEncoder;

@Configuration
public class Encoder {
    @Bean
    public PasswordEncoder passwordEncoder(){
        return new BCryptPasswordEncoder();
    }
}
WebSecurityConfig 변경
package com.SecurityDB.auth;

import org.springframework.beans.factory.annotation.Autowired;
import org.springframework.context.annotation.Bean;
import org.springframework.context.annotation.Configuration;
import org.springframework.security.config.annotation.authentication.builders.AuthenticationManagerBuilder;
import org.springframework.security.config.annotation.web.builders.HttpSecurity;
import org.springframework.security.config.annotation.web.configuration.EnableWebSecurity;
import org.springframework.security.core.userdetails.User;
import org.springframework.security.core.userdetails.UserDetailsService;
import org.springframework.security.crypto.bcrypt.BCryptPasswordEncoder;
import org.springframework.security.crypto.password.PasswordEncoder;
import org.springframework.security.provisioning.InMemoryUserDetailsManager;
import org.springframework.security.web.SecurityFilterChain;

import javax.sql.DataSource;

@Configuration
@EnableWebSecurity
public class WebSecurityConfig {

    @Autowired
    public CustomAuthenticationFailureHandler customAuthenticationFailureHandler;

    @Autowired
    private DataSource dataSource;

    @Autowired
    private PasswordEncoder passwordEncoder;

    @Autowired
    public void configure(AuthenticationManagerBuilder auth) throws Exception {
        auth.jdbcAuthentication()
                .dataSource(dataSource)
                .usersByUsernameQuery("select name as userName, password, enabled from user_list where name =?")
                .authoritiesByUsernameQuery("select name as userName, authority from user_list where name =?")
                .passwordEncoder(passwordEncoder);
    }

    @Bean
    public SecurityFilterChain filterChain(HttpSecurity http) throws Exception {
        http
                .authorizeRequests(auth -> auth
                        .requestMatchers("/").permitAll()
                        .requestMatchers("/guest/**", "/css/**", "/js/**", "/img/**", "/WEB-INF/views/**").permitAll()
                        .requestMatchers("/member/**").hasAnyRole("USER", "ADMIN")
                        .requestMatchers("/admin/**").hasRole("ADMIN"))
                .formLogin(formLogin -> formLogin
                        .loginPage("/loginForm")                        // default : /login
                        .loginProcessingUrl("/j_spring_security_check")
                        .failureHandler(customAuthenticationFailureHandler)
                        .usernameParameter("j_username")                // default : j_username
                        .passwordParameter("j_password")                // default : j_password
                        .permitAll())
                .logout(logout -> logout
                        .logoutUrl("/logout") // default
                        .logoutSuccessUrl("/")
                        .permitAll());

        http.csrf(csrf -> csrf.disable());

        return http.build();
    }

}
📍결과
👉 로그인 정보 코드를 삭제해도 데이터베이스에 등록되어 있기 때문에 로그인이 잘 된다.
📍어떤 구조로 실행?
1. 데이터베이스
2. WebSecurityConfig
    @Autowired
    private DataSource dataSource;
👉
    @Autowired
    private PasswordEncoder passwordEncoder;
👉 PasswordEncoder 객체 (bean) 가져오기
@Autowired
    public void configure(AuthenticationManagerBuilder auth) throws Exception {
        auth.jdbcAuthentication()
                .dataSource(dataSource)
                .usersByUsernameQuery("select name as userName, password, enabled from user_list where name =?")
                .authoritiesByUsernameQuery("select name as userName, authority from user_list where name =?")
                .passwordEncoder(passwordEncoder);
    }
👉 인증 관련 객체
AuthenticationManagerBuilder, jdbc로 DB 확인 (Java <-> 데이터 베이스)dataSource(dataSource)👉 DB 정보
usersByUsernameQuery("select name as userName, password, enabled from user_list where name =?")👉 아이디 확인 정보 추출
Username데이터에Set,?는.usernameParameter("j_username")authoritiesByUsernameQuery("select name as userName, authority from user_list where name =?")👉
Role사용,?는.usernameParameter("j_username")passwordEncoder(passwordEncoder)👉 비밀번호 암호화
3. welcome2, 3 비교 후 출력
<sec:authorize access="isAuthenticated()">
        <p> is Log-In </p>
    </sec:authorize>
👉 로그인 해서 정보가 있는 경우
    <sec:authorize access="!isAuthenticated()">
        <p> is Log-Out </p>
    </sec:authorize>
👉 로그인 해서 정보가 없는 경우
<sec:authentication property="name"/>👉 인증된
name출력
🔥회원가입 만들기🔥
"/"를 로그인/회원가입 버튼 페이지로 변경, 회원가입 페이지까지 만들어보자. 비밀번호는 암호화 되어 저장이 되고user와admin는 선택해서 로그인 되는 것으로 만들어 보자. 유효성 검사는 나중에..
📌데이터 베이스 변경
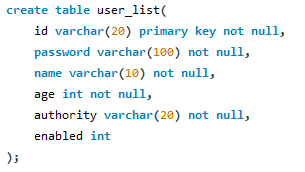
👉 id, pw, 이름, 나이를 입력 받으며 관리자/유저 는 선택하여 데이터 베이스에
저장 되도록 한다.
📌DAO/DTO
📍IMemberDAO 인터페이스
package com.SecurityDB.DAO;

import com.SecurityDB.DTO.MemberDTO;
import org.apache.ibatis.annotations.Mapper;

import java.util.List;

@Mapper
public interface IMemberDAO {
    public int signUpDao(MemberDTO memberDTO);
}
📍MemberDTO 클래스
package com.SecurityDB.DTO;

import lombok.Data;
import org.springframework.beans.factory.annotation.Autowired;
import org.springframework.security.crypto.password.PasswordEncoder;

@Data
public class MemberDTO {
    private String id;
    private String password;
    private String name;
    private int age;
    private String authority;
}
📍MemberDAO.xml
<?xml version="1.0" encoding="UTF-8" ?>
<!DOCTYPE mapper
        PUBLIC "-//mybatis.org//DTD Mapper 3.0//EN"
        "http://mybatis.org/dtd/mybatis-3-mapper.dtd">

<mapper namespace="com.SecurityDB.DAO.IMemberDAO">
    <insert id="signUpDao">
        insert into user_list(id, password, name, age, authority, enabled) values(#{id}, #{password}, #{name}, #{age}, #{authority}, 1)
    </insert>
</mapper>
📌Service 패키지
📍IMemberService 인터페이스
package com.SecurityDB.Service;


import com.SecurityDB.DTO.MemberDTO;

public interface IMemberService {
    int saveMember(MemberDTO dto);
}
👉 실객체 저장
📍상속 받는 MemberService 클래스
package com.SecurityDB.Service;

import com.SecurityDB.DAO.IMemberDAO;
import com.SecurityDB.DTO.MemberDTO;
import org.springframework.beans.factory.annotation.Autowired;
import org.springframework.security.crypto.password.PasswordEncoder;
import org.springframework.stereotype.Service;

@Service
public class MemberService implements IMemberService{
    @Autowired
    IMemberDAO dao;

    @Autowired
    PasswordEncoder passwordEncoder;

    public int saveMember(MemberDTO dto){
        String pw = passwordEncoder.encode(dto.getPassword()); // 👉 암호화!!

        dto.setPassword(pw);

        return dao.signUpDao(dto);
    }
}
📍MyController 추가
package com.SecurityDB;
import com.SecurityDB.DAO.IMemberDAO;
import com.SecurityDB.DTO.MemberDTO;
import com.SecurityDB.Service.IMemberService;
import org.springframework.beans.factory.annotation.Autowired;
import org.springframework.stereotype.Controller;
import org.springframework.ui.Model;
import org.springframework.web.bind.annotation.RequestMapping;
import org.springframework.web.bind.annotation.RequestMethod;
import org.springframework.web.bind.annotation.ResponseBody;
@Controller
public class MyController {
@Autowired
IMemberService memberService;
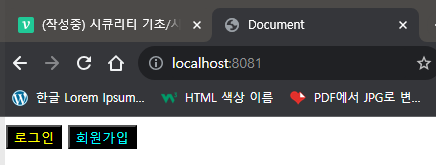
@RequestMapping("/")
public String firstPage(){
return "firstPage";
}
@RequestMapping("/security/signupPage")
public String signupPage(){
return "security/signupPage";
}
@RequestMapping(value = "/security/signup", method = RequestMethod.POST)
public String signup(MemberDTO dto){
memberService.saveMember(dto);
return "redirect:/";
}
@RequestMapping("/guest/welcome")
public String welcome1(){
return "guest/welcome1";
}
@RequestMapping("/member/welcome")
public String welcome2(){
return "member/welcome2";
}
@RequestMapping("/admin/welcome")
public String welcome3(){
return "admin/welcome3";
}
@RequestMapping("/loginForm")
public String loginForm(){
return "security/loginForm";
}
@RequestMapping("/loginError")
public String loginError(){
return "security/loginError";
}
}
📍WebSecurityConfig 수정
    @Autowired
    public void configure(AuthenticationManagerBuilder auth) throws Exception {
        auth.jdbcAuthentication()
                .dataSource(dataSource)
                .usersByUsernameQuery("select id, password, enabled from user_list where id =?") // 👉 테이블 컬럼 맞춰 주기
                .authoritiesByUsernameQuery("select id, authority from user_list where id =?") // 👉 테이블 컬럼 맞춰 주기
                .passwordEncoder(passwordEncoder); // 👉 암호화 해주지 않으면 로그인 할 수 없다.
    }

    @Bean
    public SecurityFilterChain filterChain(HttpSecurity http) throws Exception {
        http
                .authorizeRequests(auth -> auth
                        .requestMatchers("/").permitAll()
                        .requestMatchers("/guest/**", "/security/signupPage", "/css/**", "/js/**", "/img/**", "/WEB-INF/views/**").permitAll()
                        // 👉 회원가입으로 접근이 가능하도록 설정!
                        .requestMatchers("/member/**").hasAnyRole("USER", "ADMIN")
                        .requestMatchers("/admin/**").hasRole("ADMIN"))
📌JSP
📍firstPage.jsp
<%@ page language="java" contentType="text/html; charset=UTF-8"
  pageEncoding="UTF-8" %>
<%@ taglib prefix="c" uri="http://java.sun.com/jsp/jstl/core" %>
<%@ taglib prefix="sec" uri="http://www.springframework.org/security/tags" %>
<!DOCTYPE html>
<html lang="ko">
<head>
    <meta http-equiv="Content-Type" content="text/html"; charset="UTF-8">
    <title>Document</title>
</head>
<body>
    <a href="loginForm"><input type="button" value="로그인" style="color: yellow; border: 1 solid black; background-color: black;"></a>
    <a href="/security/signupPage"><input type="button" value="회원가입" style="color: cyan; border: 1 solid black; background-color: black;"></a>
</body>
</html>
📍signupPage.jsp
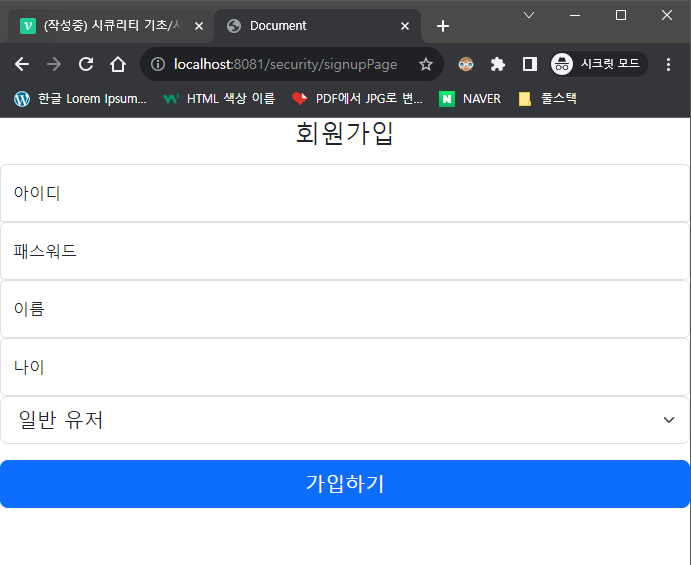
<%@ page language="java" contentType="text/html; charset=UTF-8"
  pageEncoding="UTF-8" %>
<%@ taglib prefix="c" uri="http://java.sun.com/jsp/jstl/core" %>
<%@ taglib prefix="sec" uri="http://www.springframework.org/security/tags" %>
<!DOCTYPE html>
<html lang="ko">
<head>
    <link href="https://cdn.jsdelivr.net/npm/bootstrap@5.3.0-alpha1/dist/css/bootstrap.min.css" rel="stylesheet" integrity="sha384-GLhlTQ8iRABdZLl6O3oVMWSktQOp6b7In1Zl3/Jr59b6EGGoI1aFkw7cmDA6j6gD" crossorigin="anonymous">
    <link th:href="@{/css/sign-in.css}" rel="stylesheet">
    <meta http-equiv="Content-Type" content="text/html"; charset="UTF-8">
    <title>Document</title>
    <style><
        #floatingInput {
            border-bottom-left-radius: 0;
            border-bottom-right-radius: 0;
        }
    </style>
</head>
<main class="form-signin w-100 m-auto">
    <form method="post" action="/security/signup">
        <h1 class="h3 mb-3 fw-normal text-center">회원가입</h1>

        <div class="form-floating">
            <input type="text" class="form-control" id="floatingInput" name="id" placeholder="아이디" required>
            <label for="floatingInput">아이디</label>
        </div>
        <div class="form-floating">
            <input type="password" class="form-control" id="floatingPassword" name="password" placeholder="패스워드" required>
            <label for="floatingPassword">패스워드</label>
        </div>
        <div class="form-floating">
            <input type="text" class="form-control" id="floatingName" name="name" placeholder="이름">
            <label for="floatingName">이름</label>
        </div>
        <div class="form-floating">
                    <input type="text" class="form-control" id="floatingAge" name="age" placeholder="나이">
                    <label for="floatingName">나이</label>
        </div>

        <select name="authority" id="authority" class="form-select form-select-lg mb-3" aria-label="Large select example">
          <option value="ROLE_USER" name="ROLE_USER" id="ROLE_USER">일반 유저</option>
          <option value="ROLE_ADMIN" name="ROLE_ADMIN" id="ROLE_ADMIN">관리자</option>
        </select>

        <button class="w-100 btn btn-lg btn-primary" type="submit">가입하기</button>
    </form>
</main>
</body>
</html>
❓어떤 구조로 실행?
1. firstPage.jsp
에서 로그인 / 회원가입을 선택하여 들어간다.
2. signupPage.jsp
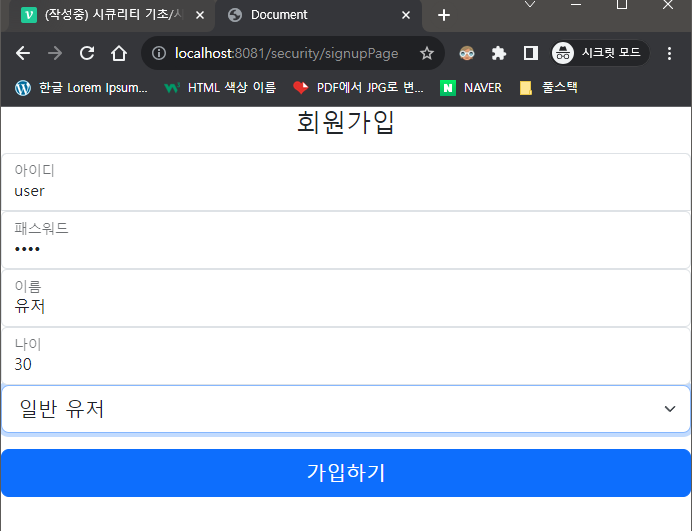
회원가입을 선택하여 다음과 같이 입력 후 가입을 하면 폼 액션에 의해
@RequestMapping(value = "/security/signup", method = RequestMethod.POST)로 값을 넘겨 주게 된다.
3. MyController
    @RequestMapping(value = "/security/signup", method = RequestMethod.POST)
    public String signup(MemberDTO dto){
        memberService.saveMember(dto);
        return "redirect:/";
    }
👉
MemberDTO의 객체를 인터페이스 서비스의 메소드인int saveMember(MemberDTO dto);로 연결 시킨다.4. MemberService, ❗서비스의 개념을 잘 알고 있자
@Service
public class MemberService implements IMemberService{
    @Autowired
    IMemberDAO dao;
    @Autowired
    PasswordEncoder passwordEncoder;
    public int saveMember(MemberDTO dto){
        String pw = passwordEncoder.encode(dto.getPassword()); // 👉 암호화!!
        dto.setPassword(pw);
        return dao.signUpDao(dto);
    }
}
👉 암호화가 필요하므로
@Data를 사용하여 암호화된password를get해준 뒤 다시set해준다. 그리고dto객체를dao의signUpDao로 리턴해준다.5. IMemberDAO
리턴 받은
public int signUpDao(MemberDTO memberDTO);가@Mapper로 인해Mybatis를 통하여 테이블에 값이insert가 된다
6. 로그인 인증 (WebSecurityConfig)
@Autowired
    public void configure(AuthenticationManagerBuilder auth) throws Exception {
        auth.jdbcAuthentication()
                .dataSource(dataSource)
                .usersByUsernameQuery("select id, password, enabled from user_list where id =?") // 👉 테이블 컬럼 맞춰 주기
                .authoritiesByUsernameQuery("select id, authority from user_list where id =?") // 👉 테이블 컬럼 맞춰 주기
                .passwordEncoder(passwordEncoder); // 👉 암호화 해주지 않으면 로그인 할 수 없다.
    }
👉
DB에서ID와 암호화된PASSWORD를 비교해 일치하면 로그인이 되고 일치하지 않으면customAuthenticationFailureHandler로 에러체크를 하게 된다.