
❓AJAX란?
프로그래밍 언어 ❌
웹 페이지에서 웹 서버에 접속하는 기술이다.일반적인 웹은
mapping👉Controller👉HTML,JSP로 화면전환
을 하는데상황에 따라 화면 전환 없이 기존 화면을 변경 하고 싶은 경우 AJAX를 사용한다
AJAX는 비동기
- 동기 : 실행 흐름의 싱크가 맞는다(예 - 전화). 끊어지면 다 끝
- 비동기 : 실행 흐름이 상관이 없다(예 - 문자). 끊어져도 상관이 없다
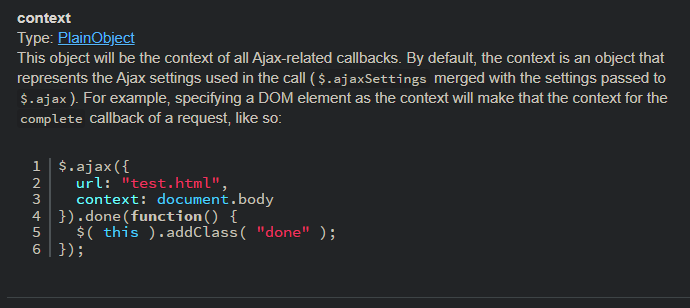
$.ajax({
  url: "test.html",
  context: document.body
}).done(function() {
  $( this ).addClass( "done" );
});
👉 url 설정 후 성공하면 함수 실행. 우리가 할거는 더 복잡하다. 제일 기본적인 형태
$.ajax({
	url : 통신을 원하고자 하는 URL주소를 입력(필수 입력)
	data : 서버로 보낼 데이터를 입력
	type : get, post 등의 통신 방식을 지정
	dataType : 통신의 결과로 넘어올 데이터의 종류를 지정
	success(data) : 통신 성공시 호출해야 하는 함수를 지정. 매개변수로 넘어온 데이터를 받는다
	error : 통신 실패시 호출해야 하는 함수를 지정
	complete : 통신 성공 여부와 관계없이 통신이 끝난 후 호출해야 하는 함수를 지정
	beforeSend : 통신 전에 호출해야 하는 함수를 지정
	async : 비동기(true), 비동기(false) 여부 지정
    cache: 요청한 페이지를 인터넷에 캐시(저장)할지의 여부 설정. 기본값은 true
});
📖프로젝트 생성
하나씩 천천히 쉬운 것 부터 진행하며 AJAX가 어떻게 동작하는지 확인 해보자
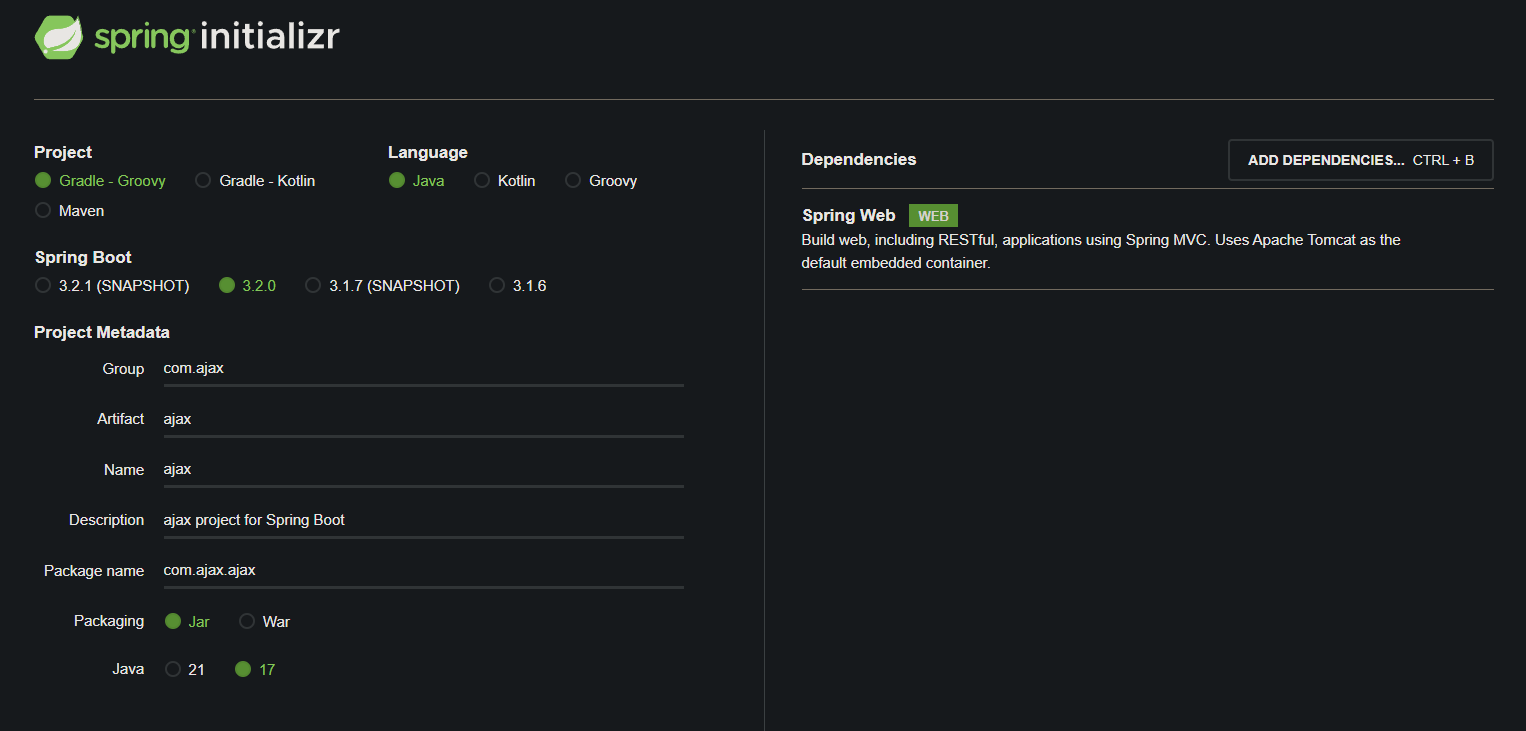
Spring Boot Starter Thymeleaf 👉 의존성 추가
dependencies {
	implementation 'org.springframework.boot:spring-boot-starter-web'
	testImplementation 'org.springframework.boot:spring-boot-starter-test'
	implementation 'org.springframework.boot:spring-boot-starter-thymeleaf:3.2.0'

}
📌AjaxCotroller 클래스 생성
package com.ajax.ajax;

import org.springframework.stereotype.Controller;
import org.springframework.web.bind.annotation.GetMapping;

// GET 👉 화면 출력을 하는 쪽
// POST 👉 받는 쪽. View 데이터 👉 Controller 👉 Service 👉 Repositiry, Entity 👉 DB
// PUT 👉 받는 쪽. 수정
// PATCH 👉 받는 쪽. 수정(PUT과 큰 차이 없다)
// DELETE 👉 삭제
// AJAX는 보통 POST를 사용한다.
@Controller
public class AjaxCotroller {

    @GetMapping(value = "/")
    public String home(){
        return "home";
    }

}
📌home.html 생성
package com.ajax.ajax;

import org.springframework.stereotype.Controller;
import org.springframework.web.bind.annotation.GetMapping;

@Controller
public class AjaxCotroller {

    @GetMapping(value = "/")
    public String home(){
        return "home";
    }

}
📍결과
📌JavaScript 사용하기
📍home.html 수정
<!DOCTYPE html>
<html lang="en">
<head>
<meta charset="UTF-8">
<title>AJAXHOME</title>
</head>
<body>
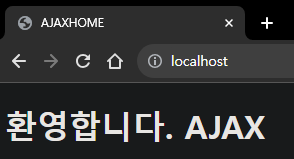
<h1 id="title">환영합니다. AJAX</h1>
<button onclick="getAjax()">Get Ajax</button>
</body>
</html>👉 onclick="getAjax()" 는 function 👉 JavaScript 추가
<!DOCTYPE html>
<html lang="en">
<head>
    <meta charset="UTF-8">
    <title>AJAXHOME</title>
    <script>
        function getAjax(){
            alert("getAjax()");
        }
    </script>
</head>
<body>
    <h1 id="title">환영합니다. AJAX</h1>

    <button onclick="getAjax()">Get Ajax</button>
</body>
</html>
👉 버튼 클릭시 alert("getAjax()"); function 실행
📍결과
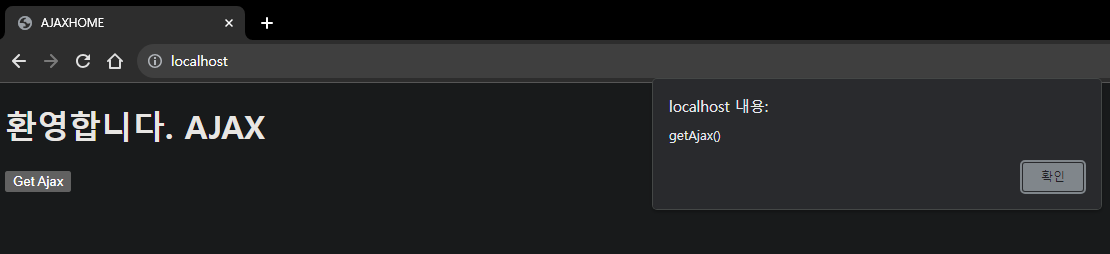
👉AJAX가 잘 올라온다 이제 controller에 내려가는 것을 확인 해보자.
📌AJAX 사용을 위한 Jquery 추가
📍home.html 수정
Jquery를 넣어보자
<script src="https://code.jquery.com/jquery-3.5.1.min.js"></script>
👉 Jquery 추가
<!DOCTYPE html>
<html lang="en">
<head>
<meta charset="UTF-8">
<title>AJAXHOME</title>
<script src="https://code.jquery.com/jquery-3.5.1.min.js"></script>
<script>
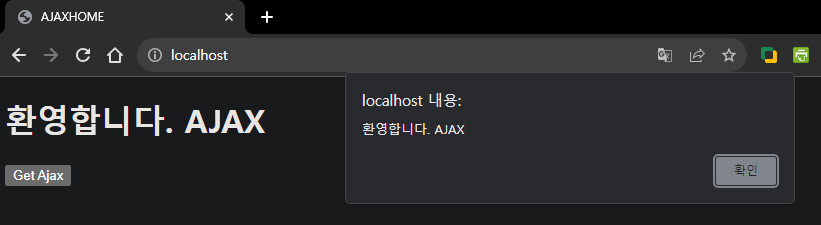
function getAjax(){
let a = $("#title").text();
alert(a);
}
</script>
</head>
<body>
<h1 id="title">환영합니다. AJAX</h1>
<button onclick="getAjax()">Get Ajax</button>
</body>
</html>📍결과
📌AJAX GET 사용해보기
이제
ajax를 사용해controller에 갔다 온 것을 확인 해보자
📍home.html 수정
<!DOCTYPE html>
<html lang="en">
<head>
    <meta charset="UTF-8">
    <title>AJAXHOME</title>
    <script src="https://code.jquery.com/jquery-3.5.1.min.js"></script>
    <script>
        function getAjax(){
            let a = $("#title").text();
            alert(a);

            $.ajax({
                url : "getAjax?title="+a,
                type : 'GET',
                success : function (response){
                    alert("success " + response);
                },
                error : function(jqXHR, status, error){
                      alert(jqXHR.responseText);
                }
            });
        }
    </script>
</head>
<body>
    <h1 id="title">환영합니다. AJAX</h1>

    <button onclick="getAjax()">Get Ajax</button>
</body>
</html>
👉 error 는 형식이 정해져 있다.
📍AjaxCotroller 클래스 수정
package com.ajax.ajax;

import org.springframework.stereotype.Controller;
import org.springframework.web.bind.annotation.GetMapping;
import org.springframework.web.bind.annotation.ResponseBody;

// GET 👉 화면 출력을 하는 쪽
// POST 👉 받는 쪽. View 데이터 👉 Controller 👉 Service 👉 Repositiry, Entity 👉 DB
// PUT 👉 받는 쪽. 수정
// PATCH 👉 받는 쪽. 수정(PUT과 큰 차이 없다)
// DELETE 👉 삭제
// AJAX는 보통 POST를 사용한다.
@Controller
public class AjaxCotroller {

    @GetMapping(value = "/")
    public String home(){
        return "home";
    }

    @GetMapping(value = "/getAjax")
    public @ResponseBody String getAjax(String title){
        System.out.println(title);
        return title;
    }

}
📍결과
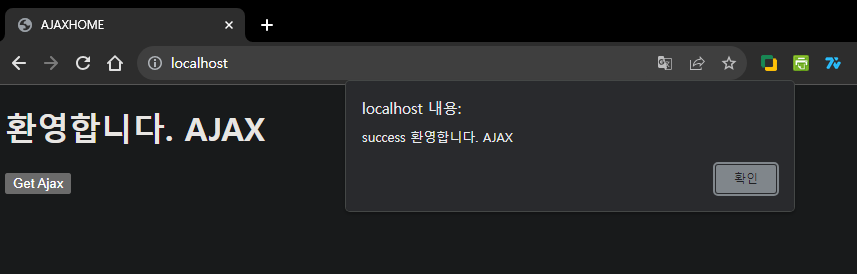
👉 title 을 잘 받아왔다.
👉 콘솔창에도 잘 출력 됐다. controller에서 리턴을 잘 받아 온 것을 확인 할 수 있다.
👁🗨QUIZ
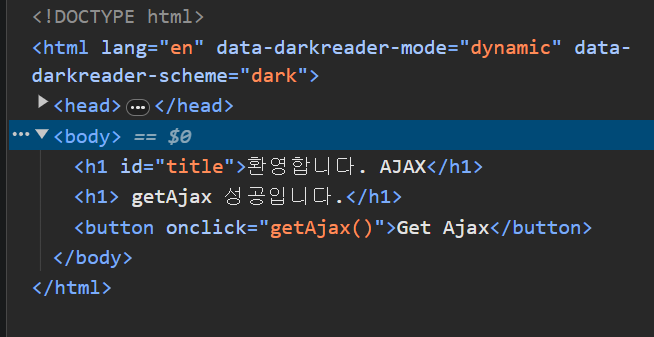
AJAX가 성공한 경우alert없이 h1 태그 밑에<h1> getAjax 성공입니다.</h1>이 출력이 되게 만드시오.
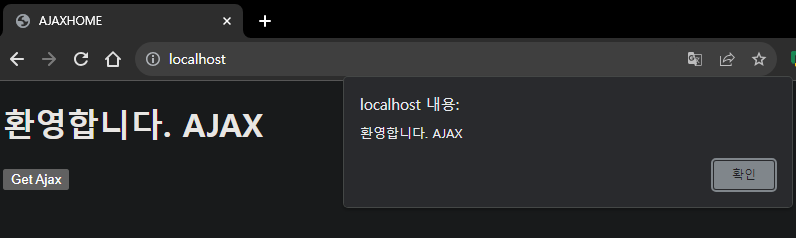
👉 let a = $("#title").text(); alert(a); 가 출력되고 확인을 누르면

👉 성공적으로 들어 간 것을 확인 할 수 있다.
이때 AJAX로 새로고침을 하지 않고 바로 들어가는 모습을 볼 수 있다.
<!DOCTYPE html>
<html lang="en">
<head>
    <meta charset="UTF-8">
    <title>AJAXHOME</title>
    <script src="https://code.jquery.com/jquery-3.5.1.min.js"></script>
    <script>
        function getAjax(){

            let a = $("#title").text();
            alert(a);

            $.ajax({
                url : "getAjax?title="+a,
                type: 'GET',
                success: function (response){
                      $('#title').after("<h1> getAjax 성공입니다.</h1>");
                },
                error : function(jqXHR, status, error){
                      alert(jqXHR.responseText);
                }
            });

        }
    </script>
</head>
<body>
    <h1 id="title">환영합니다. AJAX</h1>

    <button onclick="getAjax()">Get Ajax</button>
</body>
</html>
📌AJAX List 사용하기
📍home.html 수정
<!DOCTYPE html>
<html lang="en">
<head>
<meta charset="UTF-8">
<title>AJAXHOME</title>
<script src="https://code.jquery.com/jquery-3.5.1.min.js"></script>
<script>
function getAjax(){
let a = $("#title").text();
alert(a);
$.ajax({
url : "getAjax?title="+a,
type: 'GET',
success: function (response){
$('#title').after("<h1> getAjax 성공입니다.</h1>");
},
error : function(jqXHR, status, error){
alert(jqXHR.responseText);
}
});
}
function getAjaxList(){
let a = $("#title").text();
let b = $("#ajax").text();
// a, b 하나로 모으기
let data = {
"title" : a,
"ajax" : b
};
$.ajax({
url : "getAjaxList",
type: 'GET',
data : data,
success: function (response){
alert("success");
},
error : function(jqXHR, status, error){
alert(jqXHR.responseText);
}
});
}
</script>
</head>
<body>
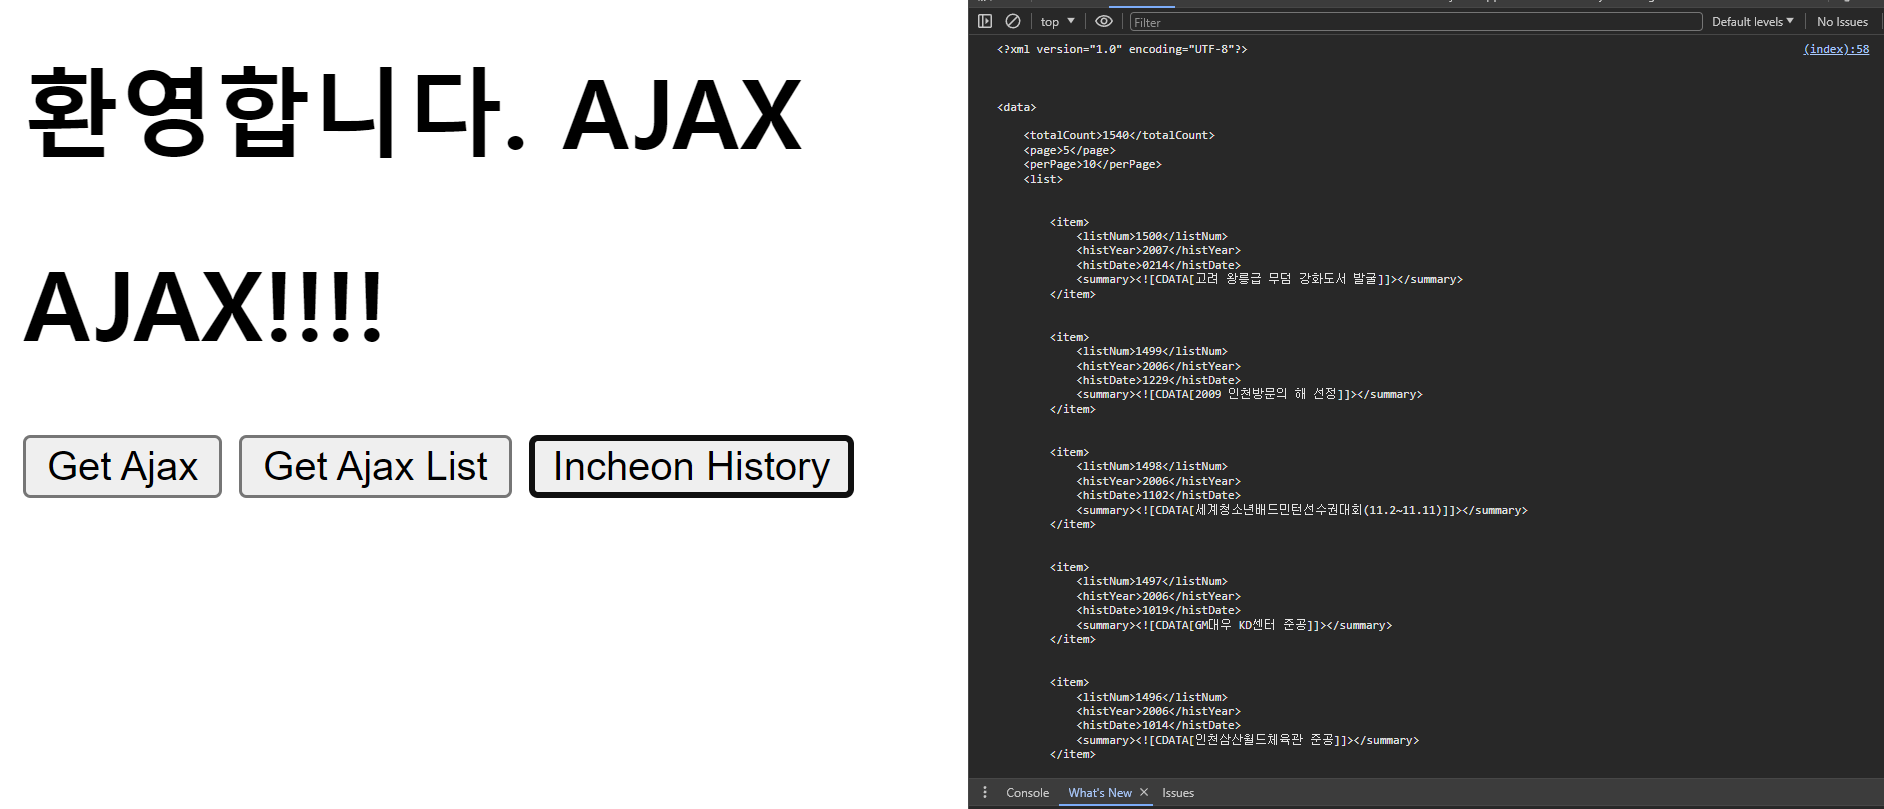
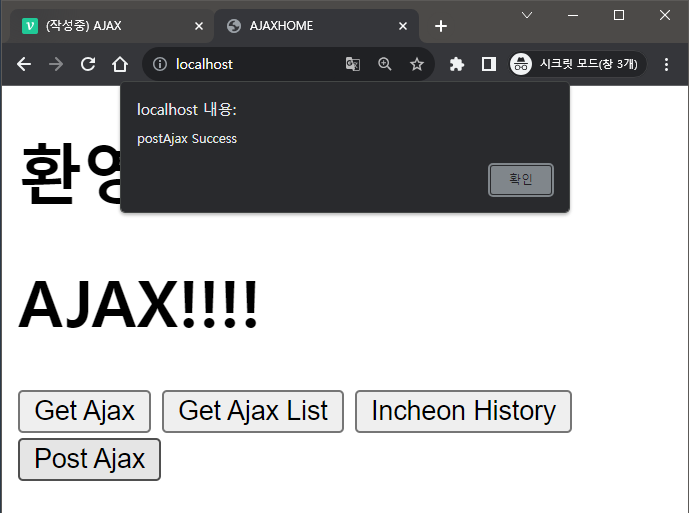
<h1 id="title">환영합니다. AJAX</h1>
<h1 id="ajax">AJAX!!!!</h1>
<button onclick="getAjax()">Get Ajax</button>
<button onclick="getAjaxList()">Get Ajax List</button>
</body>
</html>📍AjaxCotroller 클래스 수정
package com.ajax;

import org.springframework.stereotype.Controller;
import org.springframework.web.bind.annotation.GetMapping;
import org.springframework.web.bind.annotation.RequestBody;
import org.springframework.web.bind.annotation.RequestParam;
import org.springframework.web.bind.annotation.ResponseBody;

import java.util.HashMap;
import java.util.List;
import java.util.Map;
import java.util.Objects;

// GET 👉 화면 출력을 하는 쪽
// POST 👉 받는 쪽. View 데이터 👉 Controller 👉 Service 👉 Repositiry, Entity 👉 DB
// PUT 👉 받는 쪽. 수정
// PATCH 👉 받는 쪽. 수정(PUT과 큰 차이 없다)
// DELETE 👉 삭제
// AJAX는 보통 POST를 사용한다.
@Controller
public class AjaxController {
    @GetMapping(value = "/")
    public String home(){
        return "home";
    }
    @GetMapping(value = "/home")
    public String home1(){
        return "home";
    }
    @GetMapping(value = "/getAjax")
    public @ResponseBody String getAjax(String title){
        System.out.println(title);
        return title;
    }
    @GetMapping(value = "/getAjaxList")
    public @ResponseBody String getAjaxList(@RequestParam(value = "title")String title,
                                            @RequestParam(value = "ajax")String ajax){
        System.out.println(title);
        System.out.println(ajax);
        return "success";
    }
}
📍결과
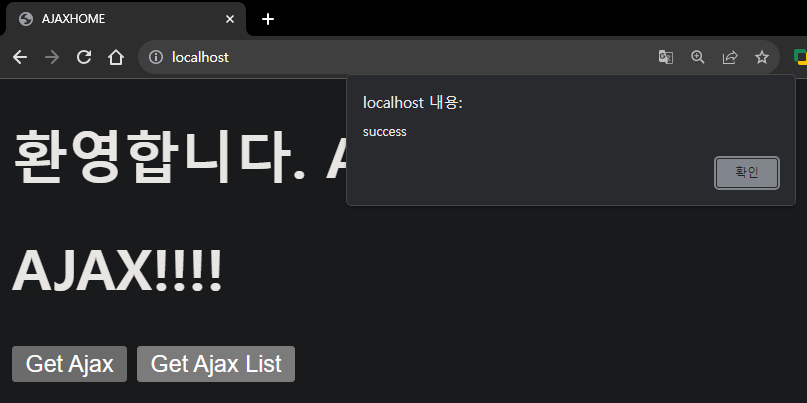
👉 Get Ajax List 클릭
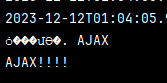
👉 콘솔창에 잘 출력 됐다
📌AJAX POST로 사용해보기
📍home.html 수정
...
function postAjax(){
let a = $("#title").text();
let b = $("#ajax").text();
// a, b 하나로 모으기
let data = {
"title" : a,
"ajax" : b
};
$.ajax({
url : "postAjax",
type: 'POST',
data : data,
success: function (response){
alert(response);
},
error : function(jqXHR, status, error){
alert(jqXHR.responseText);
}
});
}
...
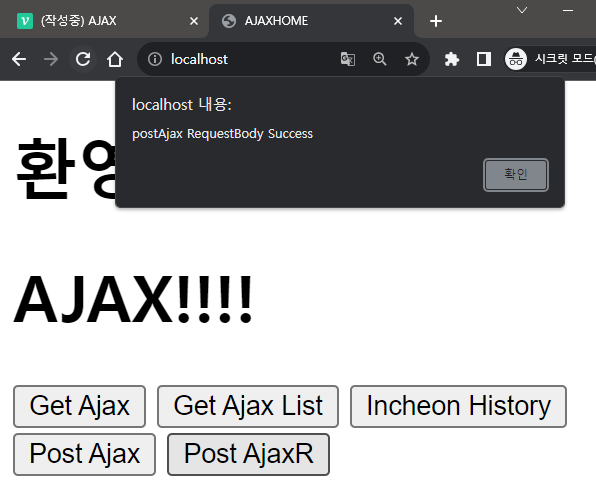
<button onclick="getIncheon()">Incheon History</button>
<br>
<button onclick="postAjax()">Post Ajax</button>
📍DataDto 클래스 생성
Project Lombok
implementation 'org.projectlombok:lombok:1.18.30'
annotationProcessor 'org.projectlombok:lombok:1.18.30'
dependencies {
	implementation 'org.springframework.boot:spring-boot-starter-web'
	testImplementation 'org.springframework.boot:spring-boot-starter-test'
	implementation 'org.springframework.boot:spring-boot-starter-thymeleaf:3.2.0'
	implementation 'org.projectlombok:lombok:1.18.30'
	annotationProcessor 'org.projectlombok:lombok:1.18.30'
}
👉 의존성 추가
package com.ajax.ajax;
package com.ajax.ajax;

import lombok.Data;

@Data
public class DataDto {

    private String title;
    private String ajax;

}
📍AjaxCotroller 클래스 수정
기본
...

    @PostMapping(value = "/postAjax")
    public @ResponseBody String postAjax(DataDto dto){
        System.out.println(dto.getTitle());
        System.out.println(dto.getAjax());

        return "postAjax Success";
    }

}
@RequestBody 로 받기
    @PostMapping(value = "/postAjax")
    public @ResponseBody String postAjaxR(@RequestBody DataDto dto){
        System.out.println(dto.getTitle());
        System.out.println(dto.getAjax());

        return "postAjax RequestBody Success";
    }

}
...
function postAjaxR(){
let a = $("#title").text();
let b = $("#ajax").text();
let data = {};
data ["title"] = a;
data ["ajax"] = b;
var param = JSON.stringify(data); // JSON 형식을 String 형식으로 바꾼다
$.ajax({
url : "postAjaxR",
type: 'POST',
data : param,
dataType : "json",
contentType : "application/json",
success: function (response){
alert(response);
},
error : function(jqXHR, status, error){
alert(jqXHR.responseText);
}
});
}
...
Map으로 받기
        function postAjaxMap(){

            let a = $("#title").text();
            let b = $("#ajax").text();

            let data = {};

            data ["title"] = a;
            data ["ajax"] = b;

            var param = JSON.stringify(data); // JSON 형식을 String 형식으로 바꾼다

            $.ajax({
                url : "postAjaxMap",
                type: 'POST',
                data : param,
                dataType : "json",
                contentType : "application/json",
                success: function (response){
                      alert(response);
                },
                error : function(jqXHR, status, error){
                      alert(jqXHR.responseText);
                }
            });

        }

...

<button onclick="postAjaxMap()">Post AjaxMap</button> @PostMapping(value = "/postAjaxMap")
public @ResponseBody String postAjaxMap(@RequestBody Map<String, Object> map){
System.out.println((String)map.get("title"));
System.out.println((String)map.get("ajax"));
return "postAjax Map Success";
}📍결과

👉 세 방식 다 정상적으로 작동 된다
📌PUT, PATCH, DELETE 사용해보기
📍home.html 수정
...

// Get과 비슷한 형식
        function putAjax(){

            let a = $("#title").text();
            let b = $("#ajax").text();

            var url = "putAjax?title=" + a + "&ajax=" + b;

            $.ajax({
                url : url,
                type : "PUT",
                dataType : "json",
                success: function (response){
                      alert(response);
                },
                error : function(jqXHR, status, error){
                      alert(jqXHR.responseText);
                }

            });

        }

        // Put과 똑같다
        function patchAjax(){

            let a = $("#title").text();
            let b = $("#ajax").text();

            var url = "patchAjax?title=" + a + "&ajax=" + b;

            $.ajax({
                url : url,
                type : "PATCH",
                dataType : "json",
                success: function (response){
                      alert(response);
                },
                error : function(jqXHR, status, error){
                      alert(jqXHR.responseText);
                }

            });

        }

        // 위와 형식은 똑같다
        function deleteAjax(){

            let a = $("#title").text();
            let b = $("#ajax").text();

            var url = "deleteAjax?title=" + a + "&ajax=" + b;

            $.ajax({
                url : url,
                type : "DELETE",
                dataType : "json",
                success: function (response){
                      alert(response);
                },
                error : function(jqXHR, status, error){
                      alert(jqXHR.responseText);
                }

            });

        }

...

    <br>
    <button onclick="putAjax()">Put Ajax</button>
    <button onclick="patchAjax()">Patch Ajax</button>
    <button onclick="deleteAjax()">delete Ajax</button>
📍AjaxCotroller 수정
...
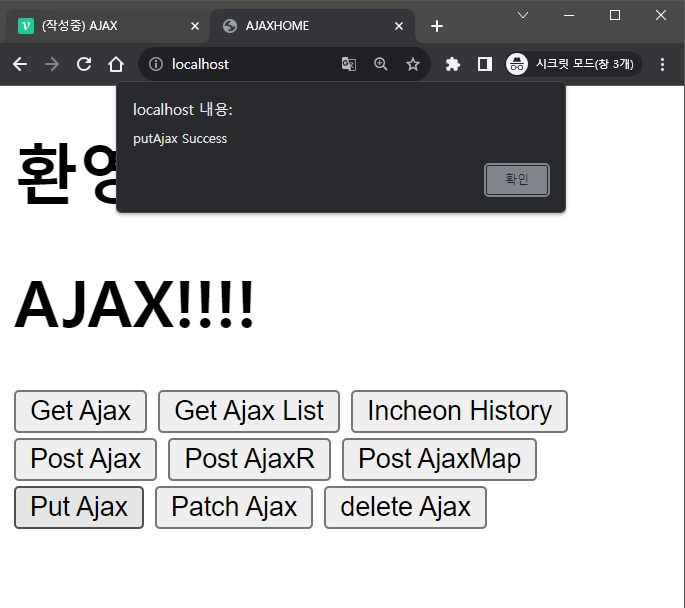
@PutMapping(value = "/putAjax")
public @ResponseBody String putAjax(String title, String ajax){
System.out.println(title);
System.out.println(ajax);
return "putAjax Success";
}
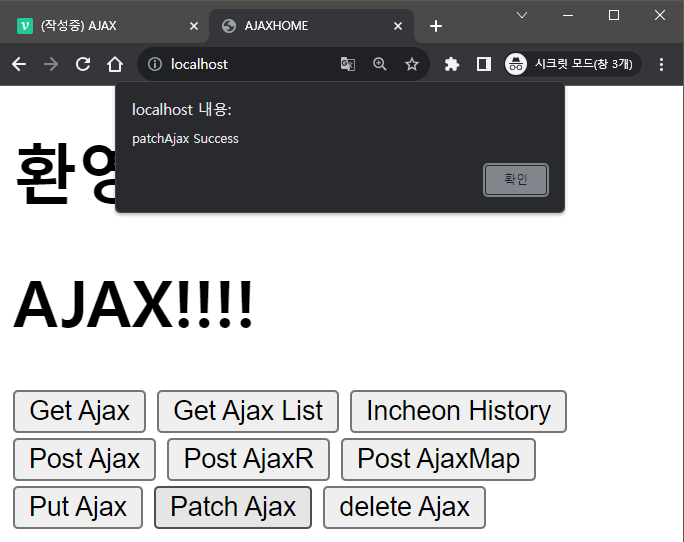
@PatchMapping(value = "/patchAjax")
public @ResponseBody String patchAjax(String title, String ajax){
System.out.println(title);
System.out.println(ajax);
return "patchAjax Success";
}
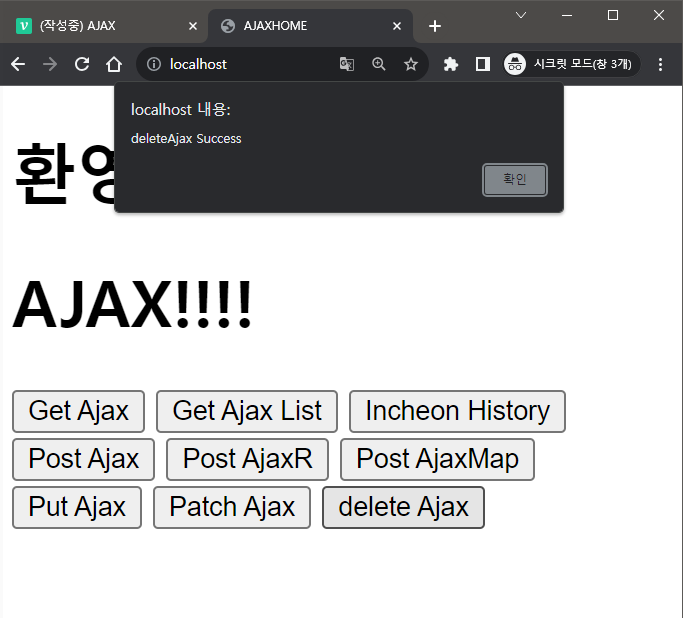
@DeleteMapping(value = "/deleteAjax")
public @ResponseBody String deleteAjax(String title, String ajax){
System.out.println(title);
System.out.println(ajax);
return "deleteAjax Success";
}
}
📍결과
📖OPEN API 사용하기
인천 OPEN API 사용하기
👉Java로 받지 말고AJAX로 바로API를 사용해보자.
인증KEY로URL을 날리면 바로response해준다. 그걸 출력 해본다.
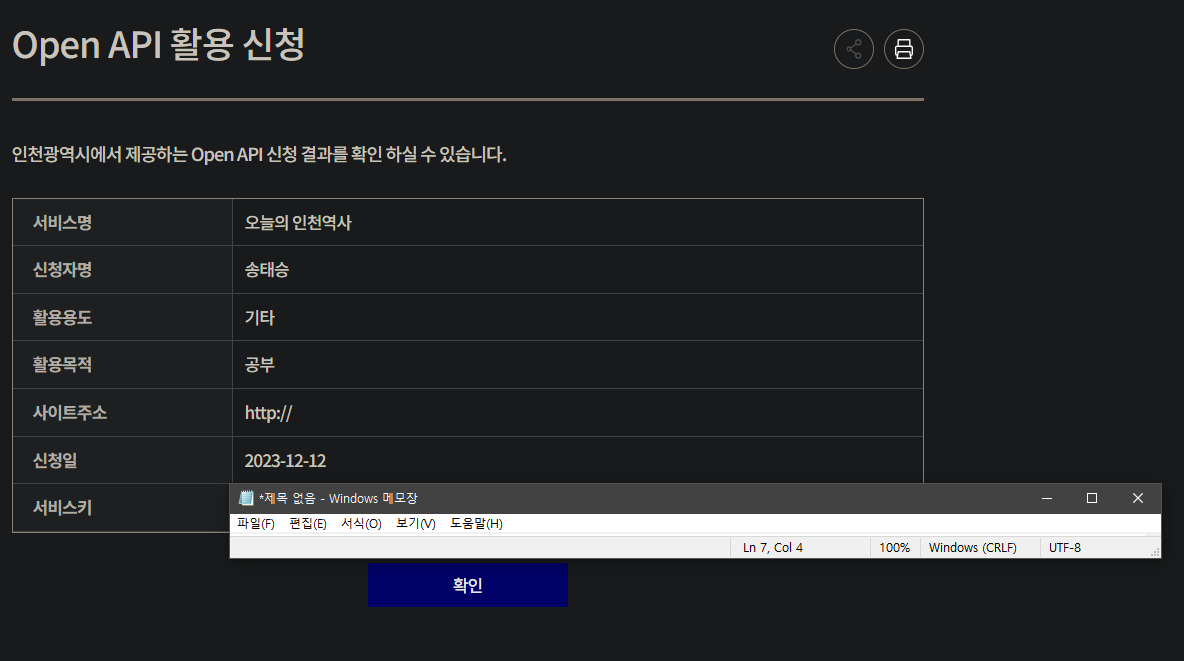
Open API : 오늘의 인천역사
회원 가입 후 인증키를 받고 사용해보자.
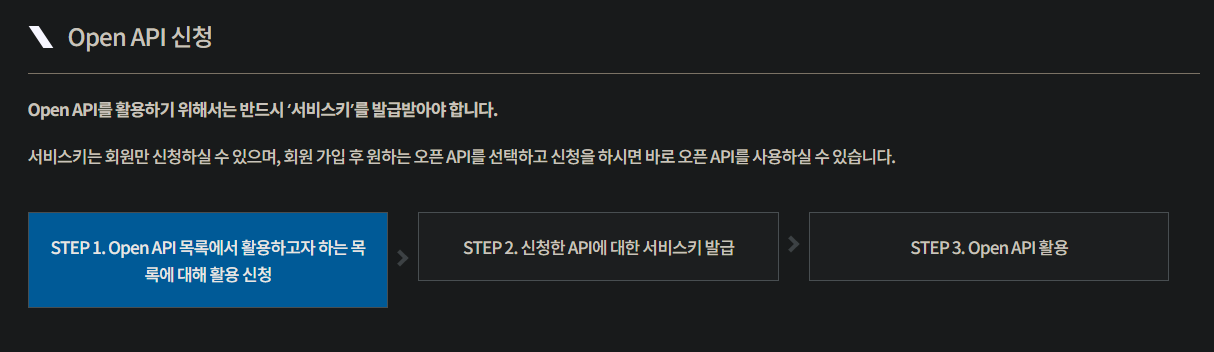

📌인증 키 얻기
회원 가입을 한 뒤 신청을 하고 나면 마이페이지에서 확인이 가능하다
📌인증 키로 AJAX 활용하기
다른 지역은
JSON형식이라 실행이 잘 되는데. 하필 인천은Xml형식이라 AJAX 사용 불가..Node.js문법을 사용해야 한다. 나중에 배울 것임function getIncheon(){ $.ajax({ url : "https://www.incheon.go.kr/dp/openapi/data?apicode=10&key=본인키", type: 'POST', contentType: "application/json; charset=utf-8", dataType: "json", xhrFields: { withCredentials: true // 클라이언트와 서버가 통신할 때 쿠키와 같은 인증 정보 값을 공유하겠다는 설정 }, success: function (retval, textStatus) { console.log( JSON.stringify(retval)); }, error : function(jqXHR, status, error){ alert(jqXHR.responseText); } }); }👉
AJAX사용 코드function getIncheon(){ fetch(`https://api.allorigins.win/raw?url=${encodeURIComponent("https://www.incheon.go.kr/dp/openapi/data?apicode=10&key=본인키&")}`+"page=5") .then(response => { if (response.ok) return response.text(); //.json(), .blob()사용가능 throw new Error('Network response was not ok.') }).then((data) => { //let jsonData = xmlToJSON.parseString(data); //xml파일을 json으로 변환 //let vuJson = prettyPrintJson.toHtml(jsonData); //json파일에서 텍스트를 html태그로 변환 console.log(data); }); }👉
Node.js사용 코드
📌실행해보기
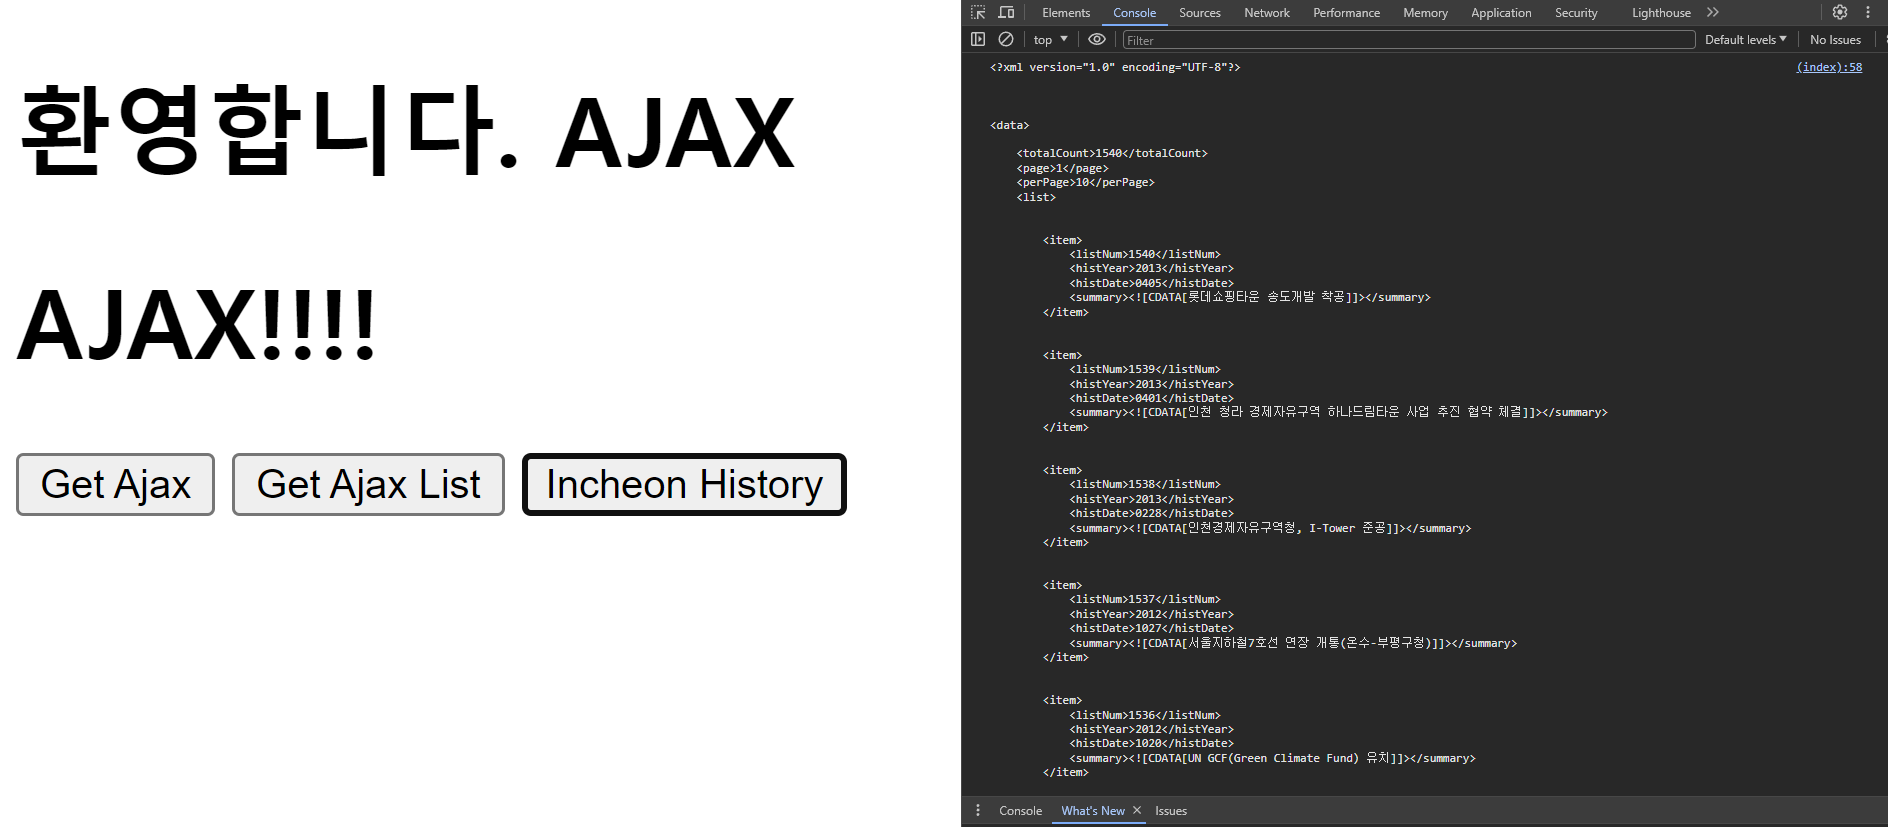
function getIncheon(){
            fetch(`https://api.allorigins.win/raw?url=${encodeURIComponent("https://www.incheon.go.kr/dp/openapi/data?apicode=10&key=33addbf4b7124dd5aa6e409940773c&")}`+"page=5")
              .then(response => {
                     if (response.ok) return response.text(); //.json(), .blob()사용가능
                     throw new Error('Network response was not ok.')
              }).then((data) => {
                   //let jsonData = xmlToJSON.parseString(data); //xml파일을 json으로 변환
                   //let vuJson = prettyPrintJson.toHtml(jsonData); //json파일에서 텍스트를 html태그로 변환
                   console.log(data);
           });

        }
👉 5 페이지로 변경