
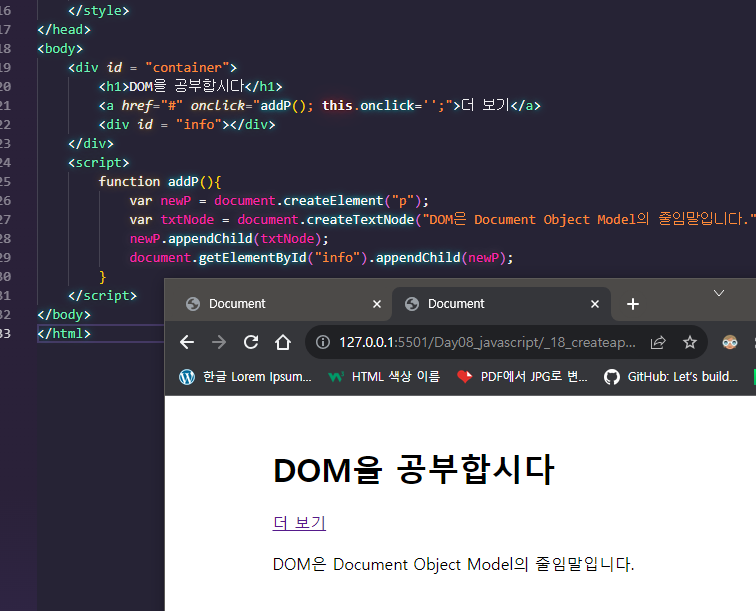
❗ Javascript의 객체 지향 (2일차 복습)
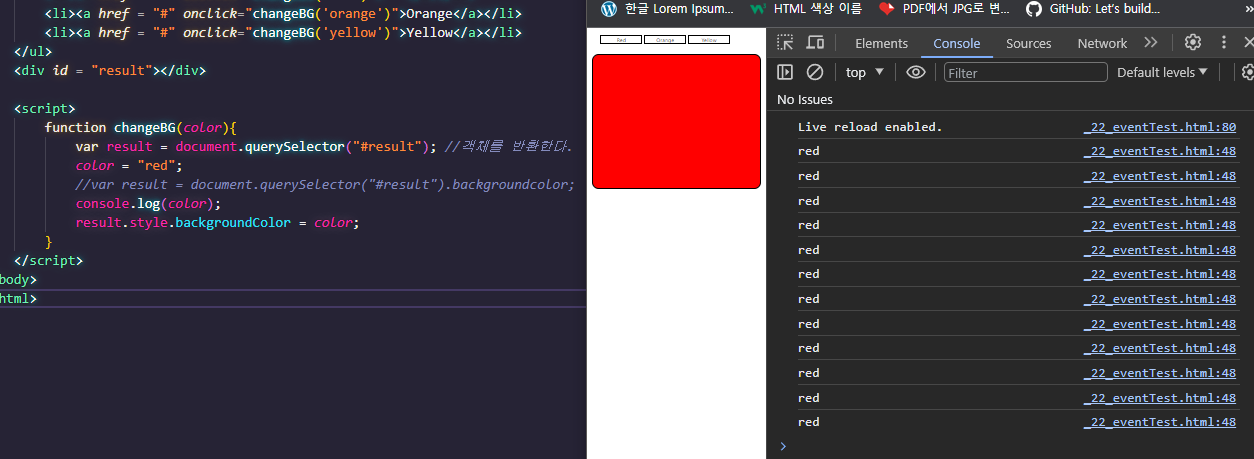
👉 뭘 눌러도 red, 여기서 color는 String, 객체가 아니다. 이렇게 쓰면 안됨
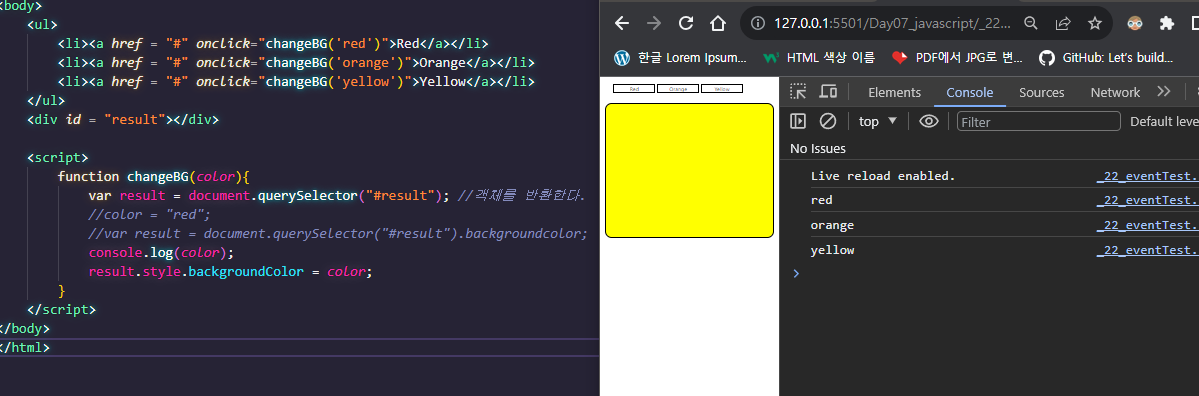
👉 객체지향, 이해해야한다.
<!DOCTYPE html>
<html lang="ko">
<head>
    <meta charset="UTF-8">
    <meta name="viewport" content="width=device-width, initial-scale=1.0">
    <title>Document</title>
    <style>
        body{
            margin: 20px auto;
        }
        #result{
            width: 500px;
            height: 400px;
            margin: 30px auto ;
            border: 1px solid black;
            border-radius: 20px;
        }
        ul{
            list-style: none;
            width: 500px;
            margin: 0 auto;
        }
        ul li{
            display: inline-block;
            width: 120px;
            border: 1px solid black;
            text-align: center;
        }
        a:link, a:visited{
            color: black;
            text-decoration: none;
        }
    </style>
</head>
<body>
    <ul>
        <li><a href = "#" onclick="changeBG('red')">Red</a></li>
        <li><a href = "#" onclick="changeBG('orange')">Orange</a></li>
        <li><a href = "#" onclick="changeBG('yellow')">Yellow</a></li>
    </ul>
    <div id = "result"></div>

    <script>
        function changeBG(color){
            var result = document.querySelector("#result"); //객체를 반환한다.
            //color = "red";
            //var result = document.querySelector("#result").backgroundcolor;
            console.log(color);
            result.style.backgroundColor = color;
        }
    </script>
</body>
</html>
📖자바스크립트의 내장 객체
📌Array 객체의 메서드
concat: 기존 배열에 요소를추가해새로운 배열을 만듦every: 배열의모든 요소가 주어진 함수에 대해 참이면 true, 거짓이면 falsefilter: 배열 요소 중에서 주어진 필터링 함수에 대해true인 요소만 골라새로운 배열을 만듦forEach: 배열의모든 요소에 대해 주어진함수 실행indexOf:주어진 값과일치하는 값이 있는 배열 요소의첫 인덱스를 찾는다join: 배열 요소를문자열로 합친다. 이때구분자를 지정할 수 있다.push: 배열의맨 끝에 새로운 요소를추가한 후 새로운length를 반환unshift: 배열의시작부분에 새로운 요소추가한 후 새로운length를 반환pop: 배열의마지막 요소를 꺼내 그 값을결과로 반환shift: 배열에서첫 번째 요소를 꺼내 그 값을결과로 반환splice: 배열에 요소를추가하거나 삭제slice: 배열에 특정한 부분만잘라 냄reverse: 배열의 배치순서를 역순으로 바꿈sort: 배열 요소를 지정한 조건에 따라정렬toString: 배열에서 지정한 부분을문자열로 반환. 이때 각 요소는 쉼표(,)로 구분
<!DOCTYPE html>
<html lang="ko">
<head>
    <meta charset="UTF-8">
    <meta name="viewport" content="width=device-width, initial-scale=1.0">
    <title>Document</title>
</head>
<body>
    <script>
        var nums = [1, 2, 3];
        var chars = ["a", "ab", "abc", "abcd", "abcde"];
        console.log("// concat");
        // concat
        var numsChars = nums.concat(chars);
        var charsNums = chars.concat(nums);
        console.log(numsChars);
        console.log(charsNums);
        console.log("// join");
        // join
        var string1 = nums.join();
        var string2 = chars.join('/');
        console.log(string1);
        console.log(string2);
        console.log("// push");
        //push
        var ret1 = nums.push(4, 5);
        console.log(nums);
        console.log(ret1);
        console.log("// unshift");
        //unshift
        var ret2 = nums.unshift(0);
        console.log(nums);
        console.log(ret2);
        console.log("// pop");
        //pop
        var popped1 = chars.pop();
        console.log(chars);
        console.log(popped1)
        console.log("// shift");
        //shift
        var popped2 = chars.shift();
        console.log(chars);
        console.log(popped2);
        console.log("// splice");
        //splice
        var numbers = [1, 2, 3, 4, 5];
        var newNumbers = numbers.splice(2); // 2이상 모두 추출
        //var newNumbers = numbers.splice(2, 1); // 2이상 인덱스 1만 추출
        console.log(numbers);
        console.log(newNumbers);
        var study = ["html", "css", "web", "jquery"];
        var newStudy = study.splice(2, 1, "js"); // web이 빠지고 js 삽입
        console.log(study);
        console.log(newStudy);
        console.log("// slice");
        //slice
        var newStudy2 = study.slice(2); // 인덱스 2이상 모두 슬라이스
        var newStudy3 = study.slice(2, 3); // 인덱스 2이상 3미만인 것만 슬라이스
        console.log(study);
        console.log(newStudy2);
        console.log(newStudy3);
    </script>
</body>
</html>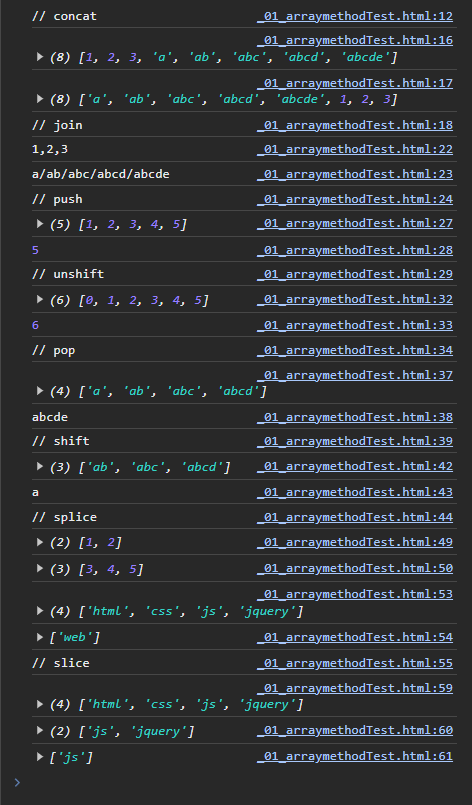
📌Date 객체
📍Date 객체 인스턴스 만들기
new Date();: 현재 날짜new Date("2023-11-07");: 특정 날짜 나타내기new Date("2023-11-07T10:22:15");: 특정 날짜와 시간 나타내기
📍자바스크립트의 날짜, 시간 입력방식 알아보기
- YYYY-MM-DD
- YYYY-MM-DDTHH
- MM/DD/YYYY
- 이름형식, January를 Jan, Monday를 Mon으로,
new Date("Tue Nov 07 2023 10:19:37 GMT+0900(한국 표준시)")
📍Date 객체의 메서드
getFullYear & setFullYear: 년도를 나타내는 4자리 숫자를 반환 & 설정getMonth & setMonth: 월을 나타내는0 ~ 11의 정수를 반환 & 설정한다. 1월은 0, 12월은 11getDate & setDate: 날짜(1 ~ 31)를 나타내는 정수를 반환 & 설정getDay:요일(0 ~ 6)를 나타내는 정수를 반환getHours & setHours:시간(0 ~ 23)를 나타내는 정수를 반환 & 설정getMinutes & setMinutes:분(0 ~ 59)를 나타내는 정수를 반환 & 설정getSeconds & setSeconds:초(0 ~ 59)를 나타내는 정수를 반환 & 설정getMilliseconds & setMilliseconds:밀리초(0 ~ 999)를 나타내는 정수를 반환 & 설정getTime & setTime:1970년 1월 1일 00:00:00(UTC)를 기점으로현재 시간까지 경과된 밀리초를 반환 & 설정한다.getTimezoneOffset:UTC와지정 로케일(Locale)시간과의차이를 분단위로 반환toDateString: 사람이 읽을 수 있는 형식의문자열로 날짜를 반환toTimeString: 사람이 읽을 수 있는 형식의문자열로 시간을 반환한다toISOString:ISO형식으로Data객체의시간을 표현한 문자열로 반환toLocalString & toLocalTimeString: 인수로 전달한Local기준으로Date 객체의날짜와 시간&시간문자열로 표현해 반환한다toString():Data 객체타입을문자열로 표시

<!DOCTYPE html>
<html lang="ko">
<head>
    <meta charset="UTF-8">
    <meta name="viewport" content="width=device-width, initial-scale=1.0">
    <title>Document</title>
</head>
<body>
    <script>
        var a = new Date();
        console.log(a.getDate()); // 오늘 11월 7일 --> 7 반환
        console.log(a.toLocaleDateString()) // 2023. 11. 7.
        console.log(a.toString()) // Tue Nov 07 2023 10:19:37 GMT+0900 (한국 표준시)
        console.log(a.getTime()); // 1970년 1월 1일 자정 이후 시간을 밀리초로 표시
        // 1000 밀리초 -> 1초
        // 60초 -> 1분
        // 60분 -> 1시간
        // 24시간 -> 1일
        console.log(Math.round(a.getTime()/(1000*60*60*24))); // 일로 표시, 19668. round는 반올림
        var start = new Date("2023-10-29");
        console.log(Math.round((a.getTime() - start.getTime())/(1000*60*60*24))); // 2023-10-29 와 9일차
    </script>
</body>
</html>👁🗨 Quiz
❗ 내 답
<!DOCTYPE html>
<html lang="ko">
<head>
<meta charset="UTF-8">
<meta name="viewport" content="width=device-width, initial-scale=1.0">
<title>Document</title>
<style>
#container{
width: 500px;
height: 500px;
border: 5px double yellow;
border-radius: 50%;
background-color: cyan;
margin: 50px auto;
text-align: center;
font-size: 1.5em;
}
h1, p{
margin-top: 50px;
}
b{
color: red;
font-size: 2em;
}
</style>
</head>
<body>
<div id ="container">
<script>
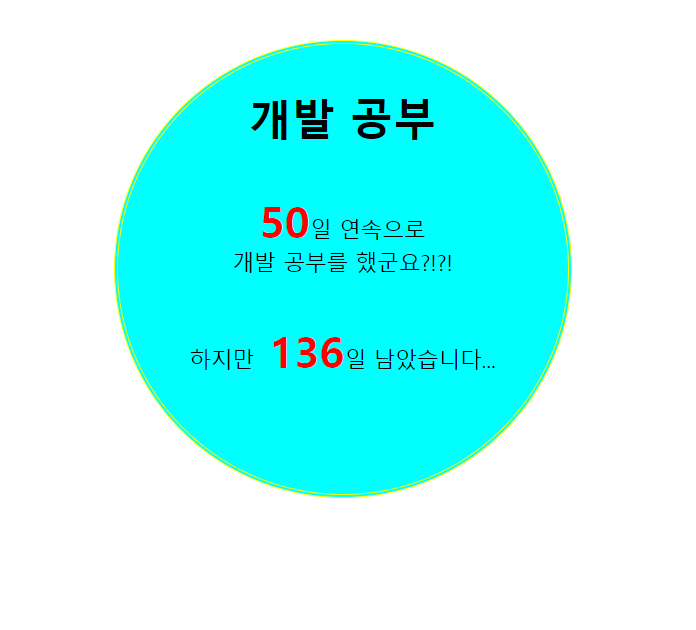
var today = new Date();
var start = new Date("2023-9-18");
var end = new Date("2024-3-22");
var date = Math.round((today.getTime() - start.getTime())/(1000*60*60*24));
var endDate = Math.round((end.getTime() - today.getTime())/(1000*60*60*24));
document.write("<h1>개발 공부</h1>" +"<p><b>" + date
+ "</b>일 연속으로<br> 개발 공부를 했군요?!?!</p>"
+ "<p>하지만<b> "+ endDate + "</b>일 남았습니다...</p>");
</script>
</div>
</body>
</html>👉 document.querySelector(#result).innerText를 사용하는 것이 실력이 늘은 것, 강사님 답 확인
❗ 강사님 답
📌Math 객체
모질라 Math
Math.프로퍼티명,Math.메서드명
📍Math 객체의 프로퍼티
E: 오일러 상수PI:SQRT2:SQRT1_2:LN2:LN10:LOG2E:LOG10E:
📍Math 객체의 메서드
abs():acos():asin():atan():atan2():cos():sin():tan():ceil():floor():max():min():pow():log():sqrt():random():exp():round():
📖브라우저와 관련된 객체
모질라 Window
-⚡window: 브라우저 창이열릴 때마다하나씩 만들어진다. 브라우저 창 안의 요소 중최상위⚡
-⚡document: 웹 문서마다 하나씩 있으며<body>태그를 만나면 만들어진다.HTML문서의 정보가 담겨있다⚡
navigator현재 사용하는 브라우저의 정보history: 현재 창에서 사용자의 방문 기록을 저장location: 현재 페이지의 URL 정보screen: 현재 사용하는 화면 정보
📌window 객체의 프로퍼티
- `` :
- `` :
- `` :
- `` :
- `` :
- `` :
- `` :
- `` :
- `` :
- `` :
- `` :
- `` :
- `` :
- `` :
- `` :
- `` :
📌window 객체의 메서드
- `` :
- `` :
- `` :
- `` :
- `` :
- `` :
- `` :
- `` :
- `` :
- `` :
- `` :
- `` :
- `` :
- `` :
- `` :
- `` :
- `` :
- `` :
📍pop 메서드
위치 지정하기
팝업 차단 고려하기
📌navigator 객체
📍웹 브라우저와 렌더링 엔진
- `` :
- `` :
- `` :
- `` :
- `` :
navigator 객체 정보 살펴보기
- `` :
- `` :
- `` :
- `` :
- `` :
- `` :
📌history 객체
모질라 history
프로퍼티
- `` :
메서드
- `` :
- `` :
- `` :
📌location 객체
모질라 location
프로퍼티
- `` :
- `` :
- `` :
- `` :
- `` :
- `` :
- `` :
- `` :
- `` :
- `` :
메서드
- `` :
- `` :
- `` :
- `` :
📌screen 객체
모질라 screen(영문)
w3hmong screen
프로퍼티
- `` :
- `` :
- `` :
- `` :
- `` :
- `` :
- `` :
메서드
- `` :
- `` :
👁🗨Quiz
🎲Quiz1

👉 자세히 보기 클릭
❗ 1
<!DOCTYPE html>
<html lang="ko">
<head>
    <meta charset="UTF-8">
    <meta name="viewport" content="width=device-width, initial-scale=1.0">
    <title>Document</title>
</head>
<body>
    <h1>문서를 열면 팝업 창이 표시됩니다.</h1>
    <script>
        popWin = window.open("_06-2_javascriptQuiz7.html", "popup", "width = 750, height = 600");
        popWin.opener = self; //popWin 객체를 만든 부모가 자신(self)이라고 알려줌
    </script>
</body>
</html>
❗ 2
<!DOCTYPE html>
<html lang="ko">
<head>
    <meta charset="UTF-8">
    <meta name="viewport" content="width=device-width, initial-scale=1.0">
    <title>Document</title>
    <style>
        #container{
            width: 600px;
            margin: 10px auto;
            padding: 10px;
            text-align: center;
        }
    </style>
</head>
<body>
    <div id = "container">
        <h1>이벤트 공지</h1>
        <img src = "images/doit.jpg">
        <p><a href = "_06-3_javascriptQuiz7.html"
             onclick = "loadURL(this.href); return false;">자세히 보기</a></p>
             <!--return false; -> href 시작하고 동작하지 말라는 것-->
             <!--onclick이 없이 <a>태그만 사용하면 본인이 바뀐다.-->
    </div>
    <script>
        function loadURL(url){
            window.opener.location = url; // 부모 창(creator)의 location에 url을 넘겨줍니다.
            window.close();
            // 현재 창을 닫습니다. 본인이 부모의 것인 _06-2_javascriptQuiz7.html 가 된다.
        }
    </script>
</body>
</html>
❗ 3
<!DOCTYPE html>
<html lang="ko">
<head>
<meta charset="UTF-8">
<meta name="viewport" content="width=device-width, initial-scale=1.0">
<title>Do it!</title>
<style>
#container{
width:750px;
margin:0 auto;
text-align:center;
}
</style>
</head>
<body>
<div id="container">
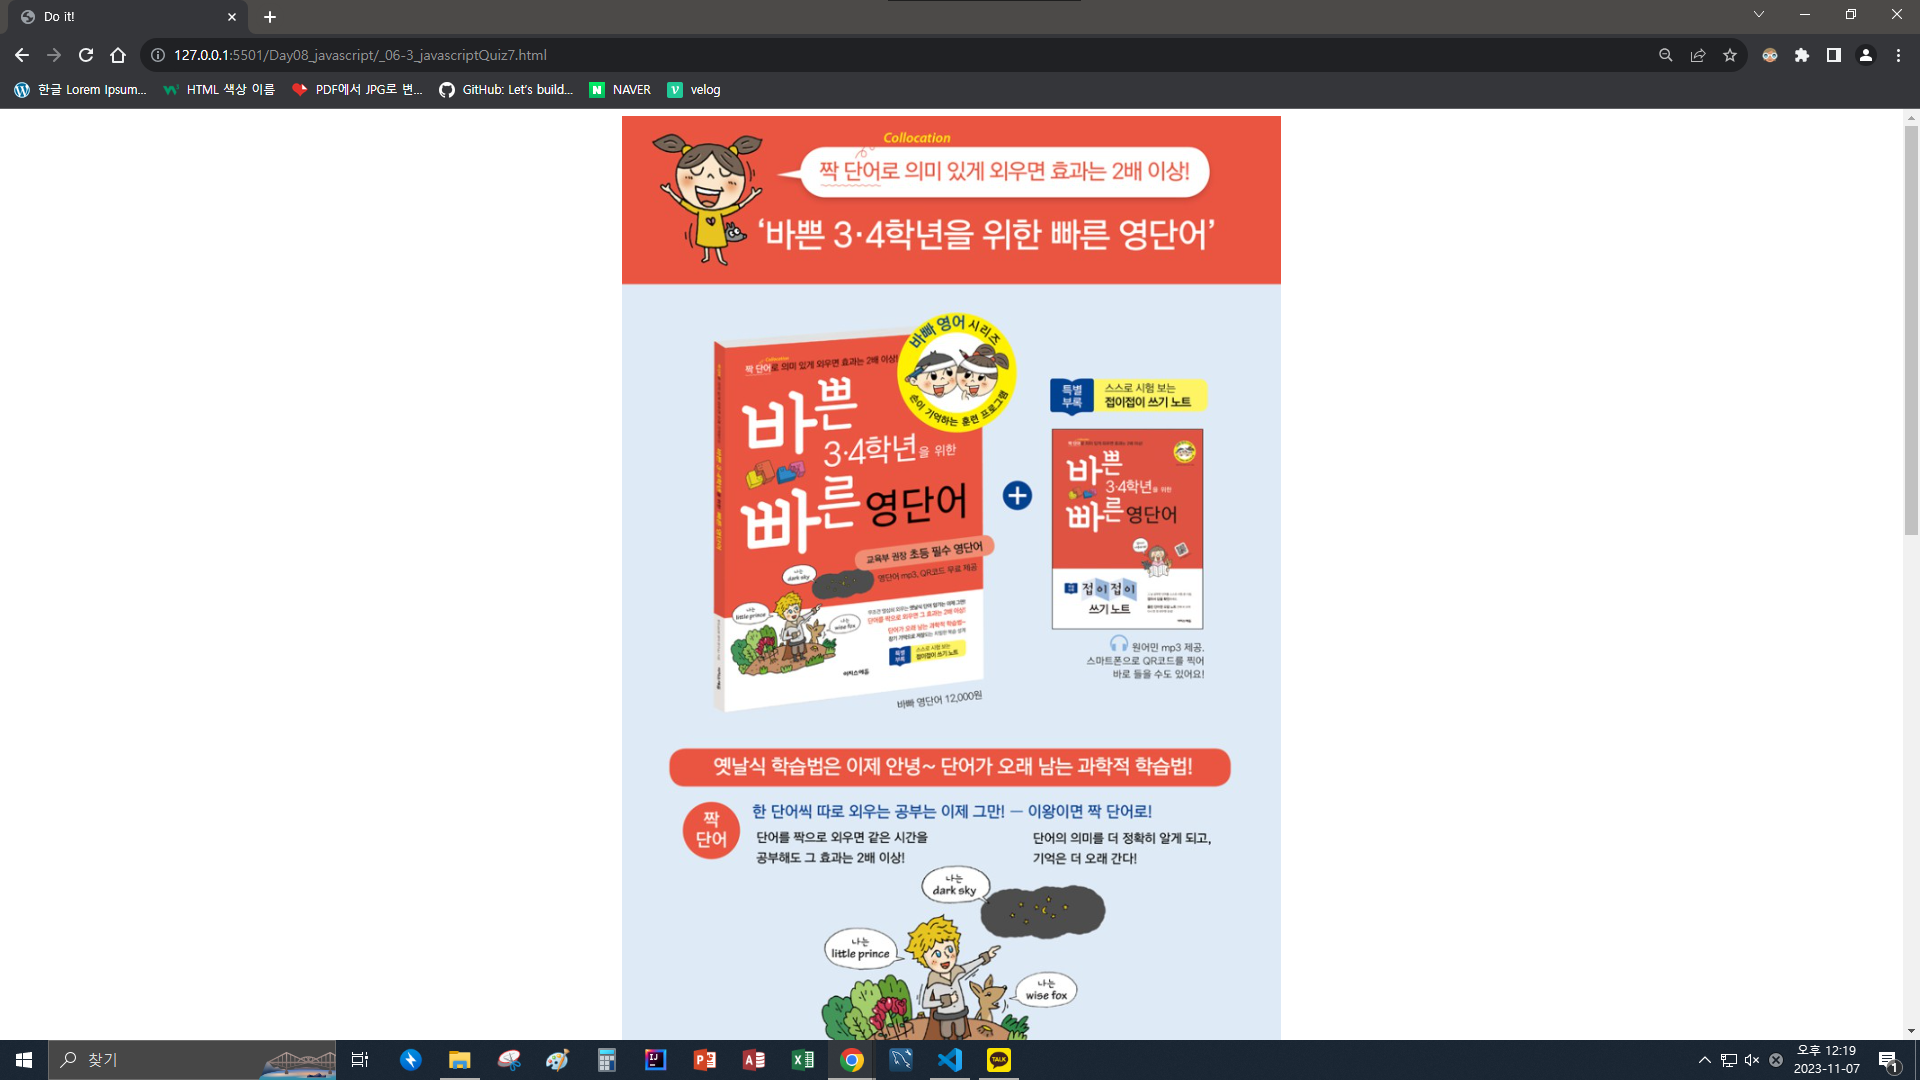
<img src="http://www.easyspub.co.kr/upload/smarteditor/BOOK/2016/20160418190258778248.jpg">
</div>
</body>
</html>🎲Quiz2
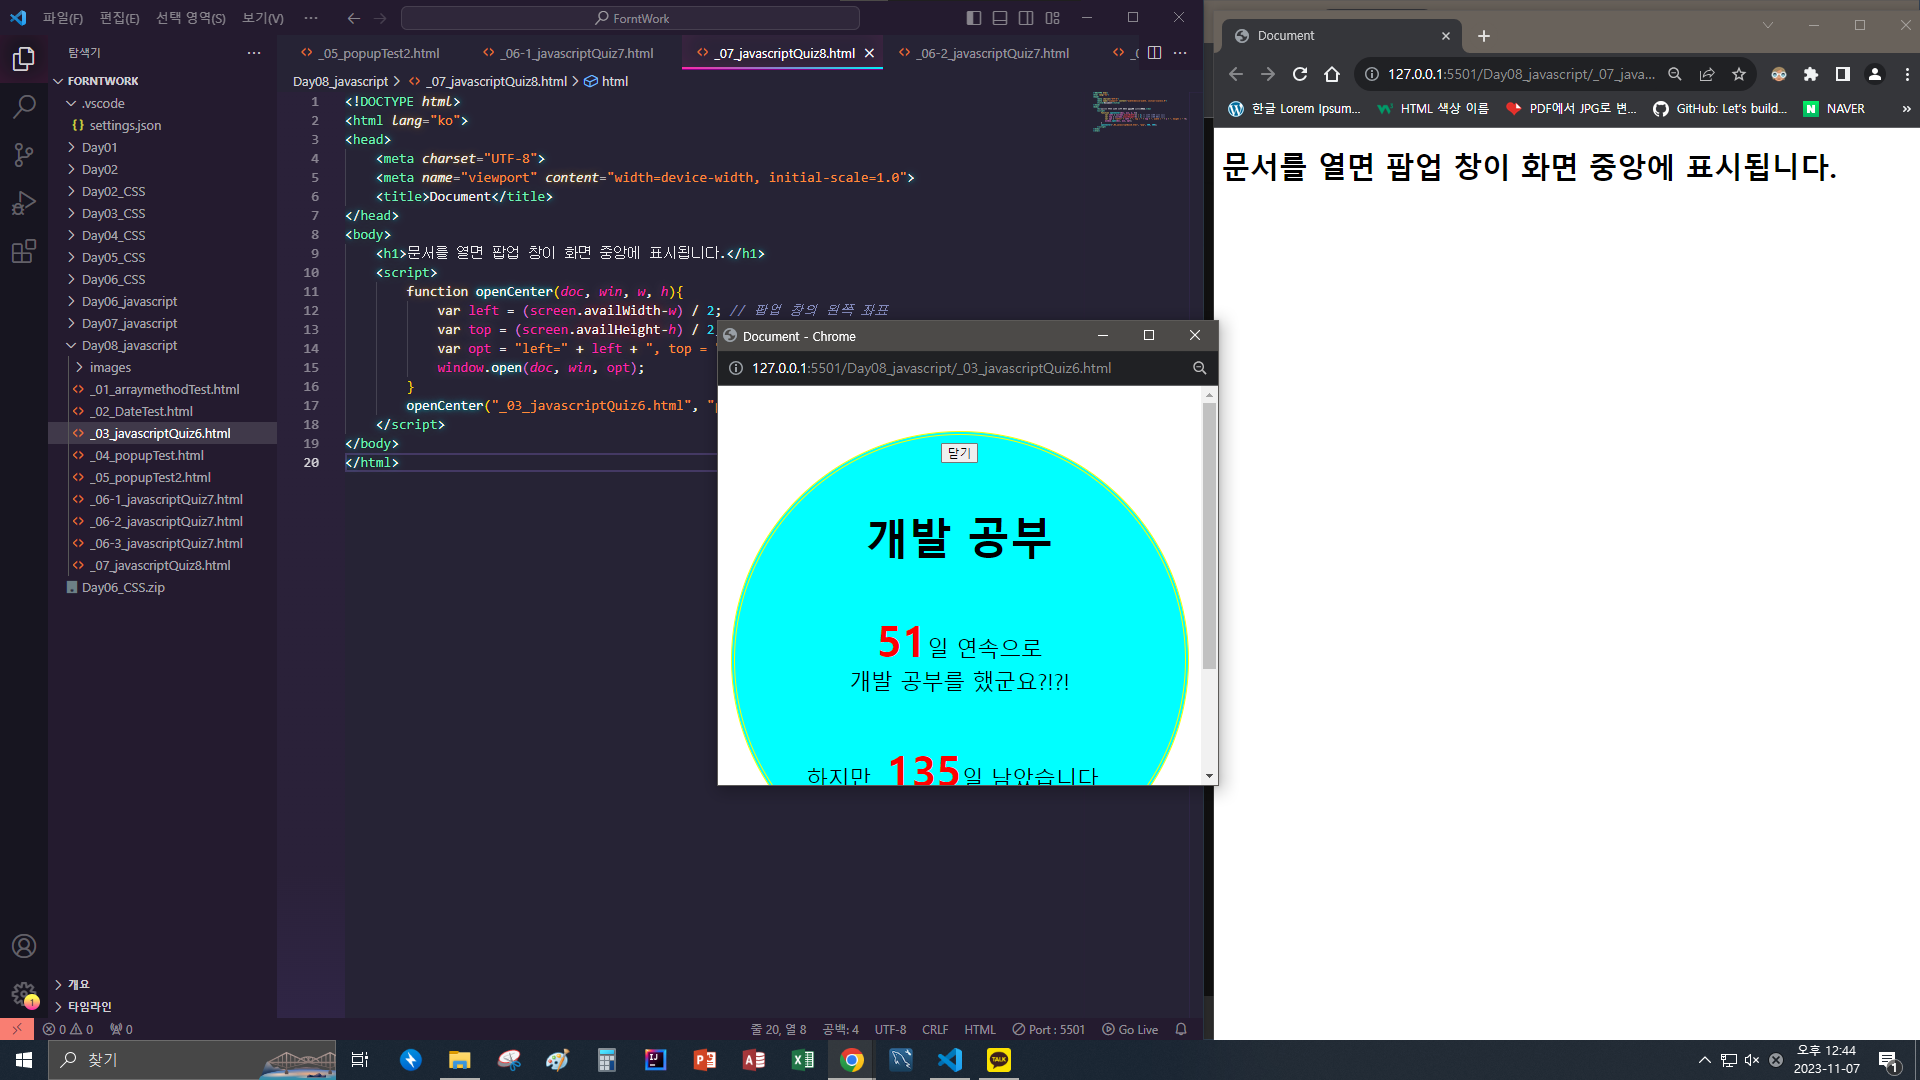
👉 팝업 창이 화면 정중앙에 뜬다
<!DOCTYPE html>
<html lang="ko">
<head>
    <meta charset="UTF-8">
    <meta name="viewport" content="width=device-width, initial-scale=1.0">
    <title>Document</title>
</head>
<body>
    <h1>문서를 열면 팝업 창이 화면 중앙에 표시됩니다.</h1>
    <script>
        function openCenter(doc, win, w, h){
            var left = (screen.availWidth-w) / 2; // 팝업 창의 왼쪽 좌표
            var top = (screen.availHeight-h) / 2; // 팝업 창의 위쪽 좌표
            var opt = "left=" + left + ", top = " + top + ", width = " + w + ", height = " +h;
            window.open(doc, win, opt);
        }
        openCenter("_03_javascriptQuiz6.html", "pop", 500, 400);
    </script>
</body>
</html>
❗ 위 Quiz1에 닫기 버튼 추가 하였음
🎲Quiz3

<!DOCTYPE html>
<html lang="ko">
<head>
    <meta charset="UTF-8">
    <meta name="viewport" content="width=device-width, initial-scale=1.0">
    <title>Document</title>
    <style>
        body{
            font-size: 2.5em;
        }
        h1{
            border: 1px solid black;
            background-color: cyan;
        }
    </style>
</head>
<body>
    <h1>당첨자 발표</h1>
    <script>
        var inputNum = prompt("전체 응모자 수 : ")
        var boom = Math.floor(Math.random()*inputNum);

        document.write("<p>전체 응모자 수 : " + inputNum + "명</p>");
        document.write("<p>당첨자 : " + boom + "번</p>");
    </script>
</body>
</html>
🎲Quiz4
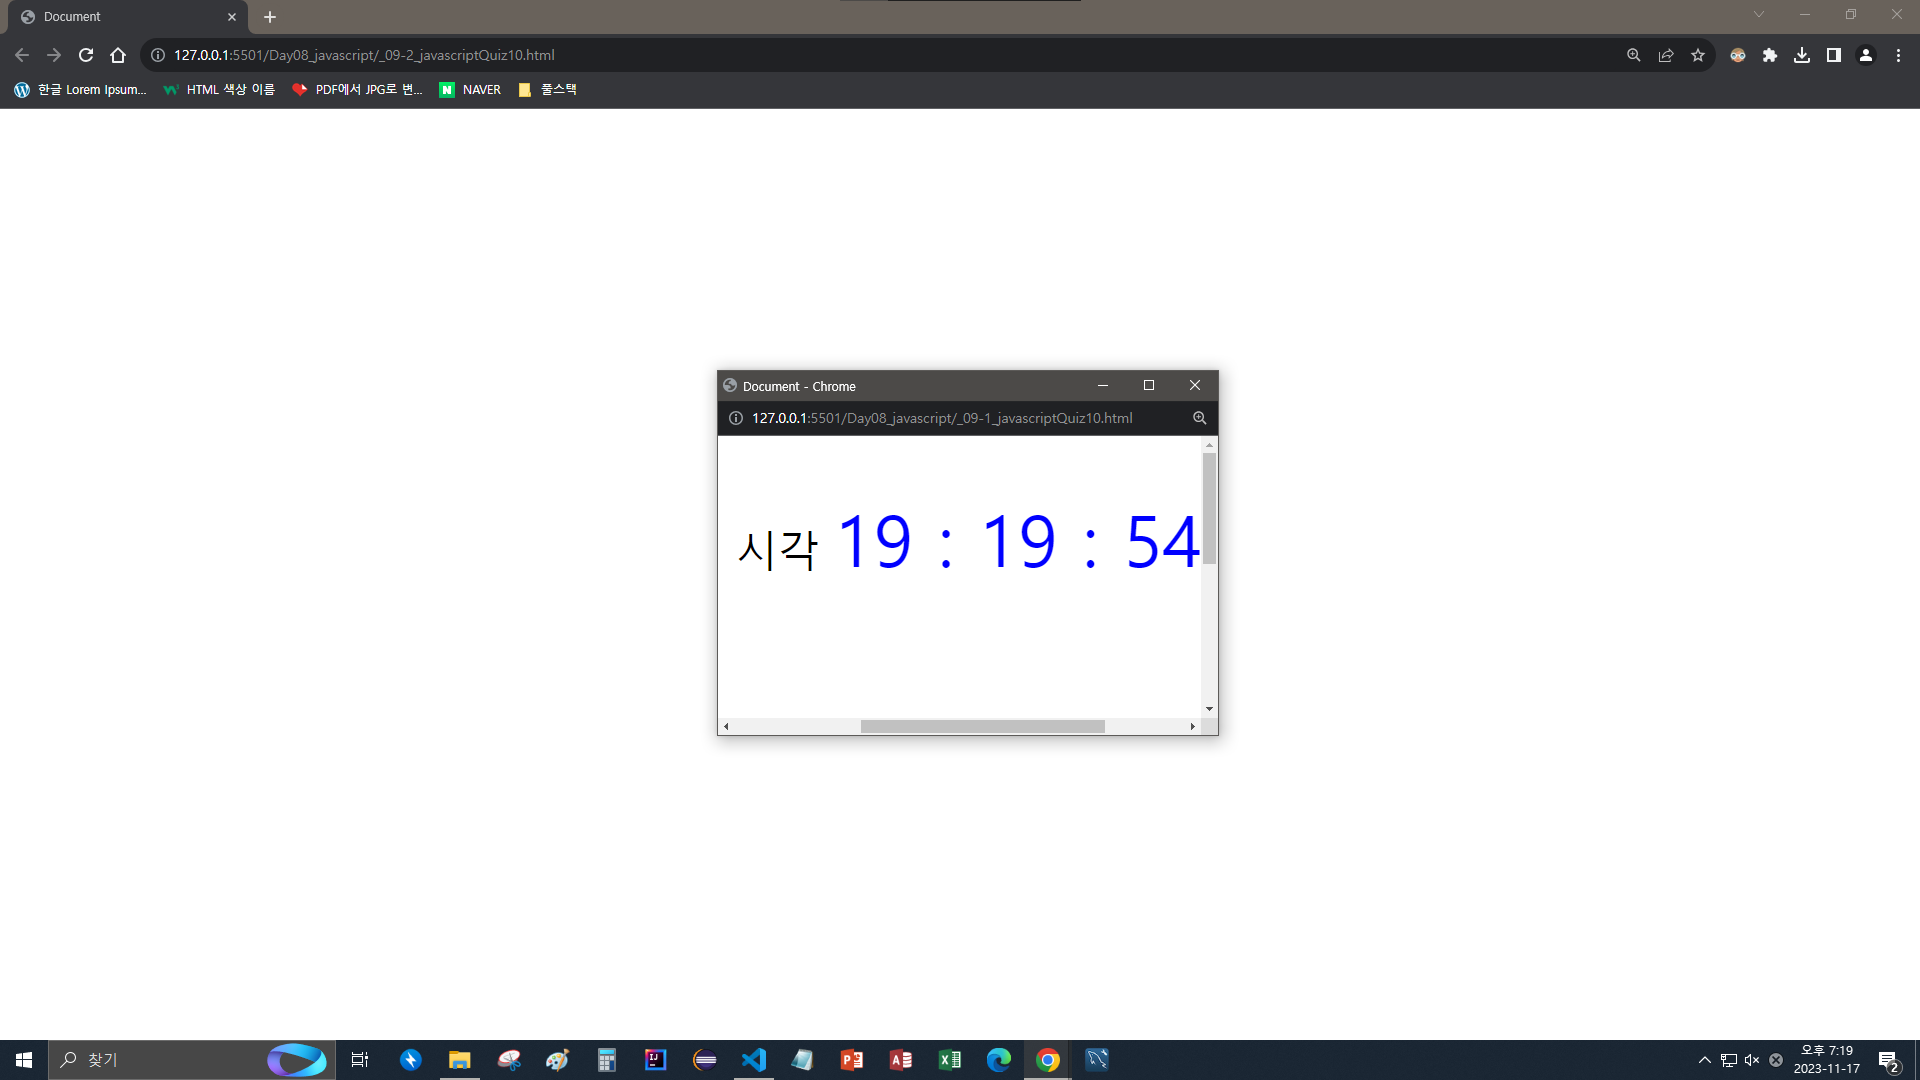
setinterval(a, 1000);: 1000밀리초 (1초) 단위로 갱신
<!DOCTYPE html>
<html lang="ko">
<head>
    <meta charset="UTF-8">
    <meta name="viewport" content="width=device-width, initial-scale=1.0">
    <title>Document</title>
    <style>
        #container{
            width: 500px;
            height: 300px;
            margin: 30px auto;
            text-align: center;
        }
        span{
            font-size: 1.7em;
            color: blue;
        }
        p{
            font-size: 1.5em;
        }
        .display{
            width: 500px;
            height: 300px;
        }
    </style>
</head>
<body>
    <div id = "container">
    <!-- <button>현재 시간 보기</button> -->
    <p>현재 시각 <span id = "current" class = "display"></span></p>
    <script>
        setInterval(now, 1000);


        function now(){
            var time = new Date();
            var hr = time.getHours();
            var min = time.getMinutes();
            var sec = time.getSeconds();

            var currentTime = hr + " : " + min + " : " + sec
            document.querySelector("#current").innerHTML = currentTime;

            console.log(time.toLocaleTimeString()); //이거 쓰면 됐는데 하..
        }
    </script>
    </div>
</body>
</html>
<!DOCTYPE html>
<html lang="ko">
<head>
<meta charset="UTF-8">
<meta name="viewport" content="width=device-width, initial-scale=1.0">
<title>Document</title>
</head>
<body>
<script>
function openCenter(doc, win, w, h){
var left = (screen.availWidth-w) / 2; // 팝업 창의 왼쪽 좌표, 나누기 2 => 중간
var top = (screen.availHeight-h) / 2; // 팝업 창의 위쪽 좌표, 나누기 2 => 중간
var opt = "left=" + left + ", top = " + top + ", width = " + w + ", height = " +h;
window.open(doc, win, opt);
}
openCenter("_09-1_javascriptQuiz10.html", "pop", 500, 300);
</script>
</body>
</html>📖문서 객체 모델 알아보기
웹 문서를 해석할 DOM 구조를 생각할 수 있어야 자바스크립트를 이용하여 객체에 접근, 원하는 부분을 수정하기 편함
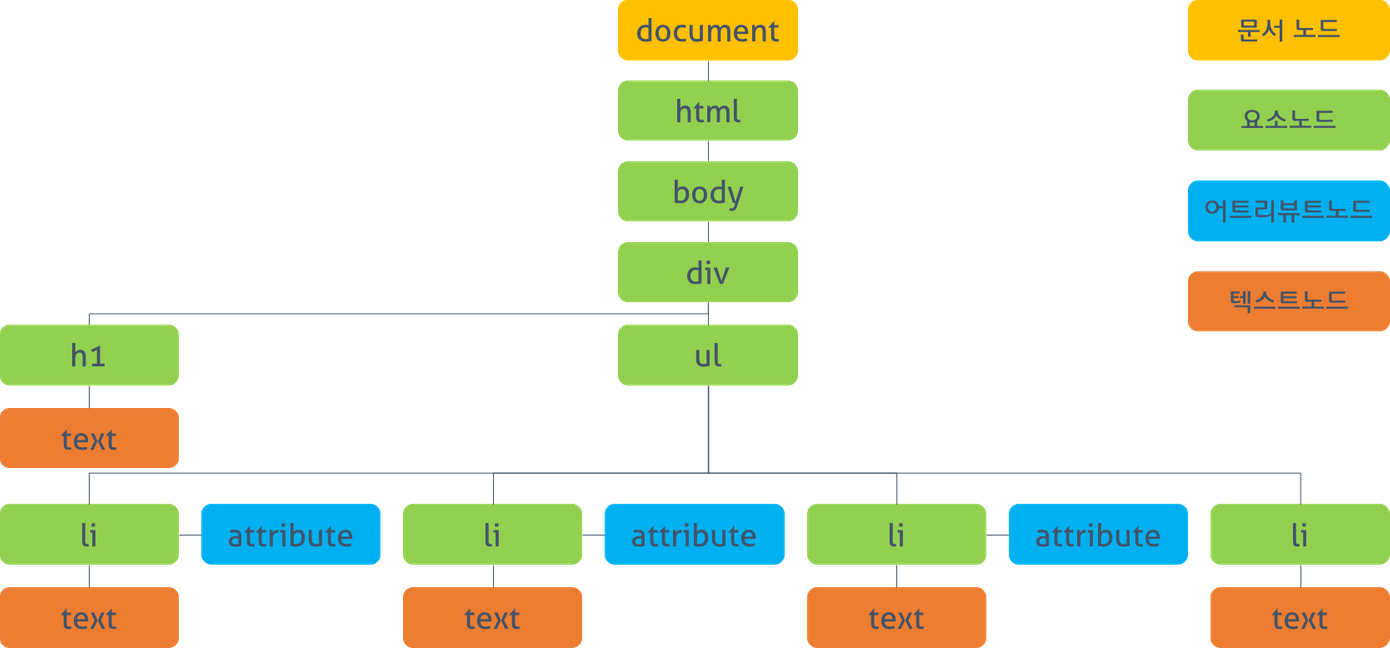
📌문서 객체 모델(DOM)이란
자바스크립트를 이용하여 웹 문서에 접근하고 제어할 수 있도록 객체를 사용해 웹 문서를 체계적으로 정리하는 방법, HTML 언어로 작성한 웹 문서의 DOM을 HTML DOM이라고 한다.
📌DOM 트리
- 모든 HTML 태그는 요소 노드이다
- HTML 태그에서 사용하는 텍스트 내용은 자식 노드인 텍스트 노드이다
- HTML 태그에 있는 속성은 자식 노드인 속성 노드이다
- 주석은 주석 노드이다
⭐📖DOM 요소에 접근하고 속성 가져오기⭐
📌DOM에 접근하기
📍id 선택자로 접근
document.getElementById("id명")
📍class 선택자로 접근
document.getElementByClass("class명")
📍태그 이름으로 접근
document.getElementByTagName("태그명")
📍querySelector
querySelector("#heading") // id="heading"인 요소
querySelectorAll(".bright") // class = "bright"인 요소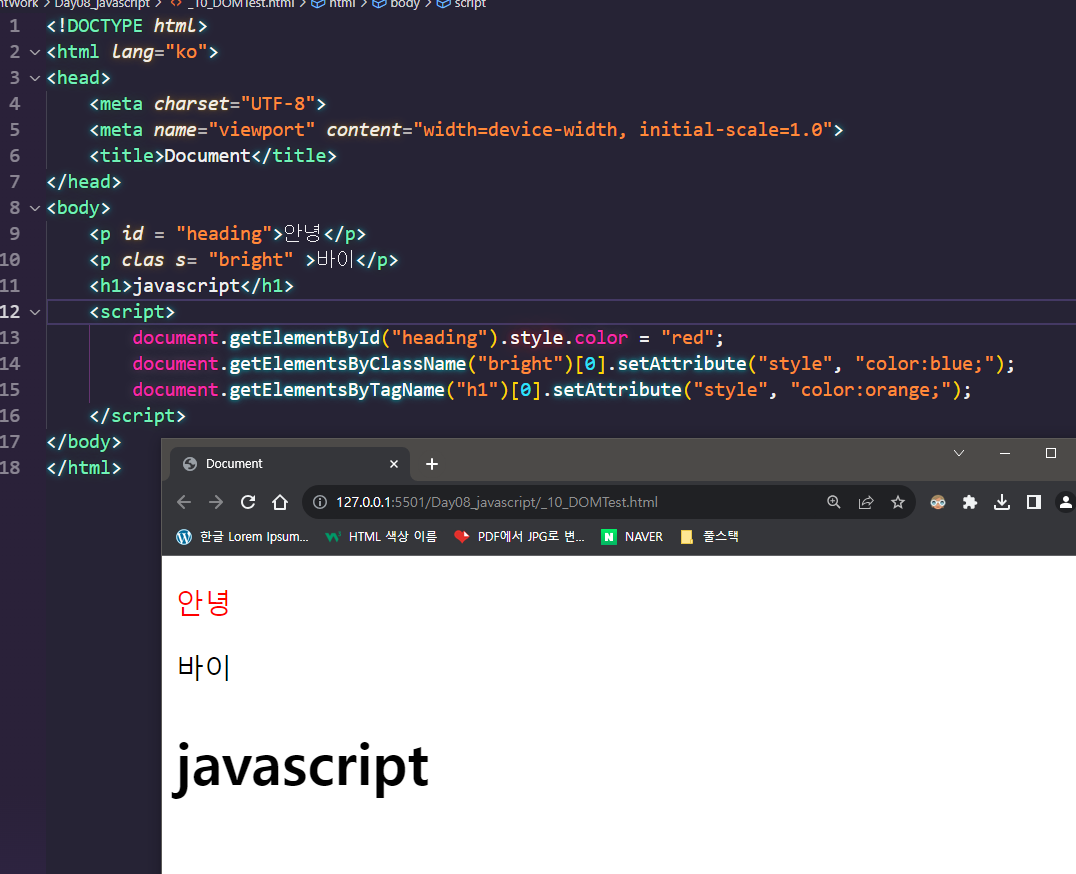
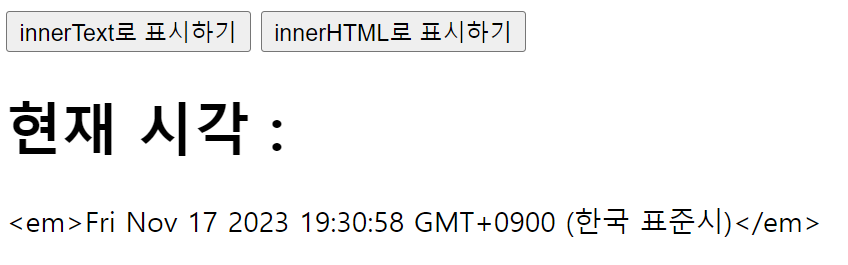
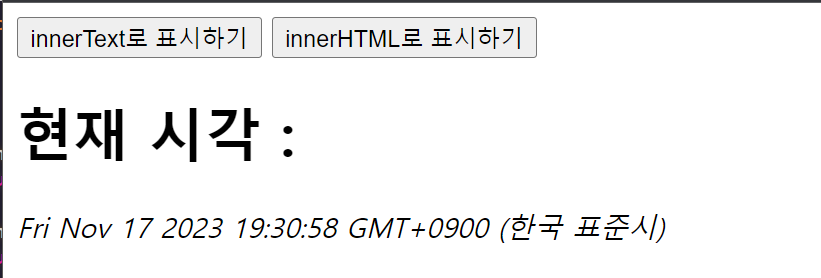
📌innerText, innerHTML 프로퍼티
웹 요소의 내용을 수정
요소명.innerText= 내용요소명.innerHTML= 내용
<!DOCTYPE html>
<html lang="ko">
<head>
<meta charset="UTF-8">
<meta name="viewport" content="width=device-width, initial-scale=1.0">
<title>Document</title>
</head>
<body>
<button onclick="inntext()">innerText로 표시하기</button>
<button onclick="innhtml()">innerHTML로 표시하기</button>
<h1>현재 시각 : </h1>
<div id = "current"></div>
<script>
var now = new Date();
function inntext(){
document.getElementById("current").innerText = "<em>" + now + "</em>";
}
function innhtml(){
document.getElementById("current").innerHTML = "<em>" + now + "</em>";
}
</script>
</body>
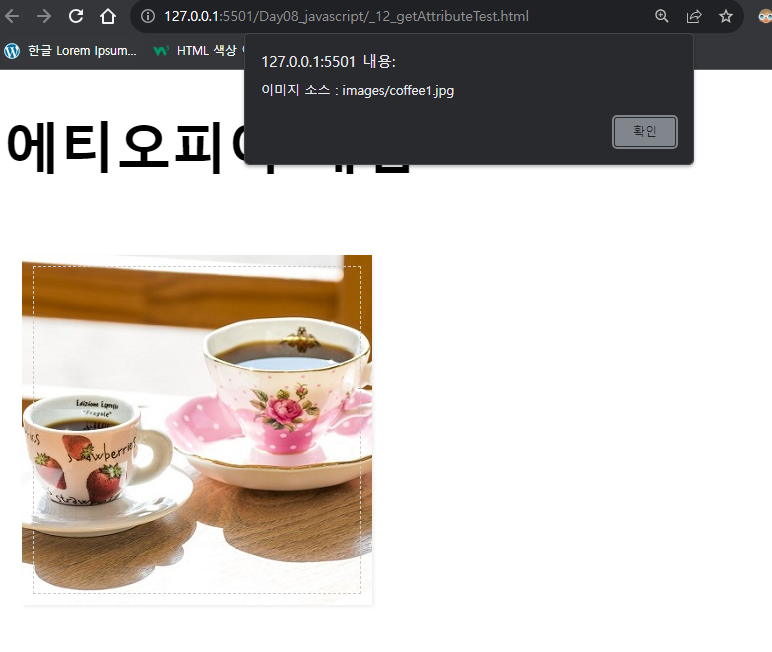
</html>📌getAttribute(), setAttribute() 메서드
속성을 가져오거나 수정
getAttribute("속성명")setAttribute("속성명", "값")
<!DOCTYPE html>
<html lang="ko">
<head>
<meta charset="UTF-8">
<meta name="viewport" content="width=device-width, initial-scale=1.0">
<title>Document</title>
<style>
#container {
width:600px;
margin:0 auto;
}
#prod-pic, #desc {
float:left;
}
#prod-pic {
margin:20px 20px auto 10px;
padding:0;
}
#cup {
box-shadow:1px 1px 2px #eee;
outline:1px dashed #ccc;
outline-offset: -7px;
}
#small-pic {
margin-top:20px;
list-style: none;
padding:0;
}
#small-pic > li {
float:left;
margin-right:10px;
}
.small {
width:60px;
height:60px;
}
#small-pic img:hover {
cursor:pointer;
}
#desc {
width:300px;
padding-top:20px;
margin-bottom:50px;
}
.bluetext {
color:#4343ff;
font-weight:bold;
}
#desc button {
margin-top:20px;
margin-bottom:20px;
width:100%;
padding:10px;
}
#desc ul {
list-style:none;
}
#desc li{
font-size:0.9em;
line-height:1.8;
}
#desc a {
text-decoration: none;
font-size:0.9em;
color:blue;
padding-left:40px;
}
hr {
clear:both;
border:1px dashed #f5f5f5;
}
#detail {
padding-top:20px;
display:none;
}
#detail li {
font-size:0.9em;
line-height:1.4;
}
h1 {
font-size:2em;
}
h2 {
font-size:1.5em;
color:#bebebe;
font-weight:normal;
}
h3 {
font-size:1.1em;
color:#222;
}
p {
font-size:0.9em;
line-height:1.4;
text-align: justify;
}
</style>
</head>
<body>
<div id = "container">
<h1 id = "heading">에티오피아 게뎁</h1>
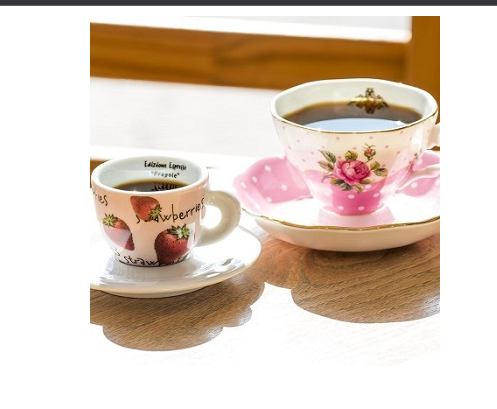
<div id = "prod-pic">
<img src = "images/coffee1.jpg" alt = "에티오피아 게뎁" id = "cup" width="200px"
height="200px" onclick="displaySrc()">
</div>
</div>
<script>
function displaySrc(){
var cup = document.querySelector("#cup");
alert("이미지 소스 : " + cup.getAttribute("src"));
}
</script>
</body>
</html>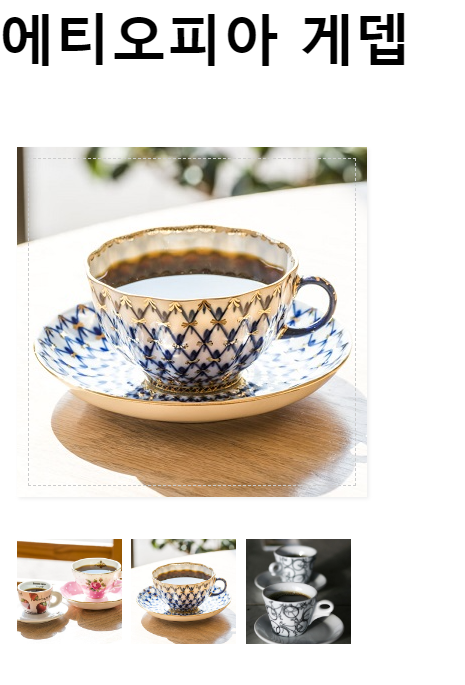
<!DOCTYPE html>
<html lang="ko">
<head>
<meta charset="UTF-8">
<meta name="viewport" content="width=device-width, initial-scale=1.0">
<title>Document</title>
<style>
#container {
width:600px;
margin:0 auto;
}
#prod-pic, #desc {
float:left;
}
#prod-pic {
margin:20px 20px auto 10px;
padding:0;
}
#cup {
box-shadow:1px 1px 2px #eee;
outline:1px dashed #ccc;
outline-offset: -7px;
}
#small-pic {
margin-top:20px;
list-style: none;
padding:0;
}
#small-pic > li {
float:left;
margin-right:10px;
}
.small {
width:60px;
height:60px;
}
#small-pic img:hover {
cursor:pointer;
}
#desc {
width:300px;
padding-top:20px;
margin-bottom:50px;
}
.bluetext {
color:#4343ff;
font-weight:bold;
}
#desc button {
margin-top:20px;
margin-bottom:20px;
width:100%;
padding:10px;
}
#desc ul {
list-style:none;
}
#desc li{
font-size:0.9em;
line-height:1.8;
}
#desc a {
text-decoration: none;
font-size:0.9em;
color:blue;
padding-left:40px;
}
hr {
clear:both;
border:1px dashed #f5f5f5;
}
#detail {
padding-top:20px;
display:none;
}
#detail li {
font-size:0.9em;
line-height:1.4;
}
h1 {
font-size:2em;
}
h2 {
font-size:1.5em;
color:#bebebe;
font-weight:normal;
}
h3 {
font-size:1.1em;
color:#222;
}
p {
font-size:0.9em;
line-height:1.4;
text-align: justify;
}
</style>
</head>
<body>
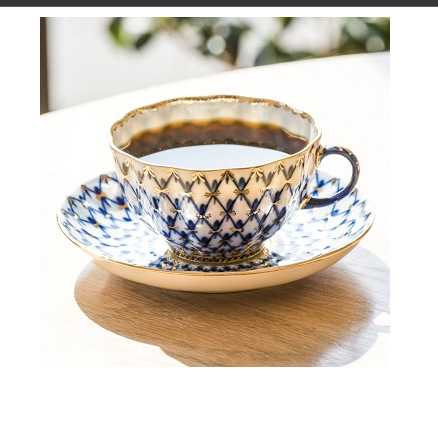
<div id = "container">
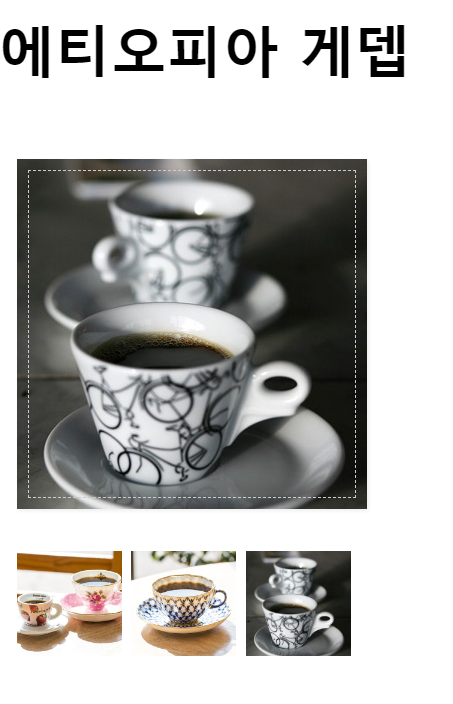
<h1 id = "heading">에티오피아 게뎁</h1>
<div id = "prod-pic">
<img src = "images/coffee1.jpg" alt = "에티오피아 게뎁" id = "cup" width="200px"
height="200px" onclick="displaySrc()">
<div id = "small-pic">
<img src = "images/coffee1.jpg" class = "small">
<img src = "images/coffee2.jpg" class = "small">
<img src = "images/coffee3.jpg" class = "small">
</div>
</div>
</div>
<script>
var smallPics = document.getElementsByClassName("small"); // 배열로 가져옴
console.log(smallPics.length) // 3
for(let i = 0; i<smallPics.length; i++){
smallPics[i].addEventListener("click", changePic);
//나중에 배움, 클릭하면 changePic으로
}
var cup = document.querySelector("#cup"); // displaySrc, changePic 둘 다 쓰니까 밖으로 뺌
function displaySrc(){
alert("이미지 소스 : " + cup.getAttribute("src"));
}
function changePic(){
cup.setAttribute("src", this.src);
//this를 붙여서 같은 함수에서 몇개를 사용해도 문제 없음
//this : 해당 함수 호출 방식에 따라 this에 바인딩 되는 객체가 달라짐
}
</script>
</body>
</html>📖DOM에서 이벤트 처리하기
📌DOM 요소에 함수 직접 연결하기
📌함수 이름을 사용해 연결하기
📌DOM의 event 객체 알아보기

👉 event 는 없어도 실행되지만 헷갈림을 방지하기 위해 넣었다
📌addEventListener() 메서드 사용하기

👉 이미지위에 마우스포인터가 없을 때
👉 이미지위에 마우스포인터가 있을 때
<!DOCTYPE html>
<html lang="ko">
<head>
<meta charset="UTF-8">
<meta name="viewport" content="width=device-width, initial-scale=1.0">
<title>Document</title>
<style>
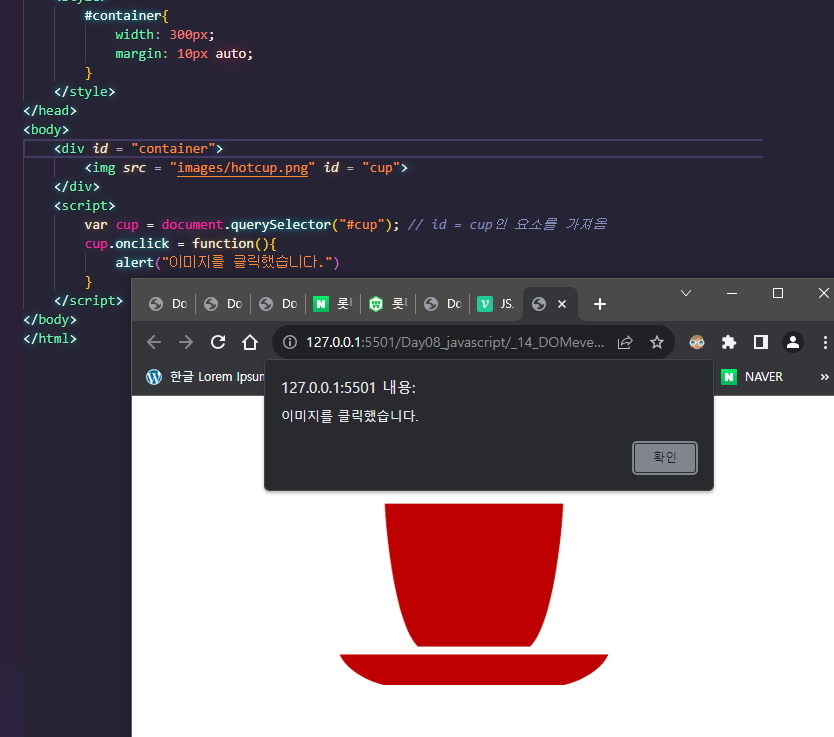
#container{
width: 300px;
margin: 10px auto;
}
</style>
</head>
<body>
<div id = "container">
<img src = "images/coffee1.jpg" id = "cover">
</div>
<script>
var cover = document.getElementById("cover");
cover.addEventListener("mouseover", changePic, false); //자식들한테 이벤트 전부 적용은 true
cover.addEventListener("mouseout", originPic, false); // 나만 이벤트 적용은 false
function changePic(){
cover.src = "images/coffee2.jpg";
}
function originPic(){
cover.src = "images/coffee1.jpg";
}
</script>
</body>
</html>📌CSS 속성에 접근하기
document.요소명.style.속성명
<!DOCTYPE html>
<html lang="ko">
<head>
<meta charset="UTF-8">
<meta name="viewport" content="width=device-width, initial-scale=1.0">
<title>Document</title>
<style>
#container{
width: 400px;
margin: 50px auto;
text-align: center;
}
#rect{
width: 100px;
height: 100px;
border: 1px solid #222;
margin: 30px auto;
transition: 1s;
}
</style>
</head>
<body>
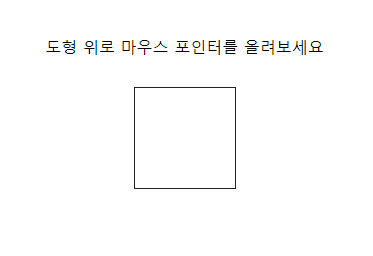
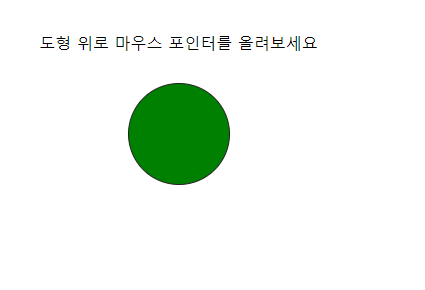
<div id = "container">
<p>도형 위로 마우스 포인터를 올려보세요</p>
<div id = "rect"></div>
</div>
<script>
var myRect = document.querySelector("#rect");
myRect.addEventListener("mouseover", function(){
myRect.style.backgroundColor = "green";
myRect.style.borderRadius = "50%";
});
myRect.addEventListener("mouseout", function(){
myRect.style.backgroundColor = "";
myRect.style.borderRadius = "";
});
</script>
</body>
</html>📖DOM에서 노드 추가/삭제하기
CSS의
display속성을 사용해 만들 수도 있지만DOM 트리에 새로운 노드를 추가/삭제 하는 방법도 있다.
📌노드 리스트란
DOM에 접근 할 때document.querySelectorAll();메서드를 사용하면 노드를 한꺼번에 가져오는데 이때 노드 정보를 여러 개 저장한 것이노드리스트이다. 노드를 추가하면 단순히 요소 노드뿐 아니라 텍스트, 속성 노드도 함께 추가해야 한다는 것이다.
📍새로운 노드 추가 과정
DOM트리 원칙에 따라 어떠한 태그를 노드로 추가한다면 단순히 태그에 해당하는 요소 노드뿐만 아니라 텍스트 노드와 속성 노드도 추가해야 한다.
<img>태그를 요소로 추가한다면src,alt의 노드도 추가된다. 따라서 사용하는 속성에 따라 더 많은 노드가 추가된다. 그래서 새 노드를 추가할 때는 웹 문서에 어떤 소스를 추가할지 생각하고 그에 따른 요소 노드, 텍스트 노드, 속성 노드 등을 만들어야 한다
📌텍스트 노드를 사용하는 새로운 요소 추가하기
- 요소 노드 만들기 -
createElement()- 텍스트 노드 만들기 -
createTextNode()- 자식 노드 연결하기 -
appendChild()- 전체 소스코드 완성하기
📌속성값이 있는 새로운 요소 추가하기
- 요소 노드 만들기 -
createElement()- 속성 노드 만들기 -
createAttribute()- 속성 노드 연결하기 -
setAttributeNode()- 자식 노드 연결하기 -
appendChild()- 전체 소스 코드 완성하기
👁🗨Quiz
🎲Quiz1
👉 클릭 안 했을 때
👉 클릭 했을 때
<!DOCTYPE html>
<html lang="ko">
<head>
<meta charset="UTF-8">
<meta name="viewport" content="width=device-width, initial-scale=1.0">
<title>Document</title>
<style>
#container{
width: 300px;
margin: 10px auto;
}
</style>
</head>
<body>
<div id = "container">
<img src = "images/coffee1.jpg" id = "cover">
</div>
<script>
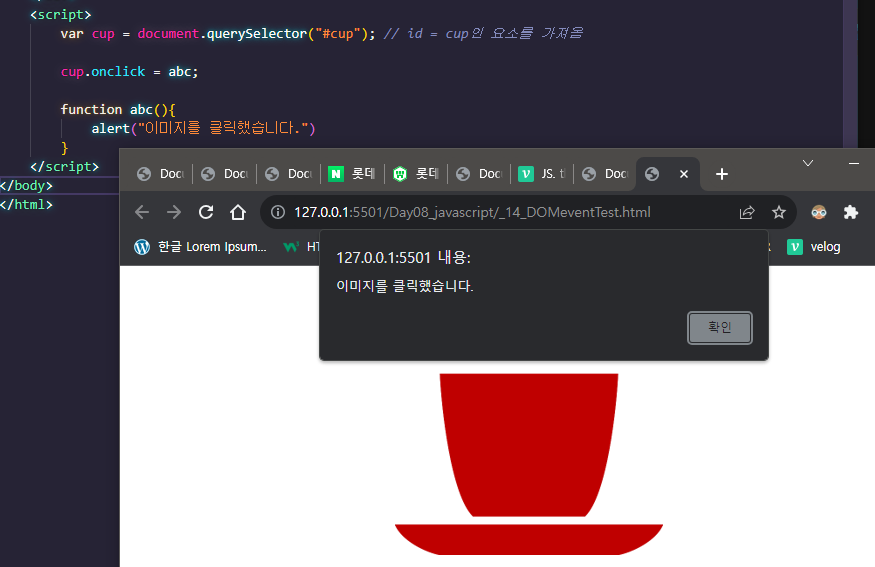
var cover = document.getElementById("cover");
cover.onclick = function(){
console.log(typeof cover.getAttribute("src")); // string
if(cover.getAttribute("src") == "images/coffee1.jpg"){
cover.setAttribute("src", "images/coffee2.jpg")
}
else{
cover.setAttribute("src", "images/coffee1.jpg")
}
}
</script>
</body>
</html>🎲Quiz2
👉 CSS, JS외부 파일 연결하기
🎲Quiz3
<!DOCTYPE html>
<html lang="ko">
<head>
<meta charset="UTF-8">
<meta name="viewport" content="width=device-width, initial-scale=1.0">
<title>Document</title>
<style>
ul{
list-style: none;
}
li{
font-size: 30px;
line-height: 60px;
}
.check{
color: gray;
font-size: 25px;
margin-right: 35px;
}
</style>
</head>
<body>
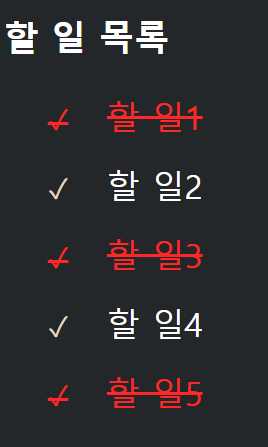
<h1>할 일 목록</h1>
<ul>
<!-- %check; 는 v 체크 마크 -->
<li><span class = "check">✓</span>할 일1</li>
<li><span class = "check">✓</span>할 일2</li>
<li><span class = "check">✓</span>할 일3</li>
<li><span class = "check">✓</span>할 일4</li>
<li><span class = "check">✓</span>할 일5</li>
</ul>
<script>
// 다 가져오기
var checks = document.querySelectorAll(".check");
for(var i = 0; i<checks.length; i++){
// 체크 표시 클릭했을 때 이벤트 발생
checks[i].addEventListener("click", function(){
// 나의 색깔을 red
this.style.color = "red";
// 나의 부모의 색깔을 red로하고 빨간 줄 긋기
this.parentNode.style.color = "red";
this.parentNode.style.textDecoration = "line-through";
});
}
</script>
</body>
</html>👉 다시 클릭하면 삭제하기 만들어 보자
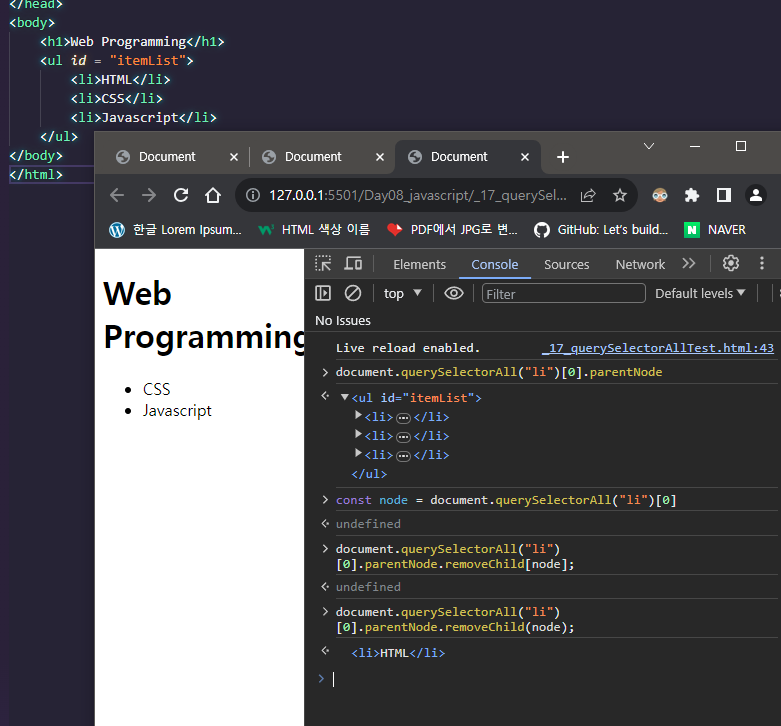
🎲Quiz4
<!DOCTYPE html>
<html lang="ko">
<head>
<meta charset="UTF-8">
<meta name="viewport" content="width=device-width, initial-scale=1.0">
<title>Document</title>
<style>
#container{
box-sizing: border-box;
width: 600px;
height: 600px;
margin: 50px auto;
}
form{
padding-left: 200px;
margin-bottom: 30px;
}
#contents{
padding-left: 200px;
}
input[type = "text"]{
width: 30px;
height: 20px;
text-align: center;
}
button{
margin-left: 10px;
}
table, td{
border: 1px solid #ccc;
border-collapse: collapse;
}
td{
padding: 10px;
}
</style>
</head>
<body>
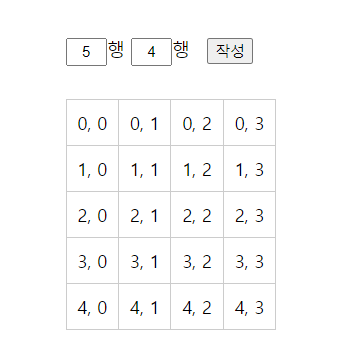
<div id = "container">
<form>
<input type="text" id = "rCount" value = "1">행
<input type="text" id = "cCount" value = "1">행
<button onclick = "drawTable(); return false;">작성</button>
</form>
<div id = "contents"></div>
</div>
<script>
function drawTable(){
var rCount = document.querySelector("#rCount").value;
var cCount = document.querySelector("#cCount").value;
var newTable = document.createElement("table");
for(i = 0; i <rCount; i++){
var newRow = document.createElement("tr");
for(j = 0; j < cCount; j++){
var newCell = document.createElement("td");
var cellText = document.createTextNode(i + ", " + j);
newCell.appendChild(cellText);
newRow.appendChild(newCell);
}
newTable.appendChild(newRow);
}
var contents = document.querySelector("#contents");
contents.appendChild(newTable);
}
</script>
</body>
</html>🎲Quiz5

👉 텍스트 필드에 입력 및 추가
👉 입력된 것을 누르면 삭제
<!DOCTYPE html>
<html lang="ko">
<head>
<meta charset="UTF-8">
<meta name="viewport" content="width=device-width, initial-scale=1.0">
<title>Document</title>
</head>
<body>
<div id = "container">
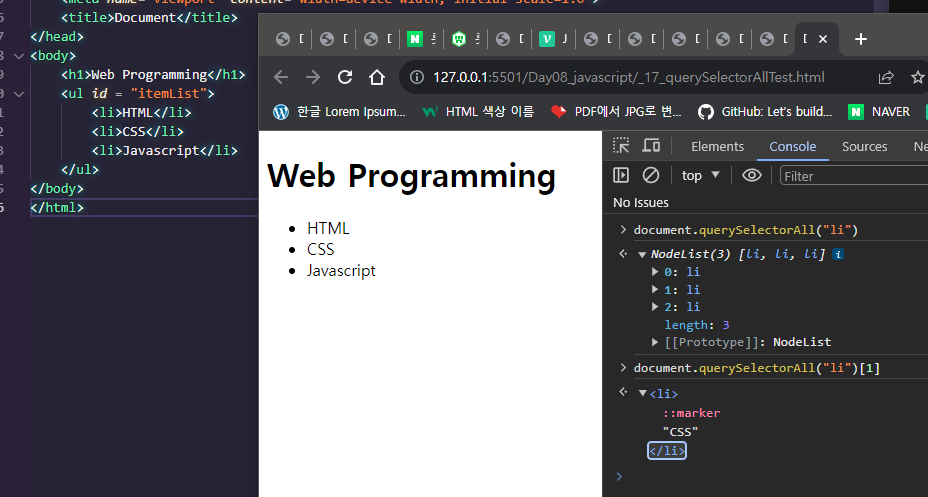
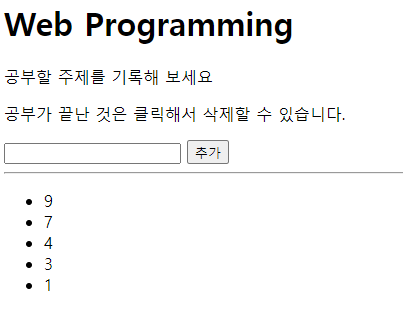
<h1>Web Programming</h1>
<p>공부할 주제를 기록해 보세요</p>
<p>공부가 끝난 것은 클릭해서 삭제할 수 있습니다.</p>
<form action="">
<input type = "text" id = "subject" autofocus>
<button onclick="add(); return false;">추가</button>
<!-- return false; 한 번만 실행하고 끝냄 -->
<hr>
<ul id = "itemList"></ul>
</form>
</div>
<script>
//1. 추가
function add(){
var newItem = document.createElement("li");
var subject = document.querySelector("#subject"); //subject 객체
var newText = document.createTextNode(subject.value); //subject 객체의 값을 newText에 넣는다
newItem.appendChild(newText);
var itemList = document.querySelector("#itemList");
itemList.insertBefore(newItem, itemList.childNodes[0]);
// 새로운게 맨 위로 가도록 childNodes 0번째 인덱스에 newItem을 insertBefore
subject.value = ""; // input = "text" 를 비워 준다
//2. 삭제. 추가할 때 마다 삭제 이벤트가 붙어 있어야함, 함수를 따로 만들어주는게 베스트임
var items = document.querySelectorAll("li");
for(let i = 0; i<items.length; i++){
items[i].addEventListener("click", function(){ // 매개변수를 함수로 바로 정의
if(this.parentNode){
this.parentNode.removeChild(this); //나를 삭제한다.
}
});
}
}
</script>
</body>
</html>