🍃 Spring Tool Suite로 Spring MVC 개발하기

다시 한 번 실습해보면서, 내가 연습할 때 보려고 하는 정리(라 다소 난잡할 수 있음..;;;;;😥)
1. 기본 환경 설정
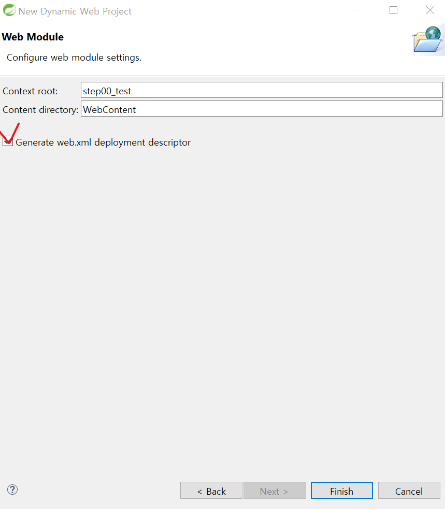
1) Dynamic Web Project 생성
생성 시 Generate web.xml deployment descriptor 체크 필수!!!
2) Convert to Maven Project : 메이븐 프로젝트로 변경
pom.xml에 필요 라이브러리 세팅
<properties>
	<java.version>1.8</java.version>
	<project.build.sourceEncoding>UTF-8</project.build.sourceEncoding>
	<project.reporting.outputEncoding>UTF-8</project.reporting.outputEncoding>
	<spring-framework.version>4.3.30.RELEASE</spring-framework.version>
</properties>

<dependencies>
	<!-- Spring MVC 즉 Spring 기반의 웹 개발에 필요한 필수 library -->
	<dependency>
		<groupId>org.springframework</groupId>
		<artifactId>spring-webmvc</artifactId>
		<version>${spring-framework.version}</version>
	</dependency>

	<!-- AOP 적용시에 필요한 추가 library - byte code를 실시간 동적으로 자동 생성해주는 기능의 library -->
	<dependency>
		<groupId>cglib</groupId>
		<artifactId>cglib</artifactId>
		<version>2.2.2</version>
	</dependency>

  	<!-- AOP 기능의 framework(aspectJ) - spring이 AOP 기술을  활용해서 spring 스럽게 활용 -->
	<dependency>
		<groupId>org.aspectj</groupId>
		<artifactId>aspectjweaver</artifactId>
		<version>1.7.3</version>
	</dependency>

	<!-- lombok을 통한 annotation 사용시 필요한 설정 -->
	<dependency>
		<groupId>org.projectlombok</groupId>
		<artifactId>lombok</artifactId>
		<version>1.18.8</version>
	</dependency>
</dependencies>
3) Add Spring Project Nature : 스프링 프로젝트 환경 설정
4) web.xml에 설정 추가
(WebContent/Web-INF/web.xml)
-
<welcome-file-list>는 대표 url 입력시 자동 실행되는 intro file명 설정 tag
여러 개를 해둘 필요없기 때문에 간략하게 수정 -
프론트 컨트롤러 역할을 할 DispatcherServelt 설정
front controller API 등록
<welcome-file-list>
	<welcome-file>index.html</welcome-file>
</welcome-file-list>

<servlet>
	<servlet-name>dispatcher</servlet-name>
 	<servlet-class>org.springframework.web.servlet.DispatcherServlet</servlet-class>
	<load-on-startup>1</load-on-startup>
</servlet>

<servlet-mapping>
 	<servlet-name>dispatcher</servlet-name>
  	<url-pattern>/</url-pattern>
</servlet-mapping>
2. Dispatcher Servlet 개발
1) WEB-INF 하단에 Spring Bean Configuration File 생성
- 파일 이름은
dispatcher-servlet.xml
web.xml에 servlet-name을 dispatcher로 해두었기 때문에 파일명 위와 같이 작성
servlet-name이 다를 경우 해당 부분을 미리 설정한 servlet-name으로 하여 작성 - XSD namespace declarations 선택
aop,beans,context(애노테이션),mvc체크

2) dispatcher-servlet.xml에 설정 추가
- 초기 실행 시 프론트 컨트롤러를 거치지 않고, 바로 index.html을 실행해주기 위한 설정
- 프론트 컨트롤러에 (서브) 컨트롤러 연동
- 컨트롤러 처리 결과를 랜더링 할 뷰를 결정하는 ViewResolver 설정
-prefix로 view를 저장할 위치 지정
-suffix로 view 파일 확장자 지정
- 파일명만 전달해주면 ViewResolver가 알아서 view 파일 찾을 수 있도록 미리 설정해두는 것
-"/WEB-INF/views/"외부 접근이 어렵기 때문에 보안 강화
<mvc:annotation-driven />
<mvc:default-servlet-handler/>

<context:component-scan base-package="controller"></context:component-scan>

<bean id="viewResolver" class="org.springframework.web.servlet.view.InternalResourceViewResolver">
	<property name="prefix" value="/WEB-INF/views/" />
	<property name="suffix" value=".jsp" />
</bean>
3. Java 코드 개발
1) controller 패키지 내부에 컨트롤러 클래스 생성
- 클래스 상단에
@Controller애노테이션을 붙여주어야 컨트롤러로 인식 - 프론트 컨트롤러에 (서브) 컨트롤러 연동시
base-package로 입력한 값을 패키지명으로 하여 내부에 컨트롤러 생성하여야 연동 가능 - 내부에 요청 처리 메소드 개발 (5. Controller 개발 상세)
2) model.domain 패키지 내부에 도메인 객체 클래스 생성
4. View 개발
1) html 개발
서버 실행시키면 가장 먼저 나오는 초기 화면(index.html) 개발
<a href="?"> 혹은 <button> 등으로 이동 url, queryString 등 요청 정보 설정
2) forward 방식 이동시, 연동될 view 개발
- prefix, suffix 설정을 기반으로 ViewResolver가 view 파일을 찾게 하려면,
prefix로 설정한 디렉토리에 view 파일을 개발해야함 - forward 방식이기 때문에(요청/응답 객체 유지) getAttribute()와 같은 ${requestScope.key}로 데이터 접근 가능
- getParameter()와 같은 ${param.key}로 데이터 접근 가능
3) redirect 방식 이동시, 연동될 view 개발
- prefix, suffix와 상관없이 컨트롤러에서 return한 redirect 위치에 view 파일 개발
- redirect 방식이기 때문에(요청/응답 객체 재생성)
getParameter()와 같은 ${param.key}로만 데이터 접근 가능
4) 예외사항 발생시, 연동될 failView 개발
5. Controller 개발 상세
1) 애노테이션(@)
| 애노테이션 | 설명 |
|---|---|
| @Controller | 클래스 선언구에 붙여, 해당 클래스가 컨트롤러임을 명시 |
| @RequestMapping | 개별 메소드 선언구에 붙여, 어떤 요청 로직을 처리하는 컨트롤러인지 명시 |
| @ModelAttribute | 메소드 내부 파라미터 앞에 붙여, 해당 파라미터를 request 객체에 자동 저장, 파라미터로 받은 key 값으로 @SessionAttribute에 등록된 세션 값과 바인딩, 메소드 내부에서 해당 값 사용 가능 컨트롤러에서 query string으로 받은 값으로 자동 생성한 객체를 이동한 페이지에서도 접근 가능 |
| @ExceptionHandler | 메소드 선언구에 붙여, 예외 처리 전담 메소드 개발 |
2) API
| API | 설명 |
|---|---|
| ModelAndView | 메소드 반환 타입으로 사용하여, 데이터(모델)과 viewName을 설정하여 viewResolver에 전달, forward 방식 이동만 가능 |
| Model | 메소드 파라미터로 사용하여, request 객체처럼 사용model.addAttribute("key","value"); → ${requestScope.key} |
| RedirectAttribute | 메소드 파라미터로 사용하여, redirect 방식 이동시에도 query string을 구성하여 데이터 전송 가능 attr.addAttribute("key", "value"); → ${param.key} |
3) 개발 코드
@Controller //Controller로 명시
public class Step01Controller {

	@RequestMapping("hello1")
	public String m1() {
		System.out.println("m1() =====");

		return "redirect:step01redirectView.jsp"; //redirect 방식 이동
	}


	@RequestMapping("hello2")
	public ModelAndView m2() {
		System.out.println("m2() =====");

		ModelAndView mv = new ModelAndView();
		mv.setViewName("step01hello2"); //이동할 view의 파일명
		mv.addObject("data1", "엔코아"); //model에 저장할 값(key=value)
		mv.addObject("data2", "playdata");

		return mv; //ModelAndView 객체 return → forward 방식 이동
	}


	//예외 발생 (아래 예외 처리 전담 메소드 개발을 위해 필요한 메소드)
	@RequestMapping("hello3")
	public String m3() throws Exception {
		System.out.println("m3() =====");

		if(true) {
			throw new Exception("삐뽀- 예외 발생");
		}
		return null;
	}
	//예외 처리 전담 메소드
	@ExceptionHandler
	public String handler(Exception e) {
		System.out.println("예외 처리 완료 > " + e.getMessage());

		return "redirect:failView.jsp";
	}


	@RequestMapping("hello4")
	public String m4(RedirectAttributes attr) { //redirect 임에도 이동되는 view에 데이터 전송
		System.out.println("m4() =====");

 		//RedirectAttributes 객체에 attribute 저장, query string 구성하여 데이터 전송
   		//이동된 view에서는 getParameter("key"), ${params.key}로 데이터 접근
		attr.addAttribute("key", "value");

		return "redirect:step04redirectView.jsp"; //redirect 방식 이동
	}


	@RequestMapping("hello5")
	public ModelAndView m5() {
		System.out.println("m5() =====");

		ModelAndView mv = new ModelAndView();
		mv.setViewName("step01hello5");

  		//setAttribute("key", "value") 처럼 사용
  		//이동된 view에서는 getAttribute("key"), ${requestScope.key}로 데이터 접근
		mv.addObject("newData", "서버에서 새로 저장한 데이터 값");

		return mv;
	}


	/*
	 * 1. client가 전송한 데이터인 query sting의 key와 dto 클래스의 모든 멤버 변수명이 일치할 경우,
  	 *    메소드의 parameter 선언만으로 dto 객체가 생성됨!!!!!!
	 * 2. String 반환시 return 문장에 redirect 표현이 없을 경우,
	 *    디폴트으로 forward 방식으로 이동!!!
	 * 3. forward로 이동했기 때문에 이동된 jsp에서는 요청객체/응답객체 공유(유지),
	 *    getParameter(), getAttribute() 둘 다 사용 가능
	 */
	@RequestMapping("hello6")
	public String m6(Customer cust) {
		System.out.println("m6() ===== " + cust.getId());

		return "step01hello6";
  		//redirect 안쓰면 디폴트로 포워드
		//forward : WEB-INF/views/step01hello6.jsp
	}


	@RequestMapping("hello7")
	public String m7(Model model) { //request 객체처럼 사용
		System.out.println("m7() ===== " + model);

		model.addAttribute("key", "값이다요~");
		//request.setAttribute("key", "값이다요~");
		//이동된 view에서는 getAttribute("key"), ${requestScope.key}로 데이터 접근

		return "step01hello7";
	}


	//Customer 객체를 자동 생성 후에 jsp에서도 사용 가능하도록 설정
	//m6() : Customer 객체 자동 생성만 가능, jsp에서는 Customer 객체 사용 불가
	@RequestMapping("hello8")
	public String m8(@ModelAttribute("c1") Customer cust) {
  	//@ModelAttribute
  	//객체 생성과 동시에 Customer 생성
 	//request.setAttribute("c1", new Customer(id, age);로 저장
		System.out.println("m8() ===== " + cust.getId());

		return "step01hello8";
  		//디폴트 forward 방식 이동
 		//이동된 view에서는 ${requestScope.c1.id}, ${requestScope.c1.age}로 객체 접근 가능
	}
}
