Module 만들기
이전 포스트 에서 module 을 사용하는 방법에 대해 알아보았으니, 이번에는 module 을 직접 만들어 보겠다.
아래 그림처럼 AWS 의 public, private subnet 을 가지는 VPC 를 구성하는 module 을 만들어보자.
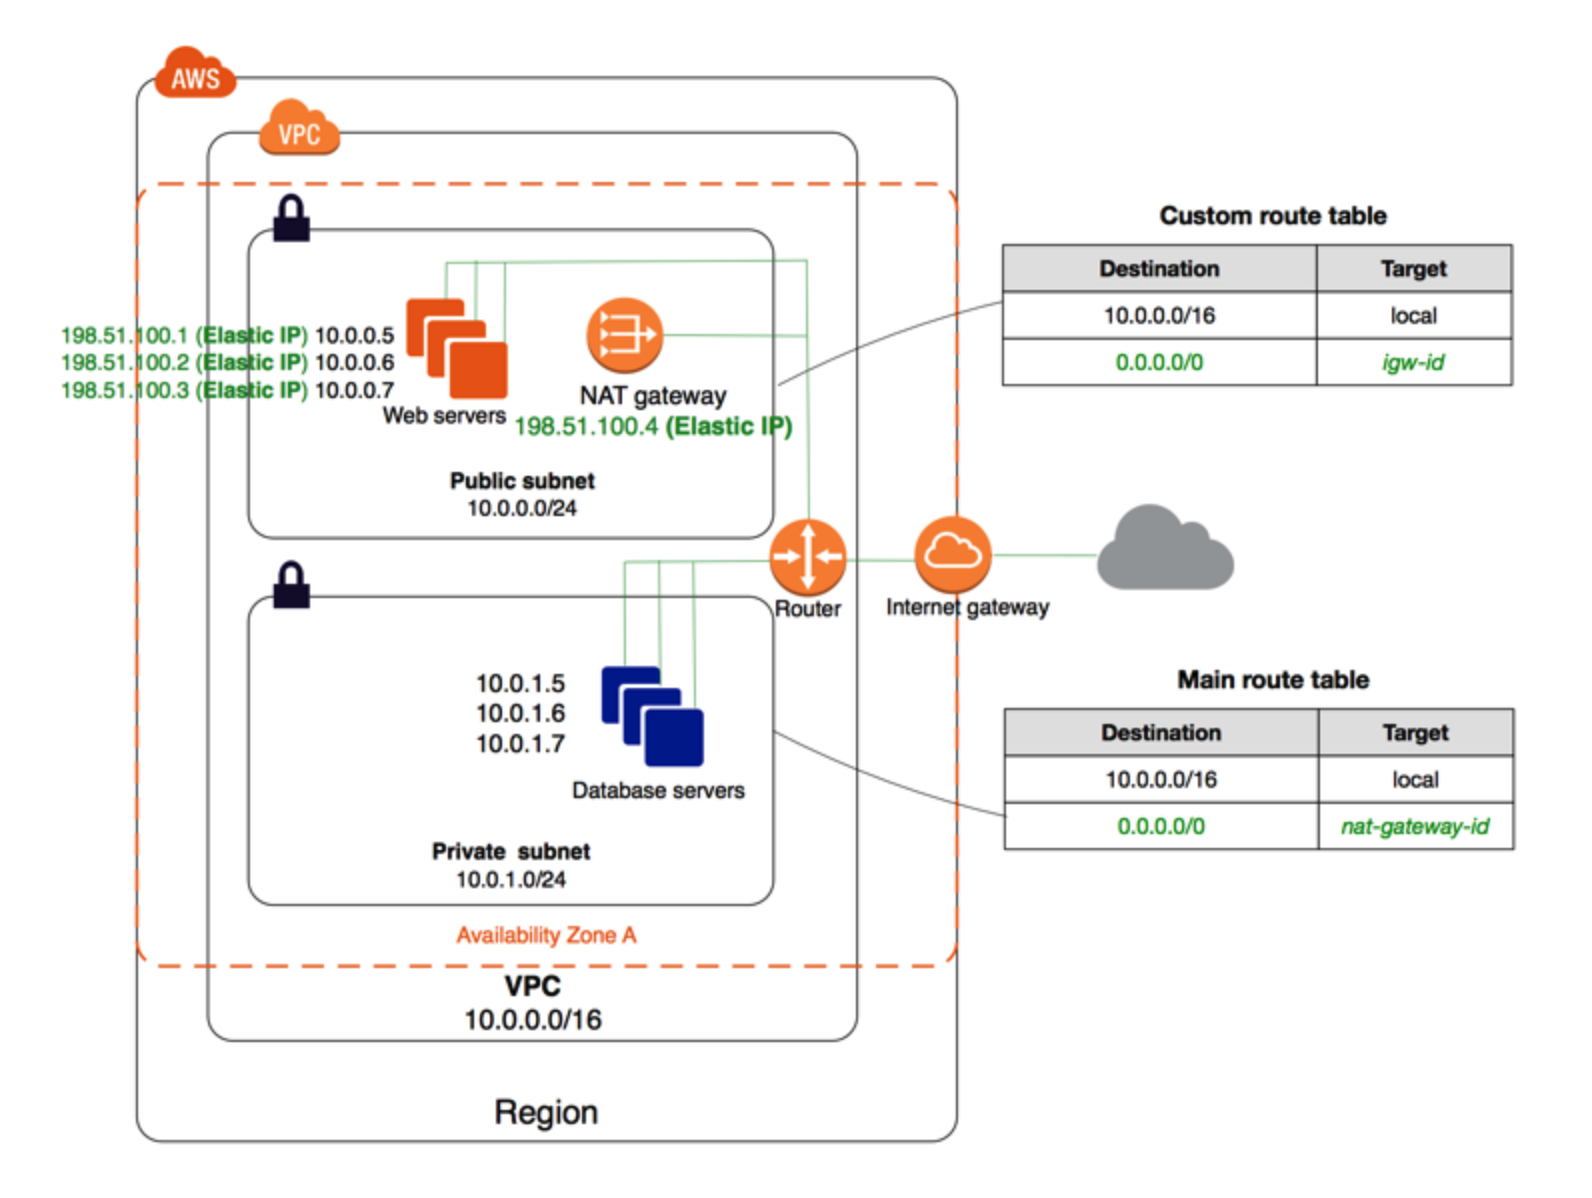
출처는 https://docs.aws.amazon.com/vpc/latest/userguide/VPC_Scenario2.html#Configuration-2 이고, web server 나 database server 의 구축은 생략하고 VPC 만 module 을 만들어 구성해 보도록 하겠다.
Module 만들기 example 구조
만들고자 하는 예제의 구조는 아래와 같다.
├── main.tf
├── outputs.tf
└── vpc
    ├── main.tf
    ├── outputs.tf
    └── variables.tf
Root module 은 main.tf, outputs.tf 로 구성되어 있고, VPC module (Child module) 은 main.tf, outputs.tf, variables.tf 파일들로 구성되어 있다.
VPC module
먼저 child module 인 VPC module 에 대해 살펴보자.
variables.tf
variable "vpc_cidr_block" {
  type = string
}

variable "public_subnet_cidr_block" {
  type = string
}

variable "private_subnet_cidr_block" {
  type = string
}
총 3개의(vpc_cidr_block, public_subnet_cidr_block, private_subnet_cidr_block) variables 를 선언했으며 각각 VPC, public subnet, private subnet 의 cidr block 정보로 사용 된다.
main.tf
resource "aws_vpc" "main" {
  cidr_block = var.vpc_cidr_block
}

resource "aws_subnet" "public" {
  vpc_id     = aws_vpc.main.id
  cidr_block = var.public_subnet_cidr_block
}

resource "aws_subnet" "private" {
  vpc_id     = aws_vpc.main.id
  cidr_block = var.private_subnet_cidr_block
}

resource "aws_internet_gateway" "main" {
  vpc_id = aws_vpc.main.id
}

resource "aws_eip" "nat" {
  vpc = true
}

resource "aws_nat_gateway" "main" {
  allocation_id = aws_eip.nat.id
  subnet_id     = aws_subnet.public.id
}

resource "aws_route_table" "public" {
  vpc_id = aws_vpc.main.id

  route {
    cidr_block = "0.0.0.0/0"
    gateway_id = aws_internet_gateway.main.id
  }
}

resource "aws_route_table" "private" {
  vpc_id = aws_vpc.main.id

  route {
    cidr_block      = "0.0.0.0/0"
    nat_gateway_id = aws_nat_gateway.main.id
  }
}

resource "aws_route_table_association" "public" {
  subnet_id      = aws_subnet.public.id
  route_table_id = aws_route_table.public.id
}

resource "aws_route_table_association" "private" {
  subnet_id      = aws_subnet.private.id
  route_table_id = aws_route_table.private.id
}
main.tf 에서 생성되고 있는 각각의 resource 들에 대해 간략하게 살펴보겠다.
aws_vpc- 사용하고자 하는 VPC 를 생성한다.aws_subnet- 총 2개의 (public, private) subnet 을 생성한다.aws_internet_gateway- public subnet 에서 Internet 과 연결을 위한 Internet gateway 를 생성한다.aws_eip- NAT gateway 에서 사용할 public IP 를 생성한다.aws_nat_gateway- private subnet 을 Internet 과 연결하기 위해 NAT gateway 를 생성한다.aws_route_table- Internet gateway 로 연결되는 public route table 과 NAT gateway 로 연결되는 private route table 을 생성한다.aws_route_table_association- 생성한 route table 을 각각 public, private subnet 에 연결시킨다.
outputs.tf
output "vpc_id" {
  value = aws_vpc.main.id
}

output "public_subnet_id" {
  value = aws_subnet.public.id
}

output "private_subnet_id" {
  value = aws_subnet.private.id
}
총 3개의 (vpc_id, public_subnet_id private_subnet_id) outputs 를 제공하며 각각 VPC, public subnet, private subnet 의 ID 정보를 나타낸다.
Root module
위에서 생성한 VPC module 을 Root module 에서 어떻게 사용하는지 확인해 보자.
main.tf
terraform {
  required_providers {
    aws = {
      source  = "hashicorp/aws"
      version = "3.27.0"
    }
  }
}

provider "aws" {
  region     = "ap-northeast-2"
}

module "vpc" {
  source                    = "./vpc"
  vpc_cidr_block            = "10.0.0.0/16"
  public_subnet_cidr_block  = "10.0.0.0/24"
  private_subnet_cidr_block = "10.0.1.0/24"
}
module 을 선언하고 이름을 vpc 로 지정하였고, source 에 우리가 VPC module 을 만든 경로를 명시하여 VPC module 을 사용하고 있다.
module block 내부에는 우리가 VPC module 을 만들때 variables.tf 파일을 사용하여 만든 input varialbes 의 값을 전달해 주고 있다.
모든 input variables 가 default 값이 명시되어 있지 않았으므로 module 사용 시 반드시 이 3개의 input variables 값을 명시해줘야 한다.
outputs.tf
output "vpc_id" {
  value = module.vpc.vpc_id
}

output "public_subnet_id" {
  value = module.vpc.public_subnet_id
}

output "private_subnet_id" {
  value = module.vpc.private_subnet_id
}
VPC module 의 outputs.tf 에 선언한 3개의 outputs 들을 root module 의 output 으로 사용하였다.
Root module 의 output 은 terraform apply 실행 시 화면에 출력된다.
실행해보기
이제 위에서 만든 example 을 terraform apply 를 통하여 실행해보자.
$ terraform apply

An execution plan has been generated and is shown below.
Resource actions are indicated with the following symbols:
  + create

Terraform will perform the following actions:

.............................
.............................
.............생략.............
.............................
.............................

Plan: 10 to add, 0 to change, 0 to destroy.

Changes to Outputs:
  + private_subnet_id = (known after apply)
  + public_subnet_id  = (known after apply)
  + vpc_id            = (known after apply)

Do you want to perform these actions?
  Terraform will perform the actions described above.
  Only 'yes' will be accepted to approve.

  Enter a value: yes

module.vpc.aws_eip.nat: Creating...
module.vpc.aws_vpc.main: Creating...
module.vpc.aws_eip.nat: Creation complete after 0s [id=eipalloc-0a21826635c51295e]
module.vpc.aws_vpc.main: Creation complete after 1s [id=vpc-03e4770c2d7b0868e]
module.vpc.aws_internet_gateway.main: Creating...
module.vpc.aws_subnet.private: Creating...
module.vpc.aws_subnet.public: Creating...
module.vpc.aws_subnet.private: Creation complete after 1s [id=subnet-0b4889567cc77817a]
module.vpc.aws_subnet.public: Creation complete after 1s [id=subnet-0ef1ae52c410480ef]
module.vpc.aws_nat_gateway.main: Creating...
module.vpc.aws_internet_gateway.main: Creation complete after 1s [id=igw-01757742674125cf1]
module.vpc.aws_route_table.public: Creating...
module.vpc.aws_route_table.public: Creation complete after 1s [id=rtb-09895b82c32852ee6]
module.vpc.aws_route_table_association.public: Creating...
module.vpc.aws_route_table_association.public: Creation complete after 0s [id=rtbassoc-028b8e80fcbcce4e0]
module.vpc.aws_nat_gateway.main: Still creating... [10s elapsed]
module.vpc.aws_nat_gateway.main: Still creating... [20s elapsed]
module.vpc.aws_nat_gateway.main: Still creating... [30s elapsed]
module.vpc.aws_nat_gateway.main: Still creating... [40s elapsed]
module.vpc.aws_nat_gateway.main: Still creating... [50s elapsed]
module.vpc.aws_nat_gateway.main: Still creating... [1m0s elapsed]
module.vpc.aws_nat_gateway.main: Still creating... [1m10s elapsed]
module.vpc.aws_nat_gateway.main: Still creating... [1m20s elapsed]
module.vpc.aws_nat_gateway.main: Still creating... [1m30s elapsed]
module.vpc.aws_nat_gateway.main: Still creating... [1m40s elapsed]
module.vpc.aws_nat_gateway.main: Still creating... [1m50s elapsed]
module.vpc.aws_nat_gateway.main: Creation complete after 1m56s [id=nat-01d06bebe8bd875f1]
module.vpc.aws_route_table.private: Creating...
module.vpc.aws_route_table.private: Creation complete after 1s [id=rtb-09cd8a95583a8d11f]
module.vpc.aws_route_table_association.private: Creating...
module.vpc.aws_route_table_association.private: Creation complete after 0s [id=rtbassoc-05769b0c464ad59f9]

Apply complete! Resources: 10 added, 0 changed, 0 destroyed.

Outputs:

private_subnet_id = "subnet-0b4889567cc77817a"
public_subnet_id = "subnet-0ef1ae52c410480ef"
vpc_id = "vpc-03e4770c2d7b0868e"
위의 결과처럼 우리가 만든 VPC module 의 resource 들이 생성되고, output 들이 화면에 출력되는 걸 확인할 수 있다.
마무리
지금까지 어떻게 module 을 만들고 사용하는지에 대해 예제를 통해 직접 확인해 보았다.
직접 모든 resource 들을 main.tf 에 나열해서 사용하기 보단, 각각 연관된 resource 들끼리 module 을 만들고, main.tf 에서 module 을 사용하여 resource 들을 생성한다면 코드도 더욱 깔끔해지고 관리하기에도 훨씬 편해진다.
당연하게도 우리가 만든 module 을 쉽게 재사용 하는 것도 가능하다.
아직 익숙하지 않다면 본인의 infrastructure 를 직접 module 로 만들어보며 연습해보길 추천한다!


이해가 잘 되게 정리해주셨네요! 감사합니다!