4주 프로젝트는 리액트 네이티브를 사용한 음악 어플리케이션이 될 것 같습니다.
그래서 노마드코더님의 강의로 간단한 연습을 해보려 합니다.
그렇게 어려운 부분은 없으니 간단간단한 설명만 적겠습니다.
구현은 강의를 참고하시고, 코드만 설명하도록 하겠습니다.
1. React Native
리액트 네이티브는 JavaScript로 android, ios 앱을 개발할 수 있다고 알려져 있습니다.
우리는 이를 더 쉽게 개발하기 위해 expo를 사용합니다.
expo는 create-react-native-app과 합쳐져서 아주 편리하게 기본 세팅을 도와줍니다.
만들어볼 앱을 사진으로 보고 시작해보겠습니다!
2. Base Setting
expo init <프로젝트명> 으로 프로젝트를 생성하고 package.json을 수정합니다.
"dependencies": {
    "axios": "^0.19.0",
    "expo": "^34.0.1",
    "expo-linear-gradient": "^6.0.0",
    "expo-location": "~6.0.0",
    "prop-types": "^15.7.2",
    "react": "16.8.3",
    "react-dom": "^16.8.6",
    "react-native": "https://github.com/expo/react-native/archive/sdk-34.0.0.tar.gz",
    "react-native-web": "^0.11.4"
  },
  "devDependencies": {
    "babel-preset-expo": "^6.0.0"
  },
이후 yarn install로 필요한 모듈을 설치해줍니다.
yarn start 이후 ios시뮬레이터로 기본 화면이 잘 나오는지 확인해주면 끝입니다!
3. Loading Page
먼저 화면 시작 시 나올 로딩화면을 구성해보겠습니다.
코드부터 보겠습니다. Material-ui와 사용법이 유사합니다.
아직 app.js를 구현하지 않았으니 사진만 보고 상태를 판단합니다.
// Loading.js
import React from 'react';
// react-native 화면을 구성할 요소들
import { StyleSheet, Text, View, StatusBar } from 'react-native';

const Loading = () => {
  return (
    {/* 항상 View로 감싸야 화면에 보입니다. */}
    <View style={styles.container}>
      {/* 화면이 밝아서 상태바가 보이지 않으므로 검정으로 선택합니다. */}
      <StatusBar barStyle="dark-content"/>
      {/* 글자를 사용할 때는 Text를 사용합니다. */}
      <Text style={styles.text}>Getting Weather</Text>
    </View>
  )
}

// styles로 StyleSheet의 css를 사용합니다.
const styles = StyleSheet.create({
  container: {
    flex: 1,
    justifyContent: "flex-end",
    paddingHorizontal: 30,
    paddingVertical: 100,
    backgroundColor: "#FDF6AA"
  },
  text: {
    color: "#2c2c2c",
    fontSize: 30
  }
})

export default Loading;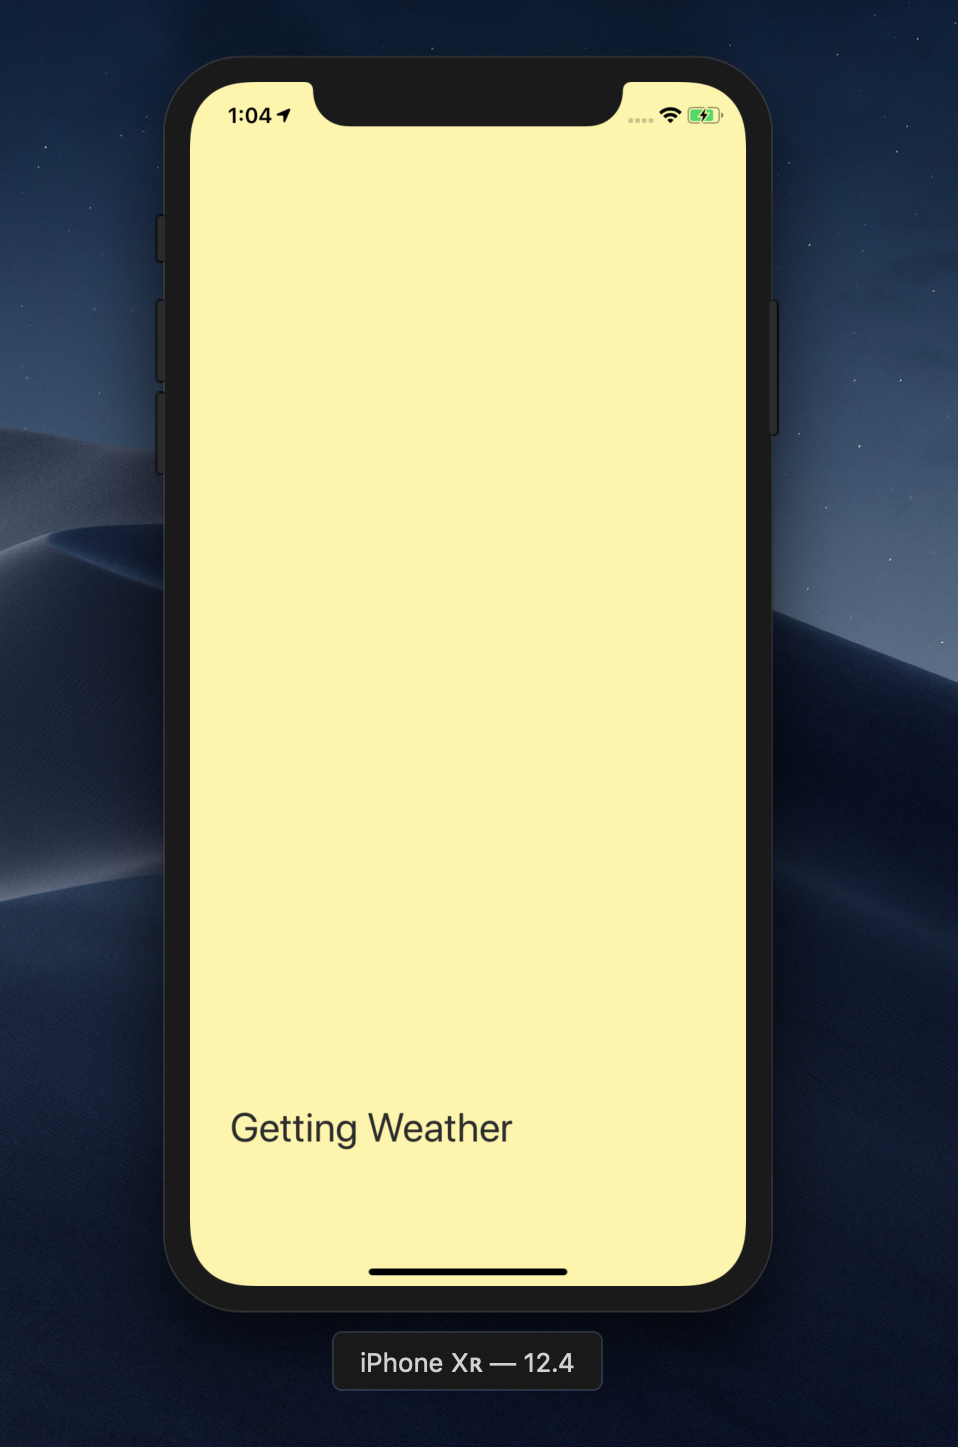
3. app.js
이제 app.js에서 상태를 설정하고, API를 불러오겠습니다.
다음 화면과 이어지므로, 4번과 같이 코드를 참고하시면 좋습니다.
import React, { Component } from 'react';
import { Alert } from 'react-native';
import Loading from './Loading';
import * as Location from 'expo-location';
import axios from 'axios';
import Weather from './Weather';
// ! OPEN_WEATHER_MAP의 API KEY입니다.
const API_KEY = "*****************************";

export default class extends Component {
  // 로딩화면의 상태를 가집니다.
  state = {
    isLoading: true
  };
  // api로 날씨를 가져올 async 함수입니다. data형식은 결과 형태에 따라 바뀝니다.
  getWeather = async (latitude, longitude) => {
    const {
      data: {
        main: { temp },
        weather
      }
    } = await axios.get(
      `http://api.openweathermap.org/data/2.5/weather?lat=${latitude}&lon=${longitude}&APPID=${API_KEY}&units=metric`
    );
    this.setState({
      // 불러오고나면 로딩창을 꺼줍니다.
      isLoading: false,
      condition: weather[0].main,
      temp
    });
  };
  // expo의 Location으로 현재 위치를 가져오는 async함수입니다.
  getLocation = async () => {
    try {
      // 위치를 가져올 수 있게 사용자에게 요청합니다.
      await Location.requestPermissionsAsync();
      const {
        coords: { latitude, longitude }
      } = await Location.getCurrentPositionAsync();
      this.getWeather(latitude, longitude);
    } catch (error) {
      // 에러 시 알림을 줍니다.
      Alert.alert("위치를 찾을 수 없습니다.", "사용자 설정에서 허가를 확인해주세요.");
    }
  };
  componentDidMount() {
    this.getLocation();
  }
  render() {
    const { isLoading, temp, condition } = this.state;
    // isLoading이 true이면 로딩화면, 아니면 날씨화면을 띄웁니다.
    return isLoading ? (
      <Loading />
    ) : (
      <Weather temp={Math.round(temp)} condition={condition} />
    );
  }
}
4. Weather.js
메인 함수를 제외하고는 Ctrl+c+v를 권장합니다.
코드가 어렵지 않고, 주로 앱 완성을 위한 부가 코드입니다.
import React from "react";
import { View, Text, StyleSheet, StatusBar } from "react-native";
import PropTypes from "prop-types";
import { LinearGradient } from "expo-linear-gradient";
import { MaterialCommunityIcons } from "@expo/vector-icons";
// 날씨에 따라 바뀔 옵션을 설정합니다.
const weatherOptions = {
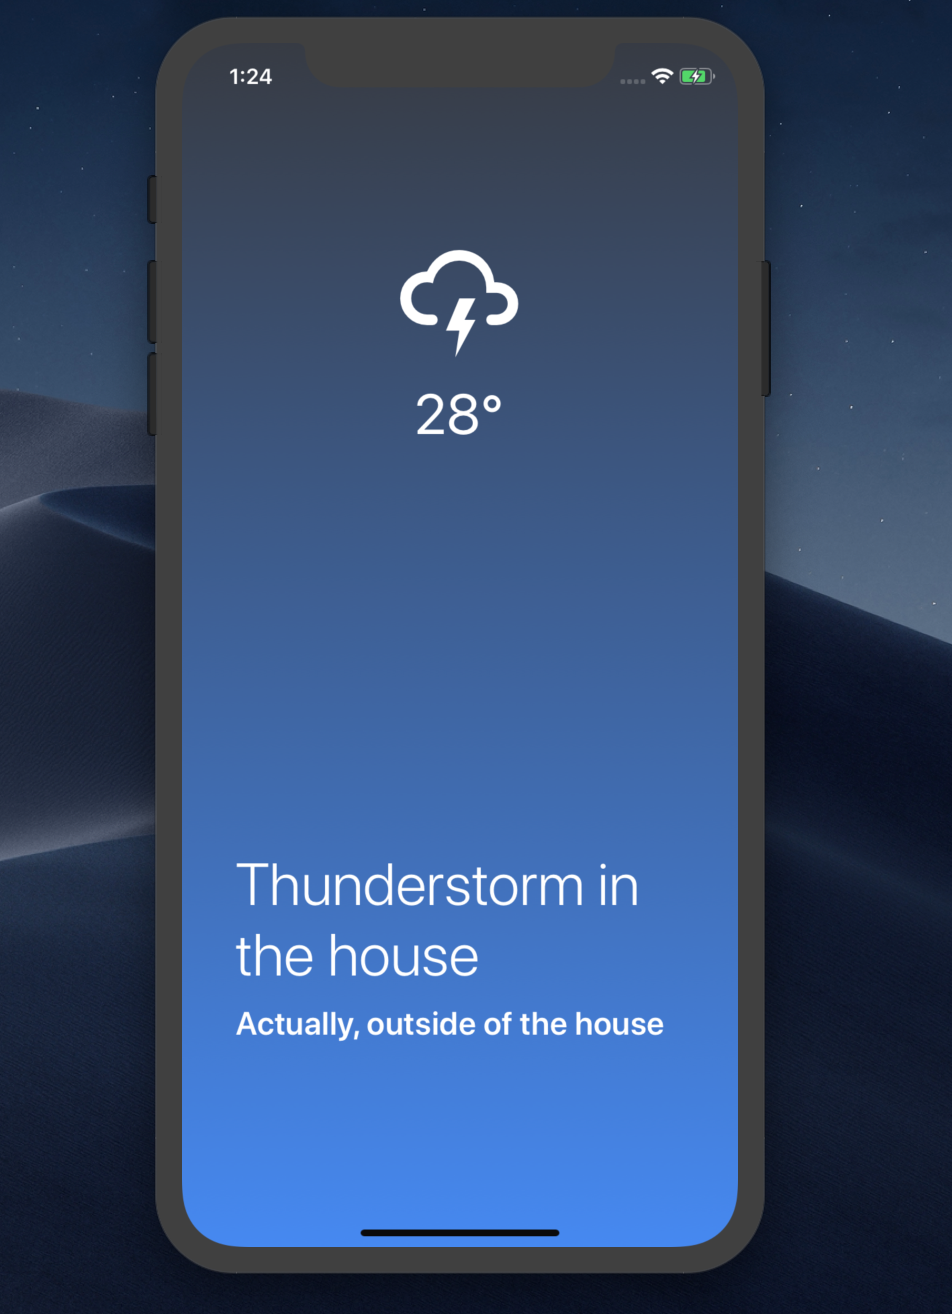
Thunderstorm: {
iconName: "weather-lightning",
gradient: ["#373B44", "#4286f4"],
title: "Thunderstorm in the house",
subtitle: "Actually, outside of the house"
},
Drizzle: {
iconName: "weather-hail",
gradient: ["#89F7FE", "#66A6FF"],
title: "Drizzle",
subtitle: "Is like rain?"
},
Rain: {
iconName: "weather-rainy",
gradient: ["#00C6FB", "#005BEA"],
title: "Raining like a MF",
subtitle: "For more info look outside"
},
Snow: {
iconName: "weather-snowy",
gradient: ["#7DE2FC", "#B9B6E5"],
title: "Cold as balls",
subtitle: "Do you want to build a snowman?"
},
Atmosphere: {
iconName: "weather-hail",
gradient: ["#89F7FE", "#66A6FF"]
},
Clear: {
iconName: "weather-sunny",
gradient: ["#FF7300", "#FEF253"],
title: "Sunny",
subtitle: "I like this day!"
},
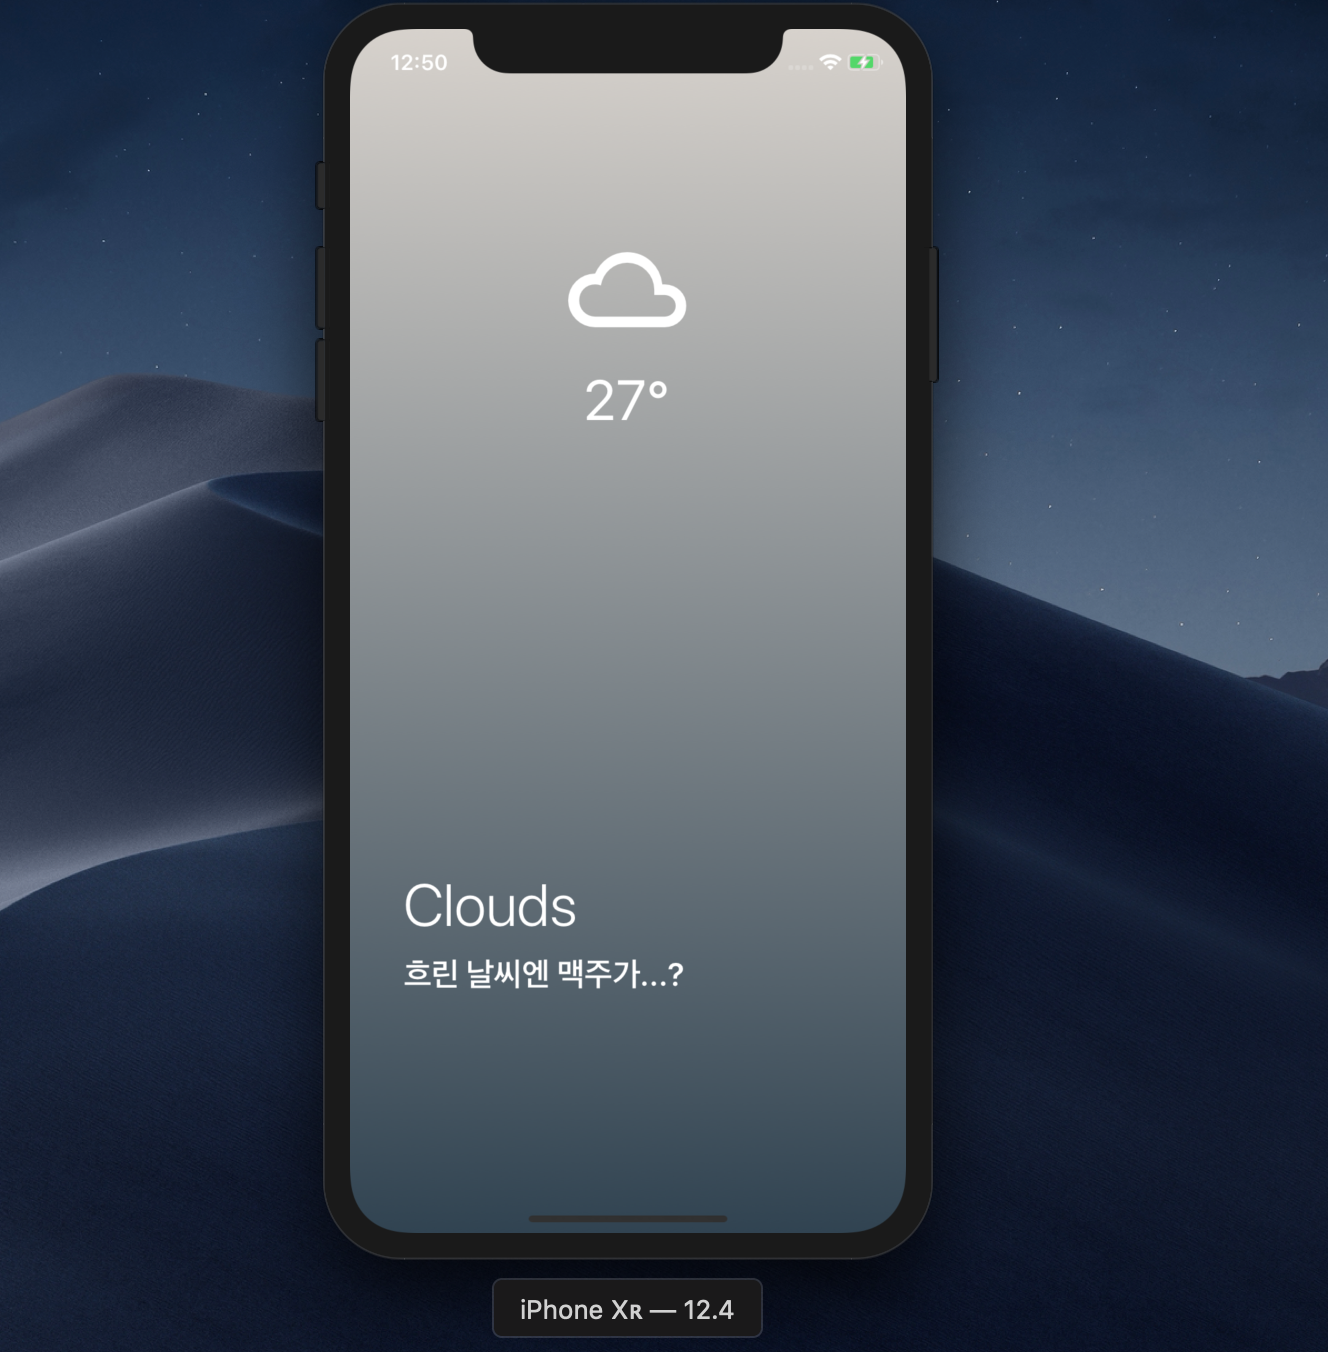
Clouds: {
iconName: "weather-cloudy",
gradient: ["#D7D2CC", "#304352"],
title: "Clouds",
subtitle: "흐린 날씨엔 맥주가...?"
},
Mist: {
iconName: "weather-hail",
gradient: ["#4DA0B0", "#D39D38"],
title: "Mist!",
subtitle: "It's like you have no glasses on."
},
Dust: {
iconName: "weather-hail",
gradient: ["#4DA0B0", "#D39D38"],
title: "Dusty",
subtitle: "Thanks a lot China 🖕🏻"
},
Haze: {
iconName: "weather-hail",
gradient: ["#4DA0B0", "#D39D38"],
title: "Haze",
subtitle: "Just don't go outside."
}
};
// 메인 함수입니다. 부모에서 temp, condition을 전달받습니다.
export default function Weather({ temp, condition }) {
return (
{/* 그래디언트를 표현하기 위해 LinearGradient로 감싸줍니다. */}
<LinearGradient
colors={weatherOptions[condition].gradient}
style={styles.container}
>
{/* 이번엔 화면이 흰색이 아니므로 밝은 상태바를 설정합니다. */}
<StatusBar barStyle="light-content" />
{/* 뷰 상하단 분리를 위해 halfContainer로 flex레이아웃을 설정합니다. */}
<View style={styles.halfContainer}>
{/* expo 내장 아이콘입니다. */}
<MaterialCommunityIcons
size={96}
name={weatherOptions[condition].iconName}
color="white"
/>
<Text style={styles.temp}>{temp}°</Text>
</View>
{/* 하단에는 타이틀, 서브타이틀을 입력합니다. */}
<View style={styles.textContainer}>
<Text style={styles.title}>{weatherOptions[condition].title}</Text>
<Text style={styles.subtitle}>
{weatherOptions[condition].subtitle}
</Text>
</View>
</LinearGradient>
);
}
// 각 조건의 prop-types를 설정합니다.
Weather.propTypes = {
temp: PropTypes.number.isRequired,
condition: PropTypes.oneOf([
"Thunderstorm",
"Drizzle",
"Rain",
"Snow",
"Atmosphere",
"Clear",
"Clouds",
"Haze",
"Mist",
"Dust"
]).isRequired
};
const styles = StyleSheet.create({
container: {
flex: 1
},
temp: {
fontSize: 42,
color: "white"
},
halfContainer: {
flex: 1,
justifyContent: "center",
alignItems: "center"
},
title: {
color: "white",
fontSize: 44,
fontWeight: "300",
marginBottom: 10,
textAlign: "left"
},
subtitle: {
fontWeight: "600",
color: "white",
fontSize: 24,
textAlign: "left"
},
textContainer: {
alignItems: "flex-start",
paddingHorizontal: 40,
justifyContent: "center",
flex: 1
}
});결과를 볼까요?
그새 날씨가 바뀌었네요!

ggit