Recursion 과제는 어려워서 좀 미루고...;;;
이전에 공부하던 리액트 복습 겸 동빈나님의 강의를 정리해본다.
다른 강의를 많이 보고 와서 그런지 이해가 쉬운 편 :)
꼼꼼하지 않게, 적.당.히 꼼꼼하게 블로깅하려고 한다...!
1. GitHub 연동
자신의 Git Repo에 'React-Management'를 생성한다.
create-react-app으로 프로젝트를 생성하고, github과 연동한다.
git remote add origin https://github.com/geonhwiii/React_Management.git
git push --set-upstream origin master
VSCode의 소스 제어를 통해서 커밋 및 푸쉬를 관리한다!
2. App.js 구성
components폴더를 생성 후 Customer.js파일을 생성한다.
그리고, rcc를 통해 기본 내용을 구성한 후 App.js파일을 수정한다.
https://placeimg.com/64/64/는 랜덤이미지를 불러온다.
// App.js
import React from 'react';
import './App.css';
import Customer from './components/Customer';
// customers 데이터 배열 생성
const customers = [{
  id: 1,
  image: 'https://placeimg.com/64/64/1',
  name: '다현',
  birthday: '940101',
  gender: '여자',
  job: '대학생',
  },
  {
    id: 2,
    image: 'https://placeimg.com/64/64/2',
    name: '소희',
    birthday: '940202',
    gender: '여자',
    job: '디자이너',
  },
  {
    id: 3,
    image: 'https://placeimg.com/64/64/3',
    name: '나연',
    birthday: '950505',
    gender: '여자',
    job: '가수',
  }
]

function App() {
  return (
    <div>
      {
        customers.map(customer => {
          return (
            <Customer
              key={customer.id}
              id={customer.id}
              image={customer.image}
              name={customer.name}
              birthday={customer.birthday}
              gender={customer.gender}
              job={customer.job}
            />
          )
        })
      }
    </div>

  );
}

export default App;
3. Customer.js 구성
App.js 에서 받은 데이터를 props로 연결만 해주며 된다.
import React, { Component } from 'react';

class Customer extends Component {
  render() {
    return (
      <div>
        <CustomerProfile id={this.props.id} image={this.props.image} name={this.props.name}/>
        <CustomerInfo birthday={this.props.birthday} gender={this.props.gender} job={this.props.job} />
      </div>

    );
  }
}

class CustomerProfile extends Component {
  render() {
    return (
      <div>
        <img src={this.props.image} alt="profile"/>
        <h2>{this.props.name}({this.props.id})</h2>
      </div>
    );
  }
}

class CustomerInfo extends Component {
  render() {
    return (
      <div>
        <p>{this.props.birthday}</p>
        <p>{this.props.gender}</p>
        <p>{this.props.job}</p>
      </div>
    );
  }
}

export default Customer;
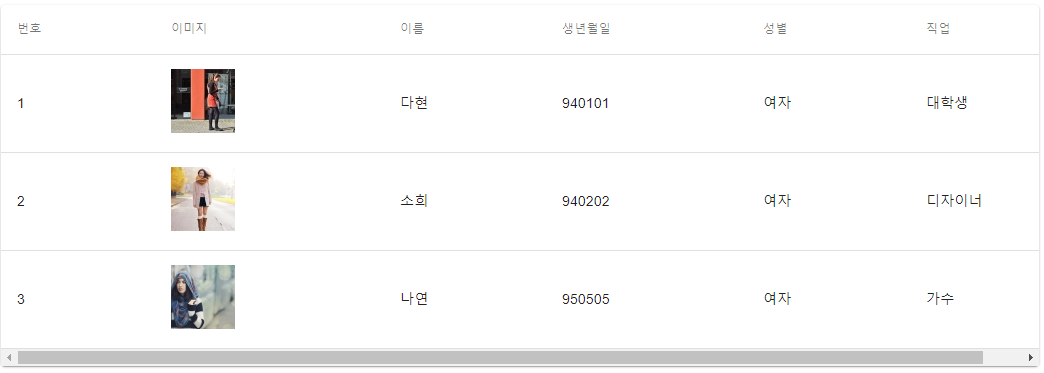
4. Material UI 적용
먼저, 라이브러리를 적용한다.
yarn add @material-ui/core이후 각 JS 파일에 아래와 같이 적용하면 된다.
// Customer.js
import React, { Component } from 'react';
import TableRow from '@material-ui/core/TableRow';
import TableCell from '@material-ui/core/TableCell'

class Customer extends Component {
  render() {
    return (
      <TableRow>
        <TableCell>{this.props.id}</TableCell>
        <TableCell><img src={this.props.image} alt="profile"/></TableCell>
        <TableCell>{this.props.name}</TableCell>
        <TableCell>{this.props.birthday}</TableCell>
        <TableCell>{this.props.gender}</TableCell>
        <TableCell>{this.props.job}</TableCell>
      </TableRow>

    );
  }
}

export default Customer;
// App.js
import React, { Component } from 'react';
import './App.css';
import Customer from './components/Customer';
import Paper from '@material-ui/core/Paper';
import Table from '@material-ui/core/Table';
import TableHead from '@material-ui/core/TableHead';
import TableBody from '@material-ui/core/TableBody';
import TableRow from '@material-ui/core/TableRow';
import TableCell from '@material-ui/core/TableCell';
import { withStyles } from '@material-ui/core/styles';
// ... 생략 ... //
class App extends Component {
render() {
const { classes } = this.props;
return (
<Paper className={classes.root}>
<Table className={classes.table}>
<TableHead>
<TableRow>
<TableCell>번호</TableCell>
<TableCell>이미지</TableCell>
<TableCell>이름</TableCell>
<TableCell>생년월일</TableCell>
<TableCell>성별</TableCell>
<TableCell>직업</TableCell>
</TableRow>
</TableHead>
<TableBody>
{
customers.map(customer => {
return (
<Customer
key={customer.id}
id={customer.id}
image={customer.image}
name={customer.name}
birthday={customer.birthday}
gender={customer.gender}
job={customer.job}
/>
)
})
}
</TableBody>
</Table>
</Paper>
);
}
}
export default withStyles(styles)(App);
