
오늘은 prototype chain에 대해서 공부를 했다.
prototype은 콘솔에서 많이 봐왔지만 무슨 역할을 하는지 알지 못했지만, 이제는 적어도 prototype이 무슨 역할을 하는지 알게 되었다.
prototype?
JavaScript에는 class라는 개념이 존재하지 않는다. es6부터는 class라는 키워드가 추가되었지만 class를 쓰더라도 객체 지향 언어가 되는 것은 아니다. 대신 객체 지향을 흉내 낼 수 있게 해 주는 prototype이 존재하기 때문에 prototype 기반 언어라고 한다.
prototype vs proto
prototype chain을 알아보기 전 prototype과 proto에 대해서 알아보자.
function Person(name, first, second) {
  this.name = name;
  this.first = first;
  this.second = second;
}

Person.prototype.sum = function(){}

const kim = new Person('kim', 10, 20);

const lee = new Person('lee', 10, 10);

console.log(kim.name); // 'kim'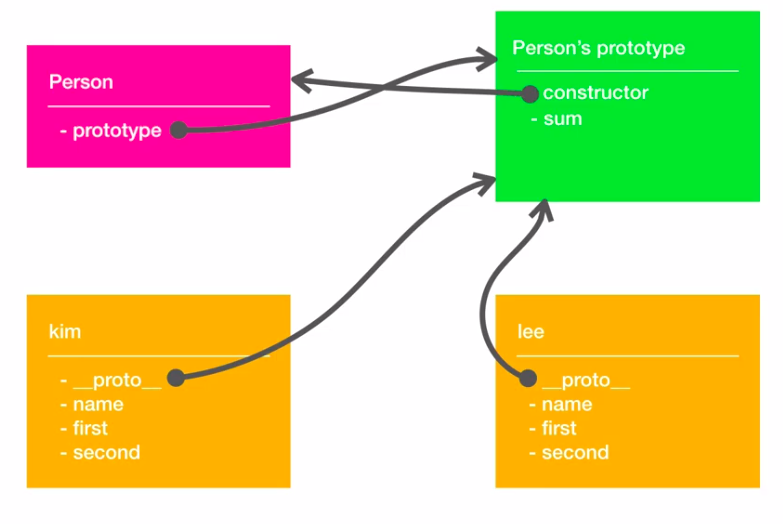
new Person을 하게 되면 Person이라는 객체가 생기가 되는데 이때 Person's prototype이라는 객체도 같이 생성되게 된다.
- Person 객체의
prototype은 Person's prototype 객체를 바라보게 된다. 이때constructor라는 property를 만들고 이 property는 Person을 바라보게 되면서 서로 상호작용을 하게 된다. - Person's prototype에 sum을 생성하고 그곳에 함수를 정의하게 된다.
- kim이라는 객체를 생성하고 Person의 property를 상속받고
__proto__라는 property가 생성된다. - 이때
__proto__는 Person's prototype을 바라보게 된다. - lee라는 객체를 생성할 때도 똑같은 과정을 반복하게 된다.
- 마지막으로 kim.name을 출력하게 되면 'kim'이 출력되지만 만약 name이라는 property가 존재하지 않는다면
__proto__를 통해서 Person's property를 참조하게 된다.
한마디로 __proto__는 부모 prototype을 참조하고 있다.
prototype chain
prototype chain은 OOP의 특성인 상속을 통해 이어지는 관계를 말한다.
한마디로 해당 prototype을 통해 상위 객체의 property를 상속받아 하위 객체에서 사용을 할 수가 있다는 말이다.
const Human = function(name) {
  this.name = name;
}

Human.prototype.sleep = function(){};

const steve = new Human('steve');
console.log(steve.name) // 'steve'
steve.toString() // [object Object]
위와 같은 예제를 보면 steve라는 객체는 상위 객체인 Human의 property를 상속받았기 때문에 steve라는 결과를 얻을 수 있지만 toString()이라는 property는 Human에도 존재하지 않지만, 사용을 할 수 있다. 어떻게 된 일일까?
그 이유는 JavaScript의 대표 객체인 Object의 prototype에 toString이 존재를 하기 때문이다.

Object.create
JavaScript에서 객체를 생성하는 방법은 new 키워드를 통해 만들거나 {}(중괄호)를 통해 생성했다.
하지만 Object의 메서드인 Object.create라는 메서드를 통해서도 객체를 생성할 수 있다.
const Human = function (name) {
  this.name = name;
};
Human.prototype.sleep = function () {
  console.log("자면 안돼!!!!");
};

const Student = function () {};

Student.prototype = Object.create(Human.prototype);
Student.prototype.constructor = Student; // constructor를 자기 자신으로 재할당해야한다. 그렇지 않으면 부모 constructor를 가리킨다.

Student.prototype.learn = function () {
  console.log("공부하는 중...");
};
const student = new Student();

console.log(student.learn()); // '공부하는 중...'
console.log(student.sleep()); // '자면 안돼!!!!'
Using class keyword
es6부터는 class 키워드가 생겨 객체지향을 표현하기 간단해졌다.
상속은 extends를 이용하여 가능하다.
아래 예제를 보고 사용법을 익혀보자
class Human {
  constructor(name) {
    this.name = name;
  }

  sleep() {
   console.log('자면 안돼!!!!');
  }
}

class Student extends Human {
  constructor(name) { // constructor는 부모 class와 모양이 똑같다면 생략할 수 있다.
    super(name);
  }

  learn() {
   console.log('공부하는 중 ...');
  }
}

const john = new Student('john');
console.log(john.learn()); // '공부하는 중...'
console.log(john.sleep()); // '자면 안돼!!!!'