스프링
- 자바 Application 개발이 가능하다.(기본개념, DI 개념)
- 웹프로그래밍 개발이 가능하다.
- jsp(모델1 기본) -> 소규모 사이트
- 스프링(모델2 기반) -> 대규모 사이트
- 객체를 만들어서 처리하기 때문에 xml파일을 만들어서 관리해야 한다.
- 참고 사이트 링크 - https://youtu.be/Jwoz4ORX60A
스프링의 특성
대규모 프로젝트에서 서버의 분산처리(백업용)가 무겁고 속도가 느리기 때문에(EJB) 스프링을 사용한다.
- 스프링 프레임워크는 경량의 프레임워크이다. (가볍다 -> 속도가 빠르다)
(EJB->Spring)- 스프링 프레임워크는 MVC 프레임워크를 제공하고 있다.
모델2 기반(흐름)(MVC 패턴으로 작업)- 스프링 프레임워크는 DI(Dependency Injection)를 지원한다.
-> 의존성 관계, OOP(객체지향 프로그래밍방식)- 스프링 프레임워크는 AOP(Aspect Oriented Programming)를 지원한다.
-> 공통모듈을 관리- 스프링 프레임워크는 POJO(Plain Old Java Objects)를 웹상에서 작업 및 지원한다.
독립적인 웹어플리케이션을 작성 및 독립적인 자바클래스를 작성할 수 있다.- 스프링 프레임워크는 트랜잭션 처리를 위한 일괄된 방법을 제공한다.
- 스프링 프레임워크는 영속성과 관련된 다양한 API를 제공한다.
(DB연동 -> Mybatis(국내), JPA(외국)- 스프링 프레임워크는 다양한 API에 대한 연동을 지원한다.
API 사이트 위치
스프링 관련 라이브러리 API 사이트 위치
티스토리
Spring 4.2.9 Api doc
MyBatis 3.4 API doc
MyBatis-Spring API doc
AspectJ Run time Api doc
jUnit4.12 api doc
Log4j2 api doc
MyBatis 잘 정리된 site
Apache commons dbcp
메이븐(Maven)
자동으로 라이브러리를 다운로드 받아서 처리해주는 툴이다.
메이븐(Maven)은 pom.xml의 설정을 통해서 필요한 라이브러리를 다운받아서 저장소에 관리하는 역할을 한다.
기존 Dynamic Web Project에서는 프로젝트의 라이브러리를 사용하기
위해서 lib 폴더에 직접 라이브러리 파일(*.jar)을 넣어주는 방식으로 작업했었다.
- pom.xml ==> 라이브러리파일을 설정하면 자동적으로 다운로드한다.
편집하는 방법
<dependency>
	<groupId>상위패키지명.하위패키지명...</groupId>
	<artifactId>jar파일의 이름</artifactId> =>관련된 파일도 같이 다운(의존성 때문에)
	<version>3.2.3-Release(버전이름)</version>
</dependency>
dependency의 version에 ${spring-framework.version}을 사용하면 spring-framework.version만 값을 변경하면 전부 자동으로 변경된다.
  <!--
  	프로그램 설치할 버전관리를 위한 환경변수를 지정하는 곳(properties)
   -->
  <properties>
		<!-- Spring -->
		<spring-framework.version>4.3.5.RELEASE</spring-framework.version>
		<!-- Hibernate / JPA -->
		<hibernate.version>4.2.1.Final</hibernate.version>
		<!-- Logging -->
		<logback.version>1.0.13</logback.version>
		<slf4j.version>1.7.5</slf4j.version>
		<!-- Test -->
		<junit.version>4.11</junit.version>
	</properties>
	<dependencies>
		<!-- Spring and Transactions -->
		<dependency>
			<groupId>org.springframework</groupId>
			<artifactId>spring-context</artifactId>
			<version>${spring-framework.version}</version>
		</dependency>
		<dependency>
			<groupId>org.springframework</groupId>
			<artifactId>spring-expression</artifactId>
			<version>${spring-framework.version}</version>
		</dependency>
	   					,,,
	</dependencies>
</project>
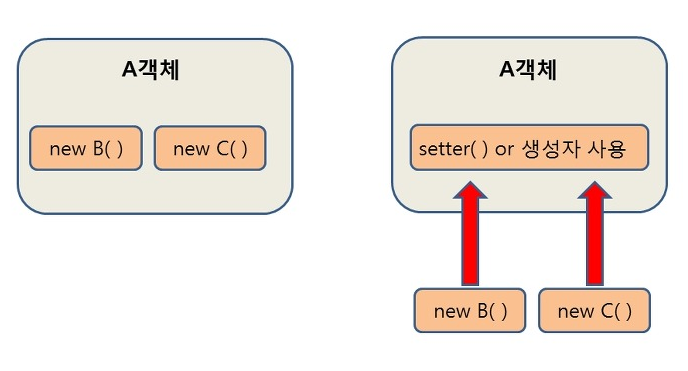
DI의 개요 및 작성법
의존성 객체를 특정한 위치에 알아서 넣어주는 기능이다.
DI(의존성 주입)는 필요로하는 객체를 만들어서 원하는 위치에 넣어주는(주입) 기능이다.
DI의 종류
1) 생성자를 이용하여 객체를 얻어와서 넣어준다. => p80
-> constructor injection
2) 멤버변수와 연관이 있으며, Setter Method를 이용해서 객체를 매개변수로 받아서 넣어주는 경우가 있다.
-> setter Injection (p84, p98~99 getBeans())형식) <property name="멤버변수명"> <value>매개변수값 </value>=>문자열 과 숫자를 넘겨줄때 <value>태그 </propety>
(DI의 개요 및 작성방법2)
xml 용도
- 스프링 환경설정 목적때문이다.
- 자바 코딩 대신사용한다.
<property>태그를 적용하여 "객체명.메서드"로 호출한다.
- =소스코드가 줄어드는 효과가 있으며, 개발시간을 단축할 수 있다.
- bean의 id값 : 정해준 단어가 없으면 클래스명을 부여(관례)->첫글자는 소문자로 지정해준다.
네임스페이스
xml p네임스페이스(태그를 추가)
형식) 객체인 경우에 해당한다.
p:멤버변수명="값" p:멤버변수명-ref="상대방 빈즈의 id값"
생성자를 이용하여 c네임스페이스를 이용해서 설정도 가능하다.public SystemMoniter(long periodTime, SmsSender sender) { this.periodTime = periodTime; this.sender = sender; System.out.println("SystemMoniter() 생성자 호출됨!!"); }생성자 injection: index를 부여하지 않으면 입력순서대로 적용이 된다.(매개변수 순서가 적용)
<bean id="moniter2" class="spring4.SystemMoniter"
    c:periodTime="30" c:sender-ref="smsSender2">
   <!--
   <constructor-arg value="10" /> =>기본형 멤버변수
   <constructor-arg ref="smsSender2" /> =>객체형 멤버변수
   -->                    ==
</bean>
<bean id="smsSender2"  class="spring4.SmsSender" />
<constructor-arg ref="userRepository" />
전체 빈즈의 종류(jsp,spring포함)
✔ getBean 방식
- SystemMoniter moniter=(SystemMoniter)context.getBean("moniter3");
- SystemMoniter moniter=context.getBean("moniter3",SystemMoniter.class);
✔ jsp빈즈
<jsp:useBean id="빈즈객체명(=객체명)"
             class="패키지명.참조클래스명"
             scope="page|request|session|application"/>
✔ spring의 빈즈
<constructor-arg index="0">
	scope="singleton|prototype|request|session"
	request, session는 웹에서 사용
 형식)
<bean id="mBean(객체명X)" class="spring2.MessageBeanImplDI"
	  scope="prototype">
</bean>
singleton(default) : 객체를 한개만 만들어져서 같이 공유
prototype : 매번 요청시 새로 만들어서 객체를 리턴해주는 경우
형식)scope="prototype"
🍳5번예제
- 익명의 빈즈객체를 전달하는 방법
- 네임스페이스를 혼용도 가능
- 내부에서는 id가 필요X
🎈applicationContext.xml<bean id="moniter3" class="spring5.SystemMoniter" p:periodTime="60"> <property name="sender"> <!-- <ref bean="smsSender3" /> --> <bean class="spring5.SmsSender"> <constructor-arg value="true" /> </bean> </property> </bean>
🍳6번예제
- id뿐만 아니라 name속성을 이용해서 객체를 얻어올 수 있다.
- List형의 객체를가져올때 사용하는 태그명 태그로 묶어준다.
/list.do=action.ListAction
/-> 경로구분자로 쓴다.(전통적으로)<bean name="/list.do" class="action.ListAction" /> =>스프링🎈PerformanceMoniter
List 인터페이스 객체를 가져오는 방법import java.util.List; public class PerformanceMoniter { private List<Double> number;//성능 public void setNumber(List<Double> number) { this.number = number; System.out.println("setNumber()호출 => "+number); } }🎈applicationContext.xml
<bean name="performanceMoniter" class="spring6.PerformanceMoniter"
			   scope="prototype">
		<property name="number">
			<list>
				<value>0.2</value>
				<value>0.3</value>
			</list>
		</property>
	</bean>
🍳7번예제
- set태그 사용해서 적용
- 고객, 도서(서버에 접속 -> ip주소(=도메인 이름), 접속시간설정(spring8), 책 대여수)
🎈Customer.javaimport java.util.Set; public class Customer { private Set<Integer>subSet;//책 대여수(중복X) public void setSubSet(Set<Integer> subSet) { this.subSet = subSet; } @Override public String toString() { // TODO Auto-generated method stub return "Customer[subSet="+subSet+"]"; } }🎈applicationContext.xml
	<bean name="customer" class="spring7.Customer">
		<property name="subSet">
			<set>
				<value>1</value>
				<value>4</value>
			</set>
		</property>
	</bean>
🍳8번예제
- props태그로 묶어준다.
ex) 자바(java)코드
객체명.setProperty("server","192.168.0.150");
객체명.setProperty("connectionTimeout","5000");//5초동안 접속제한
객체명.setProperty("Retry","3");//3번 접속시도 시간
🎈applicationContext.xml<bean name="bookClient" class="spring8.BookClient"> <property name="prop"> <props> <prop key="server">192.168.0.150</prop> <prop key="connectionTimeout">5000</prop> <prop key="Retry">3</prop> </props> </property> </bean>🎈BookClient.java
- 서버에 접속 -> ip주소, 접속시간 제한 정보저장
-> Properties객체를 이용import java.util.Properties; public class BookClient { private Properties prop; public void setProp(Properties prop) { this.prop = prop; System.out.println("setProp()호출 => "+prop); } }
🍳9번예제
- Properties(환경설정 파일)
- class RestHandler
- new RestHandler() -> public RestHandler(){} 기본생성자는 자동으로 생성
- Map객체 -> HashMap(Session객체), Hashtable
🎈applicationContext.xml<bean name="protocolHanderFactory" class="spring9.ProtocolHanderFactory"> <property name="map"> <map> <entry> <key><value>soap</value></key> <ref bean="soapHandler" /> </entry> <entry> <key><value>rest</value></key> <ref bean="restHandler" /> </entry> </map> </property> </bean> <bean name="soapHandler" class="spring9.SoapHandler" /> <bean name="restHandler" class="spring9.RestHandler" />
🍳10번예제
- public class PhoneCall {}
- SystemMoniter moniter=context.getBean("systemMoniter",SystemMoniter.class);
(1) byType을 사용하지 않은 경우 반드시 property태그를 사용한다.
🎈applicationContext.xml<bean name="systemMoniter" class="spring10.SystemMoniter"> <property name="call"> <ref bean="phoneCall" /> </property> </bean> <bean name="phoneCall" class="spring10.PhoneCall" />byType => PhoneCall와 같은 자료형의 객체를 찾아서 멤버변수에 자동으로 저장된다.
🎈SystemMoniterpublic class SystemMoniter { private PhoneCall call; public void setCall(PhoneCall call) { this.call = call; System.out.println("setCall()호출(call) => "+call); } }(2) byType을 사용한 경우
🎈applicationContext.xml<bean name="systemMoniter" class="spring10.SystemMoniter" autowire="byType" /> <bean name="phoneCall" class="spring10.PhoneCall" /> <!-- <bean name="phoneCall2" class="spring10.PhoneCall" /> -->(3) byName
- @Resource와 같은 개념
- Type으로 객체를 찾아서 넣어주는 것이 아니라 객체 이름으로 찾아서 자동으로 type과 이름을 같게 설정해준다.
- 멤버변수 이름으로 사용된다.
private PhoneCall phonecall;
public void setPhonecall(PhoneCall phonecall) {
	this.phonecall = phonecall;
	System.out.println("setPhonecall()호출(phonecall) => "+phonecall);
}
- byName private PhoneCall phonecall;
- byName에서는 PhoneCall 객체를 얻어오기 위해서는 멤버변수명과 name이름이 같아야 된다.(@Resource)
🎈applicationContext.xml<bean name="systemMoniter" class="spring10.SystemMoniter" autowire="byName" /> <bean name="phonecall" class="spring10.PhoneCall" /> <!-- <bean name="phoneCall" class="spring10.PhoneCall" /> -->
🍳11번예제
- 자바의 상속관계를 표현 -> 자식을 통해서 객체생성, 오버라이딩이 가능하다.
- 자바에서는 객체를 생성 없다.(추상클래스)
- 스프링컨테이너는 해당 자기자신의 빈객체를 생성하면 안된다.
- 5.abstract=true(추상클래스 ex : spring11.SystemMoniter)
- 대신 추상클래스를 상속받는 자식클래스를 이용한다.
6.parent="부모빈즈의 id부여" -> 오버라이딩이 가능하다.
class 자식클래스명 extends 부모클래스명<bean id="commonMoniter" class="spring11.SystemMoniter" abstract="true"> <property name="periodTime" value="10" /> <property name="sender" ref="smsSender" /> </bean>
- 부모의 멤버변수를 그대로 100% 사용하고싶다.
ex)장남
<bean id="doorMoniter" parent="commonMoniter" />
- periodTime=30 (오버라이딩을 사용)
ex)차남<bean id="lobbyMoniter" parent="commonMoniter"> <property name="periodTime" value="30" /> </bean>
- periodTime=40
ex)막내<bean id="roomMoniter" parent="commonMoniter"> <property name="periodTime" value="40" /> </bean> <bean id="smsSender" class="spring11.SmsSender" /><실행결과>
부모객체로부터 물려받은 자식객체를 사용할 수 있고 오버라이딩도 가능하다.moniter=>Systemmoniter[periodTime=10,sender=spring11.SmsSender@343f4d3d] moniter2=>Systemmoniter[periodTime=30,sender=spring11.SmsSender@343f4d3d] moniter3=>Systemmoniter[periodTime=20,sender=spring11.SmsSender@343f4d3d]