자기 소개 앱 만들기
코드 작성 과정
새로운 과제를 시작할 때 느끼는 점은 항상 막막하다...
뭐가 이리 막연한지 어디서 부터 시작해야할 지 는 5분~10분간 멍때리고 시작하는 기분이랄까 ㅎ
그래도 우선 기본적인 위젯(widiget)을 먼저 배치해 보았다.
<TextView
        android:id="@+id/textView2"
        android:layout_width="0dp"
        android:layout_height="wrap_content"

        android:text="@string/id"
        />
<EditText
        android:id="@+id/editText"
        android:layout_width="0dp"
        android:layout_height="wrap_content"

        android:text="@string/editid"
        />


    <TextView
        android:id="@+id/textView3"
        android:layout_width="0dp"
        android:layout_height="wrap_content"

        android:text="@string/password"
        />

    <EditText
        android:id="@+id/editText2"
        android:layout_width="0dp"
        android:layout_height="wrap_content"

        android:text="@string/editpassword"
        />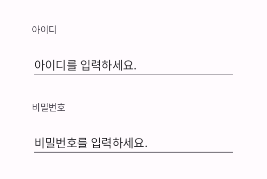
사실 위 사진은 다 제작한 뒤 캡쳐한 사진이라 위 코드만으로 정렬이 되지 않는다.
정렬하는 도중에 엄청난 시간소요가 있었고(후술하겠다) 차마 되돌리기를 할 엄두가 나지 않아서 그대로 캡쳐했다...
이후 추가로 로그인 버튼과 회원가입 버튼 그리고 로고 이미지를 넣고 레벨 1을 마무리 했다.
최종코드
<?xml version="1.0" encoding="utf-8"?>
<androidx.constraintlayout.widget.ConstraintLayout xmlns:android="http://schemas.android.com/apk/res/android"
    xmlns:app="http://schemas.android.com/apk/res-auto"
    xmlns:tools="http://schemas.android.com/tools"
    android:layout_width="match_parent"
    android:layout_height="match_parent"
    tools:context=".SignInActivity">

    <ImageView
        android:id="@+id/imageView"
        android:layout_width="fill_parent"
        android:layout_height="300dp"
        android:layout_marginStart="20dp"
        android:layout_marginEnd="20dp"
        android:layout_marginBottom="40dp"
        android:image="@+id/LoginImage"
        android:src="@drawable/aboutme"
        app:layout_constraintBottom_toTopOf="@+id/textView2"
        app:layout_constraintEnd_toEndOf="parent"
        app:layout_constraintHorizontal_bias="0.0"

        app:layout_constraintStart_toStartOf="parent" />

    <TextView
        android:id="@+id/textView2"
        android:layout_width="0dp"
        android:layout_height="wrap_content"

        android:layout_marginStart="50dp"
        android:layout_marginEnd="50dp"
        android:layout_marginBottom="20dp"
        android:text="@string/id"
        app:layout_constraintBottom_toTopOf="@+id/editText"
        app:layout_constraintEnd_toEndOf="parent"
        app:layout_constraintHorizontal_bias="0.0"
        app:layout_constraintStart_toStartOf="parent" />

    <EditText
        android:id="@+id/editText"
        android:layout_width="0dp"
        android:layout_height="wrap_content"

        android:layout_marginStart="50dp"
        android:layout_marginEnd="50dp"
        android:layout_marginBottom="30dp"
        android:text="@string/editid"
        app:layout_constraintBottom_toTopOf="@+id/textView3"
        app:layout_constraintEnd_toEndOf="parent"
        app:layout_constraintHorizontal_bias="1.0"
        app:layout_constraintStart_toStartOf="parent" />

    <TextView
        android:id="@+id/textView3"
        android:layout_width="0dp"
        android:layout_height="wrap_content"

        android:layout_marginStart="50dp"
        android:layout_marginEnd="50dp"
        android:layout_marginBottom="20dp"
        android:text="@string/password"
        app:layout_constraintBottom_toTopOf="@+id/editText2"
        app:layout_constraintEnd_toEndOf="parent"
        app:layout_constraintHorizontal_bias="0.0"
        app:layout_constraintStart_toStartOf="parent" />

    <EditText
        android:id="@+id/editText2"
        android:layout_width="0dp"
        android:layout_height="wrap_content"

        android:layout_marginStart="50dp"
        android:layout_marginEnd="50dp"
        android:layout_marginBottom="50dp"
        android:text="@string/editpassword"
        app:layout_constraintBottom_toTopOf="@+id/btn_roll"
        app:layout_constraintEnd_toEndOf="parent"
        app:layout_constraintHorizontal_bias="0.0"
        app:layout_constraintStart_toStartOf="parent" />

    <Button
        android:id="@+id/btn_roll"
        android:layout_width="wrap_content"
        android:layout_height="wrap_content"
        android:layout_marginStart="161dp"

        android:layout_marginEnd="162dp"
        android:layout_marginBottom="212dp"
        android:onClick="onButtonLogin"
        android:text="@string/Login"
        app:layout_constraintBottom_toBottomOf="parent"
        app:layout_constraintEnd_toEndOf="parent"
        app:layout_constraintHorizontal_bias="0.0"
        app:layout_constraintStart_toStartOf="parent" />

    <Button
        android:id="@+id/btn_roll2"
        android:layout_width="wrap_content"
        android:layout_height="wrap_content"
        android:layout_marginStart="161dp"
        android:layout_marginEnd="162dp"
        android:layout_marginBottom="148dp"


        android:onClick="onButtonSignup"
        android:text="@string/signup"
        app:layout_constraintBottom_toBottomOf="parent"
        app:layout_constraintEnd_toEndOf="parent"
        app:layout_constraintStart_toStartOf="parent" />


</androidx.constraintlayout.widget.ConstraintLayout>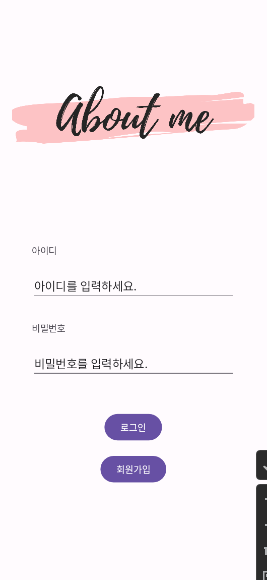
문제점
위에 기술했듯이 정렬이 이렇게 힘들고 괴로운지 몰랐다..
맨 처음 코드만 작성하고 디자인 탭 에서 드래그 앤 드롭으로만 위치 변경을 진행했더니 간격 조정이 마음대로 되지 않았고, 그 이유를 몰라서 맨땅에 헤딩으로 해결하느라 진땀을 뺏다.
찾은 해결법은 간단했다.
디자인 탭에서 드래그앤 드롭을 진행했더니 widget 간에 margin이 자기 멋대로 상하좌우를 고정시켜놨더라..(나쁜놈들)
때문에 각 widget끼리 간격을 드래그 앤 드롭으로는 좁혀지지 않아서 분통이 터졌다.
서두가 길었지만 해결법은 코드 탭으로 가서 각 위젯에 자동으로 생성된 margin을 상하 중에 하나를 지우거나 좌우 중에 하나를 지워버리면 된다.
-> 아마 다른 방법이 있을 것으로 예상되지만 내가 헤딩해서 해결한 방법이라 기술한다.
알게된 점
- 앱 제작 시 이미지 삽입법
1.drawable 폴더에 이미지 넣기
2.위젯에서 android:id="@+id/imageView"선언하기
3.android:image="@+id/이미지파일명"로 가져오기 - 앱 제작 시 constrain(강제레이아웃) 정렬 하는법 (선술)
- 앱 제작 시 정렬 디자인 탭에서 다루는 방법
느낀점
뭐랄까 굉장히 코드가 길고 개인적으로 난잡(?)해서 보기 어렵다..
익숙해진다면 괜찮아지겠지만... 아직.. 아직..어렵다..
junior_developer