Practical Testing: 실용적인 테스트 가이드 강의를 보고
- 강의를 보며 중요하다고 생각되는 내용들을 정리하였다.
정리한 Chapter
-
테스트는 왜 필요할까?
-
단위 테스트
-
TDD
-
테스트는 문서다
-
Spring & JPA 기반 테스트
-
Mock을 마주하는 자세
-
더 나은 테스트를 작성하기 위한 구체적 조언
-
Spring REST Docs
테스트는 왜 필요할까?
-
빠른 피드백
-
자동화 테스트를 통해 수동 테스트에 드는 비용 절감
-
프로그램의 신뢰성 ↑
- 소프트웨어의 빠른 변화 지원
가까이 보면 느리지만, 멀리보면 가장 빠르다.
단위 테스트
- 작은 코드 단위를 독립적으로 검증하는 테스트
JUnit 5 & AssertJ
-
JUnit 5
-
단위 테스트를 위한 프레임워크
-
AssertJ
-
테스트 코드 작성을 돕는 라이브러리
-
다양한 API, 메서드 체이닝 지원
예외 테스트
    @Test
    void addZeroBeverages() {
        CafeKiosk cafeKiosk = new CafeKiosk();
        Americano americano = new Americano();

        assertThatThrownBy(() -> cafeKiosk.add(americano, 0))
            .isInstanceOf(IllegalArgumentException.class)
            .hasMessage("음료는 1잔 이상 주문하실 수 있습니다.");
    }
- 어떤 메서드를 수행할 때
- 어떤 예외가 발생하고
- 어떤 메시지를 가졌는 지 테스트
테스트하기 어려운 영역을 분리하기
-
테스트하기 어려운 영역
-
관측할 때마다 다른 값에 의존하는 코드
- 현재 날짜/시간, 랜덤값, 사용자 입력
-
외부 세계에 영향을 주는 코드
- 표준 출력, 메시지 발송, DB에 데이터 넣기
-
-
테스트하기 쉬운 영역
-
같은 입력이면 항상 같은 결과인 순수 함수
-
외부와 단절된 형태
-
-
잘못된 테스트
    public Order createOrder() {
        LocalDateTime currentDateTime = LocalDateTime.now();
        LocalTime currentTime = currentDateTime.toLocalTime();
        if (currentTime.isBefore(SHOP_OPEN_TIME) || currentTime.isAfter(SHOP_CLOSE_TIME)) {
            throw new IllegalArgumentException("주문 시간이 아닙니다. 관리자에게 문의하세요.");
        }

        return new Order(currentDateTime, beverages);
    }
- 프로덕션 코드
- 메서드 내에서
LocalDateTime.now()를 사용해 현재 시간을 생성
- 테스트하기 어렵다.
    @Test
    void createOrder() {
        CafeKiosk cafeKiosk = new CafeKiosk();
        Americano americano = new Americano();
        cafeKiosk.add(americano);

        Order order = cafeKiosk.createOrder();

        assertThat(order.getBeverages()).hasSize(1);
        assertThat(order.getBeverages().get(0).getName()).isEqualTo("아메리카노");
    }
이 테스트를 실행하는 시간에 따라 성공할 수도 있고, 실패할 수도 있음
- 테스트하기 어려운 영역을 분리한 테스트
    public Order createOrder(LocalDateTime currentDateTime) {
        LocalTime currentTime = currentDateTime.toLocalTime();
        if (currentTime.isBefore(SHOP_OPEN_TIME) || currentTime.isAfter(SHOP_CLOSE_TIME)) {
            throw new IllegalArgumentException("주문 시간이 아닙니다. 관리자에게 문의하세요.");
        }

        return new Order(currentDateTime, beverages);
    }
- 프로덕션 코드
- 외부로부터 시간을 입력받는다.
관측할 때마다 다른 값에 의존하는 코드를 메서드 바깥으로 분리
    @Test
    void createOrderWithCurrentTime() {
        CafeKiosk cafeKiosk = new CafeKiosk();
        Americano americano = new Americano();
        cafeKiosk.add(americano);

        Order order = cafeKiosk.createOrder(LocalDateTime.of(2023, 1, 17, 10, 0));

        assertThat(order.getBeverages()).hasSize(1);
        assertThat(order.getBeverages().get(0).getName()).isEqualTo("아메리카노");
    }

    @Test
    void createOrderOutsideOpenTime() {
        CafeKiosk cafeKiosk = new CafeKiosk();
        Americano americano = new Americano();
        cafeKiosk.add(americano);

        assertThatThrownBy(() -> cafeKiosk.createOrder(LocalDateTime.of(2023, 1, 17, 9, 59)))
            .isInstanceOf(IllegalArgumentException.class)
            .hasMessage("주문 시간이 아닙니다. 관리자에게 문의하세요.");
    }
테스트 성공여부는 테스트 실행 시간과 무관하다.
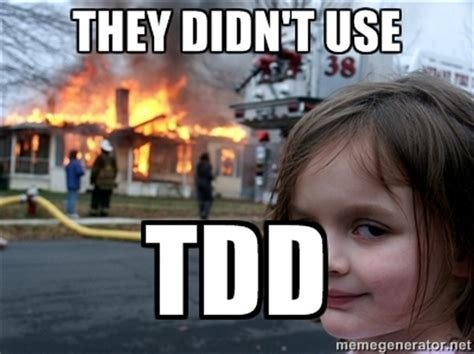
TDD
-
Test Driven Development
-
테스트 코드를 프로덕션 코드보다 먼저 작성하여, 테스트가 구현 과정을 주도하도록 하는 방법론
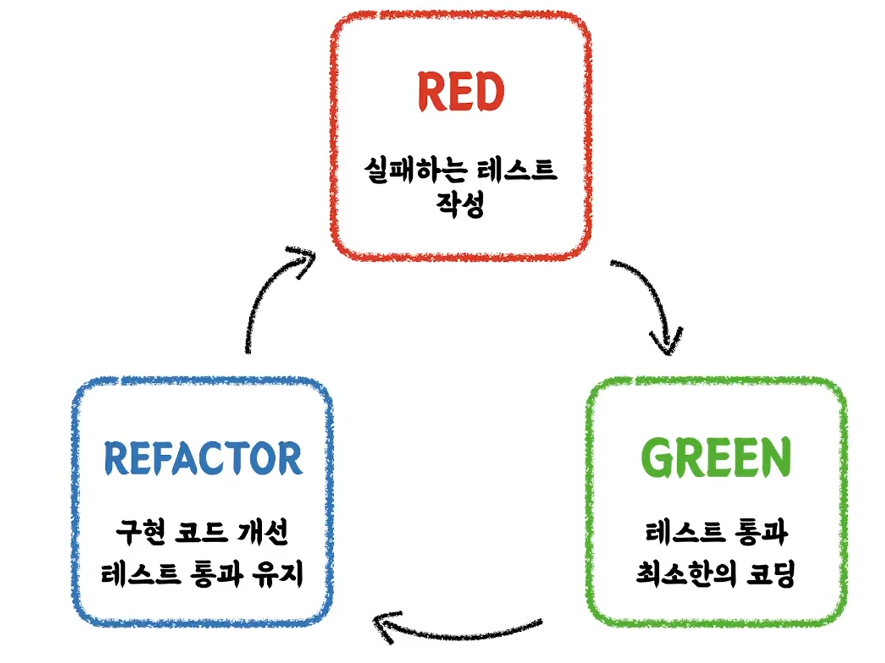
RED - GREEN - REFACTORING
- RED : 실패하는 테스트 코드 작성
- GREEN : 테스트가 빠르게 성공하도록 프로덕션 코드 작성
- REFACTORING : 테스트가 성공하는 수준에서 리팩토링 진행
-
장점
-
유연하며 유지보수가 쉬운 (테스트 가능한) 프로덕션 코드를 만들 수 있다.
-
구현에 대한 빠른 피드백을 받을 수 있다.
-
과감한 리팩토링이 가능하다.
-
테스트는 문서다
-
프로덕션 기능을 설명하는 문서의 역할을 한다.
- 다양한 테스트 케이스를 통해 프로덕션 코드를 더 깊게 이해할 수 있다.
-
프로덕션 코드를 짜면서 경험했던 고민의 결과물들을 팀 차원에서 공유할 수 있다.
DisplayName
-
JUnit 5 부터
@DisplayName애노테이션을 사용하여 테스트 코드를 명세할 수 있다. -
명사의 나열보다는 문장으로 작성하는 것이 좋다.
-
테스트 행위에 대한 결과까지 기술하는 것이 좋다.
-
음료를 1개 추가할 수 있다.(x) -
음료를 1개 추가하면 주문 목록에 담긴다.(o)
-
-
도메인 용어를 사용하여 프로젝트의 추상화된 개념을 담는 것이 좋다.
-
메서드 자체의 관점보다 도메인 정책 관점으로 기술한다.
-
특정시간 이전에 주문을 생성할 수 없다.(x) -
영업 시작시간 이전에는 주문을 생성할 수 없다.(o)
-
-
테스트 현상을 중점으로 기술하지 않는다.
-
영업 시작시간 이전에 주문을 생성하면 실패한다.(x) -
영업 시작시간 이전에는 주문을 생성할 수 없다.(o)
-
BDD
-
Behavior Driven Development
-
시나리오에 기반한 테스트 케이스 자체에 집중하여 테스트한다.
-
시나리오는 3단계로 이루어져 있다.
-
Given : 시나리오 진행에 필요한 준비 과정
-
When : 시나리오 행동 진행
-
Then : 시나리오 진행에 대한 결과 명시 및 검증
-
-
어떤 환경에서 (Given), 어떤 행동을 했을 때 (When), 어떤 상태변화가 일어난다. (Then)
- 이에 맞춰 DisplayName 을 명확하게 작성할 수 있다.
Spring & JPA 기반 테스트
통합 테스트
-
각 단위에 대한 검증을 마쳤다해도, 이것을 통합하면 예상대로 동작한다는 보장은 없다.
- 단위 테스트만으로는 기능 전체의 신뢰성을 보장할 수 없다.
-
통합 테스트는 여러 모듈이 협력하는 기능을 통합적으로 검증하는 테스트이다.
Persistence Layer Test
-
Persistence Layer
-
데이터를 관리하는 계층
-
영속성을 가지는 데이터베이스와 상호작용하는 지점
-
-
@SpringBootTest- 통합 테스트를 위해 제공하는 애노테이션
-
@DataJpaTest-
똑같이 통합테스트 환경 제공
-
@SpringBootTest보다 가볍다. -
JPA 관련 빈들만 주입하여 서버를 띄운다.
-
@Transactional애노테이션을 포함한다.
-
    @DisplayName("상품번호 리스트로 상품들을 조회한다.")
    @Test
    void findAllByProductNumberIn() {
        // given
        Product product1 = createProduct("001", HANDMADE, SELLING, "아메리카노", 4000);
        Product product2 = createProduct("002", HANDMADE, HOLD, "카페라떼", 4500);
        Product product3 = createProduct("003", HANDMADE, STOP_SELLING, "팥빙수", 7000);
        productRepository.saveAll(List.of(product1, product2, product3));

        // when
        List<Product> products = productRepository.findAllByProductNumberIn(List.of("001", "002"));

        // then
        assertThat(products).hasSize(2)
                .extracting("productNumber", "name", "sellingStatus")
                .containsExactlyInAnyOrder(
                        tuple("001", "아메리카노", SELLING),
                        tuple("002", "카페라떼", HOLD)
                );
    }
.hasSize(2): 리스트의 크기 저장.extracting: 검증하는 객체의 필드값들 추출.containsExactlyInAnyOrder( .. ): 리스트안에 다음 요소들이 정확하게 있는지 검증 (순서 무관)tuple(...): 값들을 튜플로 묶어준다.
Business Layer Test
-
Business Layer
-
비즈니스 로직을 구현하는 계층
-
Persistence Layer 와의 상호작용을 통해 비즈니스 로직을 전개
-
트랜잭션을 보장해야 한다.
- 작업 단위의 원자성을 보장해야 한다.
-
-
Persistence Layer 메서드와 Business Layer 메서드를 모두 사용하여 통합 테스트 진행
Presentation Layer Test
-
Presentation Layer
-
외부 세계의 요청을 가장 먼저 받는다.
-
요청 파라미터 값에 대한 검증을 수행한다.
-
-
하위에 위치하는 Business Layer 와 Persistence Layer 는 Mocking 처리 한다.
MockMvc를 사용- 가짜 객체를 사용해 스프링 MVC 동작을 재현하는 테스트 프레임워크
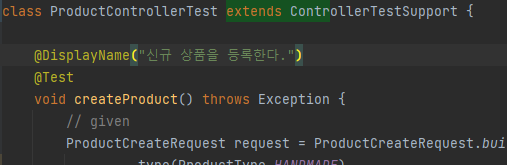
@WebMvcTest(controllers = ProductController.class)
class ProductControllerTest {

    @Autowired
    private MockMvc mockMvc;

    @Autowired
    private ObjectMapper objectMapper;

    @MockBean
    private ProductService productService;

    @DisplayName("신규 상품을 등록한다.")
    @Test
    void createProduct() throws Exception {
        // given
        ProductCreateRequest request = ProductCreateRequest.builder()
            .type(ProductType.HANDMADE)
            .sellingStatus(ProductSellingStatus.SELLING)
            .name("아메리카노")
            .price(4000)
            .build();

        // when // then
        mockMvc.perform(
                MockMvcRequestBuilders.post("/api/v1/products/new")
                    .content(objectMapper.writeValueAsString(request))
                    .contentType(MediaType.APPLICATION_JSON)
            )
            .andDo(MockMvcResultHandlers.print())
            .andExpect(MockMvcResultMatchers.status().isOk());
    }


 	// ...

 }
@WebMvcTest(controllers = ProductController.class)
- 컨트롤러 관련 빈들만 주입하여 서버를 띄운다.
- 테스트 할 컨트롤러 클래스를 지정한다.
@MockBean
private ProductService productService;
ProductService가짜 객체를 스프링 컨테이너에 넣어준다.- 컨트롤러가 필요로 하는 의존성 주입 시, 앞서 넣어준 가짜 객체를 넣어준다.
@Autowired
private ObjectMapper objectMapper;
- 객체를 JSON(JavaScript Object Notation) 으로 변환하는 직렬화와
- JSON을 객체로 변환하는 역직렬화를 도와주는 객체
objectMapper.writeValueAsString(객체)
- 객체를 JSON 으로 변환 (직렬화)
mockMvc.perform( ... )
- 요청을 보내고, 요청에 대한 결과를 검증한다.
MockMvcRequestBuilders.post("/api/v1/products/new")
- 해당 URL 로 POST 요청
.content(request body 에 담을 내용)
- request body 에 담을 내용 설정
.contentType(MediaType.APPLICATION_JSON)
- Content-Type 헤더를 application/json 으로 설정
.andDo(MockMvcResultHandlers.print())
- Mvc 결과물들의 자세한 정보들을 출력한다.
.andExpect(MockMvcResultMatchers.status().isOk());
- 응답의 status code 를 검증한다.
    @DisplayName("신규 상품을 등록할 때 상품 타입은 필수값이다.")
    @Test
    void createProductWithoutType() throws Exception {
        // given
        ProductCreateRequest request = ProductCreateRequest.builder()
            .sellingStatus(ProductSellingStatus.SELLING)
            .name("아메리카노")
            .price(4000)
            .build();

        // when // then
        mockMvc.perform(
                MockMvcRequestBuilders.post("/api/v1/products/new")
                    .content(objectMapper.writeValueAsString(request))
                    .contentType(MediaType.APPLICATION_JSON)
            )
            .andDo(MockMvcResultHandlers.print())
            .andExpect(MockMvcResultMatchers.status().isBadRequest())
            .andExpect(MockMvcResultMatchers.jsonPath("$.code").value("400"))
            .andExpect(MockMvcResultMatchers.jsonPath("$.status").value("BAD_REQUEST"))
            .andExpect(MockMvcResultMatchers.jsonPath("$.message").value("상품 타입은 필수입니다."))
            .andExpect(MockMvcResultMatchers.jsonPath("$.data").isEmpty());
    }
MockMvcResultMatchers.jsonPath("$.code").value("400")
- 해당 json 필드의 값을 검증
MockMvcResultMatchers.jsonPath("$.data").isEmpty()
- 해당 json 필드가 비어있는지 검증
MockMvcResultMatchers.jsonPath("$.data").isArray()
- 해당 json 필드가 배열인지 검증
    @DisplayName("판매 상품을 조회한다.")
    @Test
    void getSellingProducts() throws Exception {
        // given
        List<ProductResponse> result = List.of();

        Mockito.when(productService.getSellingProducts()).thenReturn(result);

        // when // then
        mockMvc.perform(
                        get("/api/v1/products/selling")
                )
                .andDo(print())
                .andExpect(status().isOk())
                .andExpect(jsonPath("$.code").value("200"))
                .andExpect(jsonPath("$.status").value("OK"))
                .andExpect(jsonPath("$.message").value("OK"))
                .andExpect(jsonPath("$.data").isArray());
    }
Mockito.when(productService.getSellingProducts()).thenReturn(result)
Mockito.when(mock bean 의 행위).thenReturn(행위의 결과물)- 앞서 만든 가짜 객체의 행위에 대한 결과물을 설정
Error creating bean with name 'jpaAuditingHandler'에러
@EnableJpaAuditing
@SpringBootApplication
public class CafekioskApplication {

    public static void main(String[] args) {
        SpringApplication.run(CafekioskApplication.class, args);
    }

}
- auditing 을 위한
@EnableJpaAuditing애노테이션이 Application 에 붙어있다.
-
-
@WebMvcTest애노테이션이 붙은 컨트롤러 테스트 클래스의 테스트 메서드 실행 시 발생 -
Spring 컨테이너를 요구하는 테스트는 가장 기본이 되는
Application클래스가 로드 된다. -
Application클래스에@EnableJpaAuditing애노테이션이 있어, Spring 컨테이너를 요구하는 모든 테스트들이 JPA 관련 bean 들을 필요로 하는 상태가 되었다. -
통합 테스트 (
@SpringBootTest) 는 전체 context 를 로드하고, JPA를 포함한 모든 bean 들을 주입받기 때문에 에러가 발생하지 않는다. -
하지만
@WebMvcTest는 JPA 관련 bean들을 전혀 로드하지 않아 다음과 같은 에러가 발생한다.
-
@Configuration으로 분리하여 해당 문제를 해결할 수 있다.
@Configuration
@EnableJpaAuditing
public class JpaAuditingConfiguration {
}
@EnableJpaAuditing애노테이션을 붙인 configuration 클래스를 만든다.
@SpringBootApplication
public class CafekioskApplication {

    public static void main(String[] args) {
        SpringApplication.run(CafekioskApplication.class, args);
    }

}
Application 의
@EnableJpaAuditing애노테이션을 제거한다.
Mock을 마주하는 자세
- Mocking
-
실제 값으로 테스트하기 어려울 때, 가짜 값을 만들어 테스트하는 것
-
외부 API를 사용하거나,
-
테스트하기 어려운 영역을 통제하기 위해 사용
-
-
        // stubbing
        Mockito.when(mailSendClient.sendEmail(ArgumentMatchers.any(String.class), ArgumentMatchers.anyString(), ArgumentMatchers.anyString(), ArgumentMatchers.anyString()))
                .thenReturn(true);
- stubbing: mock 객체에 원하는 행위를 정의한다.
ArgumentMatchers.any(String.class)
- 모든 파라미터에 대해 같은 행동을 하는 mock 객체를 만들기 위한 메서드
- 파라미터 타입을 넣어준다.
Test Double
테스트 목적으로 실제 객체 대신 사용되는 가짜 객체들, 5가지 종류가 있다.
-
Dummy
- 아무것도 하지 않는 깡통 객체
-
Fake
-
단순한 형태로 동일한 기능을 수행하는 객체
-
프로덕션에서 쓰기에는 부족
-
-
Stub
-
특정 행위에 대한 결과를 미리 정의해놓은 객체
-
사전 정의한 행위 외에는 응답하지 않는다.
-
상태 검증을 위해 사용
-
-
Spy
-
일부는 실제 프로덕션 객체처럼 동작시키고, 일부만 stubbing 한 객체
-
호출된 내용을 기록하여 보여줄 수 있다.
-
-
Mock
-
행위에 대한 기대를 명시하고 그에 따라 동작하도록 만들어진 객체
-
행위 검증을 위해 사용
-
mock 객체 생성 방법
-
Mockito.mock(클래스 타입)-
애노테이션 없이 mock 객체를 직접 생성해서 사용
-
@Mock과 기능적으로 같다.
-
class MailServiceTest {

    @DisplayName("메일 전송 테스트")
    @Test
    void sendMail() {
        // given
        MailSendClient mailSendClient = Mockito.mock(MailSendClient.class);
        MailSendHistoryRepository mailSendHistoryRepository = Mockito.mock(MailSendHistoryRepository.class);

        MailService mailService = new MailService(mailSendClient, mailSendHistoryRepository);

        Mockito.when(mailSendClient.sendEmail(ArgumentMatchers.anyString(), ArgumentMatchers.anyString(), ArgumentMatchers.anyString(), ArgumentMatchers.anyString()))
                .thenReturn(true);


        // when
        boolean result = mailService.sendMail("", "", "", "");

        // then
        assertThat(result).isTrue();
        Mockito.verify(mailSendHistoryRepository, Mockito.times(1)).save(ArgumentMatchers.any(MailSendHistory.class));
    }
}
MailSendClient mailSendClient = Mockito.mock(MailSendClient.class)
MailSendClient타입의 mock 객체 생성Mockito.verify(mailSendHistoryRepository, Mockito.times(1)) .save(ArgumentMatchers.any(MailSendHistory.class))
Mockito.verify(mock 객체, 메서드 호출 횟수).mock 객체의 메서드(파라미터)- mock 객체의 특정 메서드 호출 횟수를 검증
-
@Mock-
단위 테스트에서 사용
-
mock 객체를 직접 생성해서 사용
- 스프링 컨테이너와 상관 없다.
-
@ExtendWith(MockitoExtension.class)애노테이션 필요
-
@ExtendWith(MockitoExtension.class)
class MailServiceTest {

    @Mock
    private MailSendClient mailSendClient;

    @Mock
    private MailSendHistoryRepository mailSendHistoryRepository;

    @DisplayName("메일 전송 테스트")
    @Test
    void sendMail() {
        // given
        MailService mailService = new MailService(mailSendClient, mailSendHistoryRepository);

        Mockito.when(mailSendClient.sendEmail(ArgumentMatchers.anyString(), ArgumentMatchers.anyString(), ArgumentMatchers.anyString(), ArgumentMatchers.anyString()))
                .thenReturn(true);


        // when
        boolean result = mailService.sendMail("", "", "", "");

        // then
        assertThat(result).isTrue();
        Mockito.verify(mailSendHistoryRepository, Mockito.times(1)).save(ArgumentMatchers.any(MailSendHistory.class));
    }
}@ExtendWith(MockitoExtension.class)
class MailServiceTest {
@Mock
private MailSendClient mailSendClient;
@Mock
private MailSendHistoryRepository mailSendHistoryRepository;
@InjectMocks
private MailService mailService;
@DisplayName("메일 전송 테스트")
@Test
void sendMail() {
// given
Mockito.when(mailSendClient.sendEmail(ArgumentMatchers.anyString(), ArgumentMatchers.anyString(), ArgumentMatchers.anyString(), ArgumentMatchers.anyString()))
.thenReturn(true);
// when
boolean result = mailService.sendMail("", "", "", "");
// then
assertThat(result).isTrue();
Mockito.verify(mailSendHistoryRepository, Mockito.times(1)).save(ArgumentMatchers.any(MailSendHistory.class));
}
}
- 위의 코드와 동일하게 동작
- 차이점은
@InjectMocks사용 여부
@Mock객체들을 주입해준다.
-
@MockBean-
통합 테스트 수행 시 사용
-
mock 객체를 생성하고, 스프링 컨테이너에 등록
-
@WebMvcTest(controllers = ProductController.class)
class ProductControllerTest {

    @Autowired
    protected MockMvc mockMvc;

    @Autowired
    protected ObjectMapper objectMapper;

    @MockBean
    protected ProductService productService;

    // ...

} @Spy- 일부는 실제 객체처럼 동작시키고, 일부만 stubbing 한다.
- 일반적인 mocking 은, 정의되지 않은 행위들은 아무것도 하지 않는다.
- 일부는 실제 객체처럼 동작시키고, 일부만 stubbing 한다.
@Slf4j
@Component
public class MailSendClient {
    public boolean sendEmail(String fromEmail, String toEmail, String subject, String content) {
        log.info("메일 전송");
        throw new IllegalArgumentException("메일 전송");
    }

    public void a() {
        log.info("a");
    }

    public void b() {
        log.info("b");
    }

    public void c() {
        log.info("c");
    }
}
a(),b(),c()메서드는 log를 출력한다.
@RequiredArgsConstructor
@Service
public class MailService {

    private final MailSendClient mailSendClient;
    private final MailSendHistoryRepository mailSendHistoryRepository;

    public boolean sendMail(String fromEmail, String toEmail, String subject, String content) {
        boolean result = mailSendClient.sendEmail(fromEmail, toEmail, subject, content);
        if (result) {
            mailSendHistoryRepository.save(MailSendHistory.builder()
                    .fromEmail(fromEmail)
                    .toEmail(toEmail)
                    .subject(subject)
                    .content(content)
                    .build()
            );

            mailSendClient.a();
            mailSendClient.b();
            mailSendClient.c();

            return true;
        }

        return false;
    }
}
서비스는
mailSendClient의sendEmail(),a(),b(),c()메서드들을 호출한다.
@ExtendWith(MockitoExtension.class)
class MailServiceTest {

    @Spy
    private MailSendClient mailSendClient;

    @Mock
    private MailSendHistoryRepository mailSendHistoryRepository;

    @InjectMocks
    private MailService mailService;

    @DisplayName("메일 전송 테스트")
    @Test
    void sendMail() {
        // given
        Mockito.doReturn(true)
                .when(mailSendClient)
                .sendEmail(ArgumentMatchers.anyString(), ArgumentMatchers.anyString(), ArgumentMatchers.anyString(), ArgumentMatchers.anyString());

        // when
        boolean result = mailService.sendMail("", "", "", "");

        // then
        assertThat(result).isTrue();
        Mockito.verify(mailSendHistoryRepository, Mockito.times(1)).save(ArgumentMatchers.any(MailSendHistory.class));
    }
}
Mockito.doReturn(true)
.when(mailSendClient)
.sendEmail(anyString(), anyString(), anyString(), anyString());
mailSendClient의sendEmail메서드만 stubbingdoReturn(반환 값).when(mock 객체).mock 객체의 메서드(파라미터)@Spy객체는 실제 객체이므로,when(mock 객체.메서드()).thenReturn()문법을 사용해선 안된다.
- 실제 객체의 메서드를 호출해버린다.
- https://cornswrold.tistory.com/480 참고
- stubbing 하지 않는 다른 메서드
a(),b(),c()는 실제 객체와 동일하게 동작
- 로그가 출력된다.

BDD Mockito
Mockito를 BDD 스타일에 맞춰 사용할 수 있게끔한 클래스Mockito를 상속한다.
    @DisplayName("메일 전송 테스트")
    @Test
    void sendMail() {
        // given
//        Mockito.when(mailSendClient.sendEmail(ArgumentMatchers.anyString(), ArgumentMatchers.anyString(), ArgumentMatchers.anyString(), ArgumentMatchers.anyString()))
//                .thenReturn(true);

        BDDMockito.given(mailSendClient.sendEmail(ArgumentMatchers.anyString(), ArgumentMatchers.anyString(), ArgumentMatchers.anyString(), ArgumentMatchers.anyString()))
                .willReturn(true);

        // when
        boolean result = mailService.sendMail("", "", "", "");

        // then
        assertThat(result).isTrue();
        Mockito.verify(mailSendHistoryRepository, Mockito.times(1)).save(ArgumentMatchers.any(MailSendHistory.class));
    }
BDDMockito를 사용
Mockito와 똑같이 동작
더 나은 테스트를 작성하기 위한 구체적 조언
given 절은 간단하게
-
given절은 순수한 생성자 위주로 간단하게 구성하는 것이 좋다. -
API 를 사용하게 되면 해당 메서드를 이해하는 비용이 필요하다.
-
API 사용에서 문제가 발생하면
given절에서 테스트가 깨지게 된다.- 테스트 실패 이유를 이해하기 어려워진다.
    @DisplayName("재고가 부족한 상품으로 주문을 생성하려는 경우 예외가 발생한다.")
    @Test
    void createOrderWithNoStock() {
        // given
        LocalDateTime registeredDateTime = LocalDateTime.now();

        Product product1 = createProduct(BOTTLE, "001", 1000);
        Product product2 = createProduct(BAKERY, "002", 3000);
        Product product3 = createProduct(HANDMADE, "003", 5000);
        productRepository.saveAll(List.of(product1, product2, product3));

        Stock stock1 = Stock.create("001", 2);
        Stock stock2 = Stock.create("002", 2);
        stock1.deductQuantity(1);                           // API 사용
        stockRepository.saveAll(List.of(stock1, stock2));

        OrderCreateRequest request = OrderCreateRequest.builder()
                .productNumbers(List.of("001", "001", "002", "003"))
                .build();

        // when // then
        assertThatThrownBy(() -> orderService.createOrder(request.toServiceRequest(), registeredDateTime))
                .isInstanceOf(IllegalArgumentException.class)
                .hasMessage("재고가 부족한 상품이 있습니다.");
    }
given절에서deductQuantity(1)과 같은 API 사용은 지양하는 것이 좋다.
- 두개 짜리
Stock객체를 만든다음 하나를 빼지 말고,- 그냥 한개 짜리
Stock객체를 만들어 테스트할 것
한 눈에 들어오는 테스트 문서 작성하기
-
테스트 메서드의
given절이 중복되더라도,@BeforeEach나@BeforeAll을 쓰지 않는 것이 좋다.-
given절이 파편화되어 테스트 메서드의 가독성이 떨어진다. -
아예 몰라도 테스트 내용을 이해하는데 문제가 없고, 수정해도 모든 테스트에 영향을 주지 않는 경우 사용을 고려하자.
-
-
data.sql등을 사용해given절을 구성하는 것도 좋지않다.-
given절의 파편화 -
관리 포인트가 늘어난다.
-
-
테스트에 필요한 파라미터만 사용하는 빌더를 각각의 테스트 클래스 내부에 만들어 사용하자.
Data Cleansing
-
deleteAll()-
select쿼리를 날려 전체 테이블을 읽어오고, -
row를 하나하나씩delete쿼리를 날려 지운다. -
쿼리가 많이 나간다.
- 시간 비용 ↑
-
    @AfterEach
    void tearDown() {
        orderProductRepository.deleteAll();
        productRepository.deleteAll();
        orderRepository.deleteAll();
        stockRepository.deleteAll();
    }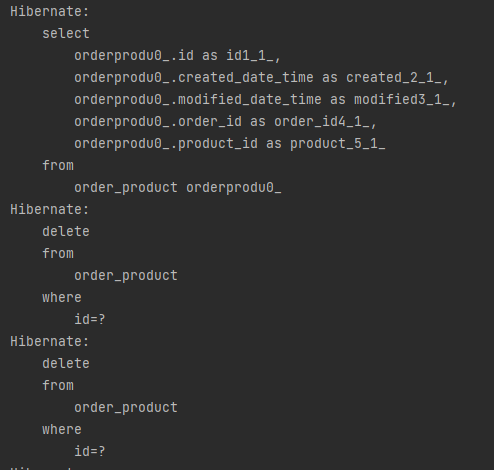
orderProduct의row개수만큼delete쿼리가 나간다.
-
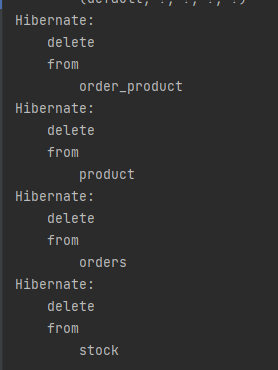
deleteAllInBatch()-
delete from 테이블쿼리가 나간다.- 벌크성 쿼리 발생
-
지우려는 테이블의 PK 가 다른 테이블의 FK 인 경우, 순서를 주의하여 삭제해야 한다.
-
deleteAll()보다 성능이 좋다.
-
    @AfterEach
    void tearDown() {
        orderProductRepository.deleteAllInBatch();
        productRepository.deleteAllInBatch();
        orderRepository.deleteAllInBatch();
        stockRepository.deleteAllInBatch();
    }
-
@Transactional-
테스트 메서드가 트랜잭션으로 감싸진다.
-
프로덕션 코드가 트랜잭션으로 감싸지지 않았는데도, 트랜잭션이 설정되어 있는 것처럼 보일 수 있다.
-
이러한 점을 주의하여 사용해야 한다.
-
-
테스트 메서드가 종료되면 자동으로 롤백된다.
-
delete쿼리 x -
PK 값 (
id) 이Auto Increment일 때, PK 값은 롤백되지 않는다.-
Auto Increment옵션은 동시성 때문에 트랜잭션 범위 밖에서 동작한다.
-
-
-
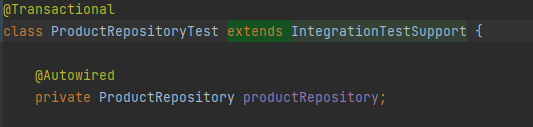
@Transactional
class OrderServiceTest {

    @Autowired
    private ProductRepository productRepository;

    @Autowired
    private OrderRepository orderRepository;

    @Autowired
    private OrderProductRepository orderProductRepository;

    @Autowired
    private StockRepository stockRepository;

    @Autowired
    private OrderService orderService;

    // ...
}
@ParameterizedTest
-
테스트 환경이나 결과값을 바꿔가면서 테스트하고 싶은 경우 사용
-
@CsvSource
    @DisplayName("상품 타입이 재고 관련 타입인지를 체크한다.")
    @CsvSource({"HANDMADE,false", "BOTTLE,true", "BAKERY,true"})
    @ParameterizedTest
    void containsStockType4(ProductType productType, boolean expected) {
        // when
        boolean result = ProductType.containsStockType(productType);

        // then
        assertThat(result).isEqualTo(expected);
    }
CSV 순서쌍이 순서대로 테스트 메서드의 파라미터가 된다.
@MethodSource
    private static Stream<Arguments> provideProductTypesForCheckingStockType() {
        return Stream.of(
                Arguments.of(ProductType.HANDMADE, false),
                Arguments.of(ProductType.BOTTLE, true),
                Arguments.of(ProductType.BAKERY, true)
        );
    }

    @DisplayName("상품 타입이 재고 관련 타입인지를 체크한다.")
    @MethodSource("provideProductTypesForCheckingStockType")
    @ParameterizedTest
    void containsStockType5(ProductType productType, boolean expected) {
        // when
        boolean result = ProductType.containsStockType(productType);

        // then
        assertThat(result).isEqualTo(expected);
    }
메서드의 이름으로 source 를 지정한다.
Dynamic Test
- 어떤 환경에 대해 사용자 시나리오를 단계별로 테스트하고 싶을 때 사용
    @DisplayName("재고 차감 시나리오")
    @TestFactory
    Collection<DynamicTest> stockDeductionDynamicTest() {
        // given
        Stock stock = Stock.create("001", 1);

        return List.of(
                DynamicTest.dynamicTest("재고를 주어진 개수만큼 차감할 수 있다.", () -> {
                    // given
                    int quantity = 1;

                    // when
                    stock.deductQuantity(quantity);

                    // then
                    assertThat(stock.getQuantity()).isZero();
                }),
                DynamicTest.dynamicTest("재고보다 많은 수의 수량으로 차감 시도하는 경우 예외가 발생한다.", () -> {
                    // given
                    int quantity = 1;

                    // when // then
                    assertThatThrownBy(() -> stock.deductQuantity(quantity))
                            .isInstanceOf(IllegalArgumentException.class)
                            .hasMessage("차감할 재고 수량이 없습니다.");
                })
        );
    }
각각의 다이나믹 테스트는
Stock stock = Stock.create("001", 1);를 공유한다.
테스트 환경 통합
- 전체 테스트 수행 방법
Gradle➔Tasks➔Verification➔test실행
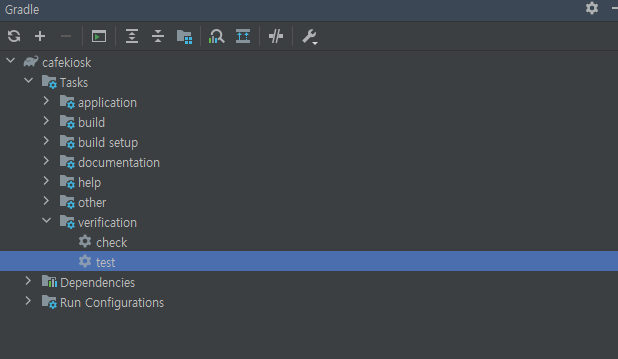
-
통합 테스트는 서버를 띄우기 때문에 시간이 오래걸린다.
- 각각의 통합 테스트는 환경이 조금이라도 다르면, 각각 새로운 서버를 띄운다.
-
각각의 통합테스트 환경의 공통적인 부분들을 모아, 하나의 서버로 통합테스트를 진행할 수 있다.
@ActiveProfiles("test")
@SpringBootTest
public abstract class IntegrationTestSupport {

    @MockBean
    protected MailSendClient mailSendClient;
}
MockBean의 존재여부는 서버 환경에 영향을 준다.
- 존재여부에 따라 서로 다른 통합테스트 환경으로 인식한다.
- 따라서 하나의 서버로 진행하고 싶은 경우, 다음과 같이 필드를 포함시켜야 한다.
- 상속받는 하위클래스에서 필드를 사용할 수 있도록
protected접근자 사용
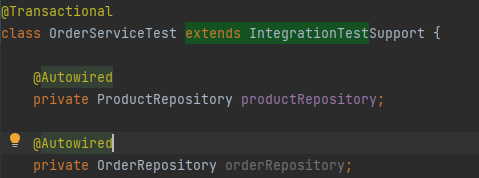
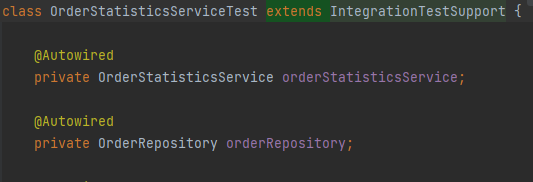
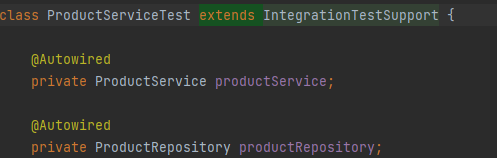

@Transactional은 서버 환경에 영향을 주지 않는다.Service layer와Persistence layer의 통합 테스트 환경을 하나로 합친다.
@WebMvcTest(controllers = {
        OrderController.class,
        ProductController.class
})
public abstract class ControllerTestSupport {

    @Autowired
    protected MockMvc mockMvc;

    @Autowired
    protected ObjectMapper objectMapper;

    @MockBean
    protected OrderService orderService;

    @MockBean
    protected ProductService productService;
}
사용하는 컨트롤러가 여러개인 경우 배열로 관리한다.
Presentation layer의 통합 테스트 환경을 하나로 합친다.
서버가 올라가는 횟수를 6번 ➔ 2번으로 줄여 테스트 수행 비용을 줄인다.
Spring REST Docs
-
테스트 코드를 통한 API 문서 자동화 도구
-
API 명세를 문서로 만들어 외부에 제공한다.
- AsciiDoc 문법 사용
build.gradle 설정
plugins {
    id 'java'
    id 'org.springframework.boot' version '2.7.7'
    id 'io.spring.dependency-management' version '1.0.15.RELEASE'
    id "org.asciidoctor.jvm.convert" version "3.3.2"        // asciidoctor 플러그인 추가
}

group = 'sample'
version = '0.0.1-SNAPSHOT'
sourceCompatibility = '11'

configurations {
    compileOnly {
        extendsFrom annotationProcessor
    }
    asciidoctorExt                              // asciidoctor Ext 추가
}

repositories {
    mavenCentral()
}

dependencies {
    // Spring boot
    implementation 'org.springframework.boot:spring-boot-starter-web'
    implementation 'org.springframework.boot:spring-boot-starter-data-jpa'
    implementation 'org.springframework.boot:spring-boot-starter-validation'

    // test
    testImplementation 'org.springframework.boot:spring-boot-starter-test'

    // lombok
    compileOnly 'org.projectlombok:lombok'
    annotationProcessor 'org.projectlombok:lombok'

    // h2
    runtimeOnly 'com.h2database:h2'

    // Guava
    implementation("com.google.guava:guava:31.1-jre")

    // RestDocs
    asciidoctorExt 'org.springframework.restdocs:spring-restdocs-asciidoctor'
    testImplementation 'org.springframework.restdocs:spring-restdocs-mockmvc'
}

tasks.named('test') {
    useJUnitPlatform()
}

ext { // 전역 변수
    snippetsDir = file('build/generated-snippets')      // 문서 조각들이 저장될 경로 설정
}

test {
    outputs.dir snippetsDir                     // 테스트가 끝난 결과물을 snippetsDir 에 넣는다.
}

asciidoctor {
    inputs.dir snippetsDir          			// snippetsDir 에서 문서를 받아온다.
    configurations 'asciidoctorExt'

    sources {   						 // 특정 파일만 html 로 만든다. 다른 adoc 모듈들이 각각의 html 파일이 되지 않도록 설정
        include("**/index.adoc")
    }

    baseDirFollowsSourceFile()  				// 다른 adoc 파일을 include 할 때 경로를 baseDir로 맞춘다.
    dependsOn test                  			// 테스트가 수행된 뒤, asciidoctor 를 수행한다.
}

bootJar {                              	 // jar 를 만든다.
    dependsOn asciidoctor
    from("${asciidoctor.outputDir}") {      	// outputDir 경로에 결과물로서 나온 파일들을
        into 'static/docs'                  	// static/docs 경로에 복사해서 넣는다.
    }
}
RestDocs 설정 클래스
@ExtendWith(RestDocumentationExtension.class)
public abstract class RestDocsSupport {

    protected MockMvc mockMvc;
    protected ObjectMapper objectMapper = new ObjectMapper();

    @BeforeEach
    void setUp(RestDocumentationContextProvider provider) {
        this.mockMvc = MockMvcBuilders.standaloneSetup(initController())                // 스프링 서버를 띄우지 않고 문서 작성
                .apply(MockMvcRestDocumentation.documentationConfiguration(provider))
                .build();
    }

    protected abstract Object initController();     // 문서를 작성할 컨트롤러를 매번 입력할 수 없으니, 추상메서드 생성
}
@ExtendWith(RestDocumentationExtension.class)
- RestDoc 확장
this.mockMvc = MockMvcBuilders.standaloneSetup(initController())
- 스프링 의존성 없이 (서버를 띄우지 않는다) 문서를 작성한다.
- 파라미터에 문서화하고 싶은 컨트롤러 클래스를 넣는다.
protected abstract Object initController()
- 문서화하려는 모든 컨트롤러를 명시하긴 힘들다.
- 하위 구현체에서 메서드를 구현해 컨트롤러를 주입하기 위한 메서드
문서화를 위한 Controller 클래스
public class ProductControllerDocsTest extends RestDocsSupport {
private final ProductService productService = Mockito.mock(ProductService.class); // 스프링 서버를 띄우지 않았으므로, 직접 Mock 객체 생성
@Override
protected Object initController() {
return new ProductController(productService); // 문서화할 ProductController 반환
}
@DisplayName("신규 상품을 등록하는 API")
@Test
void createProduct() throws Exception {
ProductCreateRequest request = ProductCreateRequest.builder()
.type(ProductType.HANDMADE)
.sellingStatus(ProductSellingStatus.SELLING)
.name("아메리카노")
.price(4000)
.build();
BDDMockito.given(productService.createProduct(ArgumentMatchers.any(ProductCreateServiceRequest.class)))
.willReturn(ProductResponse.builder()
.id(1L)
.productNumber("001")
.type(ProductType.HANDMADE)
.sellingStatus(ProductSellingStatus.SELLING)
.name("아메리카노")
.price(4000)
.build()
);
mockMvc.perform(
MockMvcRequestBuilders.post("/api/v1/products/new")
.content(objectMapper.writeValueAsString(request))
.contentType(MediaType.APPLICATION_JSON)
)
.andDo(MockMvcResultHandlers.print())
.andExpect(MockMvcResultMatchers.status().isOk())
.andDo(MockMvcRestDocumentation.document("product-create",
Preprocessors.preprocessRequest(Preprocessors.prettyPrint()),
Preprocessors.preprocessResponse(Preprocessors.prettyPrint()),
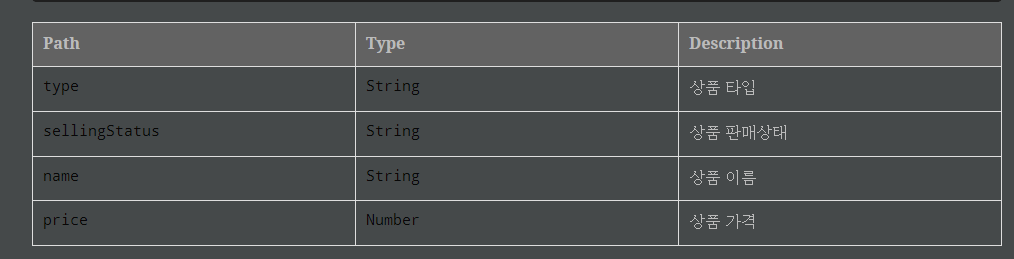
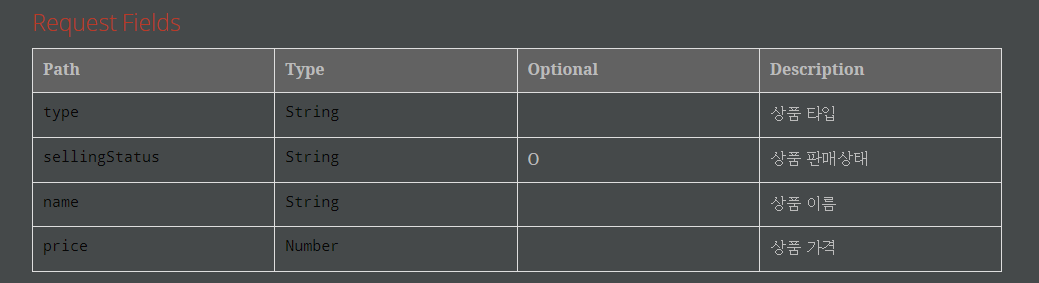
PayloadDocumentation.requestFields(
PayloadDocumentation.fieldWithPath("type")
.type(JsonFieldType.STRING)
.description("상품 타입"),
PayloadDocumentation.fieldWithPath("sellingStatus")
.type(JsonFieldType.STRING)
.optional()
.description("상품 판매상태"),
PayloadDocumentation.fieldWithPath("name")
.type(JsonFieldType.STRING)
.description("상품 이름"),
PayloadDocumentation.fieldWithPath("price")
.type(JsonFieldType.NUMBER)
.description("상품 가격")
),
PayloadDocumentation.responseFields(
PayloadDocumentation.fieldWithPath("code")
.type(JsonFieldType.NUMBER)
.description("코드"),
PayloadDocumentation.fieldWithPath("status")
.type(JsonFieldType.STRING)
.description("상태"),
PayloadDocumentation.fieldWithPath("message")
.type(JsonFieldType.STRING)
.description("메시지"),
PayloadDocumentation.fieldWithPath("data")
.type(JsonFieldType.OBJECT)
.description("응답 데이터"),
PayloadDocumentation.fieldWithPath("data.id")
.type(JsonFieldType.NUMBER)
.description("상품 ID"),
PayloadDocumentation.fieldWithPath("data.productNumber")
.type(JsonFieldType.STRING)
.description("상품 번호"),
PayloadDocumentation.fieldWithPath("data.type")
.type(JsonFieldType.STRING)
.description("상품 타입"),
PayloadDocumentation.fieldWithPath("data.sellingStatus")
.type(JsonFieldType.STRING)
.description("상품 판매상태"),
PayloadDocumentation.fieldWithPath("data.name")
.type(JsonFieldType.STRING)
.description("상품 이름"),
PayloadDocumentation.fieldWithPath("data.price")
.type(JsonFieldType.NUMBER)
.description("상품 가격")
)
));
}
}-
protected Object initController()추상화 메서드의 반환값으로 문서화 할ProductController를 반환 -
.andDo(MockMvcRestDocumentation.document("문서 스니펫 식별자",
PayloadDocumentation.requestFields( ... ),
PayloadDocumentation.responseFields( ... ) ));-
문서 스니펫 식별자 (
build/generated-snippets/지정한식별자하위로 스니펫들이 생성된다.) -
요청 필드
-
응답 필드 형식으로 검증한다.
-
테스트가 성공해야 문서가 생성된다.
-
-
PayloadDocumentation.fieldWithPath("sellingStatus")
.type(JsonFieldType.STRING)
.optional()
.description("상품 판매상태"),-
필드명, 타입, 추가설명으로 이루어진다.
-
특정 객체 하위의 필드명은
객체.필드로 표현한다.- ex)
PayloadDocumentation.fieldWithPath("data.price") ...
- ex)
-
특정 필드가 꼭 있어야하는 필수 필드가 아니면,
.optional()을 붙인다.
-
-
Preprocessors.preprocessRequest(Preprocessors.prettyPrint()),
Preprocessors.preprocessResponse(Preprocessors.prettyPrint()),- 문서에서 요청과 응답 JSON 을 보기좋게 포맷팅한다.
AsciiDoc 문서 작성
-
문서 빌드
Gradle➔Tasks➔build➔build실행
-
문서 형식 커스터마이징
-
test/resources/org/springframework/restdocs/templates디렉토리 하위에 -
request-fields.snippet,response-fields.snippet등의 템플릿을 생성하여 문서의 형식을 커스터마이징 할 수 있다.
-
==== Request Fields
|===
|Path|Type|Optional|Description

{{#fields}}

|{{#tableCellContent}}`+{{path}}+`{{/tableCellContent}}
|{{#tableCellContent}}`+{{type}}+`{{/tableCellContent}}
|{{#tableCellContent}}{{#optional}}O{{/optional}}{{/tableCellContent}}
|{{#tableCellContent}}{{description}}{{/tableCellContent}}

{{/fields}}

|===
==== Response Fields
|===
|Path|Type|Optional|Description
{{#fields}}
|{{#tableCellContent}}`+{{path}}+`{{/tableCellContent}}
|{{#tableCellContent}}`+{{type}}+`{{/tableCellContent}}
|{{#tableCellContent}}{{#optional}}O{{/optional}}{{/tableCellContent}}
|{{#tableCellContent}}{{description}}{{/tableCellContent}}
{{/fields}}
|===
|{{#tableCellContent}}{{#optional}}O{{/optional}}{{/tableCellContent}}
- 문서 테이블에
optional필드를 추가하였다.optional인 경우O체크한다.
(템플릿 적용 전)
(템플릿 적용 후)
-
index.adoc파일 작성src/docs/asciidoc경로에 작성
ifndef::snippets[]
// :snippets: ../../../build/generated-snippets     없어도 된다.
endif::[]
= CafeKiosk REST API 문서
:doctype: book
:icons: font
:source-highlighter: highlightjs
:toc: left
:toclevels: 2
:sectlinks:

[[Product-API]]
== Product API

[[product-create]]
=== 신규 상품 등록

==== HTTP Request
include::{snippets}/product-create/http-request.adoc[]
include::{snippets}/product-create/request-fields.adoc[]

==== HTTP Response
include::{snippets}/product-create/http-response.adoc[]
include::{snippets}/product-create/response-fields.adoc[]
index.adoc파일
:snippets경로는 자동으로build하위의generated-snippets폴더로 잡아준다.
-
문서 모듈화
-
문서들을 모듈화하여 내용은 분리하고
-
index.adoc에서 include 하여 하나의 문서로 통합하여 보여줄 수 있다.
-
ifndef::snippets[]
// :snippets: ../../../build/generated-snippets     없어도 된다.
endif::[]
= CafeKiosk REST API 문서
:doctype: book
:icons: font
:source-highlighter: highlightjs
:toc: left
:toclevels: 2
:sectlinks:

[[Product-API]]
== Product API

include::api/product/product.adoc[]
index.adoc파일
include::api/product/product.adoc[]
api/product/product.adoc파일을 include
[[product-create]]
=== 신규 상품 등록

==== HTTP Request
include::{snippets}/product-create/http-request.adoc[]
include::{snippets}/product-create/request-fields.adoc[]

==== HTTP Response
include::{snippets}/product-create/http-response.adoc[]
include::{snippets}/product-create/response-fields.adoc[]
product.adoc파일
src/docs/asciidoc/+api/product/경로에 위치한다.
jar 파일을 실행하여 서버를 띄운 후, /docs/index.html 로 접속하여 API 문서를 확인할 수 있다.
출처
Practical Testing: 실용적인 테스트 가이드 (박우빈 강사님)
https://www.inflearn.com/course/practical-testing-%EC%8B%A4%EC%9A%A9%EC%A0%81%EC%9D%B8-%ED%85%8C%EC%8A%A4%ED%8A%B8-%EA%B0%80%EC%9D%B4%EB%93%9C
jpaAuditingHandler 에러 (suujeen 님)
https://velog.io/@suujeen/Error-creating-bean-with-name-jpaAuditingHandler
@Spy stubbing (깡냉쓰 님)
https://cornswrold.tistory.com/480
@Transaction (테코블 파피 님)
https://tecoble.techcourse.co.kr/post/2021-05-25-transactional/

훌륭한 글 감사드립니다.