
6. 연산자 - 계산의 시작
1. 산술 연산자
- 기본적인 사칙 연산
int a = 10;
int b = 3;

// 기본 사칙연산
int sum = a + b;
System.out.println("sum = " + sum);

int sub = a - b;
System.out.println("sub = " + sub);

int mul = a * b;
System.out.println("mul = " + mul);- 나눗셈에서 주의할 점
int a = 10;
int b = 3;

...

int div = a / b;
System.out.println("div = " + div); // ⚠️ 3 (소수점 버려짐)

double div2 = a / 3.0;
System.out.println("div2 = " + div2); // ✅ 3.333... (소수점 유지)- 모듈러 연산자(나머지 연산)
int mod = 10 % 3;
System.out.println("mod = " + mod); // 나머지: 1

int mod2 = 15 % 4;
System.out.println("mod2 = " + mod2); // 나머지: 3

int mod3 = 20 % 7;
System.out.println("mod3 = " + mod3); // 나머지: 6
2. 대입 연산자
- 대입연산자(=)
int num = 5;
System.out.println("변수 num의 값: " + num); // 10- 복합 대입 연산자(+=, -=, /=, %=)
- 누적 값을 구할 때 활용
int num = 5;
num += 3;  // num = num + 3;
System.out.println("+= 결과: " + num); // 8

num -= 2;  // num = num - 2;
System.out.println("-= 결과: " + num); // 6

num *= 2;  // num = num * 2;
System.out.println("*= 결과: " + num); // 12

num /= 3;  // num = num / 3;
System.out.println("/= 결과: " + num); // 4

num %= 3;  // num = num % 3;
System.out.println("%= 결과: " + num); // 1
3. 증감 연산자
-
증감 연산자의 활용
- 전위연산(++i) = 연산 후 사용
int a = 5; System.out.println("++a: " + (++a)); // 6 (먼저 증가 후 출력) System.out.println("현재 a 값: " + a); // 6- 후위연산(i++) = 사용 후 연산
int b = 5;
System.out.println("b++: " + (b++));  // 5 (출력 후 증가)
System.out.println("현재 b 값: " + b);  // 6
4. 비교 연산자
- 같음 연산자(==)
System.out.println("10 == 10: " + (10 == 10)); // true- 다름 연산자(!=)
System.out.println("10 != 5: " + (10 != 5)); // true- 크기 비교 연산자(>, < ,<=,>=)
System.out.println("10 < 5: " + (10 < 5)); // false
System.out.println("10 >= 10: " + (10 >= 10)); // true
System.out.println("10 <= 5: " + (10 <= 5)); // false| 연산자 | 설명 | 예제 | 결과 |
|---|---|---|---|
| == | 두 값이 같으면 true | 10 == 10 | true |
| != | 두 값이 다르면 ture | 10 != 5 | true |
| > | 왼쪽 값이 크면 true | 10 > 5 | true |
| < | 왼쪽 값이 작으면 true | 10 < 5 | false |
| >= | 왼쪽 값이 크거나 같으면 true | 10 >= 10 | true |
| <= | 왼쪽 값이 작거나 같으면 true | 10 <= 5 | false |
5. 논리 연산자
- AND 연산자( && ) 두 조건 모두 참일 때 ture
System.out.println("true && true: " + (true && true));  // true
System.out.println("true && false: " + (true && false)); // false
System.out.println("false && false: " + (false && false)); // false

int age = 20;
boolean isStudent = true;
System.out.println(age > 18 && isStudent); // true- OR 연산자( || )둘 중 하나라도 참이면 ture
System.out.println("true || false: " + (true || false)); // true
System.out.println("false || false: " + (false || false)); // false
System.out.println("true || true: " + (true || true)); // true


int age = 20;
boolean isStudent = true;
System.out.println(age > 18 || isStudent); // true- NOT 연산자( ! ) true일때 false, false일때 true
System.out.println("!true: " + (!true));  // false
System.out.println("!false: " + (!false)); // true


int age = 20;
boolean isStudent = true;
System.out.println(age > 18 && isStudent); // true
6. 연산자 우선순위
- ( )를 가장 우선으로 처리
- 사칙연산 우선 처리
System.out.println(10 - 3 * 2);
// 실행 순서: 10 - (3 * 2)
// → 10 - 6
// → 4
3.기본 연산자 우선순위 (산술 -> 비교 -> 논리 -> 대입)
boolean flag = 10 + 5 > 12 && true;
System.out.println(flag);
// 실행 순서: (10 + 5) > 12 && true : 산술
// → 15 > 12 && true : 비교
// → true && true : 논리
// → flag = true 대입- 비교 연산자와 산술 연산자의 우선순위
System.out.println(10 - 3 > 5 + 1);
// 실행 순서: (10 - 3) > (5 + 1) : 산술
// → 7 > 6 : 비교
// → true- 논리 연산자 우선순위( ! -> && -> ||)
boolean result = true || false && !false;
// 실행 순서: true || (false && false)
// → true || false
// → true
7. 문자열 비교
- 실무에서 문자열 비교는 == 을 사용하지 않는다.
- .equals() 활용(동등성, 동일성 문제)
String text1 = "Hello";
String text2 = "Hello";
boolean isEqual = text1.equals(text2);
System.out.println("text1과 text2가 같은가? " + isEqual);
//출력결과: text1과 text2가 같은가? true
8. 실습 문제
- 산술 연산자 문제
- 두 개의 정수 a 와 b 가 주어졌을 때 두 수의 합, 차, 곱, 나누기 결과를 변수에 저장하는 출력하는 프로그램을 작성하세요.(%모듈러 연산도 포함하세요)
public class Main {
    public static void main(String[] args) {
        int a; // 값 할당 필요
        int b; // 값 할당 필요


        // 1. 더하기
        // 1. 더하기 결과 출력

        // 2. 빼기
        // 2. 빼기 결과 출력

        //....
    }
}
//풀이
public class Main {
public static void main(String[] args) {
int a = 15;
int b = 4;
int c = a + b;
int d = a - b;
int e = a * b;
int f = a / b;
int g = a % b;
System.out.println("덧셈: " + c);
System.out.println("뺄셈: " + d);
System.out.println("곱셈: " + e);
System.out.println("나눗셈: " + f);
System.out.println("나머지: " + g);
}
}- 비교 연산자 문제
- 두 개의 정수
x와y가 주어졌을 때
-x가y보다 큰지 (>)
-x가y보다 작은지 (<)
-x와y가 같은지 (==)
-x와y가 다르면 (!=)각각의 결과를 변수에 저장하고 출력하는 프로그램을 작성하세요.
- 두 개의 정수
//풀이
public class Main {
    public static void main(String[] args) {
        int a = 10;
        int b = 20;

        boolean c = a > b;
        boolean d = a < b;
        boolean e = a == b;
        boolean f = a != b;

        System.out.println("a > b: " + c);
        System.out.println("a < b: " + d);
        System.out.println("a == b: " + e);
        System.out.println("a != b: " + f);
    }
}
3. 두 문자열이 같은지 비교할 수 있는 프로그램 - 입력한 두 개의 문자열 `str1`과 `str2` 을 비교한 결과를 `result` 에 담아서 출력하세요. - 두 문자열이 같은지 비교할 때 활용 (`.equals()`)
//풀이
import java.util.Scanner;

	public class Main {
		public static void main(String[] args) {

		Scanner scanner = new Scanner(System.in);

        System.out.println("1번 문구를 작성해주세요: ");
        String str1 = scanner.nextLine();
        System.out.println("1번 문구를 작성해주세요: ");
        String str2 = scanner.nextLine();

        boolean result = str1.equals(str2);

        System.out.println("결과: " + result);
    }
}
7. 조건문 - 프로그램의 선택지
1. 조건문
- 마주할 조건을 미리 정의하여 프래그램을 조건에 맞게 동작
2. 조건문 구조
- if문 구조
if (1 < 2) { // true
	명령문; // ✅
}

if (2 < 1) { // false
	명령문; // ❌
}
3. if문 실습
- if 문
(1) light 변수 저장
(2) 조건 확인
(3) true 면 실행
(4) 다음 코드 진행- if-else
(1) light 변수 저장
(2) 조건 확인
(3) true 면 실행 / false 면 진행
(5) 다음 코드 진행- else if
public class Main {
    public static void main(String[] args) {
        String light = "초록불";               // (1)

        if (light.equals("초록불")) {          // (2)
            System.out.println("건너세요!");    // (3)

        } else if (light.equals("노란불")) {   // (4)
            System.out.println("주의하세요!");   // (5)

        } else {
            System.out.println("멈추세요!");    // (6)
        }

        // (7) 다음코드 진행
    }
}
4. Switch
- switch문은 값에 따라 여러 동작을 실행
switch (단일값) {
    case 값1:
        // 값1일 때 실행할 코드
        break;
    case 값2:
        // 값2일 때 실행할 코드
        break;
    default:
        // 위의 값들과 일치하지 않을 때 실행할 코드
}
//예제 코드
public class SwitchNumber {
public static void main(String[] args) {
int number = 1;
switch (number) {
case 1:
System.out.println("1 입니다.");
break;
case 2:
System.out.println("2 입니다.");
break;
default:
System.out.println("1 도 아니고 2도 아닙니다.");
}
}
}5. 실습 문제
- 신호등 색상을 입력하면 올바른 안내 메시지를 출력하는 프로그램
import java.util.Scanner;
public class Main {
public static void main(String[] args) {
Scanner scanner = new Scanner(System.in);
System.out.println("신호등의 색상을 입력하세요(초록불, 노랑불, 빨강불): ");
String light = scanner.nextLine();
switch (light) {
case "초록불":
System.out.println("건너세요!");
break;
case "노랑불":
System.out.println("주의하세요!");
break;
case "빨간불":
System.out.println("멈추세요!");
break;
default:
System.out.println("잘못 작성하였습니다.");
}
}
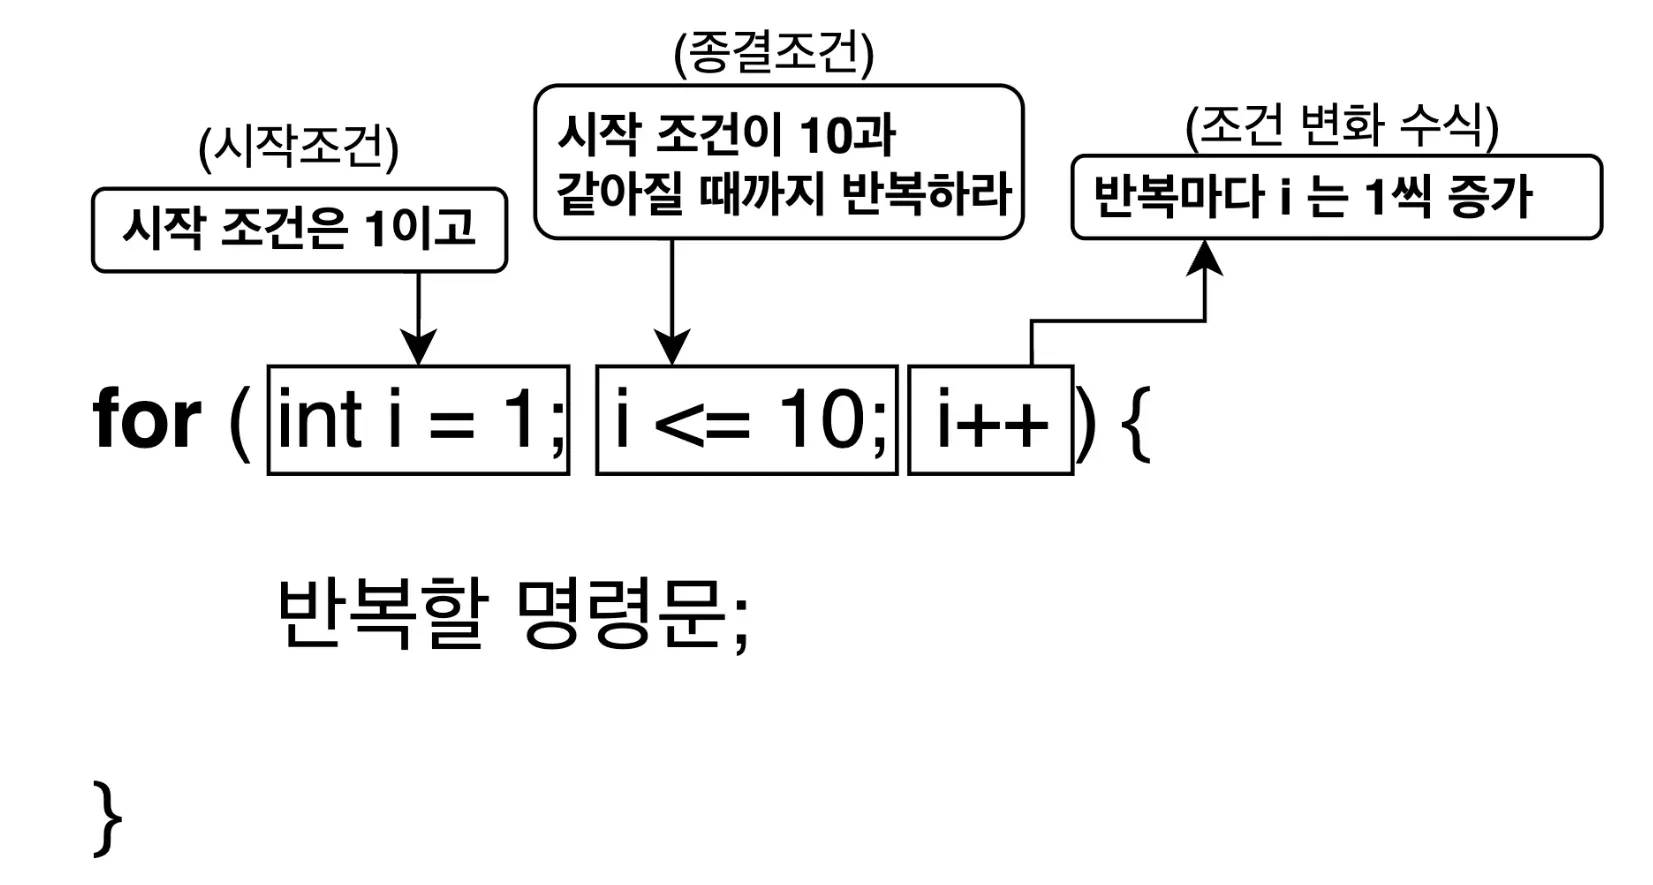
}8. 반복문 - 장도화의 첫걸음
1. 반복문
- 무언가를 단순 반복 계산할때 사용
System.out.println("안녕하세요!");
System.out.println("안녕하세요!");
System.out.println("안녕하세요!");
System.out.println("안녕하세요!");
System.out.println("안녕하세요!");

//반복문 사용시
for (int i = 1; i < 6; i++) {
    System.out.println("안녕하세요!");
}
2. 첫 번째 반복문 for
- for문의 구조
- break문과 함께 사용 예시
public class Robot {

    public static void main(String[] args) {

		    int customers = 5;

		    for (int i = 1; i <= customers; i++) {
				    if (i == 4) {
						    break; // (1) 반복을 벗어납니다.
				    }
				    System.out.println(i + "번째 손님, 안녕하세요!");
			  }
			  System.out.println("반복문이 종료되었습니다.");
    }
}- contunue문과 함께 사용 예시
public class Robot {

    public static void main(String[] args) {

		    int customers = 5;

		    for (int i = 1; i <= customers; i++) {
				    if (i == 2) {
						    continue; // (1) 반복을 건너 뜁니다.
				    }
				    System.out.println(i + "번째 손님, 안녕하세요!");
			  }
			  System.out.println("반복문이 종료되었습니다.");
    }
}
3. 두 번째 반복문 while
- while문의 구조
- 종결조건식이 true일때 까지 반복
int i = 1;
while (i <= 10) { // 1은 10보다 작음으로 반복!
		System.out.println("i 가 10 보다 작습니다.");
		i++; // ✅ 없을 경우 무한루프 발생
}
4. 세 번째 반복문 do-while
- do-while문의 구조
- while문과 비슷하지만 종결조건을 반복 전이 아니라 후에 체크
int i = 1;
do {
		System.out.println("안녕하세요.");
		i++;
} while (i <= 10);
5. 실습 문제
- 입력한 숫자의 구구단 출력
import java.util.Scanner;

public class Main {
    public static void main(String[] args) {
        Scanner scanner = new Scanner(System.in);

        System.out.print("출력할 구구단 단수를 입력하세요 (2~9): ");
        int a = scanner.nextInt();

        // 2~9 사이의 숫자인지 확인
        if (a < 2 || a > 9) {
            System.out.println("2에서 9 사이의 숫자를 입력하세요!");
        } else {
            System.out.println("==== " + a + "단 ====");
            for (int i = 1; i <= 9; i++) {
                System.out.println(a + " x " + i + " = " + (a * i));
            }
        }
    }
}
- 구구단 전체 출력(중첩 for문 사용)
public class Main {
    public static void main(String[] args) {

        for(int i = 2; i <= 9; i++){
            System.out.println(i + "단");
            for(int j = 1; j <= 9; j++){
                System.out.println(i + " * " + j + " = " + i * j);
            }
            System.out.println();
        }
    }
}
9. 배열 - 데이터 관리의 시작
1. 배열
- 비슷한 주제의 데이터를 하나의 그룹으로 묶어 표현
- 관련된 데이터를 편리하게 관리
- 모든 자료형의 종류로 배열 만들 수 있음
public class ArrayMain1 {

    public static void main(String[] args) {
        String name1 = "gygim";
        String name2 = "Steve";
        String name3 = "Grace";
        ...
        String name1000 = "Isac";
    }
}
String[] adventurerList = {"gygim", "Steve", "Grace", ...};2. 배열의 길이
- 배열을 만들 때 한 번 크기를 정하면 변경할 수 없음
int arrLenght = adventurerList.length;3. 배열 선언
- new 키워드를 사용해여 배열 선언
자료형[] 변수이름 = new 자료형[배열의길이]; // 배열선언- 배열의 이름과 길이 설정을 각 다른 줄에서도 가능
// 정수형 배열 arr 선언
int[] arr; // ✅ (1) 배열을 선언합니다.
arr = new int[5]; // ✅ (2) 배열의 길이를 5로 설정합니다. // 배열 길이 구하기
int arrLength = arr.length;
System.out.println("arrLength = " + arrLength); // arrLength = 5- 배열 선언
int[] arr = new int[5]; //// ✅ 선언과 동시에 길이를 설정합니다.
int arrLength = arr.length;
System.out.println("arrLength = " + arrLength); // arrLength = 5- int[] arr = new int[5] 은 4바이트인 int 5개로 구성되기에 20바이트
4. 배열의 요소
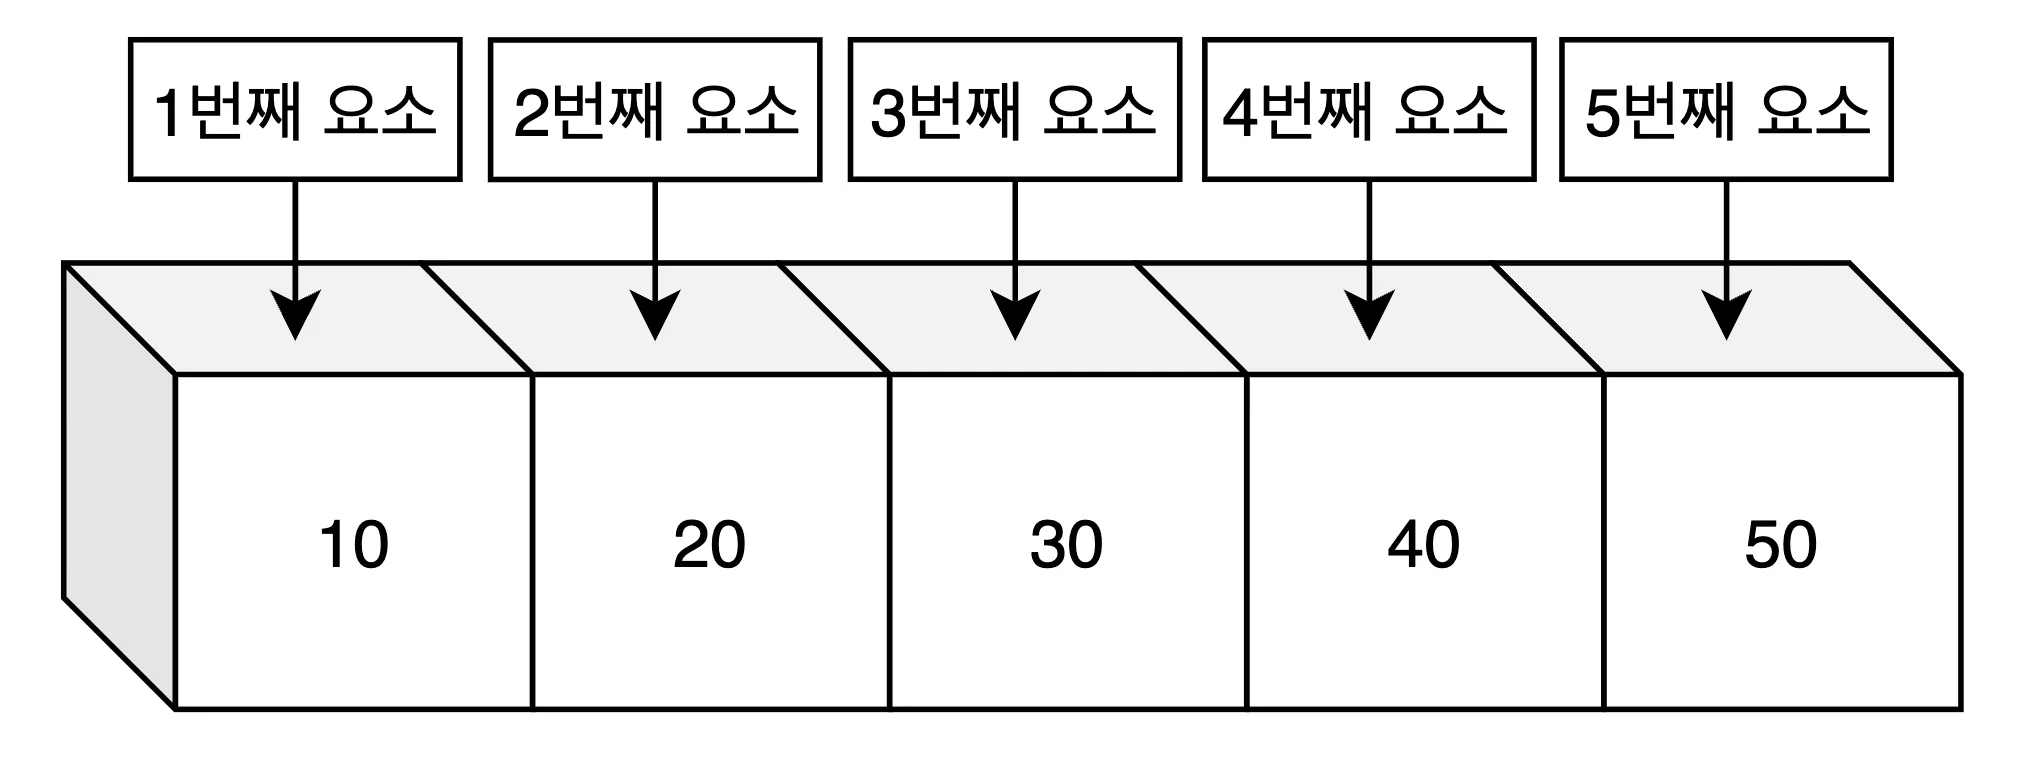
int[] arr = {10, 20, 30, 40, 50}; // ✅ 배열 선언과 동시에 배열의요소 설정5. 인덱스
- 배열의 요소에 접근하는 방법
1.인덱스(index)- index의 시작은 0
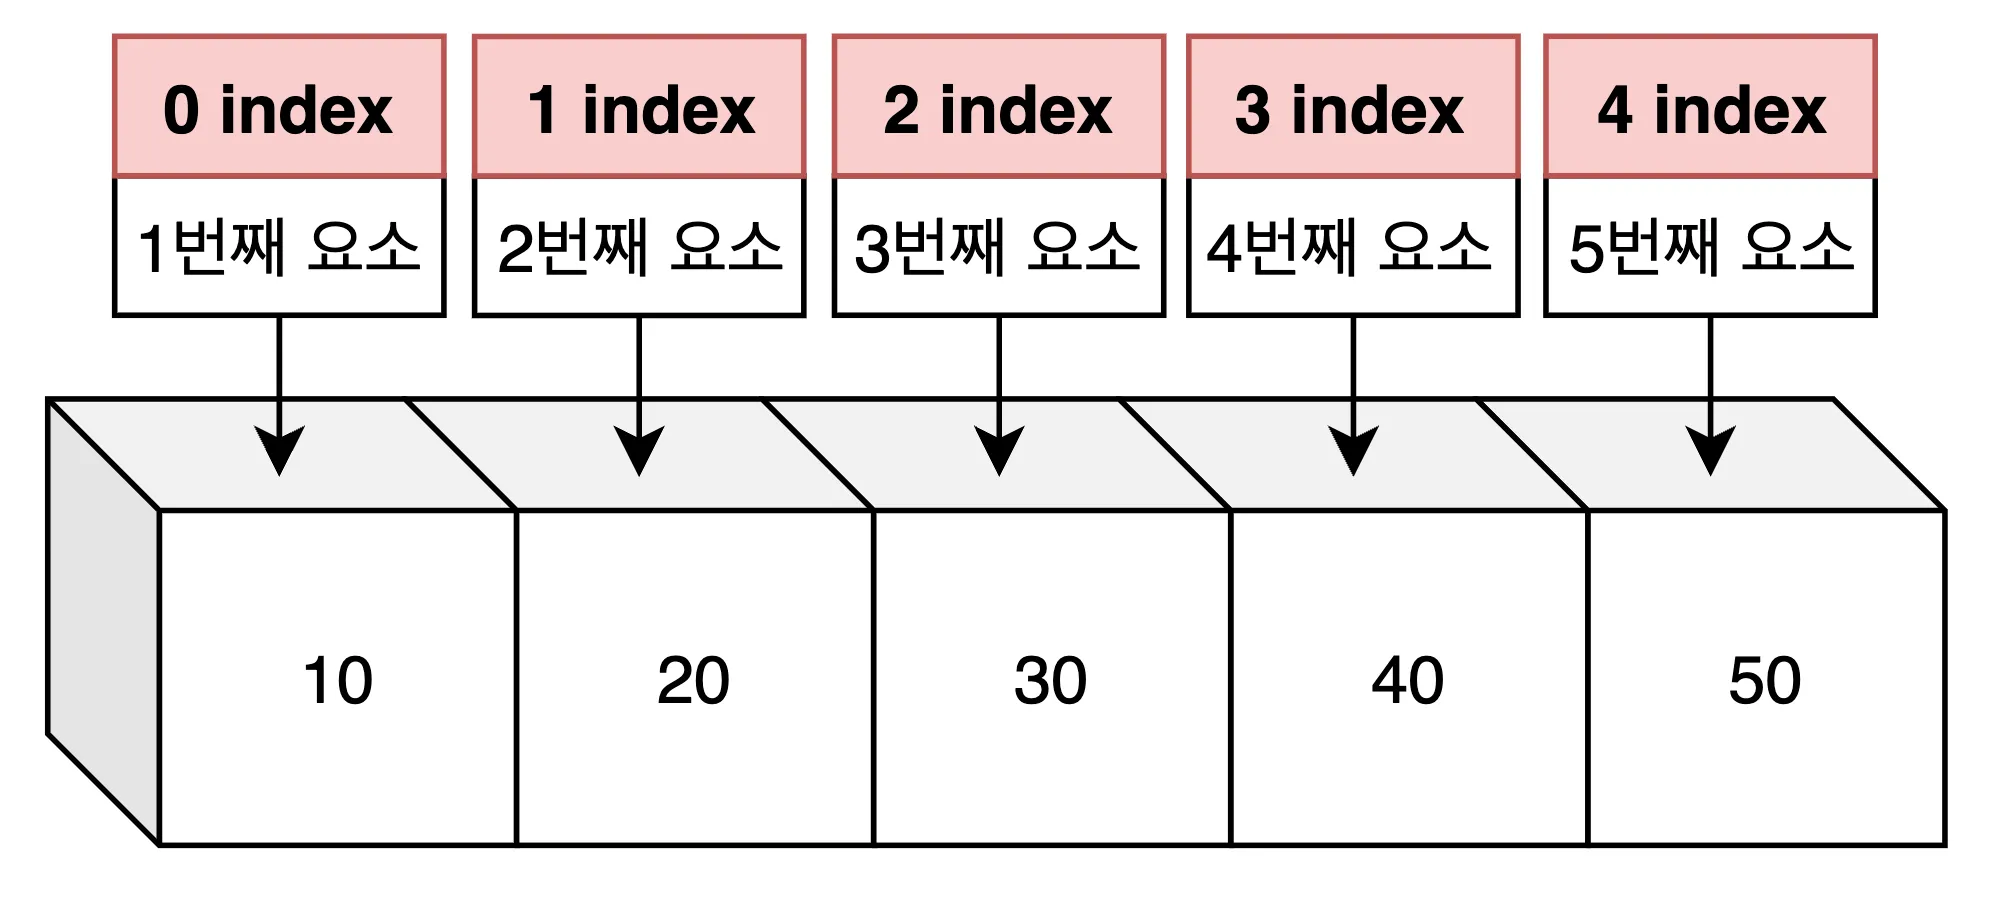
- index의 시작은 0
System.out.println("배열의 1번째 요소 = " + arr[0]);
System.out.println("배열의 2번째 요소 = " + arr[1]);
System.out.println("배열의 3번째 요소 = " + arr[2]);
System.out.println("배열의 4번째 요소 = " + arr[3]);
System.out.println("배열의 5번째 요소 = " + arr[4]);- 배열의 범위를 벗어난 요소에 접근 시
ArrayIndexOutOfBoundsException에러
ex)
int[] arr = {10, 20, 30, 40, 50}; // 5개의 길이를 가진 배열
System.out.println("배열의 6번째 요소 = " + arr[5]); // ❌ 에러 발생
6. 배열에 정보 삽입 수정
- index를 활용해 각 요소의 값을 삽입 수정 가능
int[] arr = new int[5];
arr[0] = 100; // ✅ 1번째 요소를 100로 설정
arr[1] = 200; // ✅ 2번째 요소를 200로 설정
arr[2] = 300; // ✅ 3번째 요소를 300로 설정
arr[3] = 400; // ✅ 4번째 요소를 400로 설정
arr[4] = 500; // ✅ 5번째 요소를 500로 설정
arr[5] = 600; // ❌ 접근 불가
7. 배열 탐색
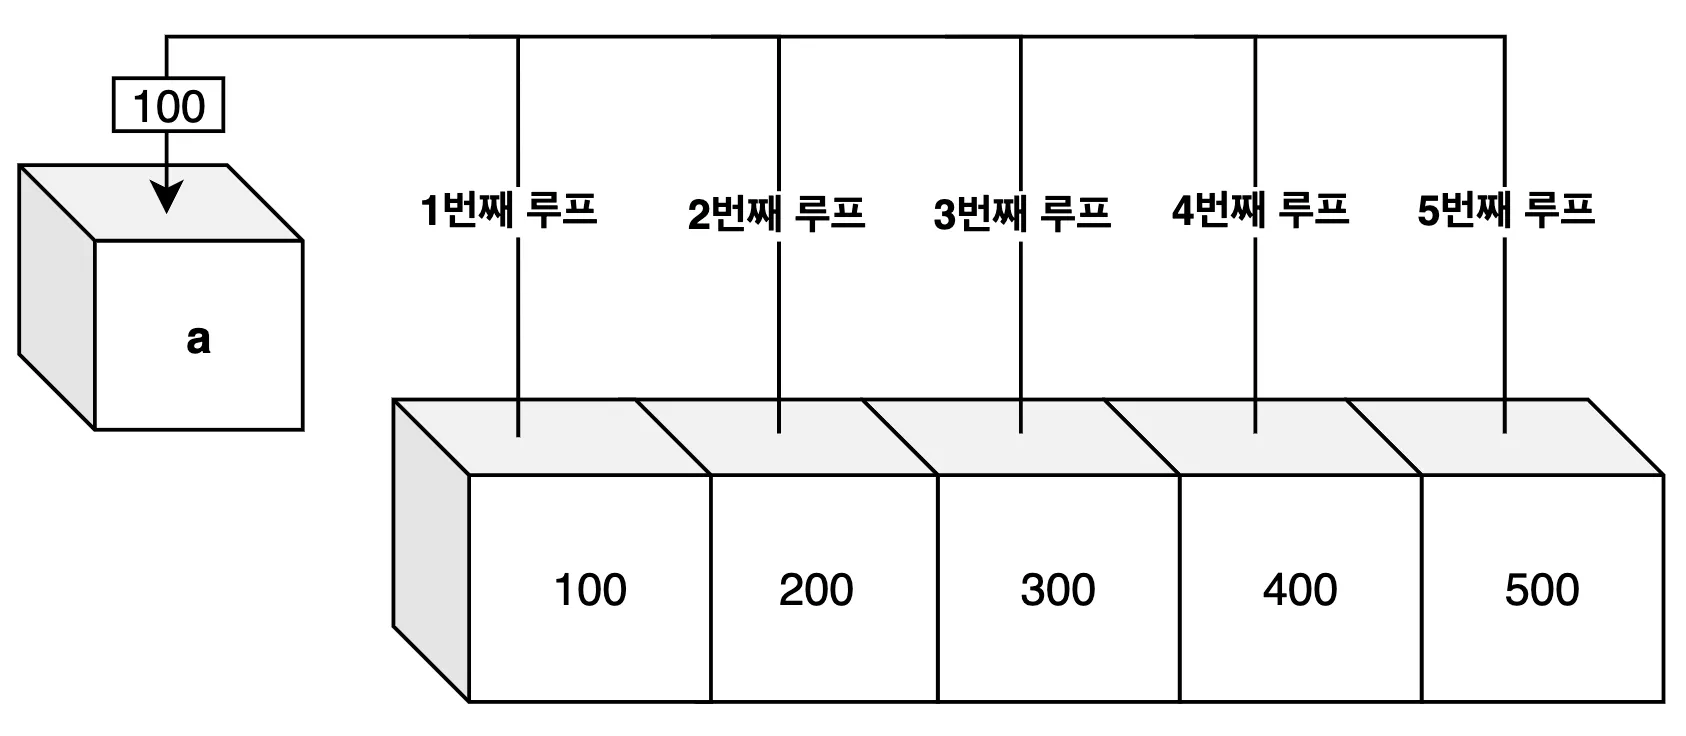
- index를 활용해 배열 탐색
int[] arr = {1, 2, 3, 4, 5};

for (int i = 0; i < arr.length; i++) {
		// ✅ 숫자대신 변수i 를 인덱스 활용
    System.out.println("numbers[" + i + "] = " + arr[i]);
}- 향상된 for문
- 배열의 모든 요소를 하나씩 거내서 활용할 때 편리한 반복문
index직접 활용하지 못합니다.for (int a : arr)→ 배열 arr 에서 하나씩 꺼내서 a 에 저장IndexOutOfBoundsException에러가 발생하지 않습니다.
for(배열의요소 : 배열) {
		명령문;
}
int[] arr = {100, 200, 300, 400, 500};
for (int a : arr) {
System.out.println("배열의 각 요소 = " + a);
}
8. 2차원 배열
- 2차원배열은 2차원적인 정보를 표현
- 첫 번째 인덱스는
행=가로방향 - 두 번째 인덱스는
열=세로방향
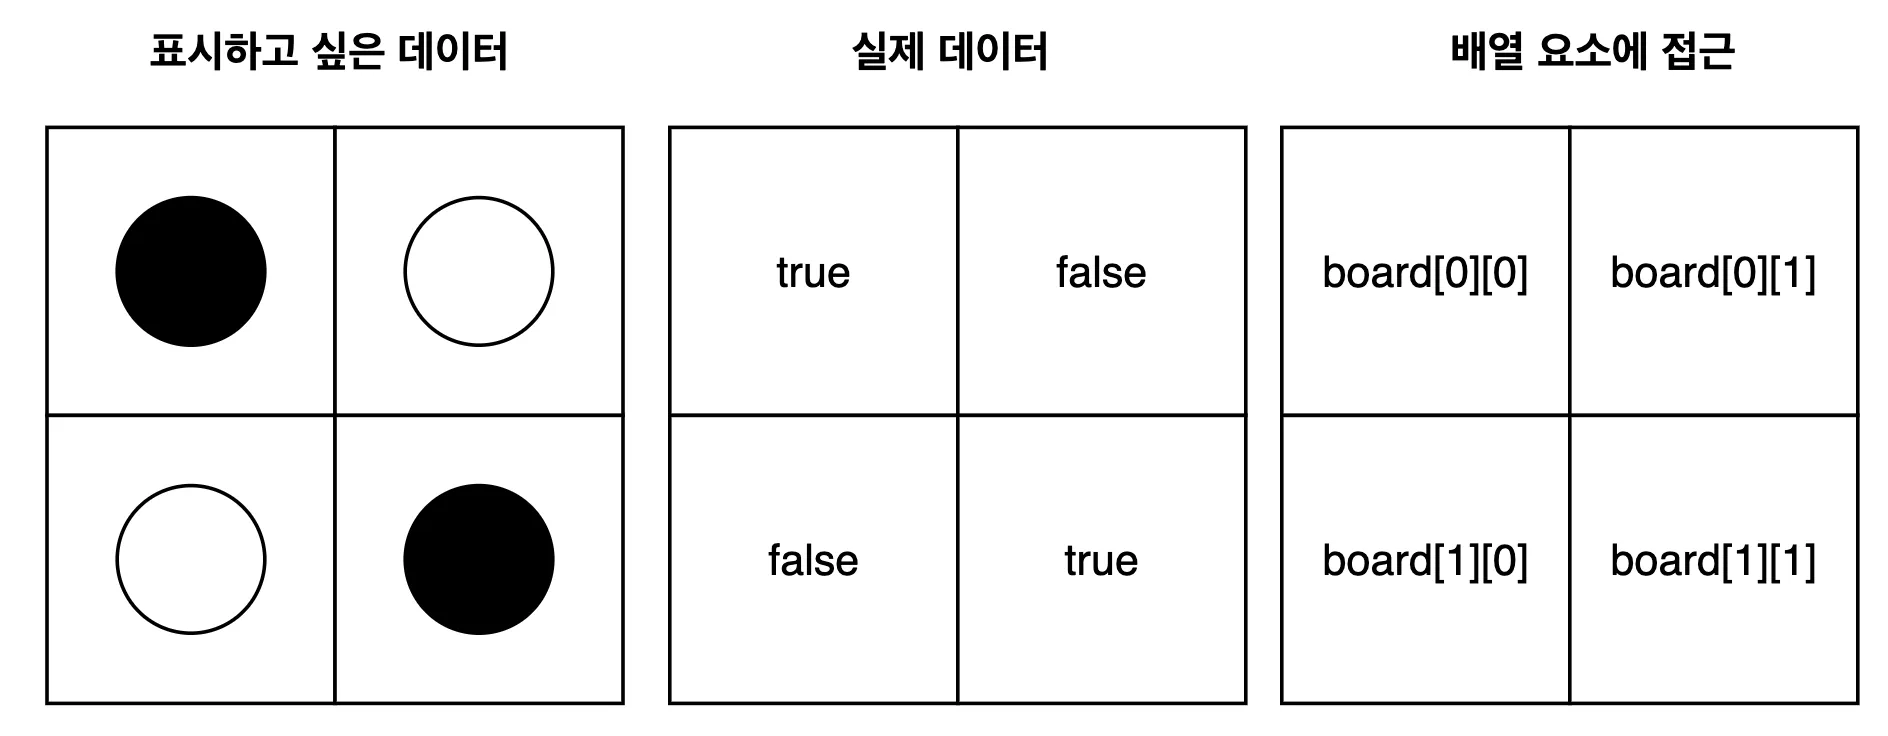
boolean[][] board = new boolean[2][2]; // ✅ 2 x 2 2차원 배열 선언boolean[][] board = {
{true, false}, // 0행의 0열, 0행의 1열,
{false, true} // 1행의 0열, 1행의 1열
};9. 실습 문제
- 1차원 배열에서 짝수만 출력
- 배열 {3, 4, 7, 10, 15, 20}
public class Main {
    public static void main(String[] args) {
        int[] arr = {3, 4, 7, 10, 15, 20};

        for (int i = 0; i < arr.length; i++) {
            if(arr[i] % 2 == 0) {
                System.out.println("짝수: " + arr[i]);
            }
        }

    }
}- 1차배열 누적합
public class Main {
    public static void main(String[] args) {
        int[] arr = {2, 5, 8};
        int sum = 0;

        for(int i = 0; i < arr.length; i++){
            sum += arr[i];
        }
        System.out.println(sum);
    }
}- 2차원 배열에서 검은돌(true)으 좌표(x, y) 찾기
public class Main {
    public static void main(String[] args) {
        boolean[][] a = {
                {true, false},
                {false, true}
        };

        for (int i = 0; i < a.length; i++) {
            for(int j = 0; j < a[i].length; j++) {
                if(a[i][j]) {
                    System.out.println("검은돌(●) 위치: (" + i + "," + j + ")");
                }
            }
        }
    }
}
10. 메서드 - 모듈화의 시작
1. 메서드: 작업단위를 표현하는 방법
- 메서드는 작업을 표현하는 방식
- 함수, 기능이라고도 한다.
- 여러 개의 작은 명령문을 한곳에 모아 사용하는 단위를 메서드라고 한다.
2. 메서드가 필요한 이유
- 모든 일련의 작업들을 한줄 한줄 표현하기 힘듬
- 만약 기능 3을 수정해야한다면 해당 코드를 일일이 찾아 수정하여야한다.
- 기능3이 메서드로 분리되어 있다면 코드가 더 명확해지고 유지 보수가 쉬워진다.
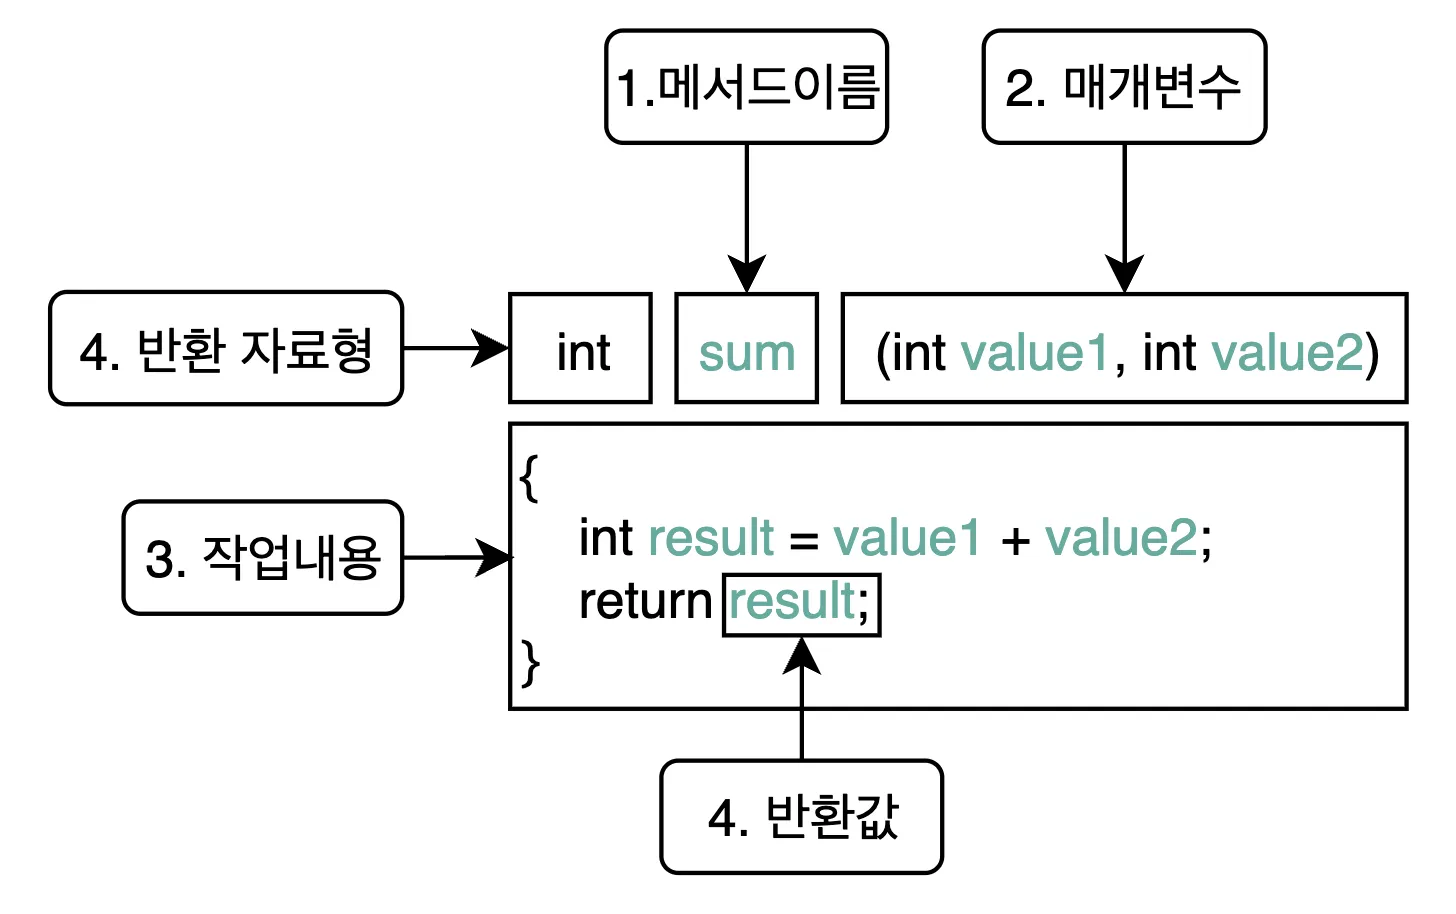
3. 메서드 살펴보기
- 메서드 구조
- 메서드는 항상 클래스 내부에 존재
public class 클래스이름 {

		[반환자료형] [메서드이름](매개변수..) {
				작업 명령문들...
		}
}

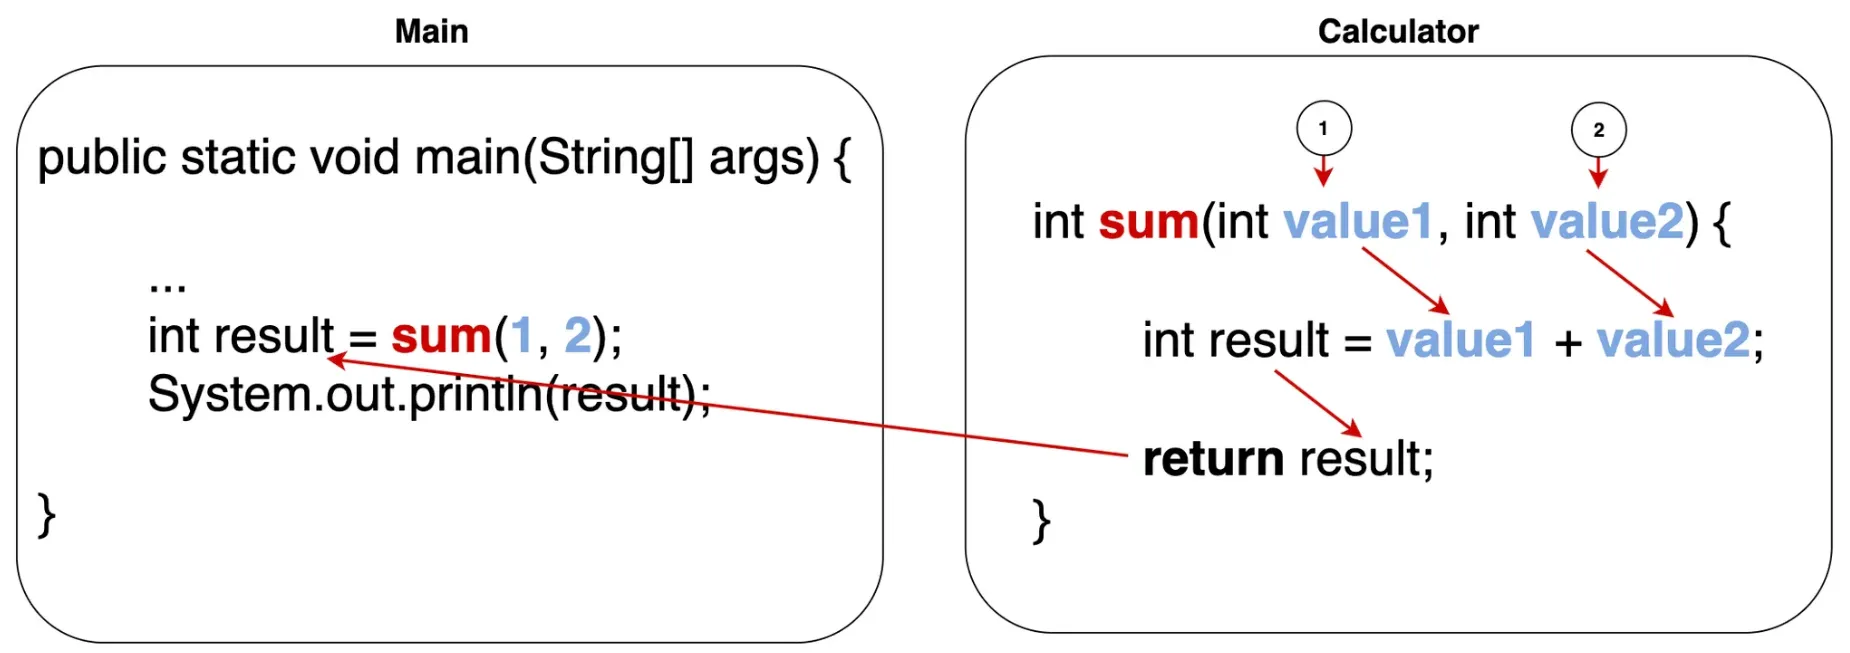
2. 선언부 - Calculator.java
public class Calculator {

		int sum(int value1, value2) { // ✅ 메서드 선언된 곳
				int result = value1 + value2;
				return result;
		}
}
3. 호출부 - Main.java
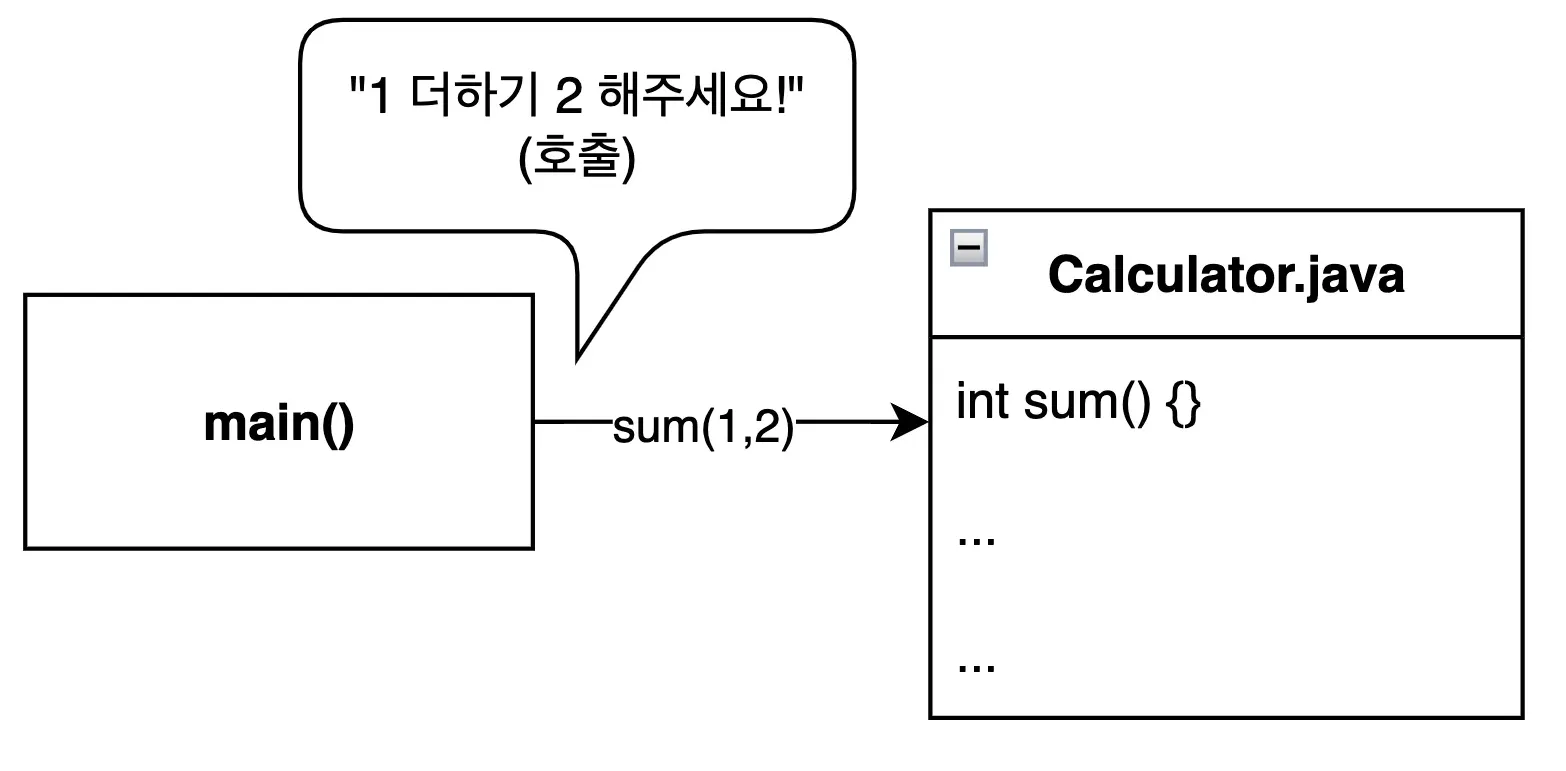
public class Main {

		public static void main(String[] args {
				Calculator calculator = new Calculator(); // ✅ Calculator 객체 소환
				int result = calculator.sum(1, 2); // ✅ 호출부
				System.out.println("결과: " + result);
		}
}
노력하고 있다니까요?