1. 들어가며
2D Diffusion 의 성공 이후로, Diffusion Model 의 막강한 성능에 힘입어 depth, normal map 등의 geometric information 을 diffusion 으로 추론하려는 연구가 이어지고 있다.
1. Marigold: Repurposing Diffusion-Based Image Generators for Monocular Depth Estimation
2. GeoWizard: Unleashing the Diffusion Priors for 3D Geometry Estimation from a Single Image
등이 그 예시인데, 결과를 볼 때 꽤나 잘 되는 것 같으면서도, 이게 실제로 geometric 하게 depth 를 얼마나 잘 예측했나가 바로 와닿지는 않는다. (figure credit: Marigold)
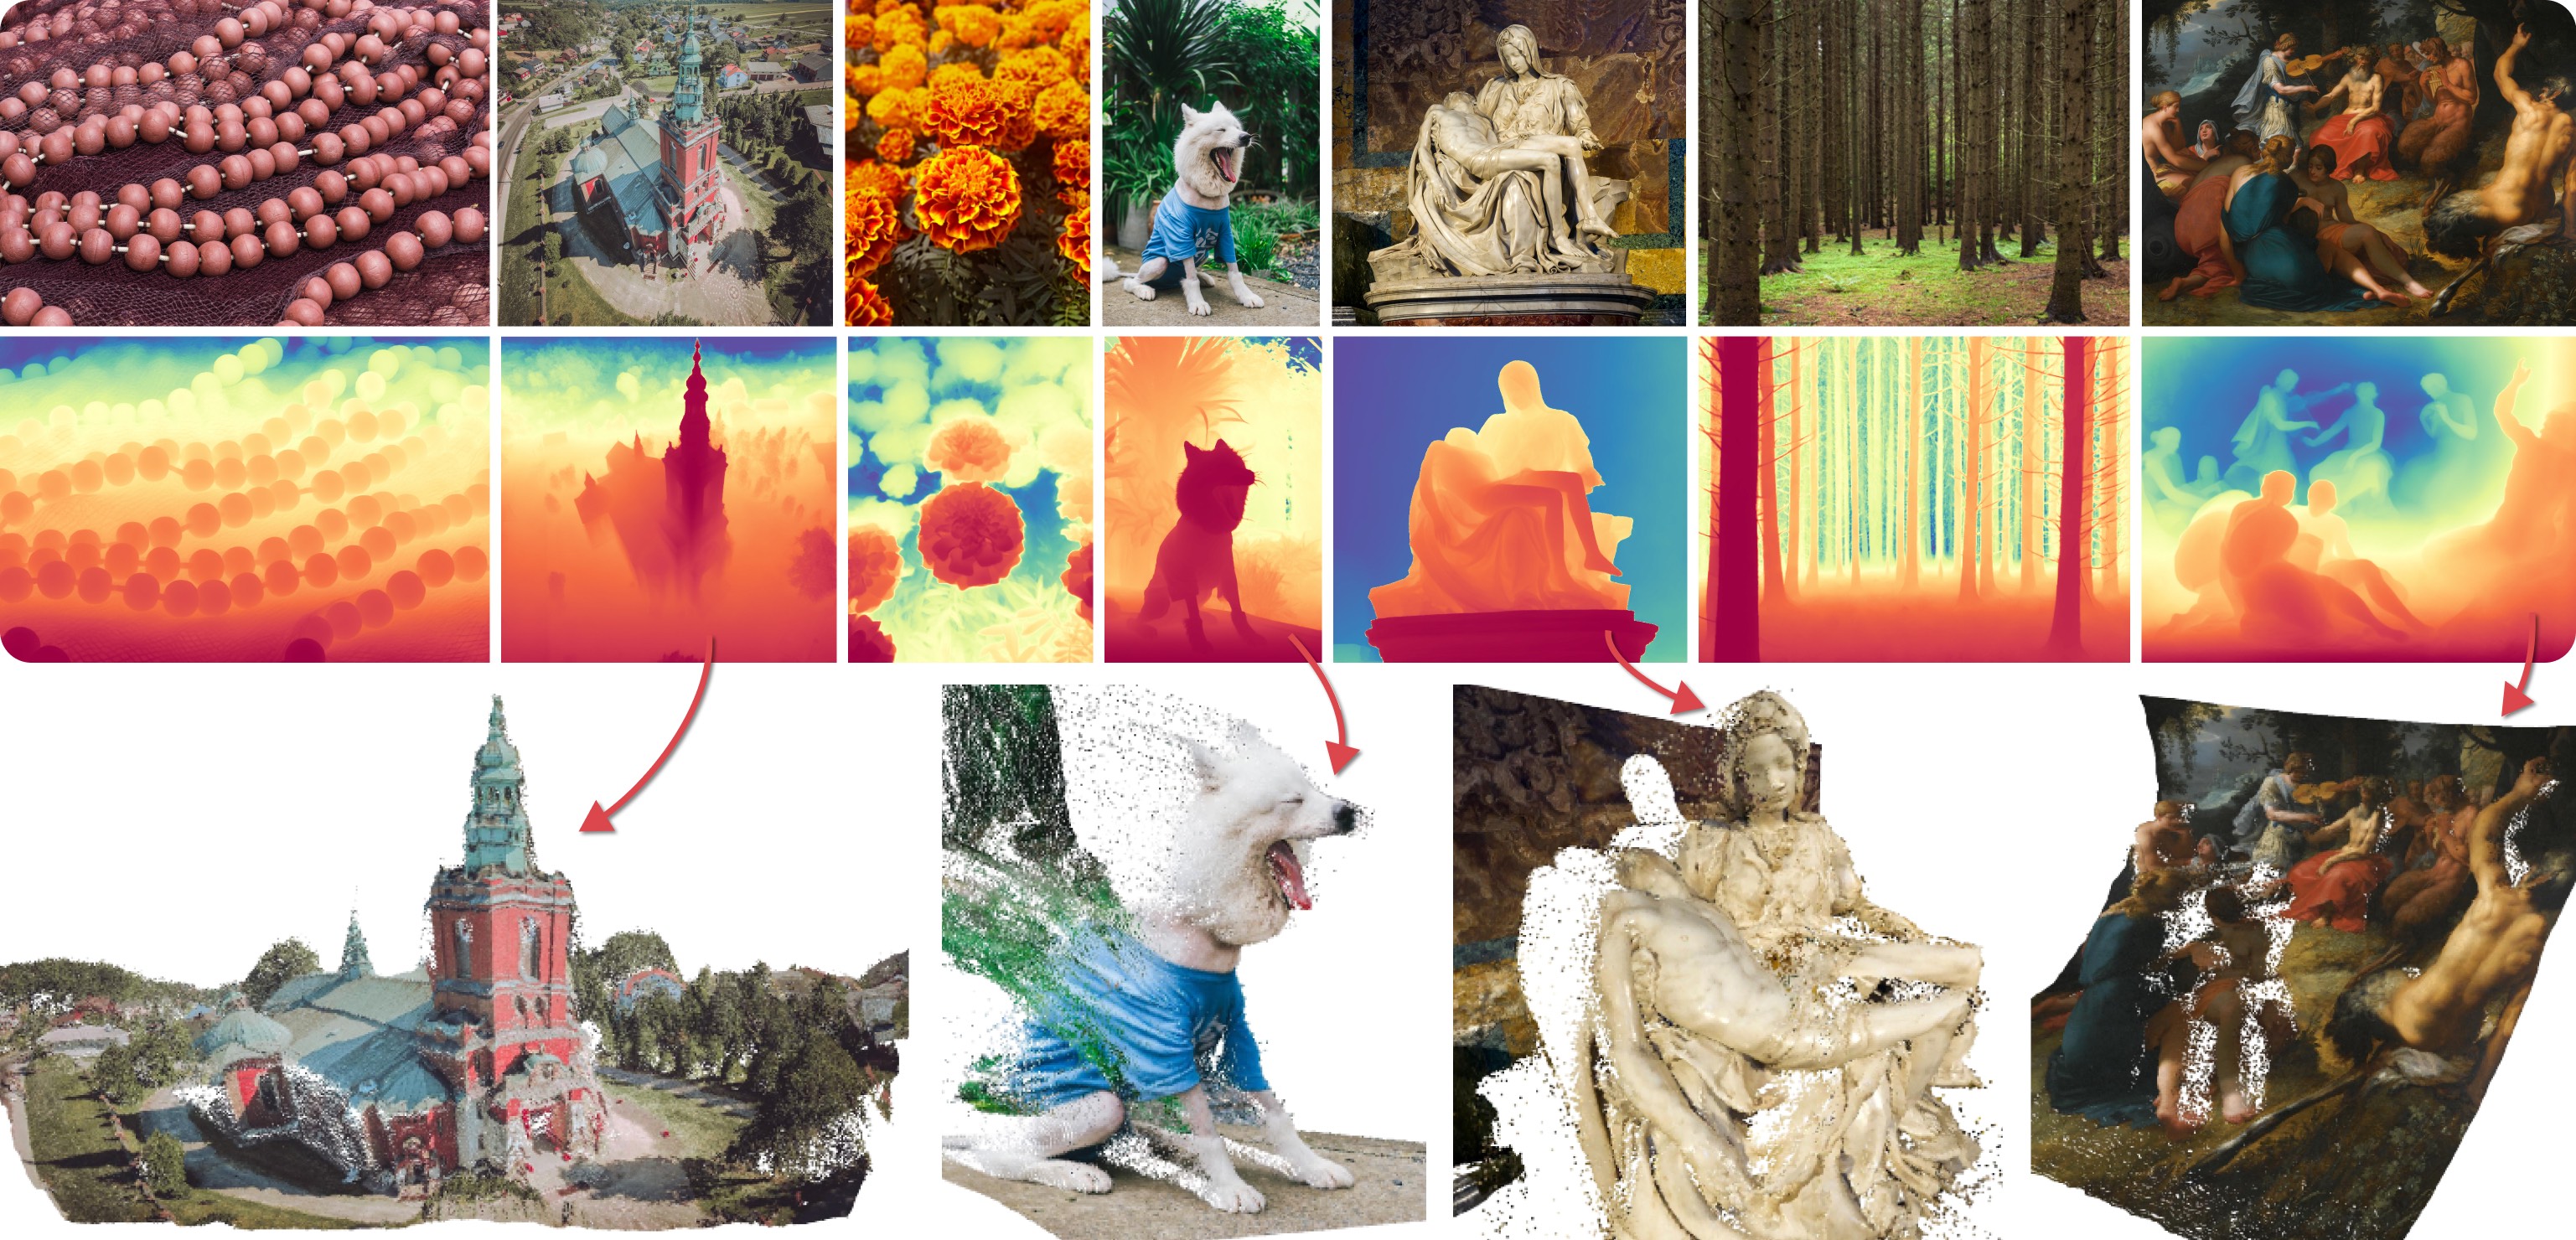
백문이 불여일견, 오늘은 DepthMap 을 통해 pointclouds 나 mesh 를 생성하고, 현재 Marigold 등의 SOTA depth estimation 모델의 성능이 어떠한지 정성적으로 평가해보자.
2. Make 3D Vertices and Faces from Depthmap
우선 depth estimation 의 baseline 으로는 위에서 언급한 Marigold 를 사용한다. light model 이긴 해도 huggingface 에서 demo 도 제공해주고 있어 성능 및 사용의 용이성이 모두 높아 선정하였다. (Demo link)
Marigold 모델을 통해 다음 3가지 output 을 만들 수 있다.
- depthmap_fp32 numpy file
- 16bit grayscale depth map image
- colored depth map image
이 글에서는 image encoding, colorization 등을 거치며 왜곡될 (2), (3) 을 사용하지는 않고 numpy 파일을 바로 읽어서 depth 로 사용할 예정이다. (물론 depth numpy 가 아닌 depth map image 만 있다면, 이를 opencv 등을 이용해서 numpy array 로 읽고 동일한 pipeline 을 사용할 수 있다)
이제 우리는 size 가 (H, W) 인 input image 로부터, depthmap.npy 에서 image 각 pixel 에 1:1 대응하는 depth value 를 가지고 있다.
따라서 우리가 할 일은 단순히 depth value 가 z value 로 mapping 만 시켜주면된다. 이를 python code 로 작성하면 다음과 같이 되겠다.
def map_depth_map_to_point_clouds(depth_map, step_size=1):
    H, W = depth_map.shape[:2]
    yy, xx = np.meshgrid(range(W), range(H))

    vertices = np.zeros((H, W, 3))
    vertices[..., 1] = xx * step_size
    vertices[..., 0] = yy * step_size
    vertices[..., 2] = depth_map

    return vertices
이렇게 함수 하나로 간단하게 끝나면 좋겠지만, textured pointclouds 가 아니라 mesh 를 생성해주기 위해서는 vertex 뿐만 아니라 vertex 로 이루어지는 face 정보도 정의해야한다.
하지만 우리는 face 를 이루는 그 어떤 정보도 알지 못하므로, image pixel 하나를 face 하나로 정의하는 함수를 만들어서 quadfacet 을 정의하여 사용하기로 하였다.
def construct_facets_from(mask):
    idx = np.zeros_like(mask, dtype=int)
    idx[mask] = np.arange(np.sum(mask))

    facet_move_top_mask = move_top(mask)
    facet_move_left_mask = move_left(mask)
    facet_move_top_left_mask = move_top_left(mask)
    facet_top_left_mask = np.logical_and.reduce((facet_move_top_mask, facet_move_left_mask, facet_move_top_left_mask, mask))

    facet_top_right_mask = move_right(facet_top_left_mask)
    facet_bottom_left_mask = move_bottom(facet_top_left_mask)
    facet_bottom_right_mask = move_bottom_right(facet_top_left_mask)

    return np.stack((4 * np.ones(np.sum(facet_top_left_mask)),
               idx[facet_top_left_mask],
               idx[facet_bottom_left_mask],
               idx[facet_bottom_right_mask],
               idx[facet_top_right_mask]), axis=-1).astype(int)
여기서 'move left' 나, 'move top right' 등의 함수는 image 를 각 방향으로 1칸씩 이동시키고 이동한 반대 부분을 모두 0으로 채우는 함수이다. 예를 들어 다음과 같이 정의할 수 있다.
def move_left(mask):
    return np.pad(mask,((0,0),(0,1)),'constant',constant_values=0)[:, 1:]

def move_top_right(mask):
    return np.pad(mask,((0,1),(1,0)),'constant',constant_values=0)[1:, :-1]
최종적으로 depthmap npy 파일을 읽어 vertex, face 를 return 하는 함수를 작성해보자.
def get_mesh_from_depth(outname, scale=None):
    depth_map = np.load(f'./depth_to_textured_mesh/{outname}_depth_fp32.npy')
    if scale is None:
        scale = np.sqrt(depth_map.shape[0] * depth_map.shape[1])
    vertices = map_depth_map_to_point_clouds((1-depth_map) * scale)
    facets = construct_facets_from(np.ones(depth_map.shape).astype(bool))

    faces = []
    with tqdm(facets) as pbar:
        pbar.set_description(f'[Info] Constructing triangular faces')
        for face in pbar:
            _, v1, v2, v3, v4 = face
            faces.append([3, v1, v2, v3])
            faces.append([3, v1, v3, v4])
    faces = np.array(faces)

    return vertices, faces
여기서 scale 은 depth value 에 곱해주는 값으로 설정하였다. depthmap numpy array 가 0~1 range 를 가지므로, 보통은 image size 로 곱해주면 적당히 괜찮은 모습을 보여주지만, 간혹 image size 를 곱해주는 것이 너무 크거나 작은 경우가 있기에 input 으로 설정하였다.
또 한가지 눈여겨볼 점은 face 를 triangular face 로 split 하는 부분이다. open3d 나 trimesh 등 mesh 관련 python library 를 사용할 때, quadface 로 정의된 mesh 를 load 하면 간혹 error 가 나는 경우가 있기 때문에 quadface 를 triangular face 로 나누어 할당하였다. 병렬화나 고속화 등을 고려하지 않고 for 문으로 일괄 처리하기 때문에 High-Resolution Input 에 대해서 이 부분의 시간이 많이 걸린다.
3. Textured Mesh from Depthmap
Texturing... 은 원래 3D asset 생성 과정에서 굉장히 중요한 문제지만, 현재 우리가 하고 있는 task 에 한정해서는 vertex 개수가 image size 와 동일하기 때문에 이미지 pixel color 를 그대로 vertex color 로 사용하여도 문제가 없다.
따라서 open3d 등의 library 를 이용해 input image 를 load 하여 vertex color 로 설정해주면, depth map 으로부터 textured mesh 가 완성된다.
def make_textured_mesh(outname, scale=None):
    textures = cv2.imread(f'./depth_to_textured_mesh/{outname}.jpeg')
    textures = cv2.cvtColor(textures, cv2.COLOR_BGR2RGB)
    textures = textures / 255
    vertices, faces = get_mesh_from_depth(outname, scale)

    mesh = o3d.geometry.TriangleMesh()
    mesh.vertices = o3d.utility.Vector3dVector(vertices.reshape(-1, 3))
    mesh.triangles = o3d.utility.Vector3iVector(faces[:, 1:])
    mesh.vertex_colors = o3d.utility.Vector3dVector(textures.reshape(-1, 3))

    o3d.io.write_triangle_mesh(f'./depth_to_textured_mesh/test/{outname}_textured_mesh.ply', mesh)

    return mesh
참고로 open3d library 를 사용하였기 때문에, mesh simplification 을 custom 하게 짜지 않고도 open3d 에 정의된 decimation 이나 laplacian smoothing 등을 편하게 이용할 수 있다.
현재 코드로는 HD, FHD 정도의 사진은 괜찮은 size 의 mesh 를 생성하지만, 4K image 에 대해서는 vertex 와 face 의 갯수가 너무 많아 MeshLab 등에서 이를 visualize 하는데는 좀 버벅인다. 이러한 경우에는 상기 simplification 을 통해 mesh vertex 를 줄여서 사용하는 편이 정신건강에 이롭다. 또한 FHD input 만 돼도 현재 code 상으로 face 수가 굉장히 많아지기 때문에, laplacian smoothing 에서 iteration 3 이상은 추천하지 않는다.
4. Result & Analysis
Marigold Demo 에 있는 다음 네 가지 사진을 이용해 Textured Mesh 를 만들어 보았다.
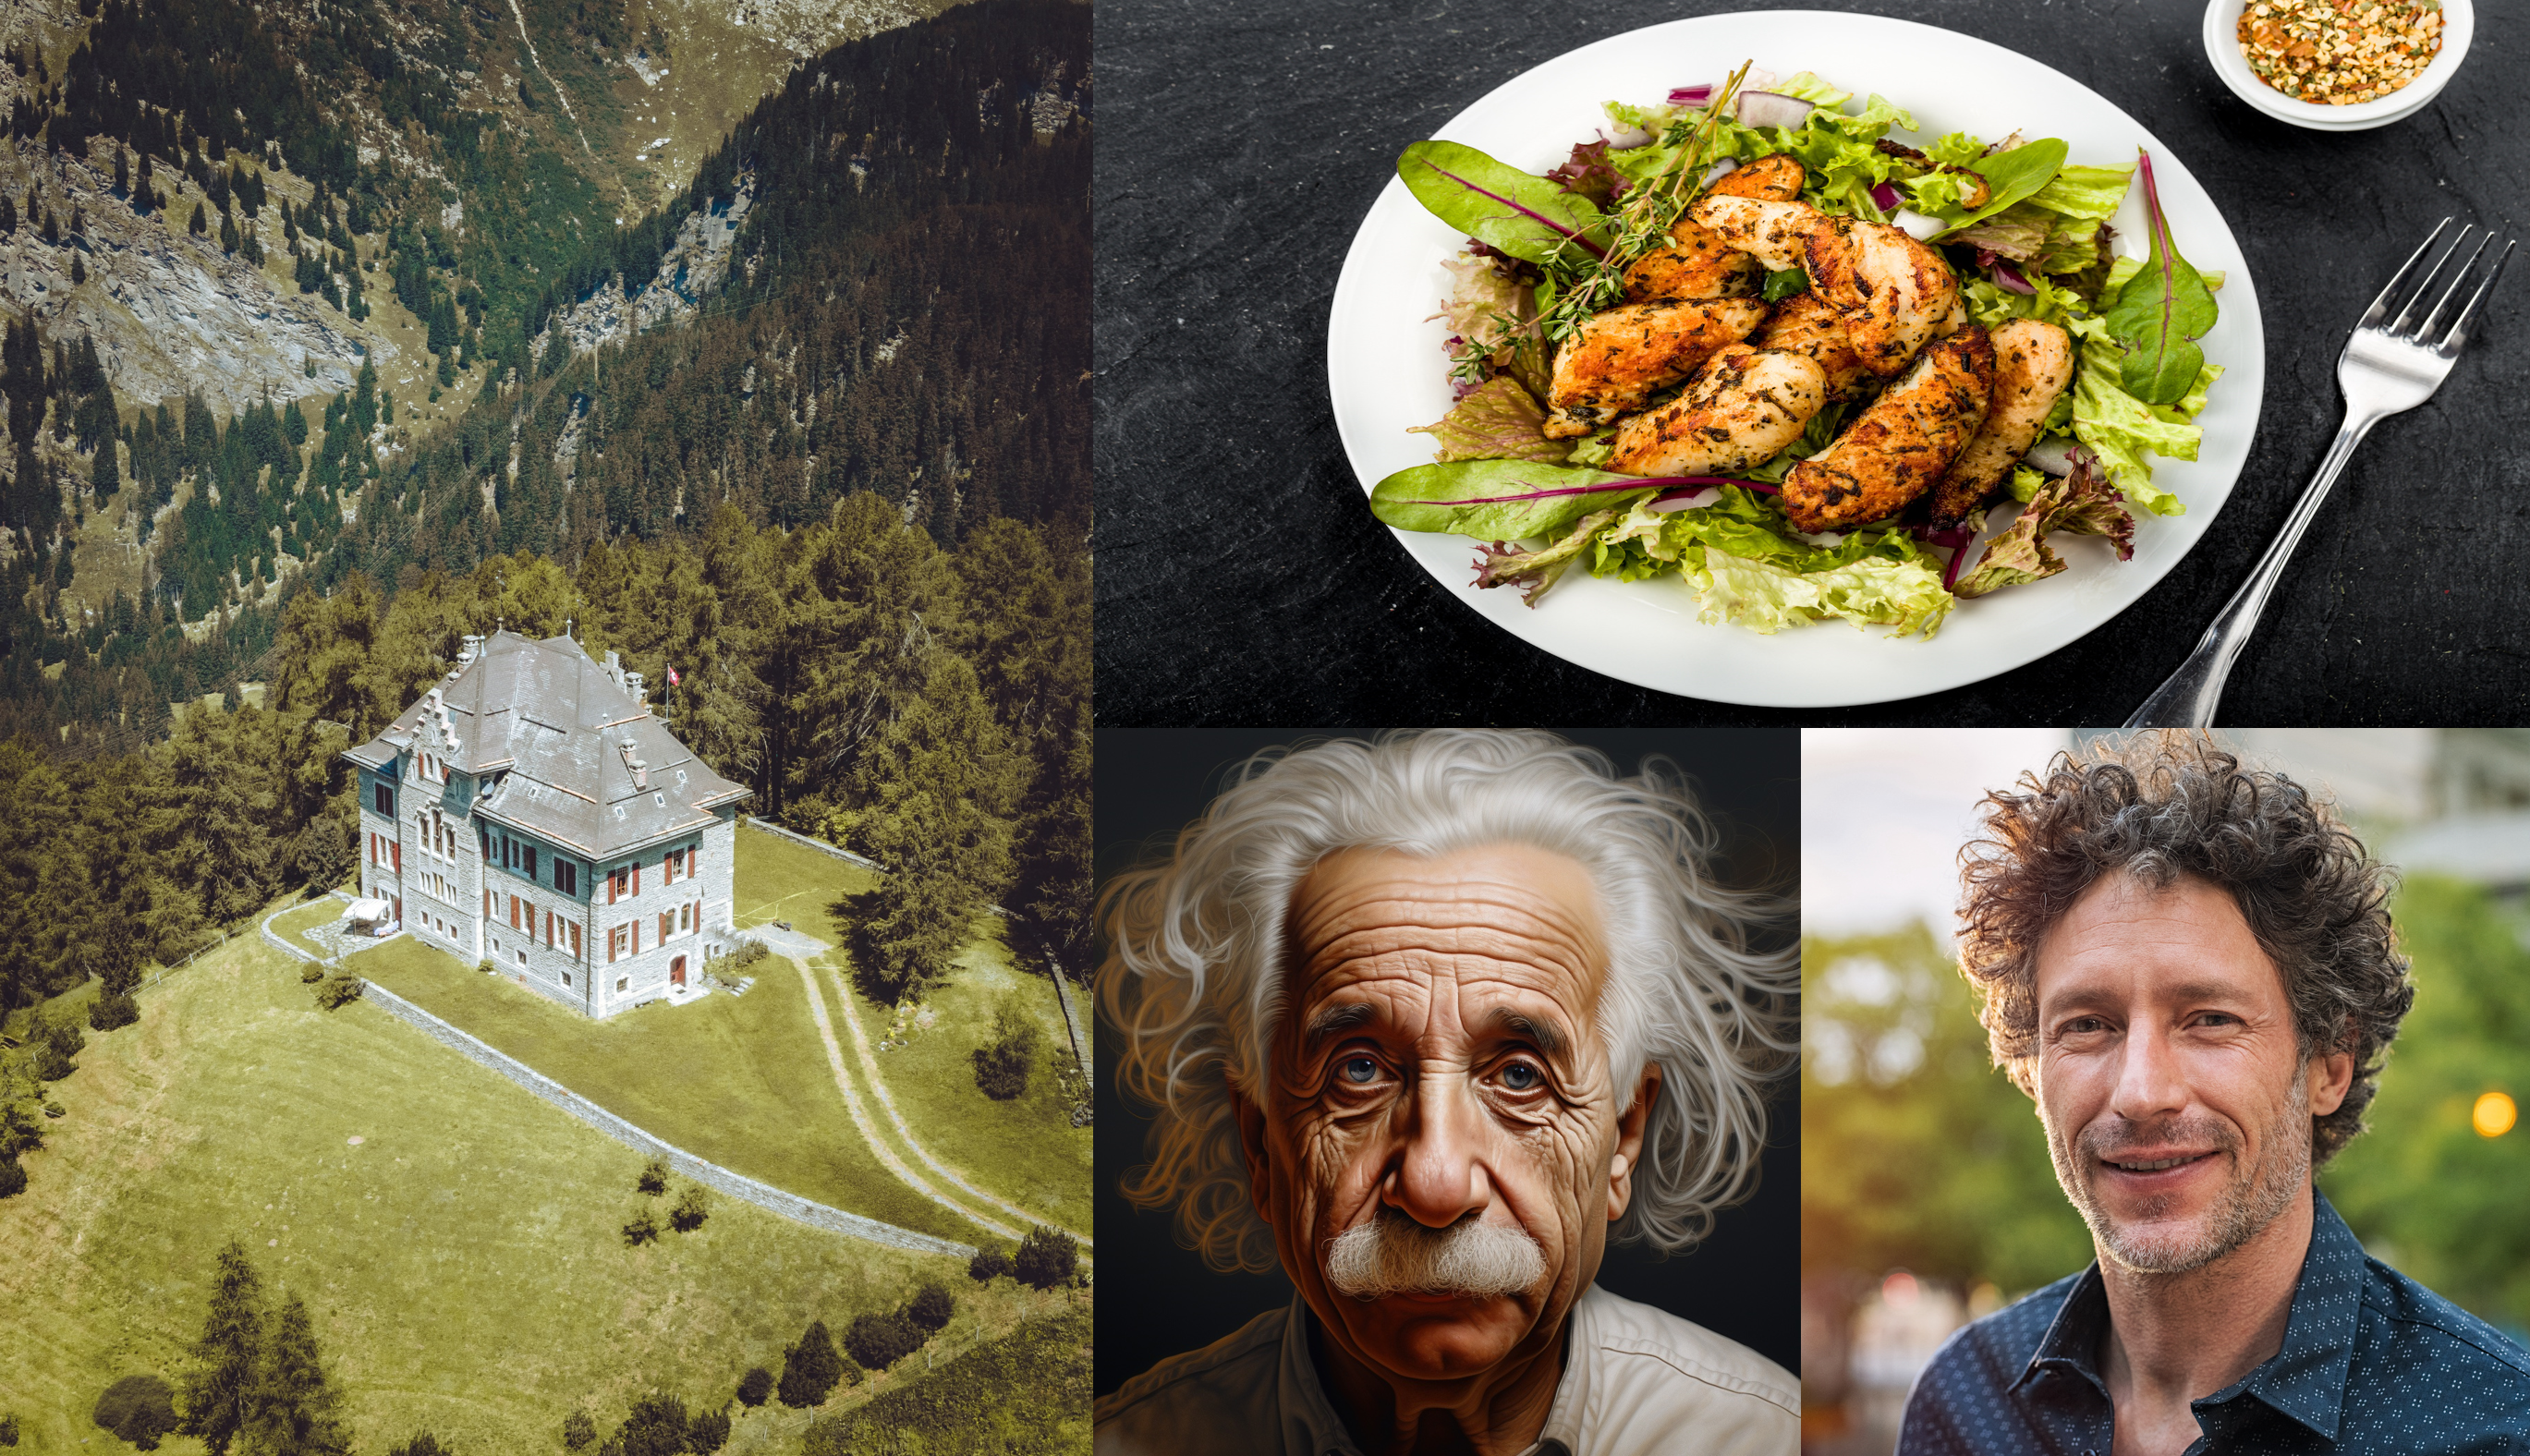
결과는 차례대로 다음과 같다.
- House
- Food
- Eienstein
- Portrait (Generated image)
Single-view reconstruction 이 무색하게 괜찮은 퀄리티를 보이고, close-up portrait 의 경우에는 2.5D 수준에서는 이런 방식을 통해 제한적인 angle 의 novel-view synthesis 등이 가능할 것이라고까지 생각된다.
다만 아직 결과물을 옆으로 돌려볼 때, 같은 semantic에 대해서는 depth 를 굉장히 flat 하게 추정하는 모습을 볼 수 있다.
이를 통해 pre-trained 된 Diffusion Model 이 일종의 semantic segmentation task 처럼 depth estimation task 를 받아들였다고도 생각할 수 있다. 특히 일부 사진 (Marigold demo 에 있는 butterfly 등) 들에서는 mesh 로 바꿔서 봤을 때 극단적으로 flat 한 결과를 보여주었다.
- Left: front / Right: Lying Down
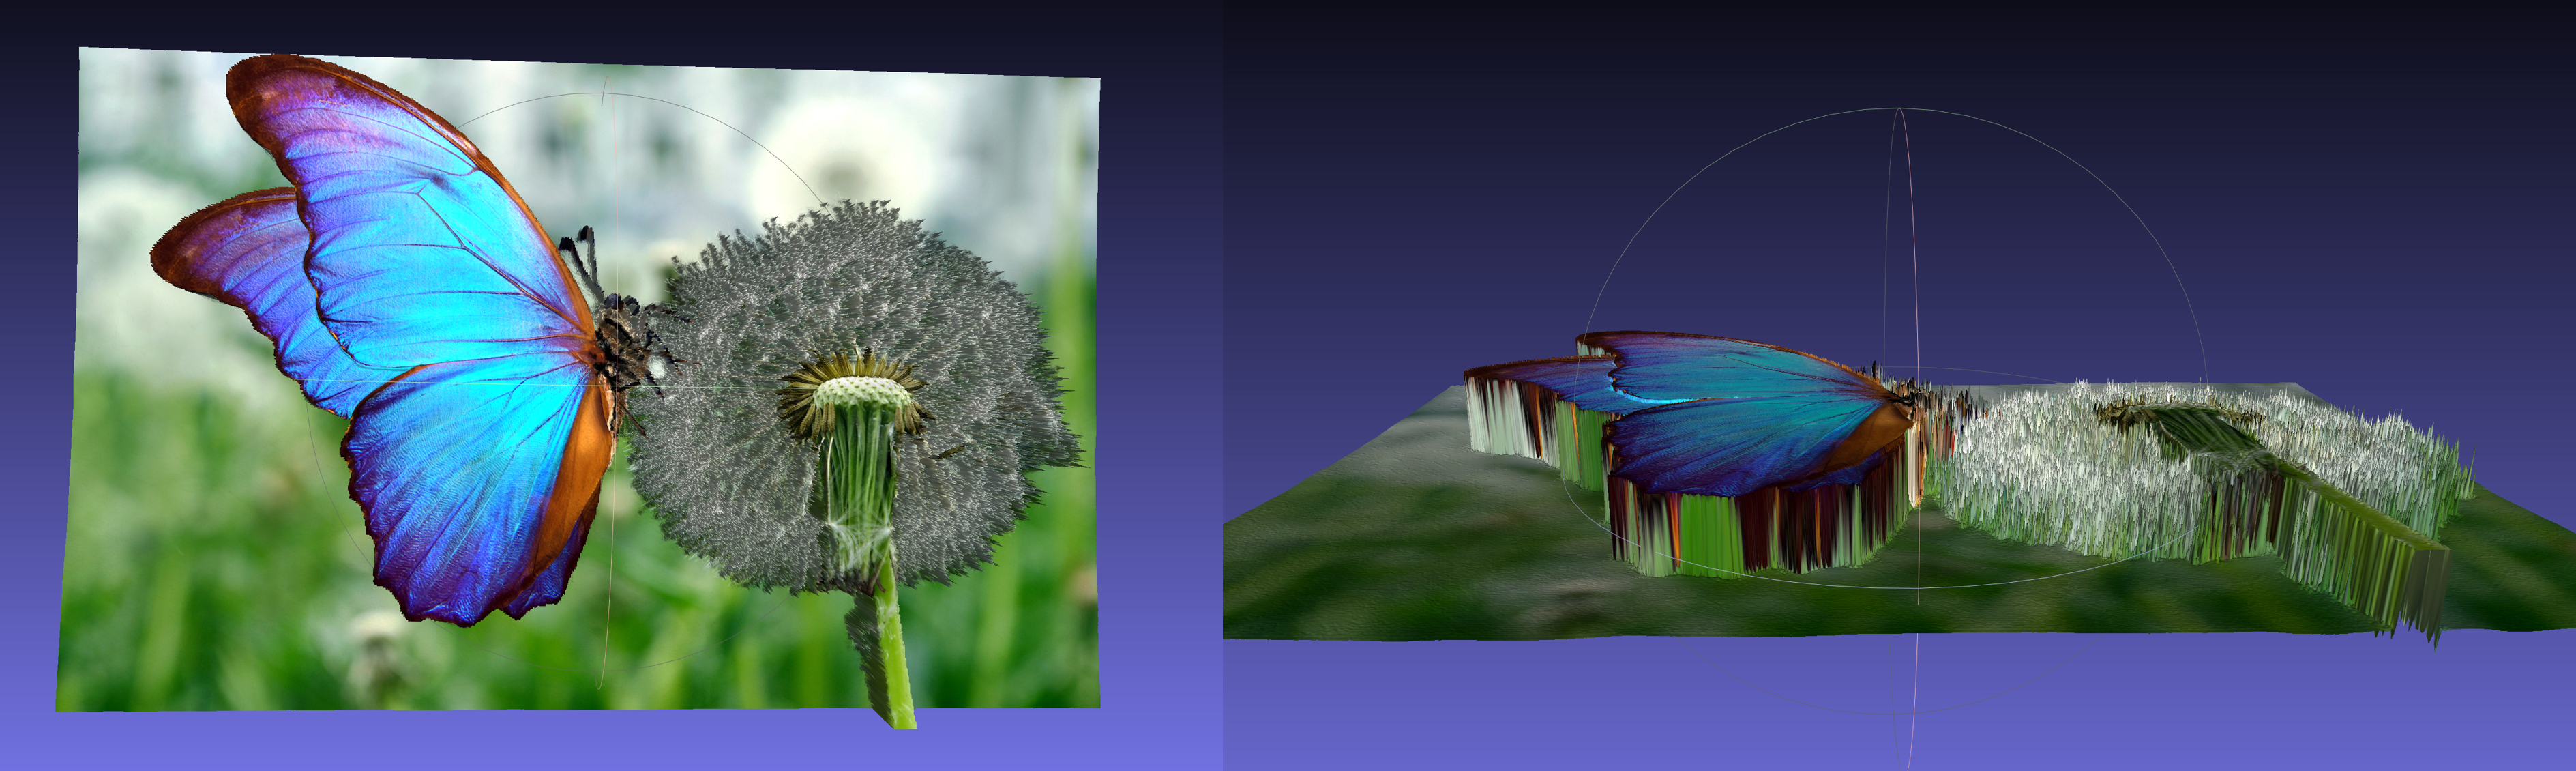
또한 위의 front 결과를 확대해서 보면, 몸통의 줄무늬 때문에 부분부분 background 로 추론되었다. Depth map 자체가 극단적인 discontinuity 를 갖기 때문에, 이러한 경우에 estimation 이 더 어려운 것으로 보인다.
마지막으로 개인 사진 두 개도 추가로 textured mesh 를 만들어보았다.
- Input
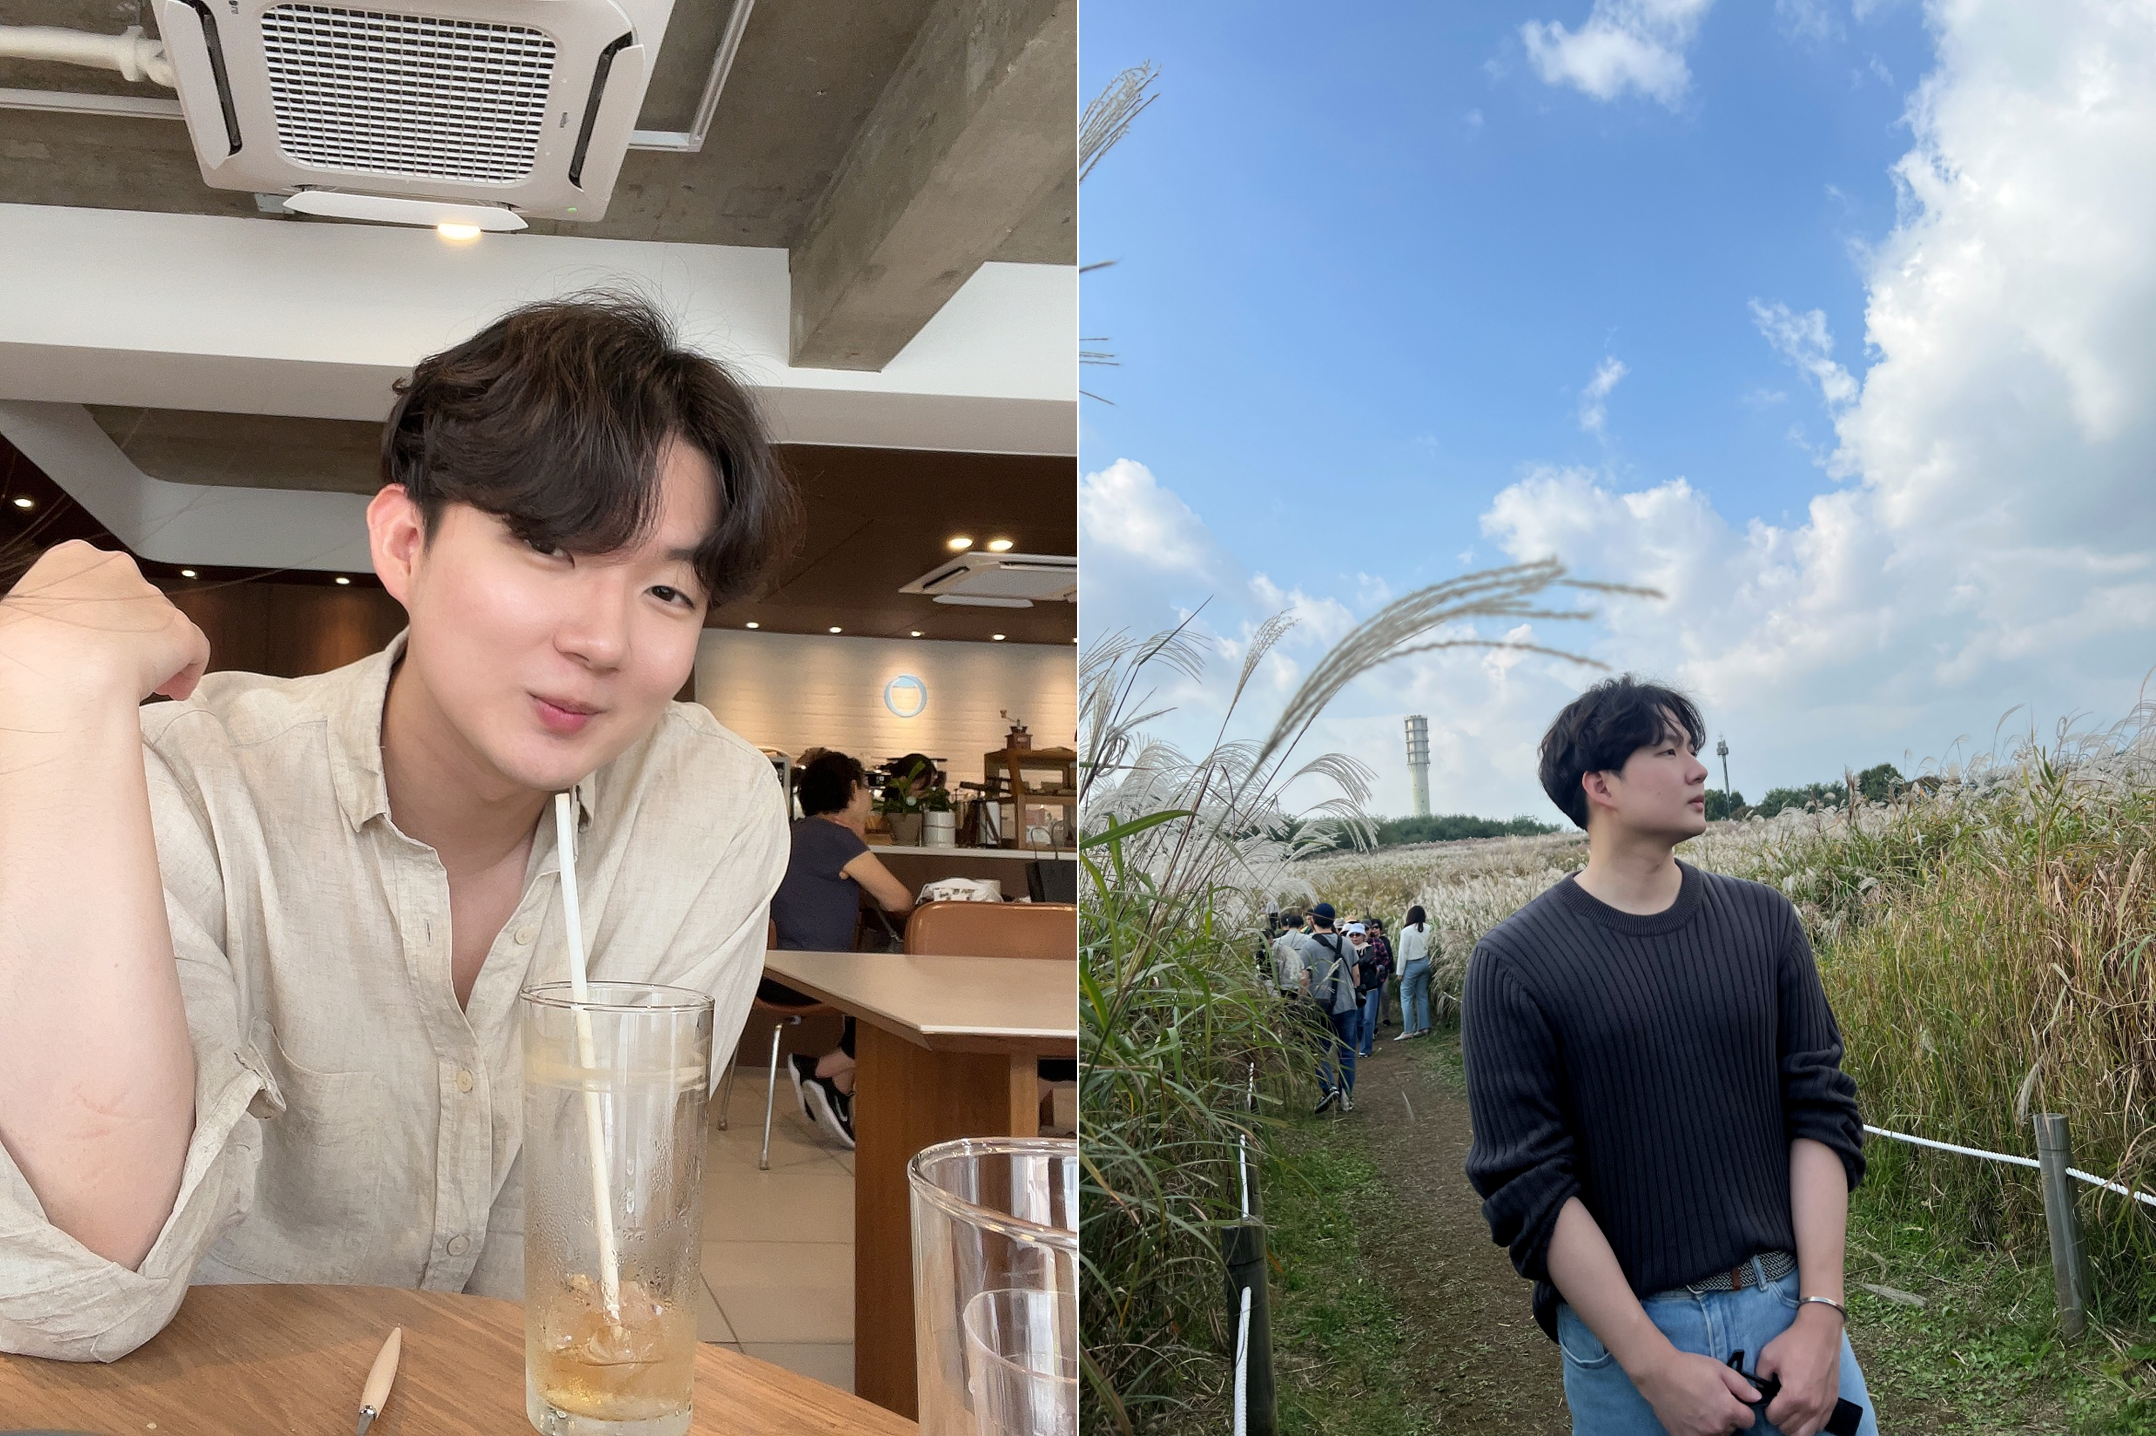
- Output Left
- Output Right
사용한 custom input 은 Marigold 에 없는 '사진에서 적당한 사이즈의 피사체' 를 사용하였는데, 이 경우에 foreground object 에서 의미 있게 depth 를 추출하는 것을 실패하는 것을 볼 수 있다. Foreground 만 crop 해서 넣으면 괜찮은가? 는 해보지 않았지만 아직까진 BG, FG 가 같이 있을 때 실제 사용할 수 있을 정도의 depth estimation 은 안되는 것을 알 수 있었다.
5. Conclusion
Diffusion 등 generation 기법을 이용해 생성된 depthmap 이 정성적으로 어느 정도의 quality 를 갖는지 볼 수 있도록 Depth map 으로부터 textured-mesh 를 생성하는 방법에 대해 논의해보았다.
일정 결과물에 대해서는 depth estimation 이 3D 상에서도 꽤나 준수한 모습을 보이지만, 아직까지 semantic segmentation 과 비슷한 양상을 보여주기 때문에 추후 연구들은 stereo vision 을 통해 이를 해결하는 방향으로 연구가 이루어지지 않을까 싶다.
예를 들어 Marigold 에서 비교군으로 잡고 있는 DSINE 는, 성능 자체는 marigold 보다 뒤떨어져도 훨씬 가벼운 network 를 쓰면서, stereo vision 에서 착안한 geomtric aware method 를 사용한다. Diffusion-based depth estimation 도 이와 같은 접근법을 통해 regularization term 을 설계하면 더 좋은 성능으로 이어질 수 있을거라 믿는다.
You may also likes:

👍