이번 포스팅에선 Network 실습환경과, AWS VPC CNI에 대해서 작성해보도록 하겠습니다.
0.실습 환경
실습 기본 환경 세팅
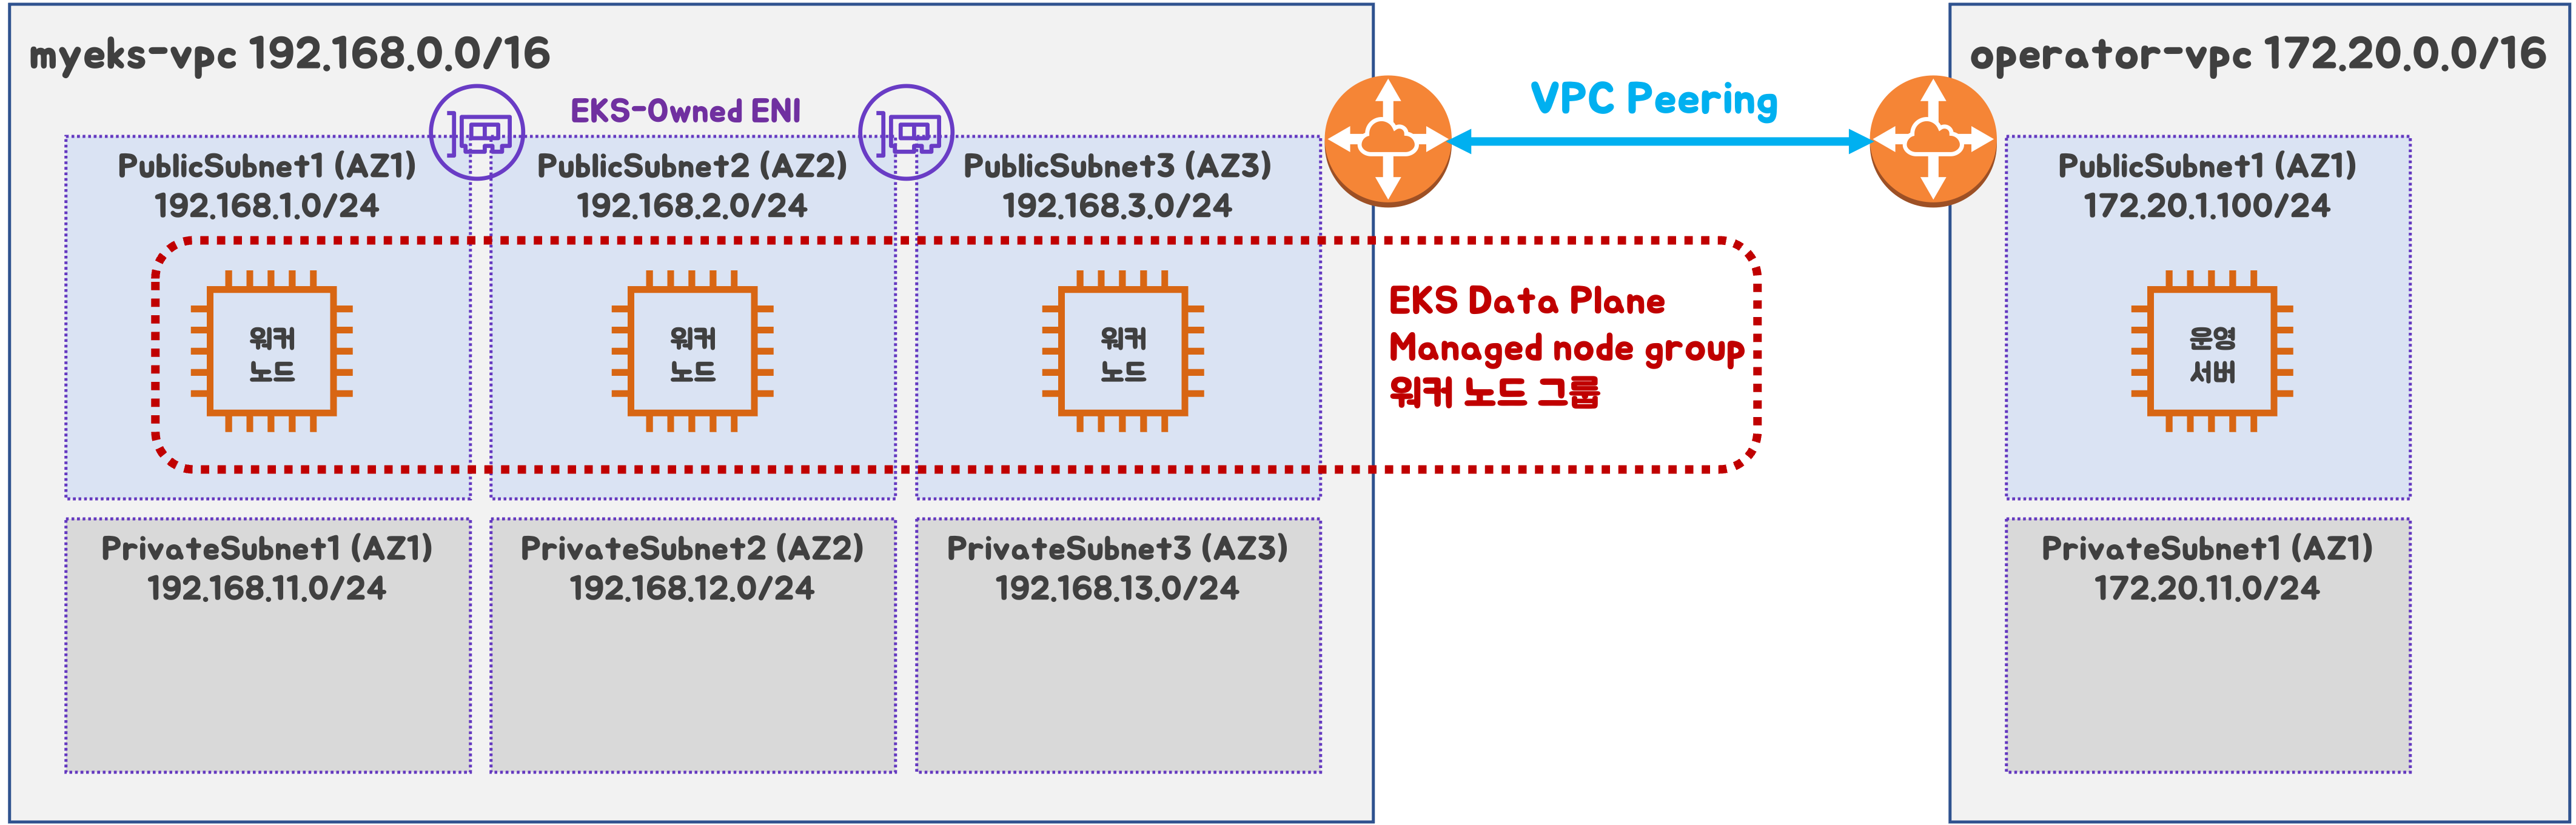
구성도 : 2개의 VPC(EKS 배포, 운영용 구분), 운영서버 EC2 + EKS 제어부, EKS 데이터부
- myeks-vpc 에 각기 AZ를 사용하는 퍼블릭/프라이빗 서브넷 배치
- operator-vpc 에 AZ1를 사용하는 퍼블릭/프라이빗 서브넷 배치
- 내부 통신을 위한 VPC Peering 배치
Stack 배포
- Cloudformation 사용 하여 operate-vpc 구성
# 배포
aws cloudformation deploy --template-file ./myeks-2week.yaml     --stack-name myeks --parameter-overrides KeyName=bocopile-key SgIngressSshCidr=$(curl -s ipinfo.io/ip)/32 --region ap-northeast-2

# Stack 배포 완료 후에 운영서버 EC2 IP 출력
aws cloudformation describe-stacks --stack-name myeks --query 'Stacks[*].Outputs[*].OutputValue' --output text

# 운영서버 EC2에 접속
ssh ec2-user@43.203.227.62
EKS 배포
- eksctl 사용하여 myeks-vpc 구성
-
yaml 파일 생성
# eksctl 배포 export CLUSTER_NAME=myeks # myeks-VPC/Subnet 정보 확인 및 변수 지정 export VPCID=$(aws ec2 describe-vpcs --filters "Name=tag:Name,Values=$CLUSTER_NAME-VPC" --query 'Vpcs[*].VpcId' --output text) echo $VPCID export PubSubnet1=$(aws ec2 describe-subnets --filters Name=tag:Name,Values="$CLUSTER_NAME-Vpc1PublicSubnet1" --query "Subnets[0].[SubnetId]" --output text) export PubSubnet2=$(aws ec2 describe-subnets --filters Name=tag:Name,Values="$CLUSTER_NAME-Vpc1PublicSubnet2" --query "Subnets[0].[SubnetId]" --output text) export PubSubnet3=$(aws ec2 describe-subnets --filters Name=tag:Name,Values="$CLUSTER_NAME-Vpc1PublicSubnet3" --query "Subnets[0].[SubnetId]" --output text) echo $PubSubnet1 $PubSubnet2 $PubSubnet3 # vpc, subnetID , ssh key 경로 수정 eksctl create cluster --name $CLUSTER_NAME --region=ap-northeast-2 --nodegroup-name=ng1 --node-type=t3.medium --nodes 3 --node-volume-size=30 --vpc-public-subnets "$PubSubnet1","$PubSubnet2","$PubSubnet3" --version 1.31 --wit h-oidc --external-dns-access --full-ecr-access --alb-ingress-access --node-ami-family AmazonLinux2023 --ssh-access --dry-run > eks-2week.yaml -
eks 배포
# kubeconfig 파일 경로 지정
export KUBECONFIG=$HOME/kubeconfig

# 배포
eksctl create cluster -f eks-2week.yaml --verbose 4
-
실습에서 자주 사용하는 변수
export KUBECONFIG=$HOME/kubeconfig
export CLUSTER_NAME=myeks

# myeks-VPC/Subnet 정보 확인 및 변수 지정
export VPCID=$(aws ec2 describe-vpcs --filters "Name=tag:Name,Values=$CLUSTER_NAME-VPC" --query 'Vpcs[*].VpcId' --output text)
echo $VPCID

export PubSubnet1=$(aws ec2 describe-subnets --filters Name=tag:Name,Values="$CLUSTER_NAME-Vpc1PublicSubnet1" --query "Subnets[0].[SubnetId]" --output text)
export PubSubnet2=$(aws ec2 describe-subnets --filters Name=tag:Name,Values="$CLUSTER_NAME-Vpc1PublicSubnet2" --query "Subnets[0].[SubnetId]" --output text)
export PubSubnet3=$(aws ec2 describe-subnets --filters Name=tag:Name,Values="$CLUSTER_NAME-Vpc1PublicSubnet3" --query "Subnets[0].[SubnetId]" --output text)
echo $PubSubnet1 $PubSubnet2 $PubSubnet3

# 인스턴스 IP 확인
aws ec2 describe-instances --query "Reservations[*].Instances[*].{InstanceID:InstanceId, PublicIPAdd:PublicIpAddress, PrivateIPAdd:PrivateIpAddress, InstanceName:Tags[?Key=='Name']|[0].Value, Status:State.Name}" --filters Name=instance-state-name,Values=running --output table

# 인스턴스 공인 IP 변수 지정
#export N1=<az1 배치된 EC2 공인 IP>
#export N2=<az2 배치된 EC2 공인 IP>
#export N3=<az3 배치된 EC2 공인 IP>
*export N1=43.203.169.0
export N2=13.125.28.29
export N3=13.125.255.7*
echo $N1, $N2, $N3

# 노드 정보 확인
for i in $N1 $N2 $N3; do echo ">> node $i <<"; ssh ec2-user@$i **hostnamectl**; echo; done
for i in $N1 $N2 $N3; do echo ">> node $i <<"; ssh ec2-user@$i **sudo ip -c addr**; echo; done
for i in $N1 $N2 $N3; do echo ">> node $i <<"; ssh ec2-user@$i **sudo ip -c route**; echo; done
for i in $N1 $N2 $N3; do echo ">> node $i <<"; ssh ec2-user@$i **sudo iptables -t nat -S**; echo; done

# 파드 이름 변수 지정
PODNAME1=$(kubectl get pod -l app=netshoot-pod -o jsonpath='{.items[0].metadata.name}')
PODNAME2=$(kubectl get pod -l app=netshoot-pod -o jsonpath='{.items[1].metadata.name}')
PODNAME3=$(kubectl get pod -l app=netshoot-pod -o jsonpath='{.items[2].metadata.name}')

# 파드 IP 변수 지정
PODIP1=$(kubectl get pod -l app=netshoot-pod -o jsonpath='{.items[0].status.podIP}')
PODIP2=$(kubectl get pod -l app=netshoot-pod -o jsonpath='{.items[1].status.podIP}')
PODIP3=$(kubectl get pod -l app=netshoot-pod -o jsonpath='{.items[2].status.podIP}')

# 자신의 도메인 변수 지정 : 소유하고 있는 자신의 도메인을 입력하시면 됩니다
MyDomain=<자신의 도메인>
MyDomain=bocopile.com

MyDnzHostedZoneId=`aws route53 list-hosted-zones-by-name --dns-name "${MyDomain}." --query "HostedZones[0].Id" --output text`
echo $MyDnzHostedZoneId

# A 레코드 값 반복 조회
while true; do aws route53 list-resource-record-sets --hosted-zone-id "${MyDnzHostedZoneId}" --query "ResourceRecordSets[?Type == 'A']" | jq ; date ; echo ; sleep 1; done
1. AWS VPC CNI
CNI 란?
컨테이너 네트워크를 설정하고 관리하기 위한 표준 인터페이스
Calico, Weave ,AWS VPC CNI 등 다양한 플러그인이 존재
CNI 주요 기능
1. 네트워크 인터페이스 관리
- 컨테이너 생성 혹은 삭제시 네트워크 인터페이스를 자동으로 추가 / 제거
2. IP 주소 할당
- 컨테이너에 고유한 IP 주소를 할당
3. 보안 및 정책 적용
- 네트워크 정책과 연동하여 컨테이너간의 트레픽을 제어할수 있음
4. 확장성
- 기본 CNI 플러그인 외에도 특정 환경에 맞춰 CNI 변경 가능
- kubernetes, Docker, OpenShift 등 다양한 컨테이너 오케스트레이션 시스템과 연동
AWS VPC CNI
AWS EKS 클러스터에서 Pod의 네트워크 관리를 위해 만들어진 인터페이스 플러그인
AWS VPC CNI는 VPC IP 주소를 직접 파드에 할당하는 방식으로 동작하며, 파드의 IP 네트워크 대역과 노드(워커)의 IP 대역이 같아서 직접 통신이 가능
주요 기능
- Pod에게 VPC 내 IP 주소를 직접 할당하여 ENI(Elastic Network Interface)를 활용한 네트워크 구성
- VPC 내 다른 리소스(EC2, RDS, ALB 등)와 원활한 통신 가능
- VPC와 통합 : VPC 보안 그룹, 라우팅 테이블, Flow Logs 활용 가능
- Warm Pool을 사용하여 빠른 Pod 시작 가능
warm pool 이란?
미리 실행되거나 준비된 리소스(서버, 인스턴스, 컨테이너 등)의 풀(pool)을 유지하여 빠르게 요청을 처리할 수 있도록 하는 방식을 의미
- 사전 프로비저닝: 필요할 때 즉시 사용할 수 있도록 리소스를 미리 생성하여 대기 상태로 유지함.
- 빠른 확장 (Auto Scaling 지원): 새로운 요청이 들어올 때 콜드 스타트(cold start) 없이 빠르게 리소스를 제공.
AWS VPC CNI의 2가지 컴포넌트
AWS VPC CNI는 크게 2가지 컴포넌트로 구성되어 있습니다.
- CNI Binary
- pod간의 통신이 가능하도록 설정
- CNI 바이너리는 노드 루트 파일 시스템에서 실행되며, 새로운 Pod가 추가되거나 기존 Pod가 노드에서 제거될 때 kubelet에 의해 호출
- ipamd (long-running node-local IP Address Management)
- 노드에서 ENI 관리
- 사용 가능한 IP 주소 또는 접두사의 warm pool 유지 관리
다른 CNI랑 비교
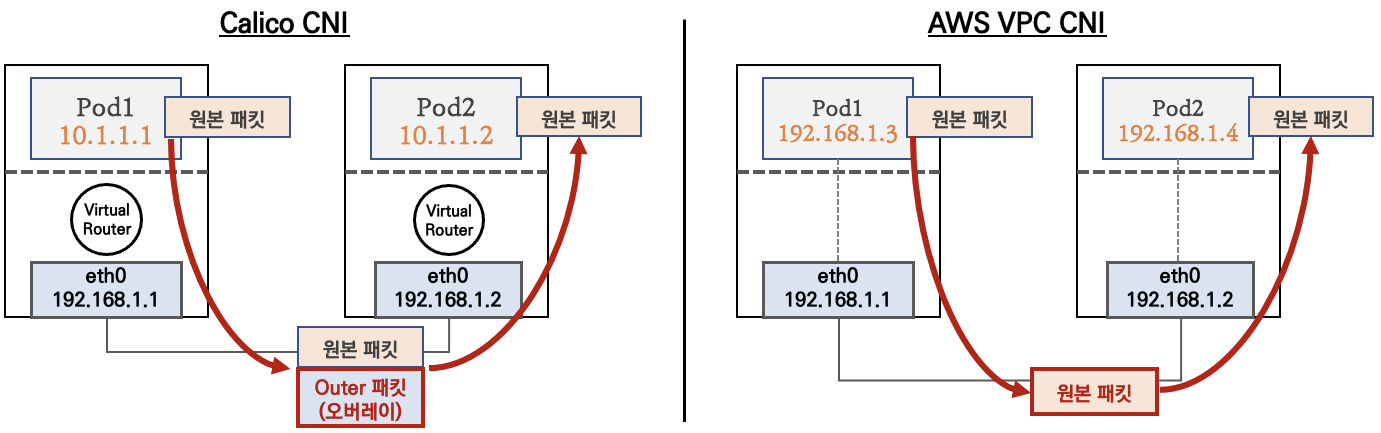
calico CNI는 노드와 파드간의 네트워크 대역대가 달라 오버레이 통신을 이용한다. 패킷 캡슐화에 자원 소모가 더 많이 소모
2. 노드에서 파드 생성 갯수 제한 확인
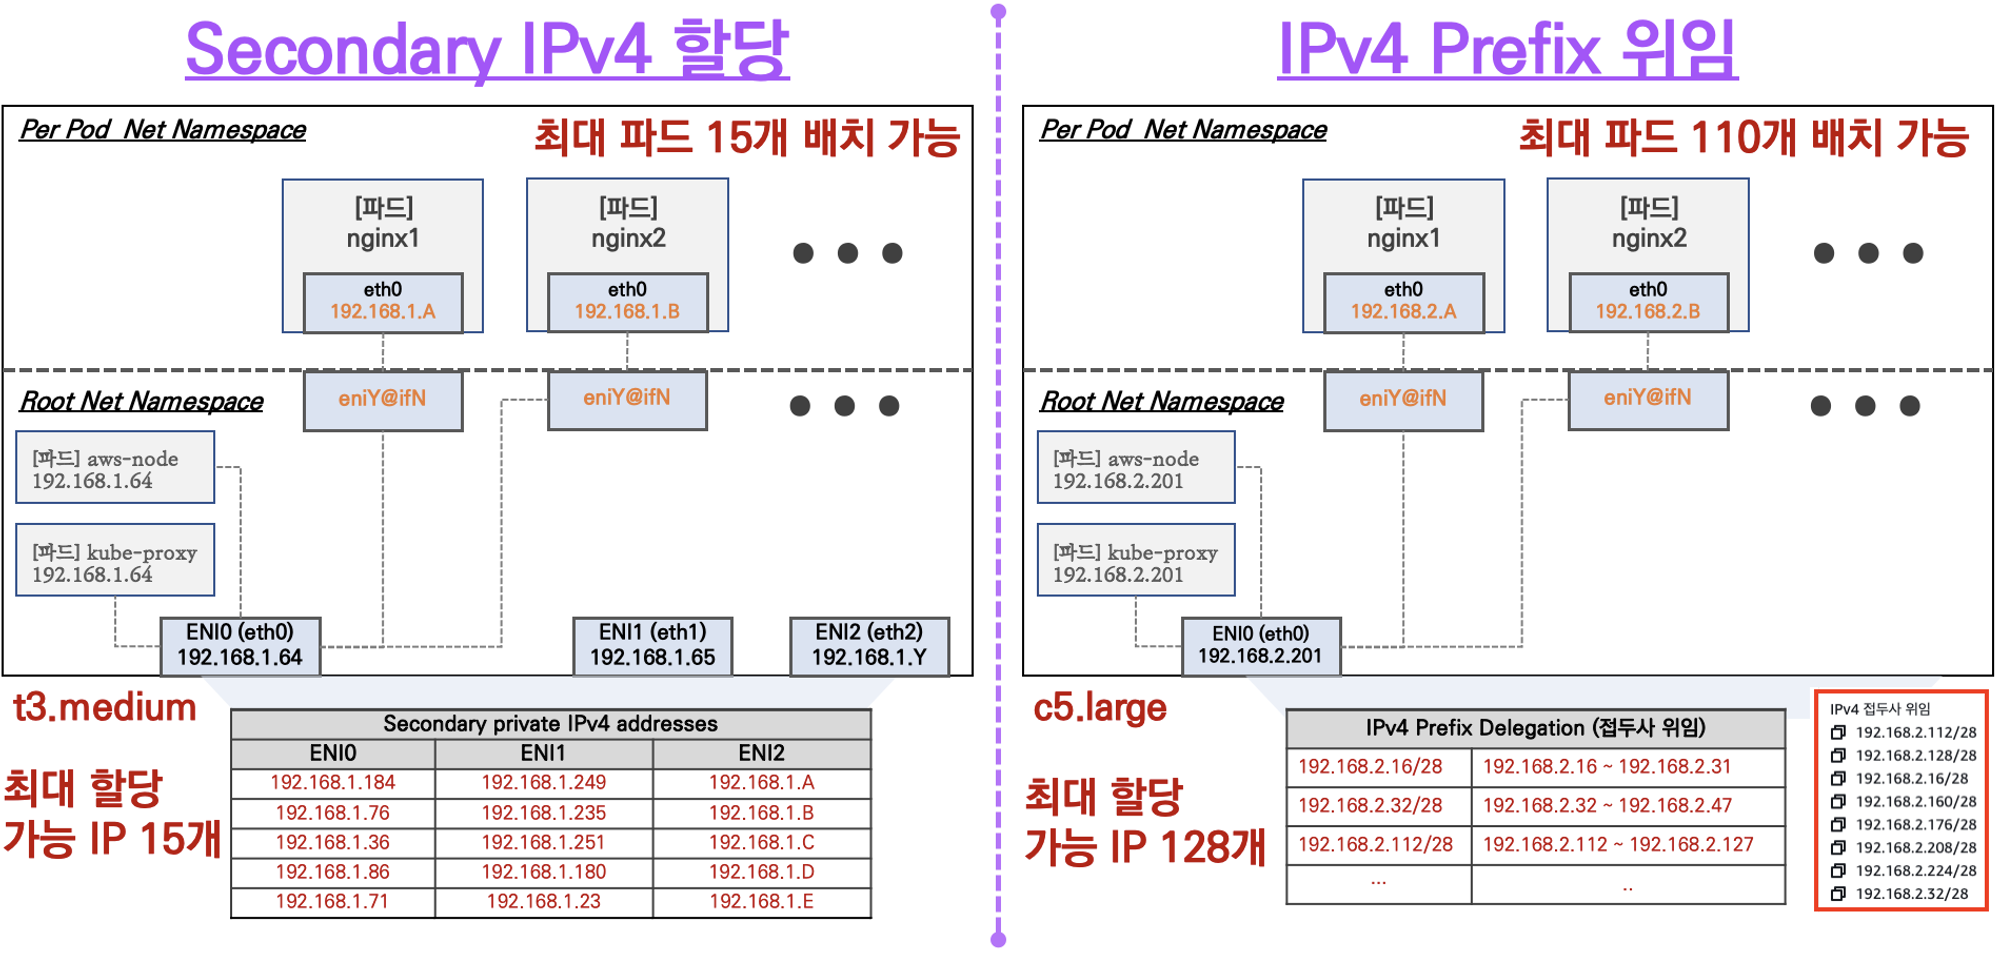
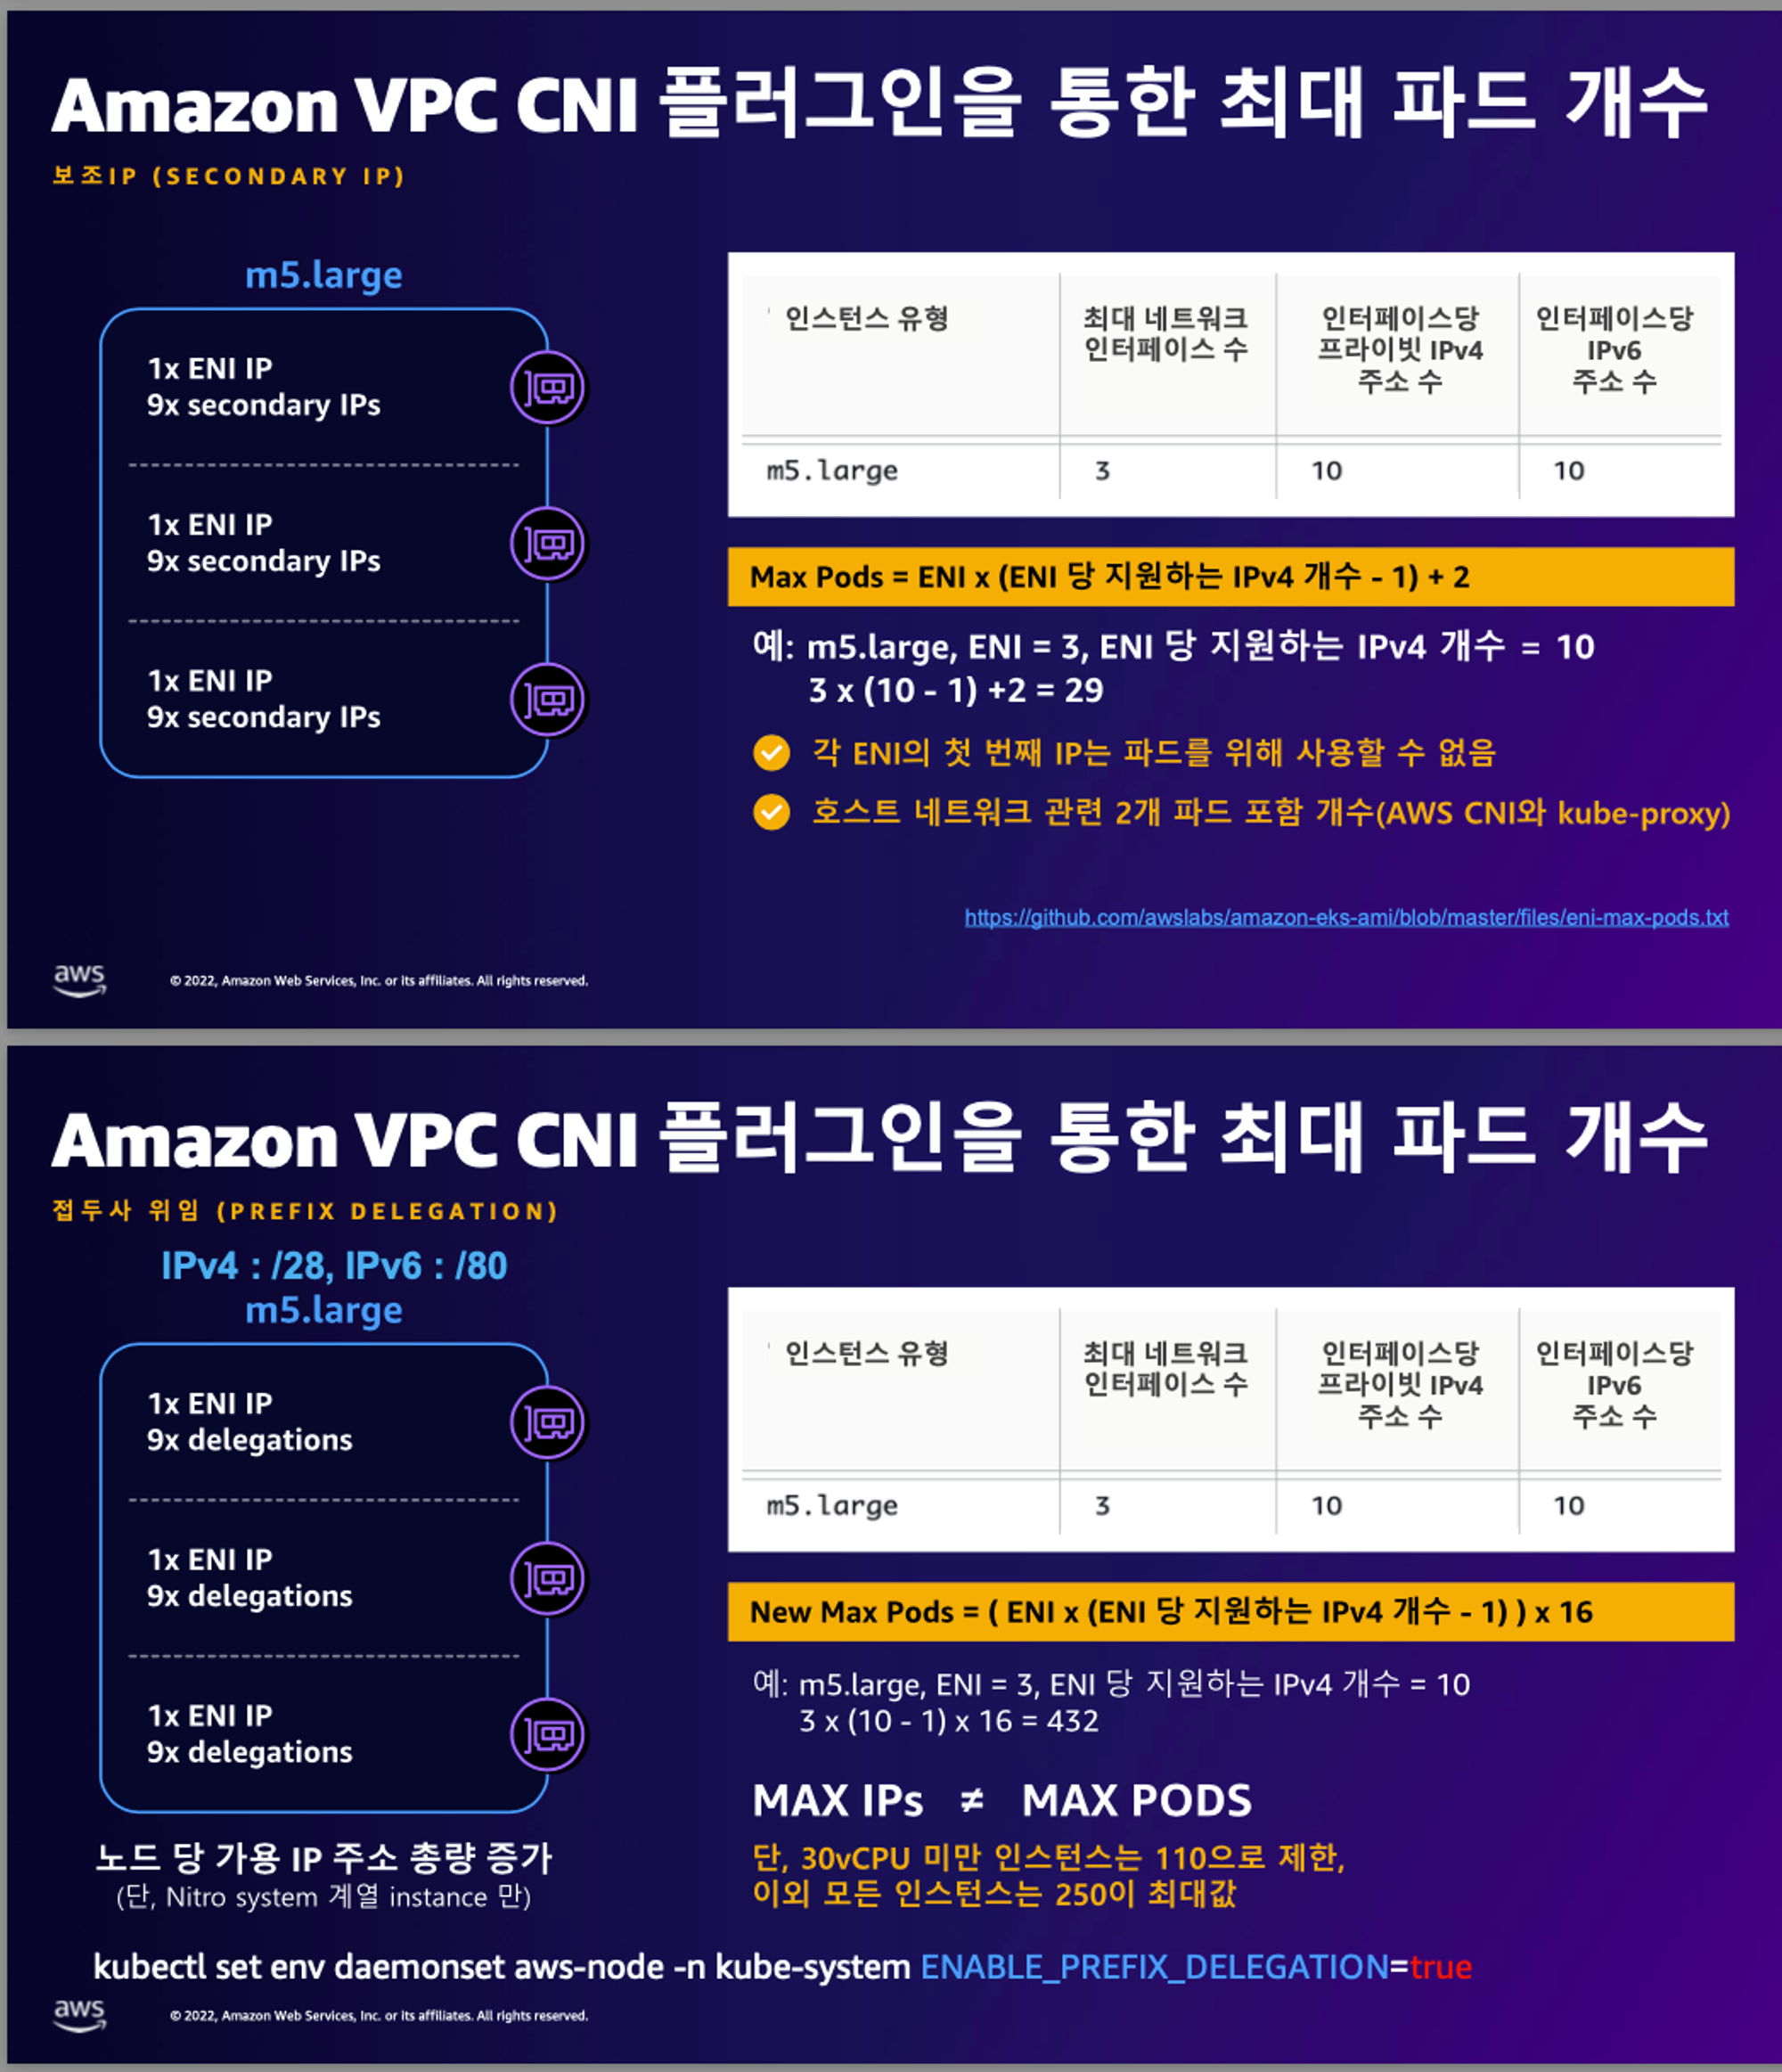
AWS VPC CNI를 사용할 때, 노드당 생성 가능한 최대 Pod 수는 ENI와 할당 가능한 IP 개수에 따라 결정
- Secondary IPv4 할당
- 인스턴스 유형에 최대 ENI 갯수와 할당 가능 IP 수를 조합하여 선정
- IPv4 Prefix 위임
- IPv4 28bit 서브넷(prefix)를 위임하여 할당 가능 IP 수와 인스턴스 유형에 권장하는 최대 갯수로 선정
- AWS VPC CNI Custom Networking
- 노드와 파드 대역 분리, 파드에 별도 서브넷 부여 후 사용
2. 노드에서 기본 네트워크 정보 확인
보조 IPv4 주소를 파드가 사용하는지 확인
# coredns 파드 IP 정보 확인
**kubectl get pod -n kube-system -l k8s-app=kube-dns -owide**

# 노드의 라우팅 정보 확인 >> EC2 네트워크 정보의 '보조 프라이빗 IPv4 주소'와 비교
for i in $N1 $N2 $N3; do echo ">> node $i <<"; ssh ec2-user@$i **sudo ip -c route**; echo; done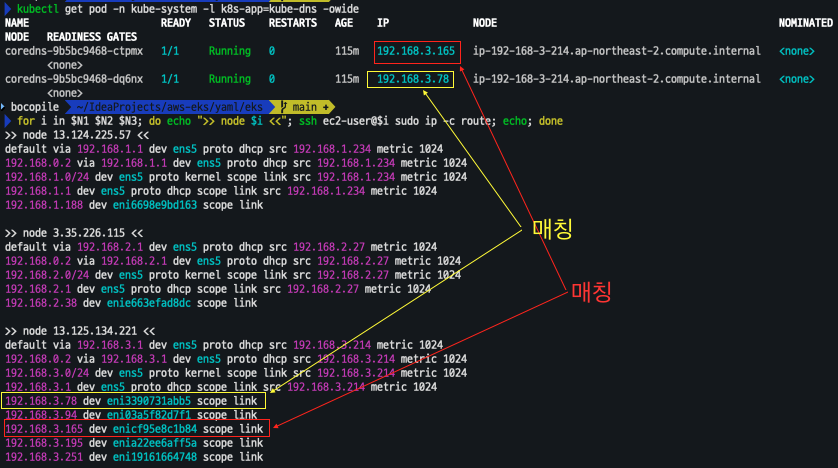
테스트용 netshoot-pod 디플로이먼트 생성
cat <<EOF | kubectl apply -f -
apiVersion: apps/v1
kind: **Deployment**
metadata:
  name: netshoot-pod
spec:
  **replicas: 3**
  selector:
    matchLabels:
      app: netshoot-pod
  template:
    metadata:
      labels:
        app: netshoot-pod
    spec:
      containers:
      - name: netshoot-pod
        image: **nicolaka/netshoot**
        command: ["tail"]
        args: ["-f", "/dev/null"]
      **terminationGracePeriodSeconds: 0**
EOF

# 파드 이름 변수 지정
PODNAME1=$(kubectl get pod -l app=netshoot-pod -o jsonpath='{.items[0].metadata.name}')
PODNAME2=$(kubectl get pod -l app=netshoot-pod -o jsonpath='{.items[1].metadata.name}')
PODNAME3=$(kubectl get pod -l app=netshoot-pod -o jsonpath='{.items[2].metadata.name}')

# 파드 확인
kubectl get pod -o wide
kubectl get pod -o=custom-columns=NAME:.metadata.name,IP:.status.podIP

# 노드에 라우팅 정보 확인
for i in $N1 $N2 $N3; do echo ">> node $i <<"; ssh ec2-user@$i sudo ip -c route; echo; done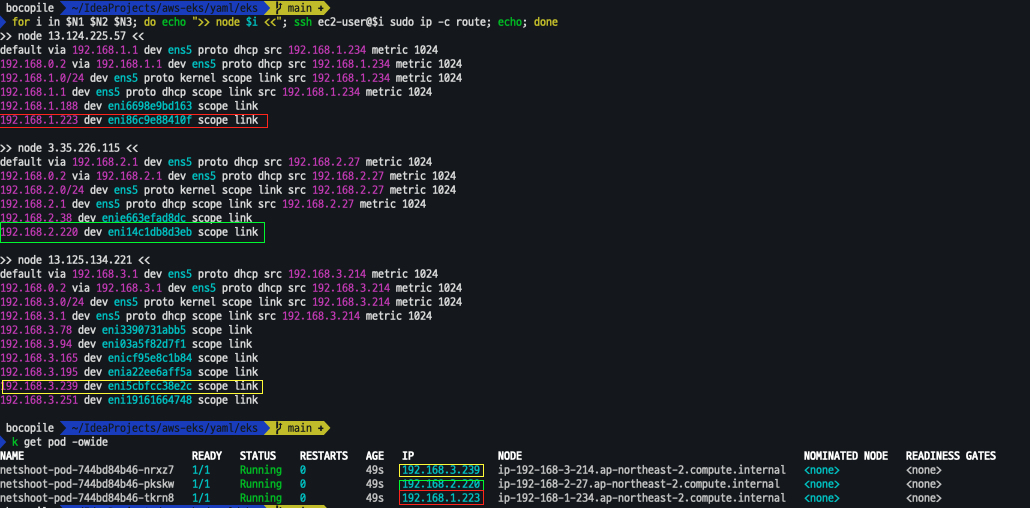
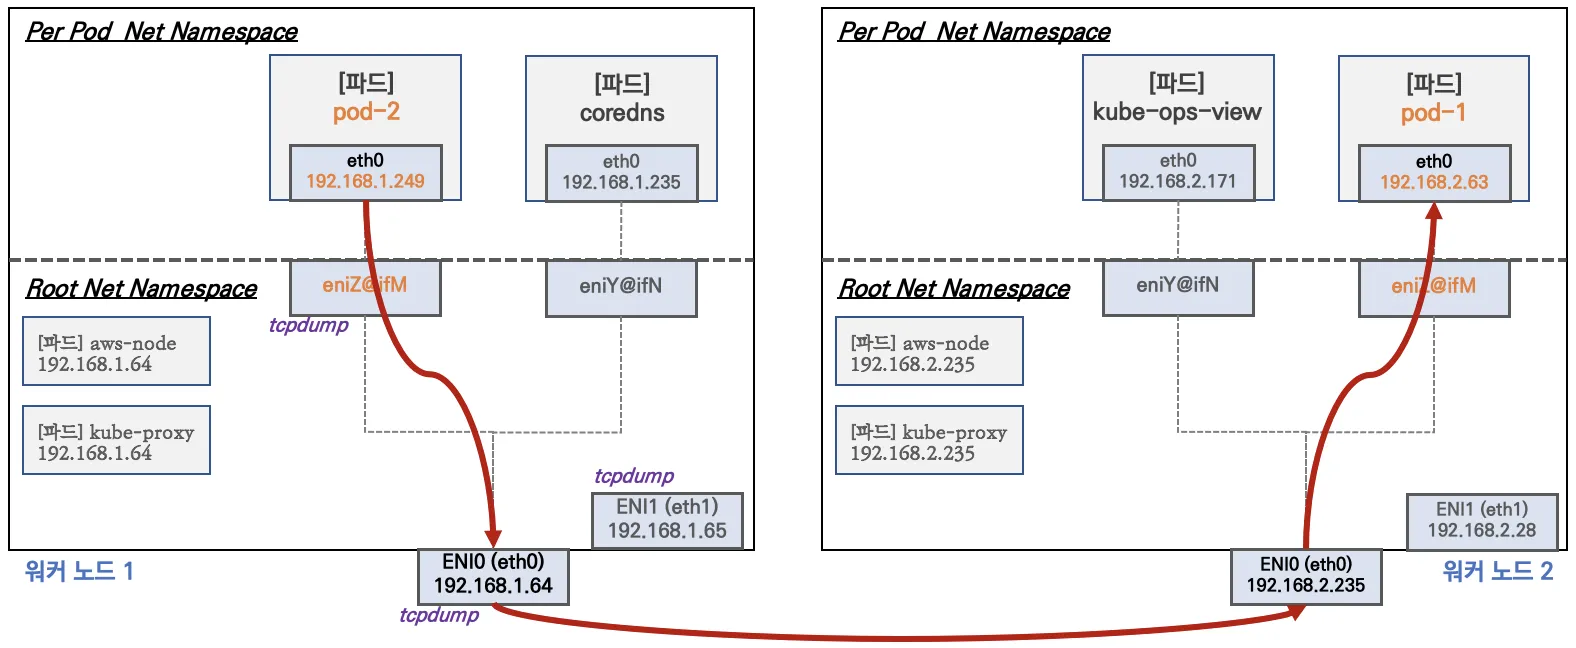
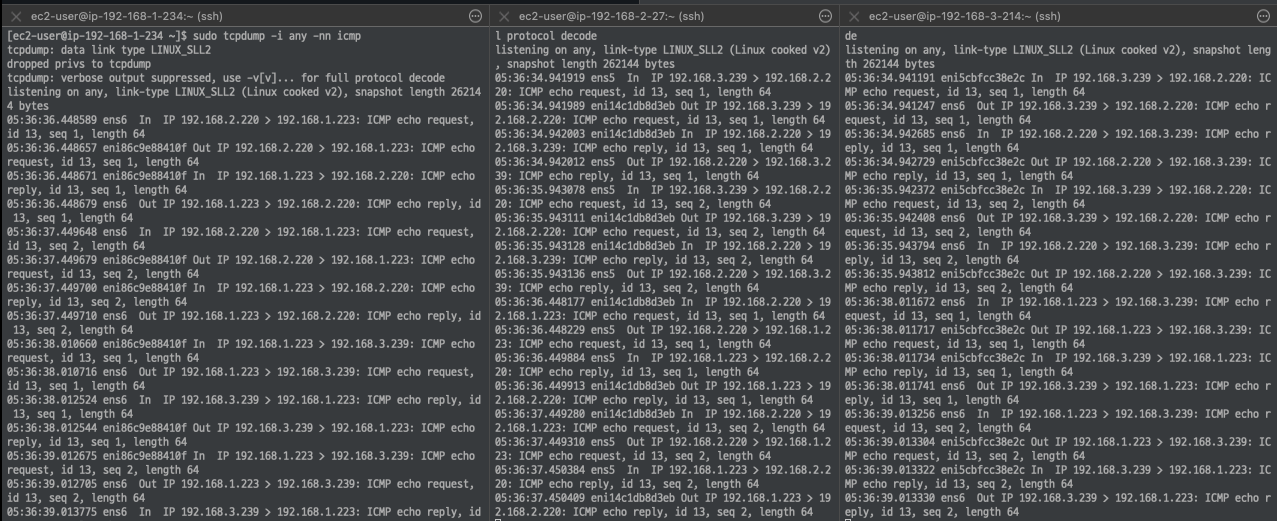
3. 노드 간 파드 통신
진행할때 파드간 통신 시 tcpdump 내용을 확인하고 통신 과정을 알아본다
변수 설정
# 변수 설정
PODIP1=$(kubectl get pod -l app=netshoot-pod -o jsonpath='{.items[0].status.podIP}')
PODIP2=$(kubectl get pod -l app=netshoot-pod -o jsonpath='{.items[1].status.podIP}')
PODIP3=$(kubectl get pod -l app=netshoot-pod -o jsonpath='{.items[2].status.podIP}')
ping test
# 파드1 Shell 에서 파드2로 ping 테스트
kubectl exec -it $PODNAME1 -- ping -c 2 $PODIP2

# 파드2 Shell 에서 파드3로 ping 테스트
kubectl exec -it $PODNAME2 -- ping -c 2 $PODIP3

# 파드3 Shell 에서 파드1로 ping 테스트
kubectl exec -it $PODNAME3 -- ping -c 2 $PODIP1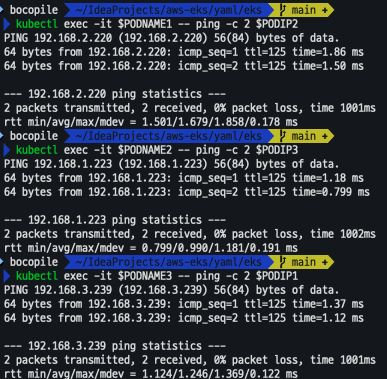
dump 확인
**# 워커 노드 EC2 :** TCPDUMP 확인
## For Pod to external (outside VPC) traffic, we will program iptables to SNAT using Primary IP address on the Primary ENI.
sudo tcpdump -i **any** -nn icmp
워커노드 네트워크 확인
[워커 노드1]
# routing policy database management 확인
ip rule

# routing table management 확인
ip route show table local

# 디폴트 네트워크 정보를 **ens5** 을 통해서 빠져나간다
ip route show table main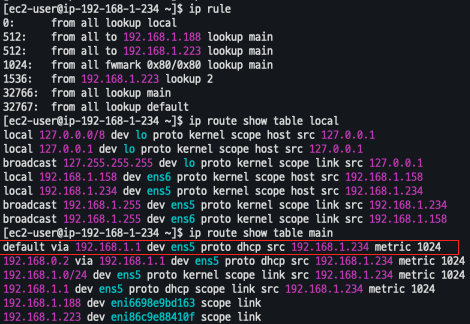
4. 파드 외부에서 통신
- 기본 : iptable 에 SNAT 을 통하여 노드의 eth0(ens5) IP로 변경되어서 외부와 통신됨
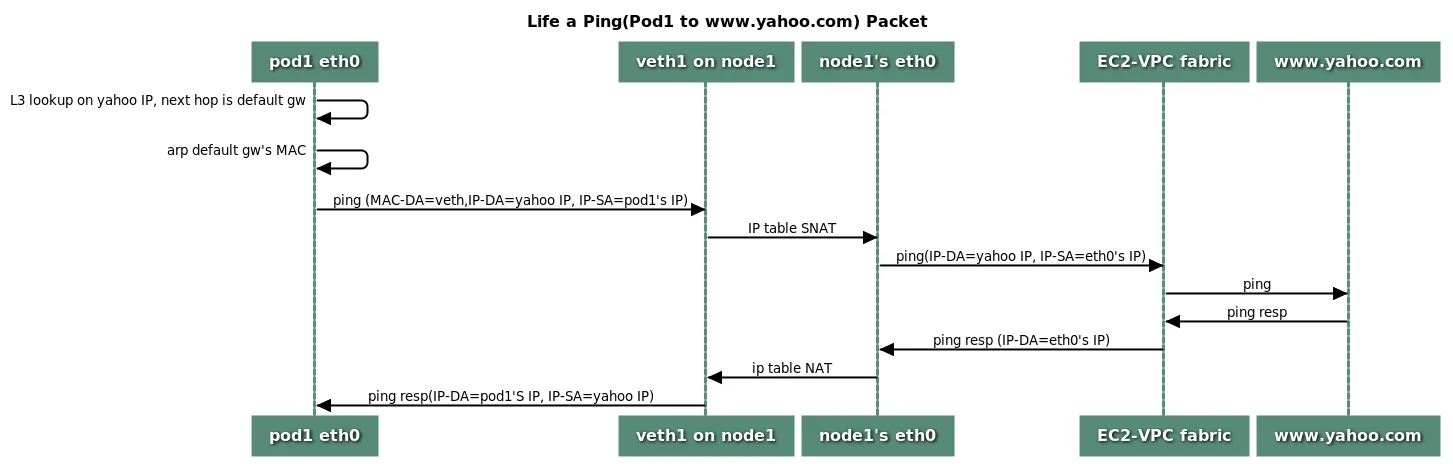
- VPC CNI 의 External source network address translation (
SNAT) 설정에 따라, 외부(인터넷) 통신 시 SNAT 하거나 혹은 SNAT 없이 통신을 할 수 있다
파드에서 외부 통신 테스트 및 확인
- 파드 shell 실행 후 외부로 ping 테스트
**#** pod-1 Shell 에서 외부로 ping
kubectl exec -it $PODNAME1 -- ping -c 1 www.google.com
**kubectl exec -it $PODNAME1 -- ping -i 0.1 www.google.com**
**kubectl exec -it $PODNAME1 -- ping -i 0.1 8.8.8.8**

**# 워커 노드 EC2** : TCPDUMP 확인
sudo tcpdump -i any -nn icmp
sudo tcpdump -i ens5 -nn icmp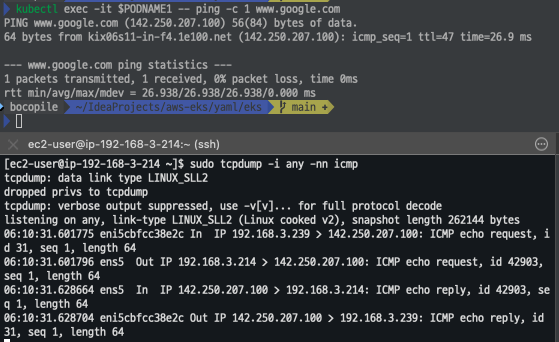
- 외부 통신시
# 파드가 외부와 통신시에는 아래 처럼 'AWS-SNAT-CHAIN-0' 룰(rule)에 의해서 SNAT 되어서 외부와 통신!
# 참고로 뒤 IP는 eth0(ENI 첫번째)의 IP 주소이다
# --random-fully 동작 - [링크1](https://ssup2.github.io/issue/Linux_TCP_SYN_Packet_Drop_SNAT_Port_Race_Condition/)  [링크2](https://ssup2.github.io/issue/Kubernetes_TCP_Connection_Delay_VXLAN_CNI_Plugin/)
sudo iptables -t nat -S | grep 'A AWS-SNAT-CHAIN

5. Pod 최대 증가 테스트
사전 준비
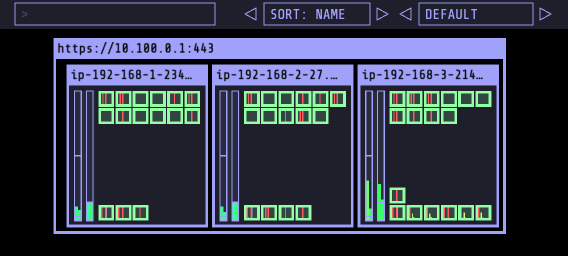
- kube-ops-view
- 여러 Kubernetes 클러스터에 대한 공통적인 운영 그림을 제공
# kube-ops-view
helm repo add geek-cookbook https://geek-cookbook.github.io/charts/
helm install kube-ops-view geek-cookbook/kube-ops-view --version 1.2.2 --set service.main.type=**LoadBalancer** --set env.TZ="Asia/Seoul" --namespace kube-system

# kube-ops-view 접속 URL 확인 (1.5 배율)
kubectl get svc -n kube-system kube-ops-view -o jsonpath='{.status.loadBalancer.ingress[0].hostname}' | awk '{ print "KUBE-OPS-VIEW URL = http://"$1":8080/#scale=1.5"}'
- 설치 확인
- 사이트 접근
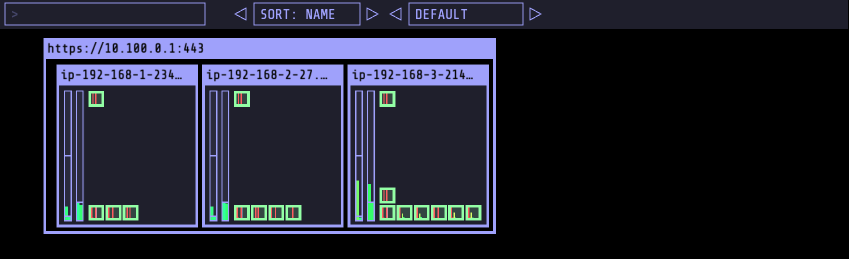
- 사이트 접근
최대 파드 배포 갯수 확인
현재 워커노드에는 t3.medium이 배포되어 있음
 aws ec2 describe-instance-types --filters Name=instance-type,Values=**t3.**\***** \
     --query "InstanceTypes[].{**Type**: InstanceType, **MaxENI**: NetworkInfo.MaximumNetworkInterfaces, **IPv4addr**: NetworkInfo.Ipv4AddressesPerInterface}" \
     --output table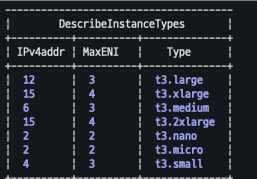
최대 파드 계산법 : ((MaxENI (IPv4addr-1)) + 2) : ((3(6-1) +2) = 17개
이 중에서 aws-node 와 kube-proxy 2개 제외하면 각 워커노드별 최대 15개 파드 배포 가능
파드 배포
cat <<EOF | kubectl apply -f -
apiVersion: apps/v1
kind: Deployment
metadata:
  name: nginx-deployment
  labels:
    app: nginx
spec:
  replicas: 2
  selector:
    matchLabels:
      app: nginx
  template:
    metadata:
      labels:
        app: nginx
    spec:
      containers:
      - name: nginx
        image: nginx:alpine
        ports:
        - containerPort: 80
EOF
파드 확인
kubectl get pod -o=custom-columns=NAME:.metadata.name,IP:.status.podIP- replicaset 변경
# 파드 증가 테스트 >> 파드 정상 생성 확인, 워커 노드에서 eth, eni 갯수 확인
kubectl scale deployment nginx-deployment --replicas=8

# 파드 증가 테스트 >> 파드 정상 생성 확인, 워커 노드에서 eth, eni 갯수 확인 >> 어떤일이 벌어졌는가?
kubectl scale deployment nginx-deployment --replicas=15

# 파드 증가 테스트 >> 파드 정상 생성 확인, 워커 노드에서 eth, eni 갯수 확인 >> 어떤일이 벌어졌는가?
kubectl scale deployment nginx-deployment --replicas=30

# 파드 증가 테스트 >> 파드 정상 생성 확인, 워커 노드에서 eth, eni 갯수 확인 >> 어떤일이 벌어졌는가?
kubectl scale deployment nginx-deployment --replicas=50- 8개
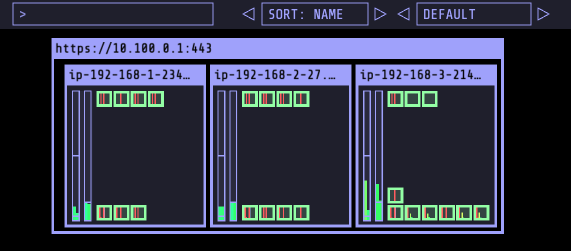
- 15개
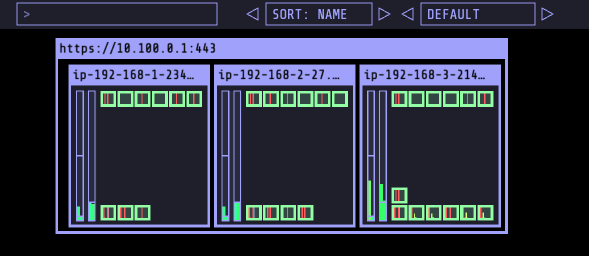
- 30개
- 50개
- 해당 갯수로 변경하는 순간 Pending 되어 배포되지 않는 Pod가 발생
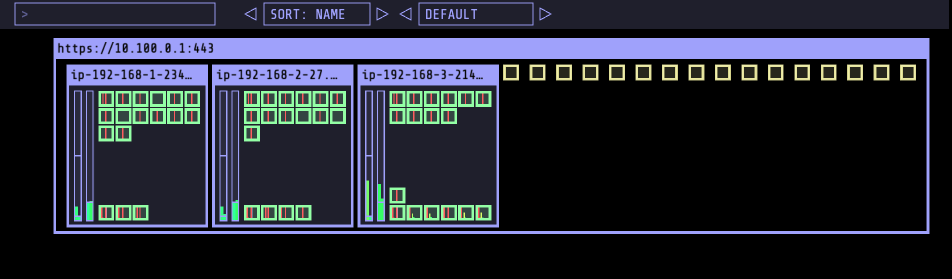
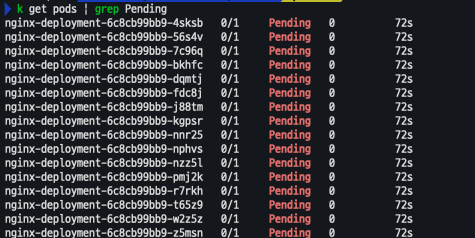

- 해당 갯수로 변경하는 순간 Pending 되어 배포되지 않는 Pod가 발생
[해결 방안]
- Prefix Delegation : https://www.eksworkshop.com/docs/networking/vpc-cni/prefix/
- Custom Networking : https://www.eksworkshop.com/docs/networking/vpc-cni/custom-networking/
- Security Groups for Pods : https://www.eksworkshop.com/docs/networking/vpc-cni/security-groups-for-pods/
- Network Policies : https://www.eksworkshop.com/docs/networking/vpc-cni/network-policies/
- Amazon VPC Lattice : https://www.eksworkshop.com/docs/networking/vpc-lattice/
