@Injectable() 데코레이션을 사용한다. 즉 Providers라는 얘기.
파이프를 사용하게 된 이유는
1. dto의 유효성 검사를 라우터 핸들러에서 수행하기에는 단일 책임 원칙을 위반한다.
2. 유효성 검사 클래스를 생성하여 작업을 위임할 수 있지만 각 메서드의 시작 부분에서 검사기를 호출해야한다.
3. 유효성 검사 미들웨어를 사용할 수 있다면 좋겠지만, 미들웨어는 호출될 핸들러와 그 매개변수 등 실행 컨텍스트를 인식하지 못한다.
이때문에 파이프를 사용하게 되었다고 한다.
즉 1번은
export class CreateCatDto {
  name: string;
  age: number;
  breed: string;
}
라우터 내부에서 dto 멤버를 전부 검사하는 것은
a. 라우터 본연의 기능 수행
b. dto 멤버 검사
2가지를 동시에 하므로 SRP를 만족하지 않는다.
매우 놀라운 사실으로, Pipe도 비동기를 지원한다!
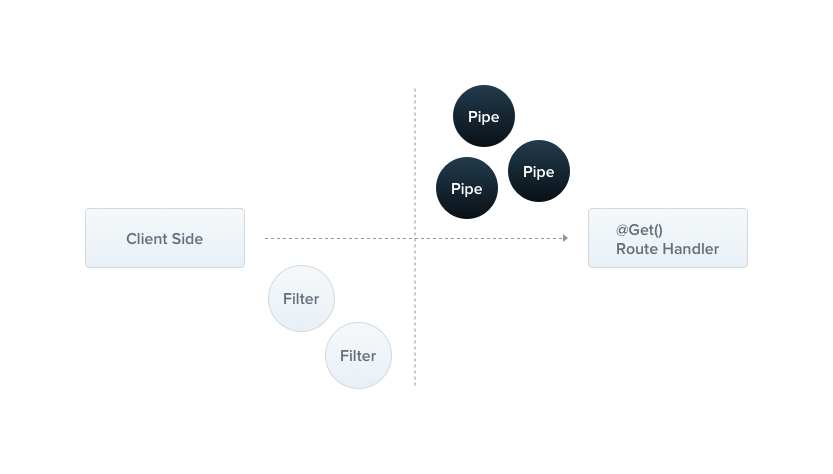
앞서 살펴본 Filter가 클라이언트쪽에 가까웠다면, Pipe는 Controller에 가깝다고 볼 수 있다. 즉,
- Filter: 클라이언트에서 들어온 데이터를 바탕으로 오류 검출
- Pipe: 클라이언트에서 들어온 데이터를 적절히 가공해서 Router에 전달
라고 할 수 있겠다!
Pipe는 두 가지 일반적인 상황에서 사용한다.
- 변환: 입력 데이터를 원하는 형식으로 변환
- 유효성 검사: 입력 데이터가 유효한지 검사. 유효하면 통과, 그렇지 않으면 에러 발생. Token 처리쪽에서 사용
위의 두 가지 모두 컨트롤러 라우트 핸들러의 인수를 대상으로 사용된다. 즉,
@Get(':id')
findOne(@Param('id', ParseIntPipe) id: number) {}
이렇게 사용이 가능하다는 내용.
전체 경로가 /cats/<id> 인 경우, id의 값을 숫자로 받아오겠다 라는 뜻이다. 예외에 관한 내용은 아래에서 서술하겠다.
Pipe를 사용하면 좋은 점은 아래 그림 하나로 설명이 가능하다.
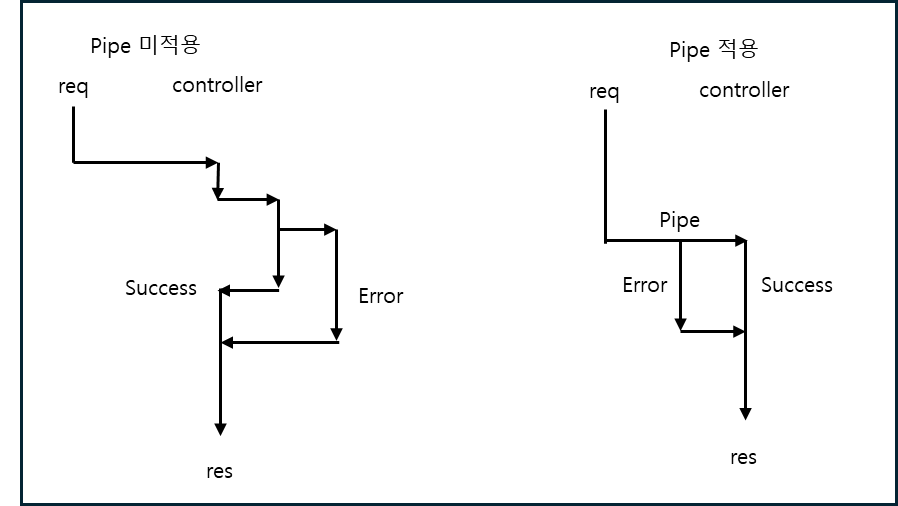
복잡한 에러 검출 내용을을 컨트롤러 내부에서 구현할 필요가 없어진다!! 즉 Low Coupling 패턴을 따라 Protected Validation을 만족할 수 있게 된다!
대충 리눅스의 command pipeline이라고 생각하자.
Pipe 기본 예제
루트 컨트롤러에 다음과 같은 라우터가 있다고 가정해보자.
@Get(':id')
async findOne(@Param('id', ParseIntPipe) id: number) {
  return this.catsService.findOne(id);
}
이때 GET localhost:3000/abc을 요청하면 아래와 같은 응답이 나오게 된다.
{
  "statusCode": 400,
  "message": "Validation failed (numeric string is expected)",
  "error": "Bad Request"
}
즉 abc를 number타입으로 바꿀 수 없다는 내용의 에러를 발생시킨다. 그리고 라우터의 내용은 실행되지 않는다!
위의 예제는 클래스를 전달하여 인스턴스화의 책임을 프레임워크에 맡겼다.
가드랑 파이프처럼 인스턴트를 생성해서 넣어줄 수 있다!
이 경우는 사용자가 정의해서 사용하는 경우 유용하다.
@Get(':id')
async findOne(
  @Param('id', new ParseIntPipe({ errorHttpStatusCode: HttpStatus.NOT_ACCEPTABLE })) // 예외 http status code를 설정할 수 있다.
  id: number,
) {
  return this.catsService.findOne(id);
}
사용자 정의 Pipe
Nest가 제공하는 기본 Pipe도 강력하지만, 개발자가 직접 만들어 사용해야할 때도 있다.
여기서는 간단한 ValidationPipe부터 시작하겠다.
import { PipeTransform, Injectable, ArgumentMetadata } from '@nestjs/common';

@Injectable()
export class ValidationPipe implements PipeTransform {
  transform(value: any, metadata: ArgumentMetadata) {
    return value; // 받은 값을 바로 반환
  }
}
PipeTransform<T, R>에서 T는 value의 타입, R은 transform이 반환하는 타입이다.
value는 원본 데이터, metadata는 처리된 데이터라고 생각하자.
Pipe의 범위
- method -
@Body(new ValidationPipe)사용 - controller -
@UsePipes(new ValidationPipe())사용 - global -
app.useGlobalPipes(new ValidationPipe())사용
이 경우 하이브리드앱에서는 작동하지 않는다고 한다.
모듈 외부에서 등록한 전역 파이프, 즉 app.useGlobalPipe()로 등록된 파이프는 종속성을 주입할 수 없다.
아래의 구성을 사용해서 모든 모듈에서 글로벌 파이프를 설정할 수 있다.
import { Module } from '@nestjs/common';
import { APP_PIPE } from '@nestjs/core';

@Module({
  providers: [
    {
      provide: APP_PIPE,
      useClass: ValidationPipe,
    },
  ],
})
export class AppModule {}
Value의 값 변경
ParseIntPipe의 구성으로 설명하겠다.
해당 Pipe는 아래와 같이 구현되어있다.
@Injectable()
export class ParseIntPipe implements PipeTransform<string, number> { // String을 Number로 변경하겠다!
  transform(value: string, metadata: ArgumentMetadata): number {
    const val = parseInt(value, 10);
    if (isNaN(val)) {
      throw new BadRequestException('Validation failed');
    }
    return val;
  }
}
바인딩을 아래와 같이 할 수 있다.
이렇게 되면 parma으로 들어온 id: string을 id: number으로 변환을 해주게 된다.
@Get(':id')
async findOne(@Param('id', new ParseIntPipe()) id) {
  return this.catsService.findOne(id);
}
Default값을 정하고 싶다면 어떻게 해야하나요?
간단하다. DefaultValuePipe를 사용하면 된다.
@Get()
async findAll(
  @Query('activeOnly', new DefaultValuePipe(false), ParseBoolPipe) activeOnly: boolean, // 해당 쿼리가 없는 경우 기본값을 false로 설정
  @Query('page', new DefaultValuePipe(0), ParseIntPipe) page: number, // 해당 쿼리가 없는 경우 기본값을 0으로 설정
) {
  return this.catsService.findAll({ activeOnly, page });
}
validator - 그냥 빌트인 검증 파이프를 쓰자...
- Zod 사용 - 스키마 기반 유효성 검사
먼저 Pipe를 하나 만들어준다.
import { PipeTransform, ArgumentMetadata, BadRequestException } from '@nestjs/common';
import { ZodSchema  } from 'zod';

export class ZodValidationPipe implements PipeTransform {
  constructor(private schema: ZodSchema) {}

  transform(value: unknown, metadata: ArgumentMetadata) {
    try {
      const parsedValue = this.schema.parse(value);
      return parsedValue;
    } catch (error) {
      throw new BadRequestException('Validation failed');
    }
  }
}
다음으로 Zod Schema를 만들어준다.
import { z } from 'zod';

export const createCatSchema = z
  .object({
    name: z.string(),
    age: z.number(),
    breed: z.string().optional(), // 필수가 아닌 항목 설정
    sex: z.string.default('attack helicopter') //  속성이 없는 경우 기본값 설정
  })
  .required();

export type CreateCatDto = z.infer<typeof createCatSchema>;
마지막으로 controller에 Pipe를 등록해준다.
@Post()
@UsePipes(new ZodValidationPipe(createCatSchema))
async create(@Body() createCatDto: CreateCatDto) {
  this.catsService.create(createCatDto);
}- Class Validator 사용
이 항목은 바닐라 JS에서는 동작하지 않습니다!!! 무조건 TypeScript 사용!!!
데코레이터를 기반으로 유효성 검사를 한다. 기본으로 제공하는 강력한 유효성 검사기가 있지만, 파이프가 어떻게 동작하는지 알아보기 위해 해당 예제를 사용하였다고 한다.
더 많은 데코레이터는 이곳으로
dto를 수정해보자.
import { IsString, IsInt } from 'class-validator';

export class CreateCatDto {
  @IsString()
  name: string;

  @IsInt()
  age: number;

  @IsString()
  breed: string;
}
다음으로 Pipe를 만들어보자.
import { PipeTransform, Injectable, ArgumentMetadata, BadRequestException } from '@nestjs/common';
import { validate } from 'class-validator';
import { plainToInstance } from 'class-transformer';

@Injectable()
export class ValidationPipe implements PipeTransform<any> {
  async transform(value: any, { metatype }: ArgumentMetadata) { // 유효성 검사 중 일부가 비동기일 수 있기 때문
    if (!metatype || !this.toValidate(metatype)) {
      return value;
    }
    const object = plainToInstance(metatype, value); // 바닐라 JS일 경우 유효성 감사를 우회
    const errors = await validate(object);
    if (errors.length > 0) {
      throw new BadRequestException('Validation failed');
    }
    return value; // 유효성 검사이므로 값을 변환 X
  }

  private toValidate(metatype: Function): boolean {
    const types: Function[] = [String, Boolean, Number, Array, Object];
    return !types.includes(metatype);
  }
}
마지막으로 Controller에 바인딩하자.
@Post()
async create(
  @Body(new ValidationPipe()) createCatDto: CreateCatDto,
) {
  this.catsService.create(createCatDto);
}
참고
Nest가 지원하는 기본 pipe는 아래와 같다.
- ValidationPipe
- ParseIntPipe
- ParseFloatPipe
- ParseBoolPipe
- ParseArrayPipe
- ParseUUIDPipe
- ParseEnumPipe
- DefaultValuePipe
- ParseFilePipe
ArgumentMetadata 인터페이스는 아래와 같이 정의되어있다.
export interface ArgumentMetadata {
  type: 'body' | 'query' | 'param' | 'custom';
  metatype?: Type<unknown>;
  data?: string;
}