토큰 인증을 하기 위한 기초로, Spring Security 설정을 해보도록 한다.
웹에 널린건 전부 Spring 6.0 이전의 Spring Security.
우리는 6.0 이상을 준비해야한다...
따라서 공식문서를 참고해서 사용 방법을 대충 눈익혀두자.
완성코드는 이곳
주요 변경점
대조군은 이곳
- and() 메소드 삭제
- 제한적 메소드 chaining
- Adapter 제외, 전부 Bean으로 제어
@Configuration
@EnableWebSecurity
public class SecurityConfig extends WebSecurityConfigurerAdapter {
    @Override
    protected void configure(AuthenticationManagerBuilder auth) throws Exception {
        auth.userDetailsService(userDetailsService);
    }

    @Bean(name = BeanIds.AUTHENTICATION_MANAGER)
    @Override
    public AuthenticationManager authenticationManagerBean() throws Exception {
        return super.authenticationManagerBean();
    }

    @Override
    protected void configure(HttpSecurity http) throws Exception {
        http.csrf().disable().authorizeRequests().antMatchers("/authenticate")
                .permitAll().anyRequest().authenticated()
                .and().exceptionHandling().and().sessionManagement()
                .sessionCreationPolicy(SessionCreationPolicy.STATELESS);
        http.addFilterBefore(jwtFilter, UsernamePasswordAuthenticationFilter.class);;
    }
}
위의 예제에서는 WebSecurotyConfigureAdapter 인터페이스를 받아 configure를 Override해 메소드를 전부 chaing해서 사용하고 있다.
이제는
@Configuration
@EnableWebSecurity
public class AuthenticationConfig {
    @Bean
    public SecurityFilterChain securityFilterChain(HttpSecurity http) throws Exception {
        http
                .csrf(AbstractHttpConfigurer::disable)
                .sessionManagement( session -> session
                        .sessionCreationPolicy(SessionCreationPolicy.STATELESS))
                .authorizeHttpRequests( request -> request
                        .requestMatchers("/authenticate").permitAll().anyRequest().authenticated()
                        .requestMatchers("/test/**").permitAll());
        return http.build();
    }
}
해당 필터를 Bean으로 만들어 내부에서 지정을 해주면 위와 같은 동작을 한다는 내용.
체이닝을 가능하지만, 제한적으로 가능하다.
이전처럼 and()를 사용해서 체인이 불가능하다는 뜻.
들어가며...
Spring Secure을 처음 써본 시각으로 작성되었다.
답답해도 "초보자였지" 라는 생각으로 봐주면 고맙겠다.
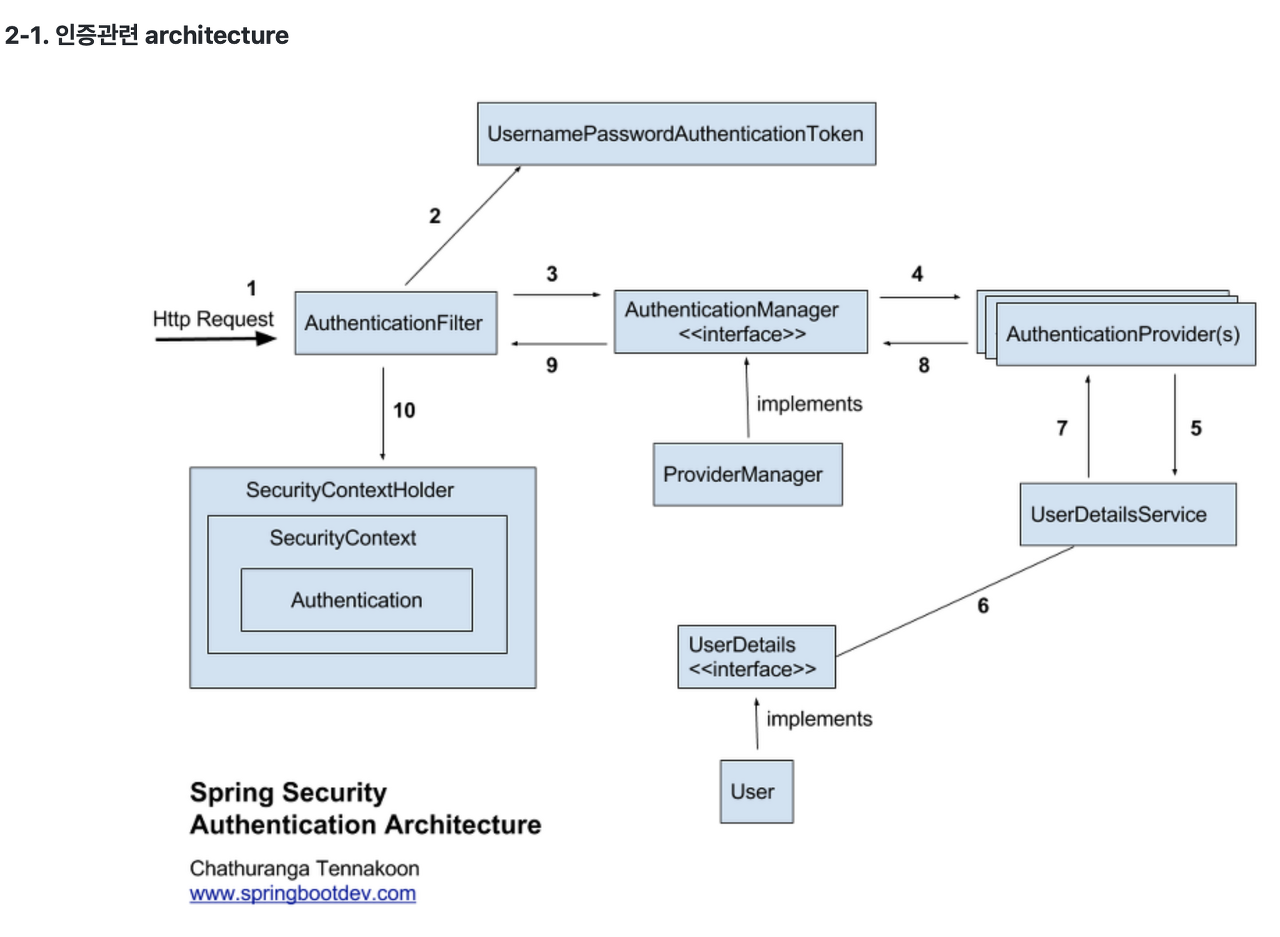
Spring Security
Spring 기반의 어플리케이션의 보안을 담당하는 스프링 하위 프레임워크.
Filter에 따라 인증, 권한을 처리한다.
| Filter | Interceptor |
|---|---|
| Dispatch Servlet으로 가기 전 | Dispatcher와 Controller 사이 |
| 인증 | 인가 |
|---|---|
| 사용자가 본인인가? | 사용자가 자원에 접근 가능한가? |
Security 활성화

HttpServeletRequest의 권한 부여 과정
여러 filterChain을 통해 인증되었는지 확인하고, 마지막으로 접근 가능한지 여부를 알려준다.
gradle에 아래의 Dependency를 추가한다.
	implementation 'org.springframework.boot:spring-boot-starter-security'
	testImplementation 'org.springframework.boot:spring-boot-starter-test'
	testImplementation 'org.springframework.security:spring-security-test'
그리고 config클래스를 하나 만들고 아래의 코드를 작성하자.
@Configuration
@EnableWebSecurity
public class AuthenticationConfig {
  @Bean
  public SecurityFilterChain securityFilterChain(HttpSecurity http) throws Exception {
    http
      .authorizeHttpRequests( auth -> auth
        .requestMatchers(HttpMethod.POST,"/posts").authenticated()
        .requestMatchers(HttpMethod.PUT, "/posts/{id}").authenticated()
        .requestMatchers(HttpMethod.DELETE, "/posts/{id}").authenticated()
        .anyRequest()
        .permitAll()
    ); // post
	http
      .formLogin(AbstractHttpConfigurer::disable);
    http
      .csrf(AbstractHttpConfigurer::disable);
    return http.build(); // HttpSecurity를 이렇게 쓸거에요~ 반환
  }
}
각 메소드의 기본 설명으로는,
- http: HttpSecurity 객체. http 접근 권한을 설정한다.
- authorizeHttpRequests: http 요청에 어떤 권한을 줄 것인지 결정하는 메소드.
Security 6부터는 Lambda DSL을 사용한다고 한다. 특정 그룹으로 묶을 수 있다는게 장점 - requestMatchers: 기존의 antMatchers. 작성한 패턴과 일치하는 경로의 요청에 대해 처리하는 방식을 제공한다.
경로는 ant, 정규식, http 메소드 이 3가지로 지정할 수 있다.- permitAll: 해당 경로로 들어오는 모든 접근을 허용하겠다
- denyAll: 해당 경로로 들어오는 모든 접근을 막겠다
- anyRequest: requestMatcher에서 지정되지 않은 경로 요청
- access: 해당 권한 또는 역할이 있는 경우 접근 권한 부여
- has 시리즈
- hasAuthority, hasAnyAuthority: 해당 인가가 있는가?
- hasRole, hasAnyRole: 해당 역할이 있는가?
- authenticated: 해당 경로는 인증이 필요함을 명시
- formLogin: spring에서 제공하는 기본 로그인. JWT 인증을 할 예정이기에, 해당 부분은 disable 했다.
- csrf: Cross Site Request Forgery. 공격자가 사용자 의도와 다르게 처리한다는 내용인 것 같은데, 우리는 MVC에서 V를 없앴다. disable 하자.
이제 서버를 실행해보자!
별 문제 없이 서버가 실행됨을 볼 수 있다.
이전에 테스트 할 때는 오류 뿜으면서 접근조차 안됐는데...
이젠 왜..... 되는거지...
혹시 모르니 swagger도 접근 가능하게끔 만들어놓자.
아래의 코드를 추가하자.
    http
      .authorizeHttpRequests( auth -> auth
        .requestMatchers("/swagger-ui/**").permitAll()
        .requestMatchers("/v3/api-docs/**").permitAll()
    ); // swagger
    http
      .sessionManagement( session -> session
        .sessionCreationPolicy(SessionCreationPolicy.STATELESS)
    );
jwt 인증은 session을 사용하지 않으니 STATELESS로 설정해놓자.
이로서 간단한 접근 방식을 알아보았다.
참고
아무 생각 없이
http
  .authorizeHttpRequests( auth -> auth
    .requestMatchers(HttpMethod.POST,"/posts").authenticated()
    .requestMatchers(HttpMethod.PUT, "/posts/{id}").authenticated()
    .requestMatchers(HttpMethod.DELETE, "/posts/{id}").authenticated()
    .anyRequest()
    .permitAll()
  ) // post
  .authorizeHttpRequests( auth -> auth
      .requestMatchers("/comments/**").authenticated()
      .anyRequest()
      .permitAll()
  ) // comment
  .authorizeHttpRequests( auth -> auth
    .requestMatchers(HttpMethod.POST,"/boards").authenticated()
    .requestMatchers(HttpMethod.PUT, "/boards/{id}").authenticated()
    .requestMatchers(HttpMethod.DELETE, "/boards/{id}").authenticated()
    .anyRequest()
    .permitAll()
  ); // board
이런식으로 작성하였는데...
Caused by: org.springframework.beans.factory.BeanCreationException: Error creating bean with name 'securityFilterChain' defined in class path resource [com/example/demo/config/AuthenticationConfig.class]: Failed to instantiate [org.springframework.security.web.SecurityFilterChain]: Factory method 'securityFilterChain' threw exception with message: Can't configure mvcMatchers after anyRequest
Caused by: org.springframework.beans.BeanInstantiationException: Failed to instantiate [org.springframework.security.web.SecurityFilterChain]: Factory method 'securityFilterChain' threw exception with message: Can't configure mvcMatchers after anyRequest
Caused by: java.lang.IllegalStateException: Can't configure mvcMatchers after anyRequest
오류가 발생하였다.
Can't configure mvcMatchers after anyRequest
이 오류를 주목하자.
mvcMatcher는 anyRequest 이후에 설정할 수 없다. 즉, 이전에 생성된 anyRequest에도 영향을 받는다는 뜻이다.
아래와 같이 수정하자.
http
  .authorizeHttpRequests( auth -> auth
    .requestMatchers(HttpMethod.POST,"/posts").authenticated()
    .requestMatchers(HttpMethod.PUT, "/posts/{id}").authenticated()
    .requestMatchers(HttpMethod.DELETE, "/posts/{id}").authenticated()
  ) // post
  .authorizeHttpRequests( auth -> auth
      .requestMatchers("/comments/**").authenticated()
  ) // comment
  .authorizeHttpRequests( auth -> auth
    .requestMatchers(HttpMethod.POST,"/boards").authenticated()
    .requestMatchers(HttpMethod.PUT, "/boards/{id}").authenticated()
    .requestMatchers(HttpMethod.DELETE, "/boards/{id}").authenticated()
    .anyRequest()
    .denyAll()
  ); // board