안녕하세요. MMSegmentation은 여러 사전 훈련된 모델과 여러 데이터셋을 제공합니다. 이 글에서는 사전 훈련된 모델을 사용해 추론하는 방법을 알려드립니다.
사전 훈련된 모델은 mmsegmentation/configs 경로에서 확인할 수 있습니다.
Inferencer
Basic Usage
한 장의 이미지 Inference
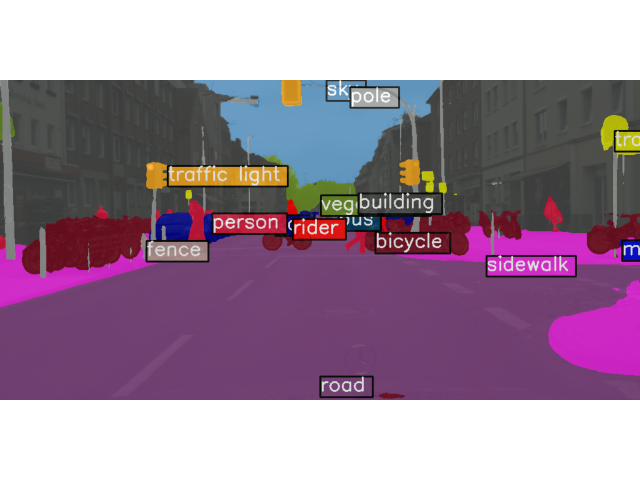
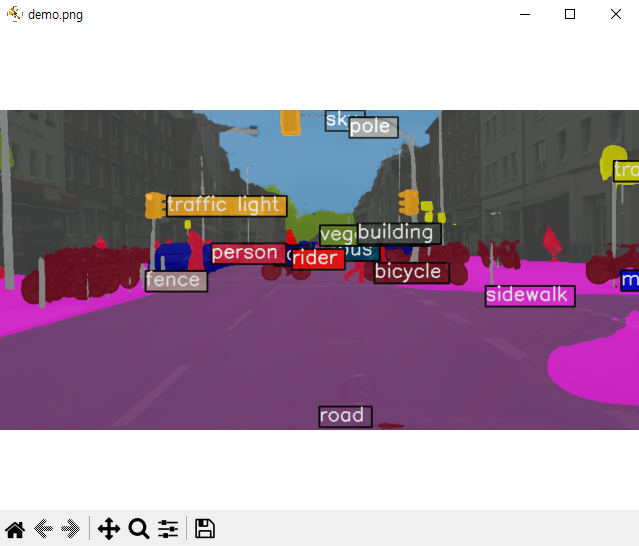
먼저 demo.png 이미지를 Inference 하는 방법을 알려드리겠습니다.
-
python 파일 생성한 후, 아래의 코드를 실행
-
Terminal에서 'python' 입력 후, 아래의 코드를 실행
from mmseg.apis import MMSegInferencer
# Load models into memory
inferencer = MMSegInferencer(model='deeplabv3plus_r18-d8_4xb2-80k_cityscapes-512x1024')
# Inference
inferencer('demo/demo.png', show=True)
demo.png 이미지에 대한 Inference 결과입니다.
여러 장의 이미지 Inference
아래는 여러 장의 이미지를 MMSegInferencer 사용하여 추론하는 코드입니다.
# 방법 1. 이미지 List 입력

images = [image1, image2, ...] # image1 can be a file path or a np.ndarray
inferencer(images, show=True, wait_time=0.5) # wait_time is delay time, and 0 means forever

# 방법 2. 이미지 디렉토리 입력

images = $IMAGESDIR
inferencer(images, show=True, wait_time=0.5)

# 시각화된 렌더링 맵 및 예측 결과 저장
# out_dir은 저장할 디렉토리
# img_out_dir 및 pred_out_dir은 out_dir의 하위 디렉토리임

inferencer(images, out_dir='outputs', img_out_dir='vis', pred_out_dir='pred')
Inferencer Option
Inferencer는 기본적으로 'visualization' 및 'predictions'라는 두 개의 키를 포함하는 dict 유형입니다.
Inferencer에는 'return_datasamples'라는 매개변수가 있습니다. 기본값은 False이며, return_datasamples=True로 설정하면 Inference는 SegDataSample를 반환합니다.
SegDataSample은 이미지 Meta Information과 Data Field로 구성되어 있습니다. Data Field는 seg_logits (softmax 함수를 거치기 전 출력), pred_sem_seg (예측된 클래스 레이블)이 있습니다.
아래 코드는 공식 문서의 코드를 일부 수정한 코드입니다.
# 한 장의 이미지

result = inferencer('demo/demo.png')
# result is a `dict` including 2 keys 'visualization' and 'predictions'

# 'visualization' includes color segmentation map
print(np.array(result['visualization']).shape)
# 출력 : []

# 'predictions' includes segmentation mask with label indice
print(np.array(result['predictions']).shape)
# (512, 1024)

# Return SegData Sample
result = inferencer('demo/demo.png', return_datasamples=True)
print(type(result))
# 출력 : <class 'mmseg.structures.seg_data_sample.SegDataSample'>

# 여러 장의 이미지

results = inferencer(images)
# The output is list

print(type(results['visualization']), np.array(results['visualization']).shape)
# 출력 : <class 'list'> (0,)

print(type(results['predictions']), np.array(results['predictions'][0]).shape)
# 출력 : <class 'list'> (512, 1024)

# Return SegData Sample
results = inferencer(images, return_datasamples=True)
print(type(results[0]))
# 출력 : <class 'mmseg.structures.seg_data_sample.SegDataSample'>
Initialization
모델의 이름은 모델 메타 파일 (configs/xxx/metafile.yaml)에서 찾을 수 있습니다. 아래는 다른 입력 매개변수입니다.
-
weights (str, optional): 체크포인트 경로. 지정되지 않고 모델이 메타파일의 모델 이름인 경우, 가중치는 메타파일에서 로드됩니다. 기본값은 None입니다.
-
classes (list, optional): 결과 렌더링을 위한 입력 클래스. 세그멘테이션 모델의 예측은 레이블 인덱스를 갖는 세그먼트 맵입니다. 클래스는 레이블 인덱스에 해당하는 항목을 포함하는 리스트입니다. 클래스가 정의되지 않은 경우, 시티스케이프 클래스를 기본값으로 사용합니다. 기본값은 None입니다.
-
palette (list, optional): 결과 렌더링을 위한 입력 팔레트. 이는 클래스에 해당하는 색상의 리스트입니다. 팔레트가 정의되지 않은 경우, 시티스케이프의 팔레트를 기본값으로 사용합니다. 기본값은 None입니다.
-
dataset_name (str, optional): 데이터셋 이름 또는 별칭, 렌더러는 데이터셋의 메타 정보를 사용합니다. 즉, 클래스와 팔레트이지만, 클래스와 팔레트가 더 높은 우선순위를 가집니다. 기본값은 None입니다.
-
device (str, optional): 추론을 실행할 장치. None인 경우, 사용 가능한 장치가 자동으로 사용됩니다. 기본값은 None입니다.
-
scope (str, optional): 모델의 범위. 기본값은 'mmseg'입니다.
Visualize prediction
MMSegInferencer는 시각화 예측을 위해 4개의 매개변수를 지원합니다. 이들은 초기화된 추론기를 호출할 때 사용할 수 있습니다:
-
show (bool): 이미지를 팝업 창에 표시할지 여부. 기본값은 False입니다.
-
wait_time (float): show의 간격(초). 기본값은 0입니다.
-
img_out_dir (str): out_dir의 하위 디렉토리, 렌더링된 컬러 세그멘테이션 마스크를 저장하는 데 사용됩니다. 따라서 예측된 마스크를 저장하려면 out_dir가 정의되어야 합니다. 기본값은 'vis'입니다.
-
opacity (int, float): 세그멘테이션 마스크의 투명도. 기본값은 0.8입니다.
이러한 매개변수들의 예시는 Basic Usage에 있습니다.
List model
MMSegmentation의 모든 모델을 볼 수 있습니다.
# models는 모델 이름들의 리스트이며, 자동으로 출력됩니다.
from mmseg.apis import MMSegInferencer
models = MMSegInferencer.list_models('mmseg')
Inference API
mmseg.apis.init_model
mmseg.apis.init_model API는 config 파일에서 세그멘테이션 모델을 초기화합니다.
Parameters:
-
config (str, Path, or mmengine.Config) - Config 파일 경로 또는 config 파일.
-
checkpoint (str, optional) - Checkpoint 경로. None이라면, 모델은 가중치를 로드하지 않습니다.
device (str, optional) - CPU/CUDA device 옵션. Default ‘cuda:0’.
cfg_options (dict, optional) - 사용된 config의 일부 설정을 재설정하는 옵션입니다.
Returns:
- nn.Module: 세그멘테이션 모델을 반환합니다.
Examples:
from mmseg.apis import init_model

config_path = 'configs/pspnet/pspnet_r50-d8_4xb2-40k_cityscapes-512x1024.py'
checkpoint_path = 'checkpoints/pspnet_r50-d8_512x1024_40k_cityscapes_20200605_003338-2966598c.pth'

# initialize model without checkpoint
model = init_model(config_path)

# init model and load checkpoint
model = init_model(config_path, checkpoint_path)

# init model and load checkpoint on CPU
model = init_model(config_path, checkpoint_path, 'cpu')
mmseg.apis.inference_model
모델을 사용하여 이미지를 추론합니다.
Parameters:
-
model (nn.Module) - 로드된 모델입니다.
-
imgs (str, np.ndarray, or list[str/np.ndarray]) - 이미지 파일 또는 로드된 이미지입니다.
Returns:
- SegDataSample or list[SegDataSample]: 이미지가 list나 tuple인 경우, 같은 길이의 list 형태 결과가 반환됩니다. 그렇지 않으면 세그멘테이션 결과가 직접 반환됩니다.
Note: SegDataSample는 MMSegmentation의 데이터 구조입니다. 또한 mmengine.structures.BaseDataElement의 데이터 구조를 따릅니다. 자세한 정보는 MMEngine의 데이터 요소 문서를 참조하십시오.
SegDataSample의 속성은 여러 부분으로 나뉩니다.
-
gt_sem_seg (PixelData) - semantic segmentation의 Ground truth 입니다.
-
pred_sem_seg (PixelData) - semantic segmentation의 예측값입니다.
-
seg_logits (PixelData) - semantic segmentation의 예측 로짓입니다.
Note: PixelData는 픽셀 수준의 예측을 위한 데이터 구조입니다. 자세한 정보는 MMEngine의 PixelData 문서를 참조하십시오.
Example:
from mmseg.apis import init_model, inference_model

config_path = 'configs/pspnet/pspnet_r50-d8_4xb2-40k_cityscapes-512x1024.py'
checkpoint_path = 'checkpoints/pspnet_r50-d8_512x1024_40k_cityscapes_20200605_003338-2966598c.pth'
img_path = 'demo/demo.png'


model = init_model(config_path, checkpoint_path)
result = inference_model(model, img_path)
mmseg.apis.show_result_pyplot
이미지 세그멘테이션 결과를 시각화합니다.
Parameters:
-
model (nn.Module) - 로드된 모델입니다.
-
img (str or np.ndarray) - 이미지 파일명 또는 로드된 이미지입니다.
-
result (SegDataSample) - 예측된 SegDataSample 결과입니다.
-
opacity (float) - 그려진 세그멘테이션 맵의 불투명도입니다. 기본값은 0.5이며, (0, 1] 범위여야 합니다.
-
title (str) - pyplot 피규어의 제목입니다. 기본값은 ''입니다.
-
draw_gt (bool) - GT SegDataSample를 그릴지 여부입니다. 기본값은 True입니다.
-
draw_pred (draws_pred) - Prediction SegDataSample을 그릴지 여부입니다. 기본값은 True입니다.
-
wait_time (float) - 표시 간격(초)입니다. 0은 "forever" 입니다. 기본값은 0입니다.
-
show (bool) - 그린 이미지를 표시할지 여부입니다. 기본값은 True입니다.
-
save_dir (str, optional) - 저장 파일 디렉토리입니다. None인 경우 어떠한 데이터도 저장하지 않습니다.
-
out_file (str, optional) - 출력 파일 경로입니다. 기본값은 None입니다.
Returns:
- np.ndarray: RGB 채널인 그린 이미지입니다.
Examples:
from mmseg.apis import init_model, inference_model, show_result_pyplot

config_path = 'configs/pspnet/pspnet_r50-d8_4xb2-40k_cityscapes-512x1024.py'
checkpoint_path = 'checkpoints/pspnet_r50-d8_512x1024_40k_cityscapes_20200605_003338-2966598c.pth'
img_path = 'demo/demo.png'


# build the model from a config file and a checkpoint file
model = init_model(config_path, checkpoint_path, device='cuda:0')

# inference on given image
result = inference_model(model, img_path)

# display the segmentation result
vis_image = show_result_pyplot(model, img_path, result)

# save the visualization result, the output image would be found at the path `work_dirs/result.png`
vis_iamge = show_result_pyplot(model, img_path, result, out_file='work_dirs/result.png')

# Modify the time of displaying images, note that 0 is the special value that means "forever"
vis_image = show_result_pyplot(model, img_path, result, wait_time=5)
Note: 현재 장치에 그래픽 사용자 인터페이스가 없는 경우, 결과를 저장하기 위해 show를 False로 설정하고 out_file 또는 save_dir을 지정하는 것이 좋습니다. 결과를 창에 표시하려면 특별한 설정이 필요하지 않습니다.