복잡한 HTML 구조를 관리하거나 재사용 가능한 컴포넌트를 만들 때, Shadow DOM과 template 태그를 활용하면 코드의 모듈화와 스타일 캡슐화가 가능합니다.
1️⃣ Shadow DOM
1-1. Shadow DOM 개념
-
Shadow DOM은 브라우저가 기본으로 렌더링하지 않는 숨겨진 DOM 트리입니다.
-
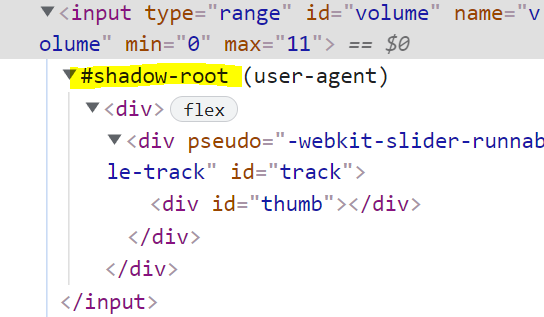
주로
<input type="range">같은 내장 요소 내부에서 여러<div>가 숨어있는 구조를 볼 수 있는데, 이처럼 일반 사용자에게는 보이지 않는 HTML 구조를 뜻합니다.
-
개발자가 직접 만들어서 외부에 노출되지 않는 별도의 DOM 영역에 코드를 작성할 수 있습니다.
1-2. Shadow DOM 만드는 방법
- 기본 구조:
<div class="mordor"></div> <script> // 'mordor' 클래스를 가진 요소에 shadow DOM 생성 document.querySelector('.mordor').attachShadow({ mode: 'open' }); // shadow DOM 내부에 HTML 삽입 document.querySelector('.mordor').shadowRoot.innerHTML = '<p>심연에서왔도다</p>'; </script> - 설명:
attachShadow({ mode: 'open' })를 사용하여 요소에shadowRoot라는 별도의 DOM 영역을 생성합니다.- 생성된
shadowRoot에 원하는 HTML 코드를 넣으면, 이 코드는 외부에서 직접 접근할 수 없게 됩니다.
1-3. Shadow DOM을 활용한 Web Component 제작
- 문제 상황 (스타일 오염):
- 일반적으로 컴포넌트에 스타일을 포함시키면, 해당 스타일이 전역에 영향을 미칠 수 있습니다.
- 예를 들어, 컴포넌트 내부에
<style>태그를 사용하면 다른 요소에도 스타일이 적용될 위험이 있습니다.
- 해결책: Shadow DOM에 스타일 캡슐화
<script> class CustomInput extends HTMLElement { connectedCallback() { // shadow DOM 생성 this.attachShadow({ mode: 'open' }); // shadow DOM 내부에 HTML과 스타일 포함 this.shadowRoot.innerHTML = ` <label>이름을 입력하쇼</label> <input> <style> label { color: red; } </style> `; } } customElements.define("custom-input", CustomInput); </script> <custom-input></custom-input> <label>오 이제 바깥건 안빨개짐</label> - 설명:
- 컴포넌트 내부의
<style>은 shadow DOM 내에서만 적용되므로, 외부 스타일 오염을 막을 수 있습니다. - 이렇게 하면 모듈식으로 개발할 때 각 컴포넌트의 스타일과 구조가 독립적으로 유지됩니다.
- 컴포넌트 내부의
2️⃣ HTML 임시보관함 template 태그
2-1. template 태그의 역할
template태그에 작성된 HTML은 렌더링되지 않고, 필요할 때 동적으로 클론하여 사용할 수 있습니다.- 코드가 길어지거나 재사용 가능한 HTML 블록을 미리 정의해둘 때 유용합니다.
2-2. template 태그 활용 예제
<!-- 사용자 정의 컴포넌트 사용 -->
<custom-input></custom-input>

<!-- HTML 임시보관함: 렌더링되지 않음 -->
<template id="template1">
  <label>이메일을 입력하쇼</label>
  <input>
  <style> label { color: red; } </style>
</template>

<script>
  class CustomInput extends HTMLElement {
    connectedCallback() {
      // shadow DOM 생성
      this.attachShadow({ mode: 'open' });
      // template 내용을 클론하여 shadow DOM에 추가
      const template = document.getElementById('template1');
      this.shadowRoot.append(template.content.cloneNode(true));
    }
  }
  customElements.define("custom-input", CustomInput);
</script>
- 설명:
<template id="template1">안의 HTML은 페이지에 바로 렌더링되지 않습니다.- 컴포넌트의
connectedCallback()에서 template의 내용을 클론(cloneNode)하여 shadow DOM에 추가하면, 해당 컴포넌트에 HTML이 삽입됩니다. - 이렇게 하면 코드의 가독성이 높아지고, 컴포넌트 내부 HTML을 별도로 관리할 수 있습니다.
3️⃣ Shadow DOM 내 이벤트 리스너 부착
3-1. Shadow DOM 내부에 이벤트 리스너 추가
- Shadow DOM에서도 일반 DOM과 같이 이벤트 리스너를 부착할 수 있습니다.
- 예제에서는 shadow DOM 내부의
<label>에 클릭 이벤트를 부착합니다.
<custom-input></custom-input>

<template id="template1">
  <label>이메일을 입력하쇼</label>
  <input>
  <style> label { color: red; } </style>
</template>

<script>
  class CustomInput extends HTMLElement {
    connectedCallback() {
      // shadow DOM 생성 및 template 클론
      this.attachShadow({ mode: 'open' });
      const template = document.getElementById('template1');
      this.shadowRoot.append(template.content.cloneNode(true));
      // shadow DOM 내 label 요소 선택 및 이벤트 리스너 추가
      const el = this.shadowRoot.querySelector('label');
      el.addEventListener('click', () => {
        console.log('클릭함');
      });
    }
  }
  customElements.define("custom-input", CustomInput);
</script>
- 설명:
- shadow DOM 내부의 요소에 이벤트를 등록해도 외부 DOM에는 영향이 없으며, 필요한 기능을 컴포넌트 내부에 캡슐화할 수 있습니다.
- 이를 통해 모듈화된 컴포넌트 안에 JavaScript 로직과 스타일을 함께 관리할 수 있습니다.
📌 정리
- Shadow DOM:
- 외부에 노출되지 않는 독립적인 DOM 영역을 생성하여, HTML 구조와 스타일을 캡슐화할 수 있습니다.
- 이를 통해 스타일 오염을 방지하고, 컴포넌트의 재사용성을 높일 수 있습니다.
- template 태그:
- 렌더링되지 않는 HTML 임시 보관함으로 활용되어, 동적으로 컴포넌트 내부에 클론하여 삽입할 수 있습니다.
- 코드의 가독성을 높이고, HTML 구조를 모듈화하는 데 유용합니다.
- 이벤트 리스너:
- shadow DOM 내부에서도 일반 DOM처럼 이벤트 리스너를 부착할 수 있어, 컴포넌트 내부에 로직을 캡슐화할 수 있습니다.