1. OAuth 2.0
서비스에서 사용자 개인정보와 인증에 대한 책임을 지지 않고 신뢰할 만한 타사 플랫폼에 위임
- 개인정보 관련 데이터를 직접 보관하는 것은 리스크가 크며 보안적으로 문제되지 않도록 안전하게 관리해야 하고 ID/PW 에 관련된 지속적인 해킹 공격 등 여러 가지 신경써야 할 부분이 많음
- 신뢰할 수 있는 플랫폼(구글, 페이스북, 네이버, 카카오 등)에 개인정보, 인증 기능을 맡기면 서비스는 인증 기능에 대한 부담을 줄일 수 있음
2. OAuth2 흐름
- kakao, naver, google 다 비슷한 흐름
- kakao 기준 설명 (참고)
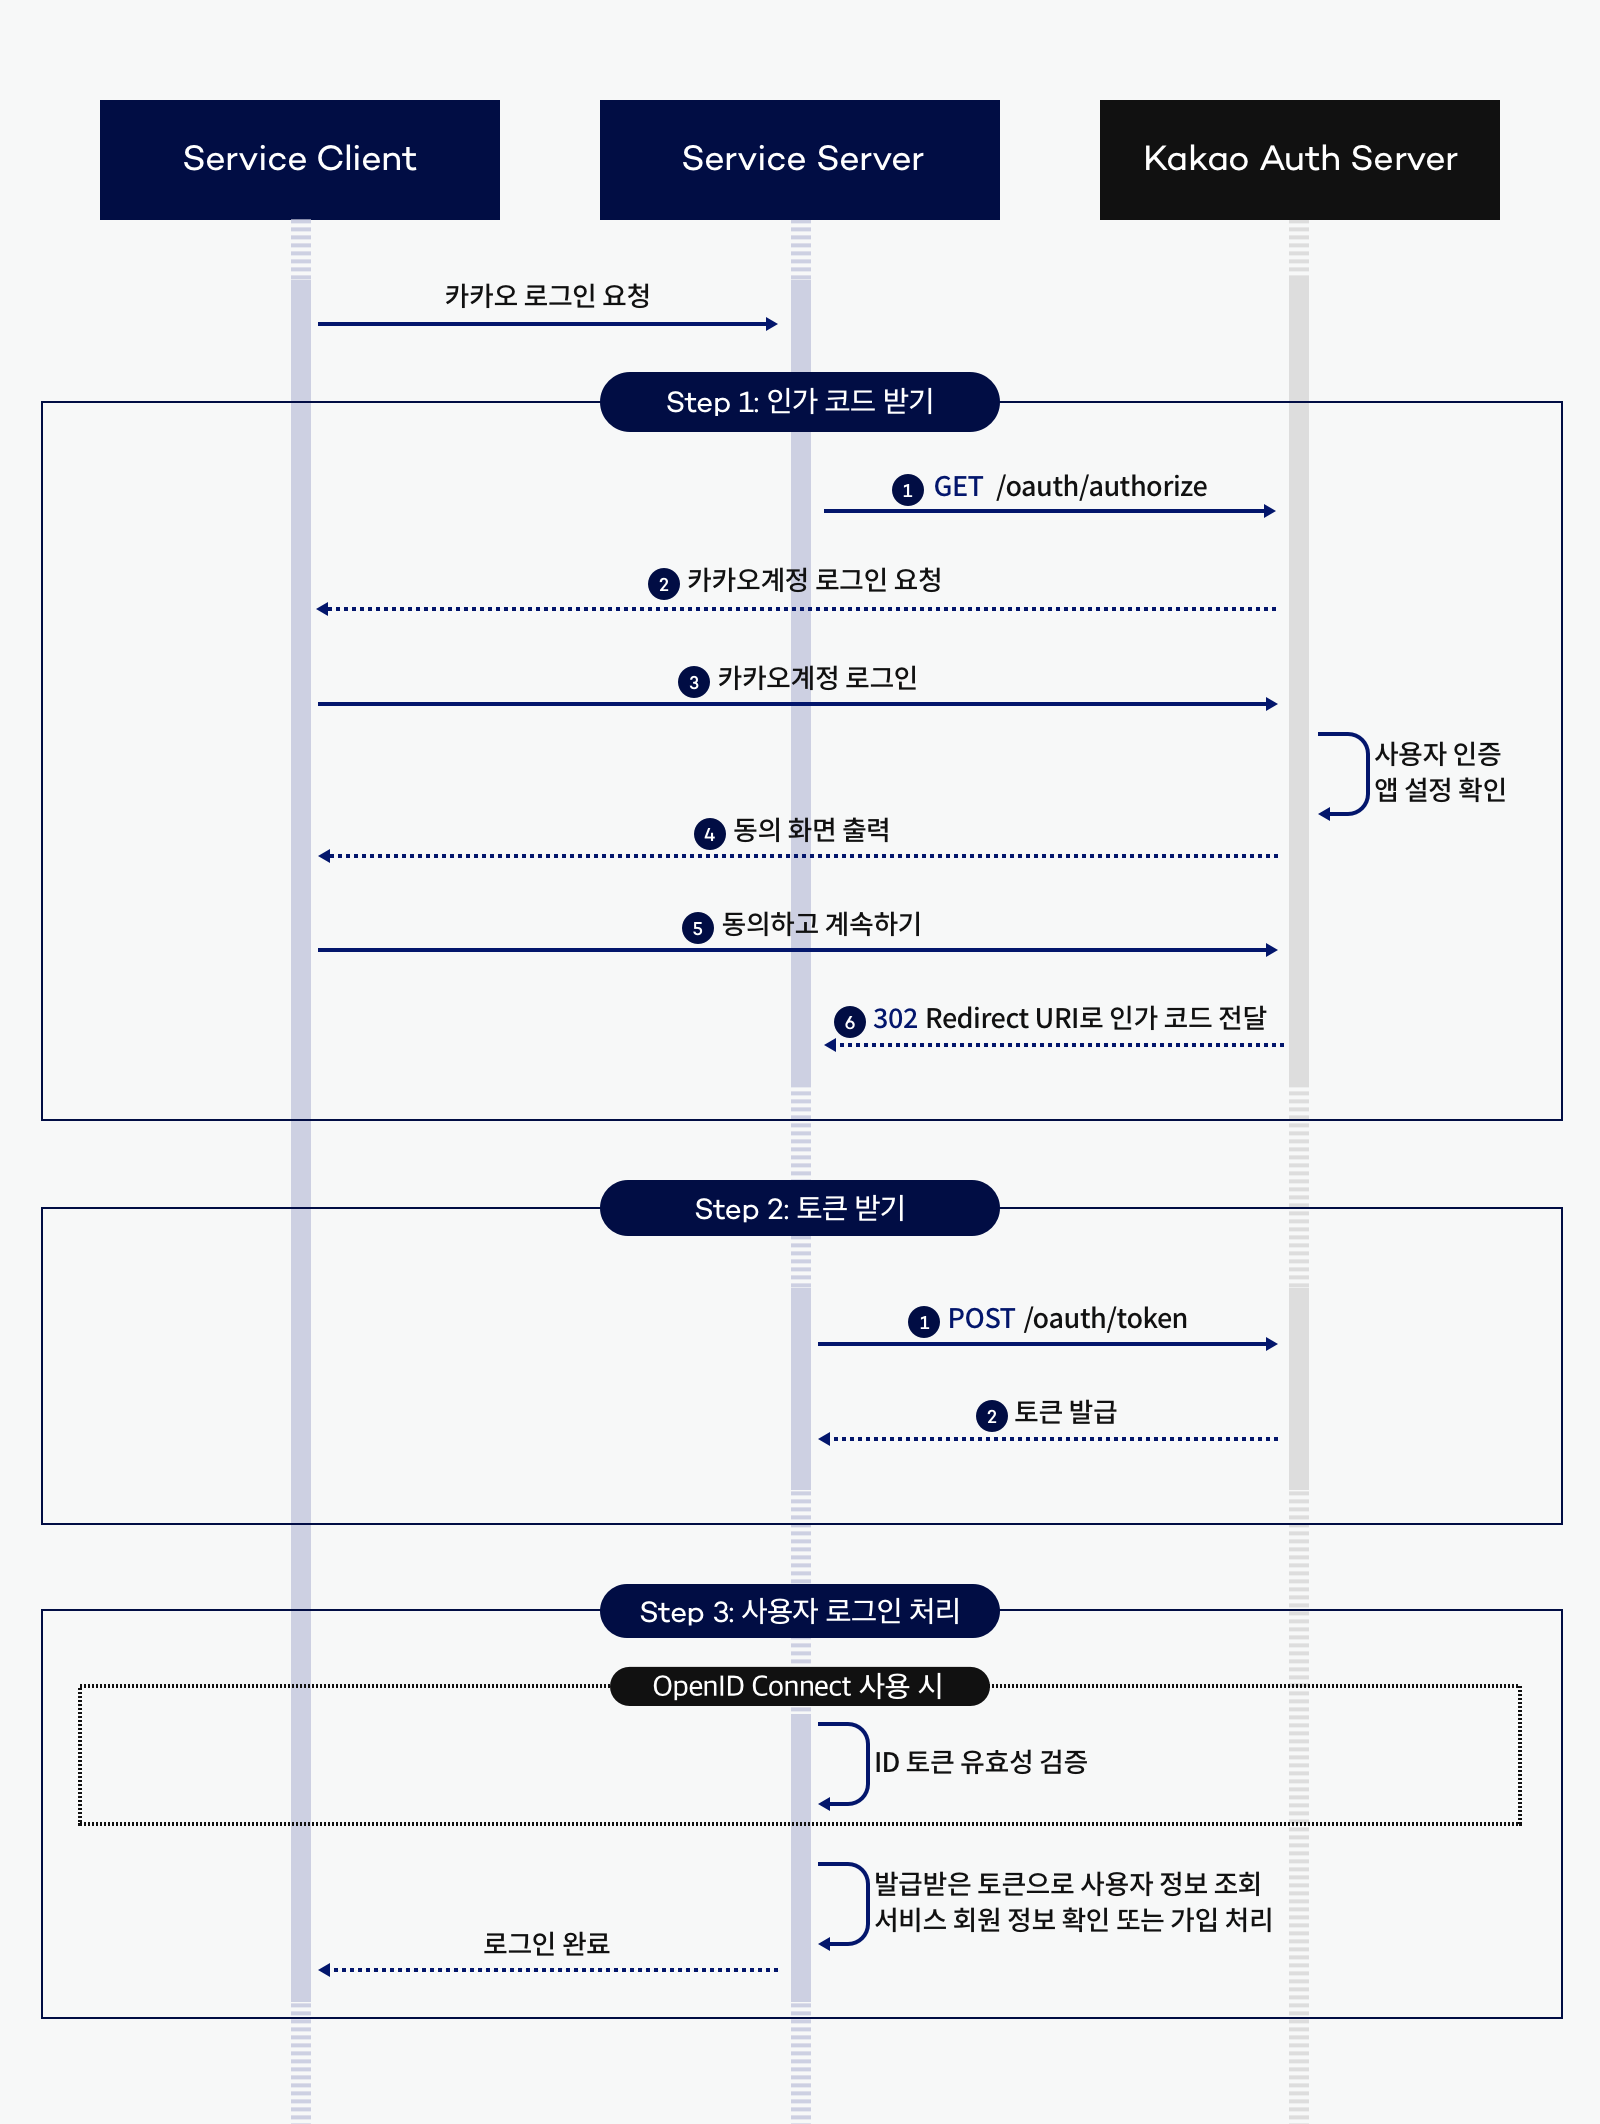
- 인가 코드 요청
1.1. client -> kakao : 로그인 창 요청https://kauth.kakao.com/oauth/authorize : response_type, client_id, redirect_uri
1.2. kakao -> client : 로그인 창 응답
1.3. client -> kakao : 로그인 요청
1.4. kakao -> client : 로그인 응답 (인가 코드)Redirect URI : code - 토큰 요청
2.1. client -> kakao : 토큰 요청https://kauth.kakao.com/oauth/token : code
2.2. kakao -> client : 토큰 응답Redirect URI : token_type, access_token, expires_in, refresh_token, refresh_token_expires_in, scope - 사용자 정보 요청
3.1. client -> kakao : 사용자 정보 요청https://kapi.kakao.com/v2/user/me : access_token
3.2. kakao -> client : 사용자 정보 응답{ "id": 123456789, "connected_at": "2022-04-11T01:45:28Z", "kakao_account": { "profile": { "nickname": "홍길동", ... }, "name":"홍길동", ... }, "properties":{ "${CUSTOM_PROPERTY_KEY}": "${CUSTOM_PROPERTY_VALUE}", ... }, "for_partner": { "uuid": "${UUID}" } } - 사용자 정보 조회 후 로그인 || 회원가입 처리
2.1 REST API
- 위의 과정을 직접 함
2.2 mvc 패턴 : spring security oauth2 client
- spring에서 프론트와 백을 모두 제공할 경우, spring security의 oauth2 클라이언트가 1~3의 과정을 제공
- 프론트에서는 spring security에서 제공하는 로그인 페이지의 버튼 또는
a href="/oauth2/authorization/[naver || kakao || google]"의 버튼을 통해 로그인 창 요청 - 백엔드에서는 DefaultOAuth2UserService를 통해 사용자 정보를 받아옴
작동하는 몇가지 oauth2 코드를 아래에 작성하겠지만 REST API 개발 중이므로 spring security oauth2 client를 통한 로그인 처리 관련 코드는 작성하지 않을 예정
3. 앱 등록
3.1 카카오
- 애플리케이션 추가하기
- 추가된 앱 > 사이드바 - 플랫폼 > Web 플랫폼 등록
- 추가된 앱 > 사이드바 - 카카오 로그인
- 활성화 설정 상태 ON
- Redirect URI 설정
- 추가된 앱 > 사이드바 - 동의 항목 > 닉네임 설정
- 추가된 앱 > 사이드바 - 요약 정보 > 앱 키 - REST API 키 (=client-id)
- 추가된 앱 > 사이드바 - 보안 > 코드 생성 > 활성화 상태 - 사용함 (=client-secret)
3.2 네이버
- 애플리케이션 등록
- 내 애플리케이션 > Client ID, Client Secret
3.3 구글
- 새 프로젝트 생성
- 사이드바 - API 및 서비스 - OAuth 동의 화면 > 외부 > 만들기 > OAuth 동의 화면 : 필수 칸들을 채워주기 > 범위 : email, profile 추가 > 다음 버튼을 계속 눌러 생성
- 사이드바 - API 및 서비스 - 사용자 인증 정보 > 사용자 인증 정보 만들기 - OAuth 클라이언트 ID > 승인된 리디렉션 URI 설정
- 클라이언트 ID(=client-id), 클라이언트 보안 비밀번호(=client-secret)
4. 코드
4.1 build.gradle
dependencies {
	implementation 'org.springframework.boot:spring-boot-starter-oauth2-client'
}
4.2 application.yml
spring:
  security:
    oauth2:
      client:
        registration:
          kakao:
            client-id:
            client-secret:
            redirect-uri:
            client-name: Kakao
            authorization-grant-type: authorization_code
            client-authentication-method: client_secret_post
            scope:
              - profile_nickname
          naver:
            client-id:
            client-secret:
            redirect-uri:
            client-name: Naver
            authorization-grant-type: authorization_code
            scope:
              - name
          google:
            client-id:
            client-secret:
            scope:
              - email
              - profile
        provider: # kakao, naver만 추가로 작성
          kakao:
            authorization-uri: https://kauth.kakao.com/oauth/authorize
            token-uri: https://kauth.kakao.com/oauth/token
            user-info-uri: https://kapi.kakao.com/v2/user/me
            user-name-attribute: id
          naver:
            authorization_uri: https://nid.naver.com/oauth2.0/authorize
            token_uri: https://nid.naver.com/oauth2.0/token
            user-info-uri: https://openapi.naver.com/v1/nid/me
            user_name_attribute: response
4.3 SecurityConfig
@Configuration
@EnableWebSecurity
@RequiredArgsConstructor
public class SecurityConfig {
    private final CustomOAuth2UserService customOAuth2UserService;

    @Bean
    public SecurityFilterChain filterChain(HttpSecurity http) throws Exception {
        http
                ...
                .oauth2Login(oauth2Login ->
				// oauth2Login.loginPage("/login/oauth2")
                        oauth2Login.userInfoEndpoint(userInfoEndpoint ->
                                        userInfoEndpoint.userService(customOAuth2UserService))
                );
        return http.build();
    }

}- loginPage를 지정하지 않으면 spring security의 기본 페이지가 사용됨
- spring security의 기본 페이지를 통해 로그인을 수행하면 그 정보를 customOAuth2UserService에서 처리
4.4 CustomOAuth2UserService
@Slf4j
@Service
@RequiredArgsConstructor
public class CustomOAuth2UserService extends DefaultOAuth2UserService {
private final UserRepository userRepository;
@Override
public OAuth2User loadUser(OAuth2UserRequest userRequest) throws OAuth2AuthenticationException {
// 1. OAuth2 로그인 유저 정보를 가져옴
OAuth2User oAuth2User = super.loadUser(userRequest);
log.info("getAttributes : {}", oAuth2User.getAttributes());
// 2. provider : kakao, naver, google
String provider = userRequest.getClientRegistration().getRegistrationId();
log.info("provider : {}", provider);
// 3. 필요한 정보를 provider에 따라 다르게 mapping
OAuth2UserInfo oAuth2UserInfo = OAuth2UserInfo.of(provider, oAuth2User.getAttributes());
log.info("oAuth2UserInfo : {}", oAuth2UserInfo.toString());
// 4. oAuth2UserInfo가 저장되어 있는지 유저 정보 확인
// 없으면 DB 저장 후 해당 유저를 저장
// 있으면 해당 유저를 저장
User user = userRepository.findByProviderAndPassword(oAuth2UserInfo.getProvider(), oAuth2UserInfo.getPassword())
.orElseGet(() -> userRepository.save(oAuth2UserInfo.toEntity()));
log.info("user : {}", user.toString());
// 5. UserDetails와 OAuth2User를 다중 상속한 CustomUserDetails
return new CustomUserDetails(user, oAuth2User.getAttributes());
}
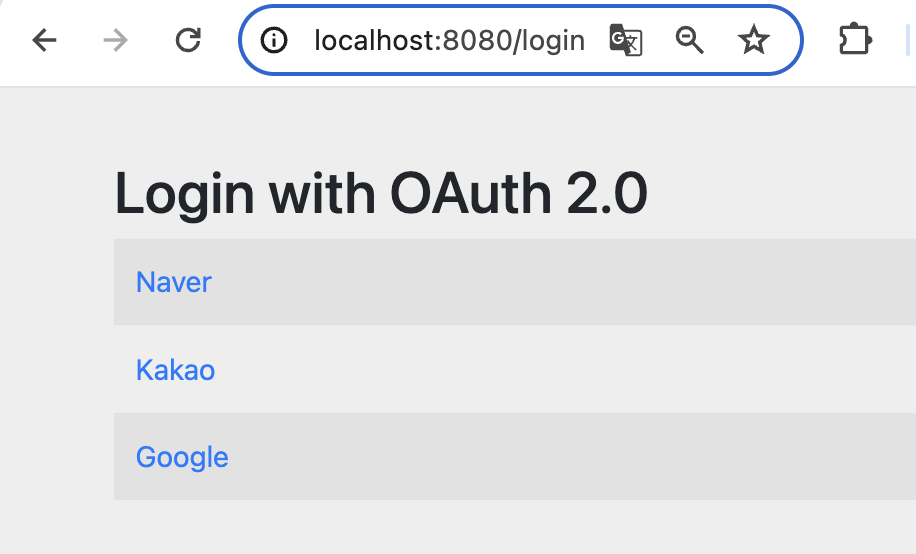
}4.4.1 기본 로그인 페이지 localhost:8080/login을 통해 소셜 로그인
4.4.2 아래와 같은 형태로 사용자 정보 response
getAttributes :
{
	sub=,
    name=,
    given_name=,
    family_name=,
    picture=,
    email=,
    email_verified=true,
    locale=ko,
    hd=
 }

 provider : google
getAttributes :
{
id=,
connected_at=2024-03-09T11:19:11Z,
properties={
nickname=
},
kakao_account={
profile_nickname_needs_agreement=false,
profile={nickname=}
}
}
provider : kakaogetAttributes :
{
resultcode=00,
message=success,
response={
id=,
nickname=,
name=
}
}
provider : naver4.5 OAuth2UserInfo
Builder
@Getter
@ToString
public class OAuth2UserInfo {
    private String id;
    private String password;
    private String email;
    private String nickname;
    private String provider;

    public static OAuth2UserInfo of(String provider, Map<String, Object> attributes) {
        switch (provider) {
            case "google":
                return ofGoogle(attributes);
            case "kakao":
                return ofKakao(attributes);
            case "naver":
                return ofNaver(attributes);
            default:
                throw new RuntimeException();
        }
    }

    private static OAuth2UserInfo ofGoogle(Map<String, Object> attributes) {
        return OAuth2UserInfo.builder()
                .provider("google")
                .id("google_" + (String) attributes.get("sub"))
                .password((String) attributes.get("sub"))
                .nickname((String) attributes.get("name"))
                .email((String) attributes.get("email"))
                .build();
    }

    private static OAuth2UserInfo ofKakao(Map<String, Object> attributes) {
        return OAuth2UserInfo.builder()
                .provider("kakao")
                .id("kakao_" + attributes.get("id").toString())
                .password(attributes.get("id").toString())
                .nickname((String) ((Map) attributes.get("properties")).get("nickname"))
                .build();
    }

    private static OAuth2UserInfo ofNaver(Map<String, Object> attributes) {
        return OAuth2UserInfo.builder()
                .provider("naver")
                .id("naver_" + (String) ((Map) attributes.get("response")).get("id"))
                .password((String) ((Map) attributes.get("response")).get("id"))
                .nickname((String) ((Map) attributes.get("response")).get("name"))
                .build();
    }

    public User toEntity() {
        return User.builder()
                .id(id)
                .password(password)
                .provider(provider)
                .nickname(nickname)
                .email(email)
                .userRole(UserRole.MEMBER)
                .build();
    }

}- 소셜 로그인이라서 비밀번호가 필요 없지만 nullable=false라서 provider id 값을 넣음
- 아이디도 provider id 값을 사용하려고 했는데 겹칠 수 있을 것 같아서 더 pk에 적합하도록 provider_providerId 값을 사용
- 따라서 provider와 provider id로 유저를 검색하기 위해 findByProviderAndPassword를 사용함. provider_providerId로 만들어서 findById를 사용하는게 더 효율적일 것 같아서 바꿀 예정
4.6 CustomUserDeatils
@Builder
public class CustomUserDetails implements UserDetails, OAuth2User {

    private User user;

    public CustomUserDetails(User user) {
        this.user = user;
    }

    public CustomUserDetails(User user, Map<String, Object> attributes) {
        this.user = user;
        this.attributes = attributes;
    }

    @Override
    public List<GrantedAuthority> getAuthorities() {
        List<GrantedAuthority> authorities = new ArrayList<>();
        authorities.add(new SimpleGrantedAuthority("ROLE_" + user.getUserRole().name()));
        return authorities;
    }

    // get Password 메서드
    @Override
    public String getPassword() {
        return user.getPassword();
    }

    // get Username 메서드 (생성한 User은 id 사용)
    @Override
    public String getUsername() {
        return user.getId();
    }

    // 계정이 만료 되었는지 (true: 만료X)
    @Override
    public boolean isAccountNonExpired() {
        return true;
    }

    // 계정이 잠겼는지 (true: 잠기지 않음)
    @Override
    public boolean isAccountNonLocked() {
        return true;
    }

    // 비밀번호가 만료되었는지 (true: 만료X)
    @Override
    public boolean isCredentialsNonExpired() {
        return true;
    }

    // 계정이 활성화(사용가능)인지 (true: 활성화)
    @Override
    public boolean isEnabled() {
        return true;
    }

    // OAuth2User
    private Map<String, Object> attributes;

    @Override
    public Map<String, Object> getAttributes() {
        return attributes;
    }

    @Override
    public String getName() {
        return user.getNickname();
    }
}
다음 글에서는 프론트에서 인가 코드를 보낸다는 가정 하에 백에서 토큰과 사용자 정보를 요청하고 jwt 로그인 처리하는 과정을 다루겠습니다.
참고