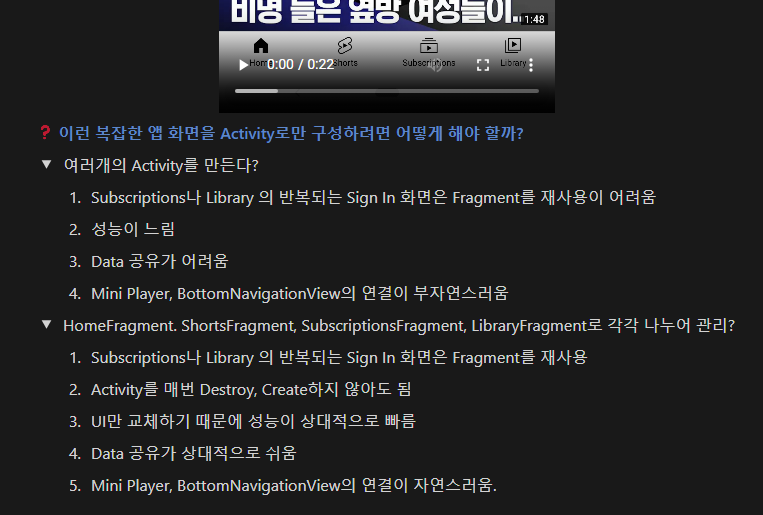
Fragment란?
-
조각’, ‘부분’, 작은 조각이나 부분적인 요소를 나타 내는 말
-
전체에서 일부를 이루는 작은 부분
-
안드로이드에서도 동일한 의미로 사용
-
사용자 인터페이스(UI)의 일부를 나타내는 재사용 가능한 클래스
-
하나의 프래그먼트를 여러 액티비티에서 재사용할 수 있음
Fragment의 목적 및 필요성
목적
복잡한 UI의 모듈화를 통한 유연한 관리
필요한 이유
재사용성
다양한 Activity에서 재사용 가능
모듈성
복잡한 UI를 여러 개의 작은 단위로 나누어 효율적으로 관리
유연한 사용자 인터페이스
하나의 Activity 내에서 여러 Fragment를 교체하거나 함께 표시함으로써 다양한 화면 크기와 방향에 맞는 유연한 사용자 인터페이스를 제공
독립적인 라이프사이클
Fragment는 자체 라이프 사이클을 가지고 있어서, Activity의 라이프 사이클과 독립적으로 관리하고 앱의 안정성을 높여줌
성능 향상
Fragment는 필요할 때만 로드되고 제거될 수 있어 메모리 사용과 앱의 전반적인 성능을 향상시킴
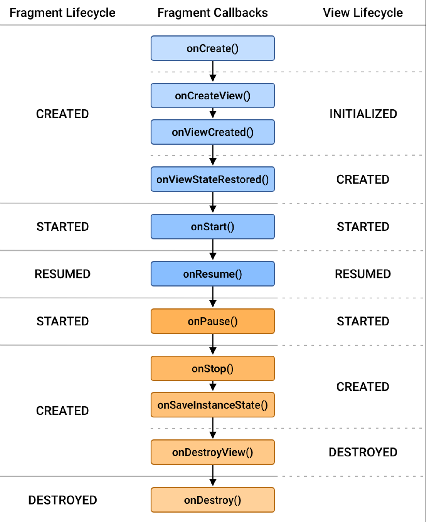
Fragment의 라이프 사이클
onAttach()
-
Fragment가 Activity에 붙을 때 호출됨
-
주로 context를 활용한 초기화 작업을 수행
context가 전반적인 액티비티의 정보를 가지고 있음. 이름은 context지만 MainActivity는 context를 상속하고 있음
val activity : MainActivity? = null
override fun onAttach(context: Context) {
    super.onAttach(context)
    if (context instanceof MainActivity) {
        activity = (MainActivity) context;
    }
    if (context is DataListener) {
        dataListener = context
    } else {
        throw RuntimeException(context.toString() + " must implement MyDataListener")
    }
}
onCreate() **** 매우 중요
-
Fragment가 생성될 때 호출됨
-
UI와 관련 없는 초기화 작업을 주로 수행
override fun onCreate(savedInstanceState: Bundle?) {
    super.onCreate(savedInstanceState)
    // savedInstanceState에서 인스턴스 상태 복원
    if (savedInstanceState != null) {
        myData = savedInstanceState.getString("KEY")
    }
    // arguments에서 새로운 데이터 받기
    val value = arguments?.getString("KEY2")
    // value와 myData를 사용하여 필요한 작업 수행
}
onCreateView() **** 매우 중요
-
Fragment의 레이아웃을 생성할 때 호출됨
-
레이아웃 리소스를 inflate하여 View를 반환
-
UI 구성 요소의 초기화와 이벤트 리스너 설정을 여기서 수행
구동을 할 때 오래 걸리면 inflater가 시간을 오래 잡아 먹는지 확인을 해주고 오래 걸린다면 레이아웃을 단순화시킬 필요가 있음
override fun onCreateView(inflater: LayoutInflater, container: ViewGroup?, savedInstanceState: Bundle?): View? {
    val view = inflater.inflate(R.layout.fragment_my, container, false)
    // UI 구성 요소 초기화
    val myTextView: TextView = view.findViewById(R.id.myTextView)
    myTextView.text = "Hello Fragment"
    return view
}
onActivityCreated() ** 중요
-
Activity의 onCreate() 메서드가 완료된 후 호출됨
-
Activity와의 통합 부분된을 초기화
override fun onActivityCreated(savedInstanceState: Bundle?) {
    super.onActivityCreated(savedInstanceState)
    // Activity와 Fragment 간의 상호작용, 예를 들어 ViewModel 설정
    activityViewModel = ViewModelProvider(requireActivity()).get(MyActivityViewModel::class.java)
}
onStart()
-
Fragment가 사용자에게 보이기 시작할 때 호출됨
-
사용자에게 보이는 UI를 준비
e.g) animation 시작, BroadcastReceiver를 등록하는 등
onResume() ** 중요
Fragment가 사용자와 상호 작용할 준비가 완료되었을 때 호출됨
e.g) 센서 리스너를 활성화, 반응형 업데이트를 시작
onPause()
-
Fragment가 더 이상 상호작용할 수 없을 때 호출
-
상호작용을 중단하고, 중요한 데이터를 저장
e.g) 진행 중인 작업을 일시 중지, 센서 리스너를 비활성화
onStop()
-
Fragment가 더 이상 사용자에게 보이지 않을 때 호출됨
-
필요한 작업: 리소스 해제 및 정리 작업을 수행
e.g) animation 종료. BroadcastReceiver 해제
onDestroyView()
-
Fragment의 뷰와 관련된 리소스를 정리할 때 호출됨
-
뷰와 관련된 모든 리소스를 해제
override fun onDestroyView() {
    super.onDestroyView()
    _binding = null
}
onDestroy()
-
Fragment가 완전히 종료될 때 호출됨
-
Fragment와 관련된 모든 리소스를 정리
onDetach()
-
Fragment가 Activity와의 연결이 끊어질 때 호출됨
-
Context와의 연결을 해제
Fragment 생성
xml Tag
FragmentContainerView, FrameLayout, fragment
<fragment
        android:id="@+id/my_static_fragment"
        android:name="com.example.MyFragment"
        android:layout_width="match_parent"
        android:layout_height="match_parent" />

<FrameLayout
        android:id="@+id/fragment_container"
        android:layout_width="match_parent"
        android:layout_height="match_parent"/>

<androidx.fragment.app.FragmentContainerView
        android:id="@+id/fragment_container"
        android:layout_width="match_parent"
        android:layout_height="match_parent"/>
FragmentContainerView를 프래그먼트의 컨테이너로 사용하는 것이 좋음. FrameLayout 같은 다른 뷰 그룹에서 제공하지 않는 프래그먼트 관련 수정사항이 FragmentContainerView에 포함되어 있기 때문
Transaction
replace() ***
기존 Fragment는 완전히 제거되며, 새로운 Fragment가 해당 컨테이너에 삽입됨
// Kotlin DSL - 선호
val myPageFragment = MyPageFragment()
parentFragmentManager.commit {
    setReorderingAllowed(true)
    replace(R.id.fragment_container, myPageFragment)
    addToBackStack(null) // 백 스택에 추가하여 뒤로 가기 버튼을 사용할 수 있게 함
}

// 기본 방식
val myPageFragment = MyPageFragment()
val transaction = parentFragmentManager.beginTransaction()
transaction.setReorderingAllowed(true)
transaction.replace(R.id.fragment_container, myPageFragment )
transaction.addToBackStack(null) // 백 스택에 추가하여 뒤로 가기 버튼을 사용할 수 있게 함
transaction.commit()
add()
새로운 Fragment가 기존 Fragment 위에 추가되며, 여러 Fragment가 겹쳐질 수 있음
val myPageFragment = MyPageFragment()
parentFragmentManager.commit {
    setReorderingAllowed(true)
    add(R.id.fragment_container, myPageFragment)
    addToBackStack(null) // 백 스택에 추가하여 뒤로 가기 버튼을 사용할 수 있게 함
}
remove()
remove() 메서드는 컨테이너에서 특정 Fragment를 제거
val fragment = parentFragmentManager.findFragmentById(R.id.fragment_container)
fragment?.let {
    val transaction = parentFragmentManager.beginTransaction()
    transaction.setReorderingAllowed(true)
    transaction.remove(it)
    transaction.commit()
}
show()
숨겨진 Fragment를 사용자에게 다시 표시. Fragment의 상태와 뷰 계층구조는 유지됨
fun showFragment() {
    val fragment = parentFragmentManager.findFragmentById(R.id.fragment_container)
    fragment?.let {
        parentFragmentManager.commit {
            setReorderingAllowed(true)
            show(it)
        }
    }
}
hide()
보이는 Fragment를 사용자에게서 숨김. Fragment는 뷰 계층구조에 남아있지만, 사용자에게는 보이지 않음
fun hideFragment() {
    val fragment = parentFragmentManager.findFragmentById(R.id.fragment_container)
    fragment?.let {
        parentFragmentManager.commit {
            setReorderingAllowed(true)
            hide(it)
        }
    }
}
addToBackStack(name: String)
-
트랜잭션을 백 스택에 추가하여, 사용자가 뒤로 가기 버튼을 누를 때 트랜잭션이 실행되기 전 상태로 돌아갈 수 있게 해줌
-
백 스택에 추가된 트랜잭션은 뒤로 가기 버튼을 누르면 트랜잭션이 되돌려져 이전의 Fragment가 다시 나타남
setReorderingAllowed(true)
FragmentTransaction의 작업 순서를 최적화하여 효율성을 높이고, 애니메이션 및 트랜지션의 원활한 작동을 보장
프래그먼트 활용

BottonNavigationView를 통한 Fragment 이동
-
레이아웃 정의:
BottomNavigationView와Fragment를 포함할 컨테이너를 레이아웃에 정의 -
BottomNavigationView 설정: 각 아이콘(탭)이 클릭되었을 때 어떤 Fragment로 전환할지를 정의
-
Fragment 트랜잭션: 선택된 탭에 따라 해당 Fragment를 동적으로 교체
예시 코드
activity_main.xml
<androidx.constraintlayout.widget.ConstraintLayout xmlns:android="http://schemas.android.com/apk/res/android"
    xmlns:app="http://schemas.android.com/apk/res-auto"
    android:layout_width="match_parent"
    android:layout_height="match_parent">

    <FrameLayout
        android:id="@+id/fragment_container"
        android:layout_width="0dp"
        android:layout_height="0dp"
        app:layout_constraintTop_toTopOf="parent"
        app:layout_constraintBottom_toTopOf="@id/navigation"
        app:layout_constraintStart_toStartOf="parent"
        app:layout_constraintEnd_toEndOf="parent" />

    <com.google.android.material.bottomnavigation.BottomNavigationView
        android:id="@+id/navigation"
        android:layout_width="0dp"
        android:layout_height="wrap_content"
        android:background="?android:attr/windowBackground"
        app:layout_constraintBottom_toBottomOf="parent"
        app:layout_constraintStart_toStartOf="parent"
        app:layout_constraintEnd_toEndOf="parent"
        app:menu="@menu/bottom_navigation_menu" />
</androidx.constraintlayout.widget.ConstraintLayout>
MainActivity
class MainActivity : AppCompatActivity() {
    private lateinit var binding: ActivityMainBinding

    override fun onCreate(savedInstanceState: Bundle?) {
        super.onCreate(savedInstanceState)
        binding = ActivityMainBinding.inflate(layoutInflater)
        setContentView(binding.root)
        binding.navigation.setOnNavigationItemSelectedListener {
            when (it.itemId) {
                R.id.navigation_home -> {
                    loadFragment(HomeFragment())
                    true
                }
                R.id.navigation_dashboard -> {
                    loadFragment(DashboardFragment())
                    true
                }
                R.id.navigation_notifications -> {
                    loadFragment(NotificationsFragment())
                    true
                }
                else -> false
            }
        }
    }

    private fun loadFragment(fragment: Fragment) {
        supportFragmentManager.beginTransaction()
            .replace(R.id.fragment_container, fragment)
            .commit()
    }
}
Drawer를 통한 Fragment 이동
-
레이아웃 정의:
DrawerLayout과NavigationView를 포함하는 레이아웃을 정의.NavigationView내에는 메뉴 항목들이 포함됨 -
항목 선택 리스너:
NavigationView의 메뉴 항목 선택 시 수행할 작업을 정의. 각 메뉴 항목에 따라 다른 Fragment로 전환
예시 코드
activity_main.xml
<androidx.drawerlayout.widget.DrawerLayout xmlns:android="http://schemas.android.com/apk/res/android"
    xmlns:app="http://schemas.android.com/apk/res-auto"
    android:id="@+id/drawer_layout"
    android:layout_width="match_parent"
    android:layout_height="match_parent">

    <include layout="@layout/content_main" />

    <com.google.android.material.navigation.NavigationView
        android:id="@+id/nav_view"
        android:layout_width="wrap_content"
        android:layout_height="match_parent"
        android:layout_gravity="start"
        app:menu="@menu/drawer_menu" />
</androidx.drawerlayout.widget.DrawerLayout>
MainActivity
class MainActivity : AppCompatActivity() {
    private lateinit var binding: ActivityMainBinding
    override fun onCreate(savedInstanceState: Bundle?) {
        super.onCreate(savedInstanceState)
        binding = ActivityMainBinding.inflate(layoutInflater)
        setContentView(binding.root)
        // NavigationView 항목 선택 리스너 설정
        binding.navView.setNavigationItemSelectedListener{ menuItem ->
            when (menuItem.itemId) {
                R.id.nav_home -> {
                    loadFragment(HomeFragment())
                }
                R.id.nav_gallery -> {
                    loadFragment(GalleryFragment())
                }
                // 기타 메뉴 항목에 대한 처리...
            }
            binding.drawerLayout.closeDrawer(GravityCompat.START) // 드로어 닫기
            true
        }
    }

    private fun loadFragment(fragment: Fragment) {
        supportFragmentManager.beginTransaction()
            .replace(R.id.fragment_container, fragment)
            .commit()
    }
}
프래그먼트 고급
ViewPager2 + TabLayout (많이 사용되는 구조)
build.gradle
plugins {
    alias(libs.plugins.android.application)
    alias(libs.plugins.jetbrains.kotlin.android)
}

android {
    namespace = "com.android.fragment_viewpager"
    compileSdk = 34

    defaultConfig {
        applicationId = "com.android.fragment_viewpager"
        minSdk = 26
        targetSdk = 34
        versionCode = 1
        versionName = "1.0"

        testInstrumentationRunner = "androidx.test.runner.AndroidJUnitRunner"
    }

    buildTypes {
        release {
            isMinifyEnabled = false
            proguardFiles(getDefaultProguardFile("proguard-android-optimize.txt"), "proguard-rules.pro")
        }
    }
    compileOptions {
        sourceCompatibility = JavaVersion.VERSION_1_8
        targetCompatibility = JavaVersion.VERSION_1_8
    }
    kotlinOptions {
        jvmTarget = "1.8"
    }
    buildFeatures{
        viewBinding = true
    }
}

dependencies {

    implementation(libs.androidx.core.ktx)
    implementation(libs.androidx.appcompat)
    implementation(libs.material)
    implementation(libs.androidx.activity)
    implementation(libs.androidx.constraintlayout)
    implementation(libs.androidx.viewpager2)

    testImplementation(libs.junit)
    androidTestImplementation(libs.androidx.junit)
    androidTestImplementation(libs.androidx.espresso.core)
}
activity_main.xml
<?xml version="1.0" encoding="utf-8"?>
<androidx.constraintlayout.widget.ConstraintLayout
    xmlns:android="http://schemas.android.com/apk/res/android"
    xmlns:app="http://schemas.android.com/apk/res-auto"
    xmlns:tools="http://schemas.android.com/tools"
    android:layout_width="match_parent"
    android:layout_height="match_parent"
    tools:context=".MainActivity">

    <androidx.viewpager2.widget.ViewPager2
        android:id="@+id/vp_viewpager_main"
        android:layout_width="match_parent"
        android:layout_height="0dp"
        app:layout_constraintBottom_toTopOf="@+id/tl_navigation_view"
        app:layout_constraintEnd_toEndOf="parent"
        app:layout_constraintStart_toStartOf="parent"
        app:layout_constraintTop_toTopOf="parent" />

    <com.google.android.material.tabs.TabLayout
        android:id="@+id/tl_navigation_view"
        android:layout_width="match_parent"
        android:layout_height="50dp"
        app:layout_constraintBottom_toBottomOf="parent"
        app:layout_constraintEnd_toEndOf="parent"
        app:layout_constraintStart_toStartOf="parent" />

</androidx.constraintlayout.widget.ConstraintLayout>
fragment_tab1.xml
<?xml version="1.0" encoding="utf-8"?>
<androidx.constraintlayout.widget.ConstraintLayout xmlns:android="http://schemas.android.com/apk/res/android"
    xmlns:app="http://schemas.android.com/apk/res-auto"
    xmlns:tools="http://schemas.android.com/tools"
    android:layout_width="match_parent"
    android:layout_height="match_parent"
    android:background="#80FF0000"
    tools:context=".Tab1Fragment">

    <TextView
        android:layout_width="wrap_content"
        android:layout_height="wrap_content"
        android:gravity="center"
        android:text="Hello Fragment1!!"
        android:textColor="@color/white"
        android:textSize="40dp"
        app:layout_constraintBottom_toBottomOf="parent"
        app:layout_constraintEnd_toEndOf="parent"
        app:layout_constraintStart_toStartOf="parent"
        app:layout_constraintTop_toTopOf="parent" />

</androidx.constraintlayout.widget.ConstraintLayout>
fragment_tab2.xml
<?xml version="1.0" encoding="utf-8"?>
<androidx.constraintlayout.widget.ConstraintLayout
    xmlns:android="http://schemas.android.com/apk/res/android"
    xmlns:app="http://schemas.android.com/apk/res-auto"
    xmlns:tools="http://schemas.android.com/tools"
    android:layout_width="match_parent"
    android:layout_height="match_parent"
    android:background="#8000FF00"
    tools:context=".Tab1Fragment">

    <TextView
        android:layout_width="wrap_content"
        android:layout_height="wrap_content"
        android:gravity="center"
        android:text="Hello Fragment2!!"
        android:textColor="@color/white"
        android:textSize="40dp"
        app:layout_constraintBottom_toBottomOf="parent"
        app:layout_constraintEnd_toEndOf="parent"
        app:layout_constraintStart_toStartOf="parent"
        app:layout_constraintTop_toTopOf="parent" />

</androidx.constraintlayout.widget.ConstraintLayout>
fragment_tab3.xml
<?xml version="1.0" encoding="utf-8"?>
<androidx.constraintlayout.widget.ConstraintLayout
    xmlns:android="http://schemas.android.com/apk/res/android"
    xmlns:app="http://schemas.android.com/apk/res-auto"
    xmlns:tools="http://schemas.android.com/tools"
    android:layout_width="match_parent"
    android:layout_height="match_parent"
    android:background="#800000FF"
    tools:context=".Tab1Fragment">

    <TextView
        android:layout_width="wrap_content"
        android:layout_height="wrap_content"
        android:gravity="center"
        android:text="Hello Fragment3!!"
        android:textColor="@color/white"
        android:textSize="40dp"
        app:layout_constraintBottom_toBottomOf="parent"
        app:layout_constraintEnd_toEndOf="parent"
        app:layout_constraintStart_toStartOf="parent"
        app:layout_constraintTop_toTopOf="parent" />

</androidx.constraintlayout.widget.ConstraintLayout>
MainActivity
class MainActivity : AppCompatActivity() {
    lateinit var binding: ActivityMainBinding


    override fun onCreate(savedInstanceState: Bundle?) {
        super.onCreate(savedInstanceState)

        binding = ActivityMainBinding.inflate(layoutInflater)
        setContentView(binding.root)

        enableEdgeToEdge()
        ViewCompat.setOnApplyWindowInsetsListener(binding.root) { v, insets ->
            val systemBars = insets.getInsets(WindowInsetsCompat.Type.systemBars())
            v.setPadding(systemBars.left, systemBars.top, systemBars.right, systemBars.bottom)
            insets
        }

        initViewPager()
    }

    private fun initViewPager() {
        //ViewPager2 Adapter 셋팅
        val viewPager2Adatper = ViewPager2Adapter(this)
        viewPager2Adatper.addFragment(Tab1Fragment())
        viewPager2Adatper.addFragment(Tab2Fragment())
        viewPager2Adatper.addFragment(Tab3Fragment())

        //Adapter 연결
        binding.vpViewpagerMain.apply {
            adapter = viewPager2Adatper

            registerOnPageChangeCallback(object : ViewPager2.OnPageChangeCallback() {
                override fun onPageSelected(position: Int) {
                    super.onPageSelected(position)
                }
            })
        }

        //ViewPager, TabLayout 연결
        TabLayoutMediator(binding.tlNavigationView, binding.vpViewpagerMain) { tab, position ->
            Log.d("jblee", "ViewPager position: ${position}")
            when (position) {
                0 -> tab.text = "Tab1"
                1 -> tab.text = "Tab2"
                2 -> tab.text = "Tab3"
            }
        }.attach()
    }
}
ViewPager2Adapter
class ViewPager2Adapter(fragmentActivity: FragmentActivity) : FragmentStateAdapter(fragmentActivity) {
    var fragments: ArrayList<Fragment> = ArrayList()

    override fun getItemCount(): Int {
        return fragments.size
    }

    override fun createFragment(position: Int): Fragment {
        return fragments[position]
    }

    fun addFragment(fragment: Fragment) {
        fragments.add(fragment)
        notifyItemInserted(fragments.size - 1)
    }

    fun removeFragement() {
        fragments.removeLast()
        notifyItemRemoved(fragments.size)
    }

}
Tab1Fragment
Fragment에서 Toast를 띄울 때 context가 따로 Fragment에는 존재하지 않기 때문에 requireContext()를 쓰면 됨
class Tab1Fragment : Fragment() {
    private var _binding: FragmentTab1Binding? = null
    private val binding get() = _binding!!

    override fun onCreate(savedInstanceState: Bundle?) {
        super.onCreate(savedInstanceState)

        //	Toast.makeText(requireContext(), "ggilggil", Toast.LENGTH_SHORT).show()
    }

    override fun onCreateView(inflater: LayoutInflater, container: ViewGroup?, savedInstanceState: Bundle?, ): View? {
        _binding = FragmentTab1Binding.inflate(inflater, container, false)
        return binding.root
    }
}
Tab2Fragment
class Tab2Fragment : Fragment() {
    private var _binding: FragmentTab2Binding? = null
    private val binding get() = _binding!!

    override fun onCreate(savedInstanceState: Bundle?) {
        super.onCreate(savedInstanceState)
    }

    override fun onCreateView(inflater: LayoutInflater, container: ViewGroup?, savedInstanceState: Bundle?, ): View? {
        _binding = FragmentTab2Binding.inflate(inflater, container, false)
        return binding.root
    }
}
Tab3Fragment
class Tab3Fragment : Fragment() {
    private var _binding: FragmentTab3Binding? = null
    private val binding get() = _binding!!

    override fun onCreate(savedInstanceState: Bundle?) {
        super.onCreate(savedInstanceState)
    }

    override fun onCreateView(inflater: LayoutInflater, container: ViewGroup?, savedInstanceState: Bundle?, ): View? {
        _binding = FragmentTab3Binding.inflate(inflater, container, false)
        return binding.root
    }
}
TapLayout은 기능에 제한적인 부분이 많아 그림도 넣을 수 없는 등의 이유가 있어 나중엔 ViewPager2와 커스텀 탭레이아웃이나 여러가지 구글링해서 응용하자
