TCP vs. UDP
- 이것이 자바다 p.1056
TCP
- 연결지향적 -> 신뢰성이 높은 프로토콜
- tcp의 흐름제어
- 던지고나서 기다려 그다음에 받았다고 응답이오면 또던져 근데 던졌는데 한참후에도 응답이없어 아하 그럼 못받았구먼 다시 똑같은거 또 던져 (=신뢰성있는통신을위해 내부적으로 프로토콜로 구현)
- tcp의 혼잡제어
- tcp로 보내면 왠만한건 제대로감
UDP
- TCP랑 비교해 상대적으로 빠름
- 동영상프레임전송
ServerSocket, Socket
- 소켓
- 네트워크로 연결된 두 대의 호스트간 통신을 위한 양쪽 끝
- Connection을 개설하기 위한 도구
- 전화기, 연결매체, 양끝단, 양쪽다필요...
- 내가 소켓을 가지고 서버에 커넥션을 요청함, 서버는 미리 클라이언트를 기다리고있던 상태임, 그럼 내가 요청함으로서 서버는 소켓을 만듬 그럼이제 소켓이 한쌍이니까 소통가능
- Well Known Port
- 7: Echo
- 13: DayTime
- 21: FTP
- 23: Telenet
- 25: SMTP
- 80: HTTP
- 나머지: Well Known Port
ServerSocket 클래스
- 서버 프로그램에서 사용하는 소켓
- 포트를 통해 연결 요청이 오기를 대기
- 요청이 오면 클라이언트와 연결을 맺고 해당 클라이언트와 통신하는 새 소켓을 만드는 일을 한다.
- 새로 만들어진 소켓은 클라이언트 소켓과 데이터를 주고받는다.
Socket 클래스
- 서버 프로그램으로 연결 요청
- 데이터 전송을 담당
TCP 소켓 프로그래밍
스레드 이용하지 않는 예제
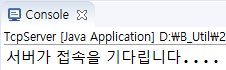
TcpServer.java
// 1. TCP 소켓통신을 하기 위해 ServerSocket 객체를 생성
// 서버소켓을 가지고 클라이언트의 소켓 접속을 기다릴 것임
ServerSocket server = new ServerSocket(7777); // ~1023은 WellKnown이라 사용불가
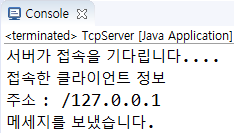
System.out.println("서버가 접속을 기다립니다...")
// 2. ServerSocket객체의 accept()메서드를 호출,
// Client로부터 연결요청이 올 때까지 계속 기다린다. (=main스레드 블락(wait))
// 3. 연결요청이 들어오면 새로운 Socket객체를 생성하여 Client의 Socket과 연결한다
Socket socket = server.accept();
// ----------------------------
// 이 이후는 클라이언트와 연결된 후의 작업을 진행하면 된다.
System.out.println("접속한 클라이언트 정보");
System.out.println("주소 : " + socket.getInetAddress()); // toString() 오버라이드
// 4. Socket객체의 Stream객체(InputStream, OutputStream)를 이용하여 메시지를 주고 받는다.
// OutputStream객체를 구성하여 전송
// 접속한 Socket의 getOutputStream()메서드를 이용하여 구한다.
OutputStream out = socket.getOutputStream();
DataOutputStream dos = new DataoOutputStream(out);
// ▶ OutputStreamReader를 쓸 수 도 있음
dos.writeUTF("어솨세요!!^ㅡ^"); // 메시지 보내기
System.out.println("메세지를 보냈습니다.");
// 5. 사용이 완료된 소켓은 close()메서드를 이용하여 종료 처리한다.
dos.close();
server.close(); // 소켓도 스트림처럼 사용 후에 닫아줘야 한다.클라이언트 연결 전
클라이언트 연결 후
TcpClient.java
String serverIp = "127.0.0.1"; // loopback주소
// 자기 자신의 컴퓨터를 나타내는 방법
// IP : 127.0.0.1
// 컴이름 : localhost
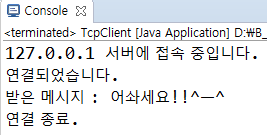
System.out.println(serverIp + " 서버에 접속 중입니다.");
// 1. 소켓을 생성하여 서버에 연결을 요청한다.
Socket socket = new Socket(serverIp, 7777);
// 2. 연결이 정상적으로 이루어지면 생성된 소켓 객체를 이용하여 서버와 메시지를 주고받음
// 생성된 소켓으로부터 스트림(InputStream, OutputStream)객체를 가져와 이용
System.out.println("연결되었습니다.");
// 서버에서 보내온 메시지 받기
// 메시지를 받기 위해 InputStream객체를 생성
// Socket의 getInputStream()메서드 이용
InputStream is = socket.getInputStream();
DataInputStream dis = new DataInputStream(is);
// 서버로부터 받은 메시지 출력하기
System.out.println(dis.readUTF());
System.out.println("연결종료");
// 3. 사용이 완료된 소켓은 close() 메서드를 이용하여 종료처리한다.
dis.close(); // 스트림닫기
socket.close();결과
스레드 이용 예제1 : 1:1 채팅
- ServerSocket과 Socket은 동기(블로킹)방식
- 서버를 실행하는 main 스레드가 직접 입출력 작업을 담당하게 되면 입출력이 완료될 때까지 다른 작업을 할 수 없는 상태가 됨
- 문제점1: 서버 애플리케이션은 지속적으로 클라이언트의 연결 수락 기능을 수행해야하지만 입출력에서 블로킹되면 이 작업을 할 수 없게 됨
- 문제점2: 클라이언트 1과 입출력하는 동안에는 클라이언트2와 입출력을 할수없음
- ★ accept(), connect(), read(), write() 는 별도의 작업 스레드를 생성해서 병렬적으로 처리하는 것이 좋음
- 스레드풀: 클라이언트의 폭증으로 인해 서버의 과도한 스레드 방지 (p.1067)
Sender.java
- 소켓을 통해서 메시지를 보내는 역할
public class Sender extends Thread {
  private DataOutputStream dos;
  private String name;

  public Sender(Socket socket) {
    name = "[" + socket.getInetAddress() + " : " + socket.getLocalPort() + "]";

    try {
        dos = new DataOutputStream(socket.getOutputStream());
    } catch (Exception e) {
        e.printStackTrace();
    }
  }

  @Override
  public void run() {
    Scanner scan = new Scanner(System.in);
    while (dos != null) { // 무한루프
      try {
        dos.writeUTF(name + " >>> " + scan.nextLine()); // scanner: 엔터치기전까지 block
      } catch (Exception e) {
      e.printStackTrace();
      }
    }
    scan.close();
  }
} // class
Receiver.java
- 소켓에서 메시지를 받아서 화면에 출력하는 역할
public class Receiver extends Thread {
  private Socket socket;
  private DataInputStream dis;

  public Receiver(Socket socket) {
    this.socket = socket;

    try {
      dis = new DataInputStream(socket.getInputStream());
    } catch (IOException e) {
      e.printStackTrace();
    }
  }

  @Override
  public void run() {
    while(dis != null) {
      try {
        System.out.println(dis.readUTF());
        // -> Sender에서 writeUTF 호출 전까지 block,
        //    writeUTF 호출되면 그때부터 read하기 시작
      } catch (IOException e) {
        e.printStackTrace();
      }
    }
  }
} // class
TcpServer2.java
- Sender와 Receiver를 활용한 클래스
public class TcpServer2 {
public static void main(String[] args) throws IOException {
ServerSocket socket = new ServerSocket(7777);
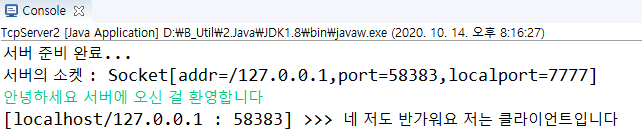
System.out.println("서버 준비 완료...");
Socket socket = server.accept();
System.out.println("서버의 소켓 : " + socket); // toString() 오버라이드 되어있음
Sender sender = new Sender(socket);
Receiver receiver = new Receiver(socket);
sender.start();
receiver.start();
// 여기까지하면 이제 3개(main+sender+receiver)의 스레드가 작동하는 멀티스레드 프로그램
} // main
} // classTcpClient2.java
public class TcpClient2 {
  public static void main(String[] args) throws UnknownHostException, IOException {
  Socket socket = new Socket("localhost", 7777);

  System.out.println("서버에 연결되었습니다.");
  System.out.println("클라이언트의 소켓 : " + socket);

  Sender sender = new Sender(socket);
  Receiver receiver = new Receiver(socket);

  sender.start();
  receiver.start();
  }
}
메세지 주고받기 전 서버

- 접속한 상대방(클라이언트)의 포트: 58383
- 서버의 localport: 7777
메세지 주고받기 전 클라이언트

- 접속한 상대방(서버)의 포트: 7777
- 클라이언트의 localport: 58383
메세지 주고받기

스레드 이용 예제2 : 단체 채팅
- 단체 채팅의 원리
- 1) 유저A: "안녕하세요!"
- 2) 서버가 유저A의 메세지를 들고 간다
- 3) 서버가 갖고 있는 맵의 소켓들을 다 꺼내서 거기에 안녕하세요를 다 write한다
- 4) 그러면 다른 유저 B,C,D...들도 "안녕하세요!" 라는 메시지를 받게된다.
- 뽀인트) 사실 유저A는 서버에 "안녕하세요!" 한건데 서버가 가운데서 열심히 일한 덕택에 B,C,D...까지 인사를 받을 수 있었던 것!!
- 중요한 점
- 소켓을 관리하기 위해 컬랙션 객체 (Map)이용
- Collections의 synchronized 메서드 이용해 Collection객체인 Map을 동기화 처리
- 우리의 프로그램은 멀티스레드 프로그래밍이기 때문에 다수의 유저가 접속하면서 동시에 소켓이 만들어질 때 동시에 put을 하게 되는 상황 발생 이 상황을 방지하고 안전하게 하기 위해 "동기화 처리"
MultiChatServer.java
public class MultiChatServer {
  // 1. 소켓을 관리하기 위한 컬렉션 객체 정의
  //  - 대화명, 클라이언트의 Socket을 저장하기 위한 Map 변수 선언
  private Map<String, Socket> clients; // String: 대화명, Socket: 해당 유저의 소켓

  public MultiChatServer() {
  // 2. 다수의 유저가 접속했을 시, 동시에 소켓이 만들어지고 Map에 저장하게 된다
  //    이를 위해 미리 객체생성시에 미리 동기화 처리가 가능하도록 처리해준다.
  clients = Collections.synchronizedMap(new HashMap<>());

  // 3. 서버를 시작하는 메서드
  public void serverStart() {
    ServerSocket serverSocket = null; // try문 밖에서 close하기 위해 밖에서 선언
    Socket socket;

    try {
      serverSocket = new ServerSocket(7777);
      System.out.println("서버가 시작되었습니다.");

      while (true) {
        // 4. 클라이언트의 접속을 대기한다.
        socket = serverSocket.accept();

        System.out.println("[" + socket.getInetAddress() + " : " + socket.getPort() + "] 에서 접속하였습니다."

        // 12. 메시지 전송 처리를 하는 스레드 생성 및 실행
        ServerReceiver receiver = new ServerReceiver(socket);
        receiver.start();
      }
    } catch (IOException e) {
      e.printStackTrace();
    } finally {
      // 서버 소켓 닫기
      if (serverSocket != null) {
        try {serverSocket.close();} catch(IOException e) {}
      }
    }
  }

  // 13. 메세지 전송 메서드
  /**
   * 대화방 즉, Map에 저장된 전체 유저에게 '안내'메시지를 전송하는 메서드
   * @param msg
   */
  public void sendMessage(String msg) {
    // 13-1. Map에 저장된 유저의 대화명 리스트를 추출 (key값 구하기)
    Iterator<String> it = clients.keySet().iterator();
    while (it.hasNext()) {
      try {
        String name = it.next(); // 13-2. 대화명(key)값 구하기

        // 13-3. 대화명에 해당하는 Socket의 OutputStream객체 구하기
        DataOutputStream out = new DataOutputStream(clients.get(name).getOutputStream());

        out.writeUTF(msg); // 13-4. 메시지 보내기
      } catch (IOException e) {
        e.printStackTrace();
      }
    }
  }

  // 14. 13번 오버로딩 : 대화명 + 내용
  /**
   * 대화방 즉, Map에 저장된 전체 유저에게 '대화'메시지를 전송하는 메서드
   * @param msg 보낼 메시지
   * @param from 보낸 사람 대화명
   */
  public void sendMessage(String msg, String from) {
    // 14-1. Map에 저장된 유저의 대화명 리스트를 추출 (key값 구하기)
    Iterator<String> it = clients.keySet().iterator();
    while (it.hasNext()) {
      try {
        String name = it.next(); // 14-2. 대화명(key)값 구하기

        // 14-3. 대화명에 해당하는 Socket의 OutputStream객체 구하기
        DataOutputStream out = new DataOutputStream(clients.get(name).getOutputStream());

        out.writeUTF("#" + from + "님의 메세지 : " + msg); // 14-4. 메시지 보내기
      } catch (IOException e) {
        e.printStackTrace();
      }
    }
  }

  // 5. 클라이언트의 이름과 메세지를 읽어들여 다시 클라이언트에게 메시지를 전송할 Thread를 Inner클래스로 정의
  // 내부 클래스 장점: Inner클래스에서 부모클래스의 멤버들을 직접 사용할 수 있음.
  class ServerReceiver extends Thread {
    private Socket socket;
    private DataInputStream dis;
    private String name;

    public ServerReceiver(Socket socekt) {
      this.socket = socket;
      try {
        dis = new DataInputStream(socket.getInputStream);
      } catch (IOException e) {
        e.printStackTrace();
      }
    }

    @Override
    public void run() {
      try {
        // 6. 사용자가 들어오자마자 대화명을 String 으로 입력할 것
        //    -> 먼저 String부터 처리해준다
        //    = 서버에서 클라이언트가 보내는 최초의 메세지(=대화명)을 수신
        name = dis.readUTF();

        // 7. 대화명을 받아서 다른 모든 클라이언트들에게 대화방 참여 메시지 전송
        sendMessage("#" + name + " 님이 입장했습니다.");

        // 8. 대화명과 소켓정보를 Map에 지정한다.
        clients.put(name, socket);
        System.out.println("#현재 서버 접속자 수는 " + clients.size() + "명입니다.");

        // 9. 이후의 메시지는 반복문으로 처리한다.
        // 한 클라이언트가 보낸 메시지를 다른 모든 클라이언트에게 보내준다.
        while (dis != null) {
          sendMessage(dis.readUTF(), name);
        }
      } catch (IOException e) {
        e.printStackTrace();
      } finally {
        // 10. 이 finally 영역이 실행된다는 것은 클라이언트의 접속이 종료되었다는 의미이다.
        sendMessage(name + "님이 나가셨습니다.");

        // 11. Map에서 해당 대화명을 삭제한다.
        clients.remove(name);

        System.out.println("[" + socket.getInetAddress() + " : " + socket.getPort() + "]에서 접속을 종료했습니다.");
        System.out.println("현재 접속자 수는 " + clients.size() + "명입니다.");
      }
    }
  } // ServerReceiver class

  public static void main(String[] args) {
      new MultiChatServer().serverStart();
  }
} // MultiChatServer class
MultiChatClient.java
public cass MultiChatClient {
  private Scanner scan = new Scanner(System.in);
  private String name;

  // 1. 시작 메서드
  public void clientStart() {

  // 2. 대화명 입력받기
  System.out.prin("대화명 : ");
  name = scan.next();

  Socket socket = null;

try {
socket = new Socket("192.168.45.2", 7777);

System.out.println("서버에 연결되었습니다.");

// 8.
// 9.
} catch (UnknownHostException e) {
  e.printStackTrace();
} catch (IOException e) {
  e.printStackTrace();
}
}

  // 서버의 메시지를 receive & 내 메시지 send -> sender, receiver 둘다 필요

  // 3. 메시지를 전송하는 Thread (내부클래스)
  class ClientSender extends Thread {
    private Socket socket;
    private DataOutputStream dos;
    private String name;

    public ClientSender(Socket socket, String name) {
      this.socket = socket;
      this.name = name;

    try {
      dos = new DataOutputStream(socket.getOutputStream());
    } catch (IOException e) {
      e.printStackTrace();
    }

    @Override
    public void run() {
      try {
      // 4. 시작하자마자 자신의 대화명을 서ㅓ로 전송
        if(dos != null) {
          dos.writeUTF(name);
        }

        while(dos!= null) {
          // 5. 키보드로 입력받은 메시지를 서버로 전송
          dos.writeUTF(scan.nextLine());
        }
      } catch (IOException e) {
        e.printStackTrace();
      }
    }
  } // 내부클래스

  // 6. 수신용 Thread 클래스
  class ClientReceiver extends Thread {
    private Socket socket;
    private DataInputStream dis;

    public ClientReceiver(Socket socket) {
      this.socket = socket;

      try {
        dis = new DataInputStream(socket.getInputStream());
      } catch (IOException e) {
        e.printStackTrace();
      }
    }

    @Override
    public void run() {
      while (dis != null) {
        try {
          // 7. 서버로부터 수신한 메시지 출력하기
          System.out.println(dis.readUTF());
        } catch (IOException e) {
          e.printStackTrace();
        }
      }
    }
  }// 내부클래스

  public static void main(String[] args) {
      new MultiChatClient().clientStart();
  }
} // MultiChatClient class
파일 전송 예제
TcpFileServer.java
- 서버는 클라이언트가 접속하면 서버 컴퓨터의 D:/D_Other 폴더에 있는 Tulips.jpg 파일을 클라이언트로 전송한다.
public class TcpFileServer {

private ServerSocket server;
private Socket socket;
private FileInputStream fis;
private OutputStream out;

  // 1. 서버 시작
  public void serverStart() {
    File file = new File("d:/D_Other/Tulips.jpg");

    try {
      server = new ServerSocket(7777);
      System.out.println("서버 준비 완료...");

      socket = server.accept();
      System.out.println("파일 전송 시작...");

      fis = new FileInputStream(file);
      out = socket.getOutputStream(); // 문자열이 아닌 바이너리 데이터를 보내기 위해 DataOutputStream 안씀

      byte[] tmp = new byte[1024]; // 버퍼기능
      int c = 0;
      while((c = fis.read(tmp)) != -1) {
        out.write(tmp, 0, c);
      }
      out.flush();
      System.out.println("파일 전송 완료...");
    } catch (IOException e) {
      e.printStackTrace();
    } finally {
      if(fis != null) {
        try {fis.close();} catch (IOException e) {}
      }
      if(out != null) {
        try {out.close();} catch (IOException e) {}
      }
      if(socket != null) {
        try {socket.close();} catch (IOException e) {}
      }
      if(server != null) {
        try {server.close();} catch (IOException e) {}
      }
    }
  }
  public static void main(String[] args) {
    new TcpFileServer().serverStart();
  }
TcpFileClient.java
- 클라이언트는 서버에 접속하여 서버가 보내주는 파일을 D:/C_Lib폴더에 저장한다.
public class TcpFileClient {
  public void clientStart() {
    File file = new File("d:/C_Lib/Tulips.jpg"); // 저장할 파일 설정

    try(Socket socket = new Socket("localhost", 7777);
      InputStream is = socket.getInputStream();
      FileOutputStream fos = new FileOutputStream(file); ) {
      // close 필요한 객체들을 try 안에서 생성하면 finally 영역에서 자동으로 close해줌
      // (JDK 1.7 이상, try-with-resource)

      System.out.println("파일 다운로드 시작...");
      byte[] tmp = new byte[1024];
      int length = 0;
      while ((length = is.read(tmp)) != -1) {
        fos.write(tmp, 0, length);
      }
      fos.flush();
      System.out.println("파일 다운로드 완료...");
    } catch (IOException e) {
      e.printStackTrace();
    }
  }

  public static void main(String[] args) {
    new TcpFileClient().clientStart();
  }
}
갈 길이 멀다