Three.js
JavaScript 라이브러리를 통해 WebGL를 쉽게 다룰 수 있도록 Three.js를 사용한다.
HTML
<head>
    <title>Scene</title>
    <script type="text/javascript" src="../libs/three.js"></script>
    <style>
        body {
            margin: 0;
            overflow: hidden;
        }
    </style>
</head>
<body>

<!-- Div which will hold the Output -->
<div id="WebGL-output">
</div>
Scene 추가
three.js 는 3차원 객체로 구성되는 장면 (Scene)이 있다.
Scene은 렌더링 할 모든 객체와, 카메라와 광원을 저장하는 컨테이너이다.
THREE.Scene 객체 없이는 Three.js는 아무것도 렌더링할 수 없다.
var scene = new THREE.Scene();Camera 객체 생성
Scene을 렌더링할 때는 어떤 시점에서 장면을 보는가에 따라서 다양한 모습으로 렌더링된다.
그 시점을 Camera로 정의한다.
Camera에는 PerspectiveCamera, OrthographicCamera 두 가지가 존재한다.
PerspectiveCamera: 일상생활에서 우리가 보는 외관.OrthographicCamera: 직교 카메라, 시점으로부터의 거리에 상관없이 모든 물체가 동일한 크기이다.
THREE.PerspectiveCamera(fov, aspect, near, far)
- fov — Camera frustum vertical field of view.
- aspect — Camera frustum aspect ratio.
- near — Camera frustum near plane.
- far — Camera frustum far plane.
var camera = new THREE.PerspectiveCamera(45, window.innerWidth / window.innerHeight, 0.1, 1000);
Renderer 추가
scene 객체가 camera 객체의 각도에 따라 브라우저에서 어떻게 보이는지 산출하는 역할을 담당한다.
이 예제에서 장면을 렌더링하는 데 그래픽 카드를 사용하도록 WebGLRenderer 를 생성한다.
Three.js에서 제공하는 소스 코드와 문서를 살펴보면 웹 GL 기반 외에도 캔버스 렌더러, SVG 기반의 렌더러 등이 존재한다. 그러나 CPU에 집중적인 부하를 주며 물질(material)과 그림자(shadow) 같은 좋은 기능들을 지원하지 않기 때문에 사용을 권장하지는 않는다.
var renderer = new THREE.WebGLRenderer({ antialias: true });
renderer.setClearColorHex();
renderer.setClearColor(new THREE.Color(0xEEEEEE)); // renderer의 배경색
renderer.setSize(window.innerWidth, window.innerHeight); // 장면이 얼마나 크게 렌더링 되어야 하는지 설정- 오브젝트의 가장자리를 매끄럽게 하기 위해 antialias를 true로 한다.
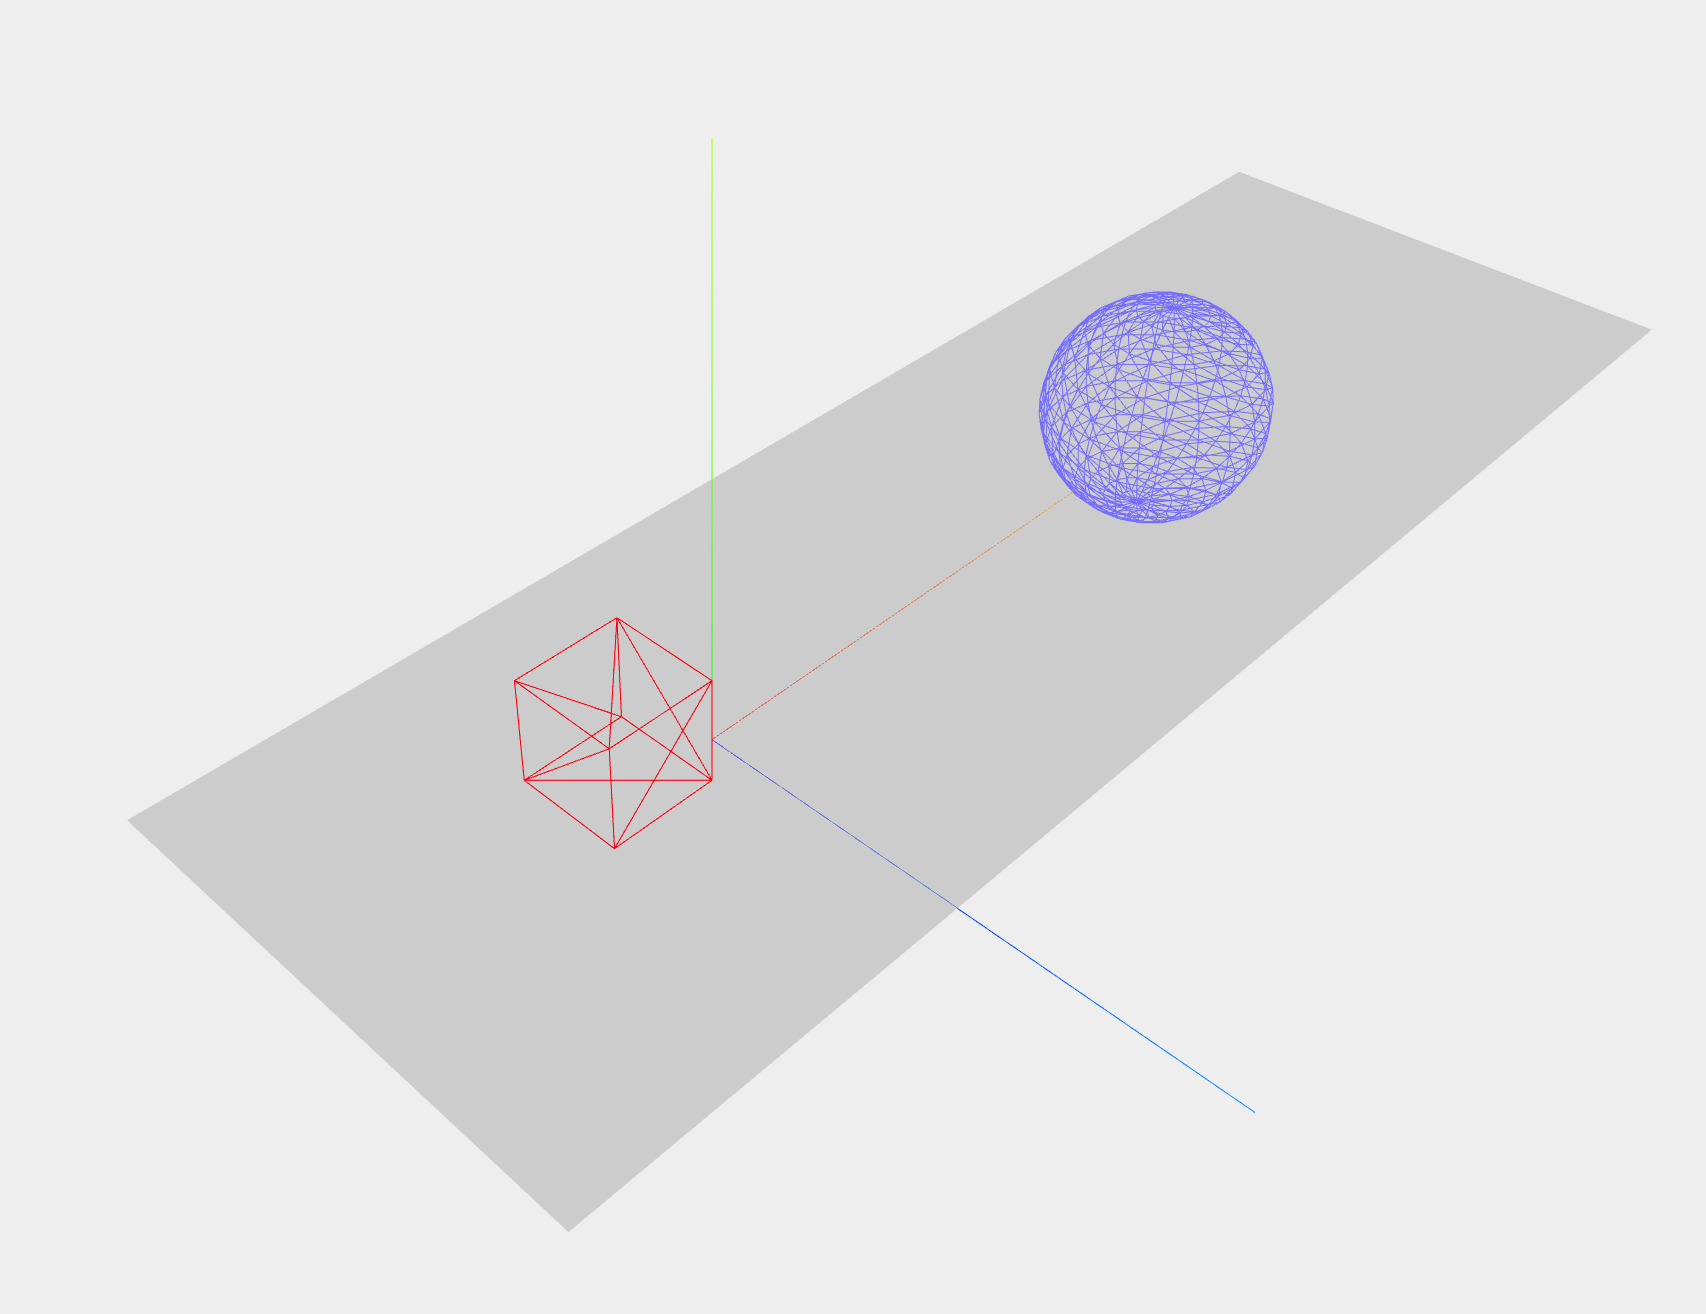
AxisHelper 생성 (보조축 생성)
var axes = new THREE.AxisHelper(20);
scene.add(axes); // 축을 장면에 추가
Plane 추가 (평면 추가)
var planeGeometry = new THREE.PlaneGeometry(60, 20); // 평면이 어떻게 보일지 설정, 폭은 60 이고 높이는 20
var planeMaterial = new THREE.MeshBasicMaterial({color: 0xcccccc}); // Three.js에 이 평면이 어떻게 보일지 설정 (평면의 색상이나 투명도 등)
var plane = new THREE.Mesh(planeGeometry, planeMaterial); // 형태, 재질 합쳐주는 역할, Mesh로 결합

// rotate and position the plane
// plane을 장면에 추가하기 전에 위치 지정해야 한다.
plane.rotation.x = -0.5 * Math.PI;
plane.position.x = 15;
plane.position.y = 0;
plane.position.z = 0;

// add the plane to the scene
scene.add(plane);- Plane은 기본값이 수직으로 서있기 때문에 rotation 시켜서 수평으로 만든다.
Cube 생성
// create a cube
var cubeGeometry = new THREE.BoxGeometry(4, 4, 4);
var cubeMaterial = new THREE.MeshBasicMaterial({color: 0xff0000, wireframe: true}); // wireframe: true -> solid object가 아닌, wireframe으로 렌더링되도록 한다.
var cube = new THREE.Mesh(cubeGeometry, cubeMaterial);

// position the cube
cube.position.x = -4;
cube.position.y = 3;
cube.position.z = 0;

// add the cube to the scene
scene.add(cube);
Sphere 생성
// create a sphere
var sphereGeometry = new THREE.SphereGeometry(4, 20, 20);
var sphereMaterial = new THREE.MeshBasicMaterial({color: 0x7777ff, wireframe: true});
var sphere = new THREE.Mesh(sphereGeometry, sphereMaterial);

// position the sphere
sphere.position.x = 20;
sphere.position.y = 4;
sphere.position.z = 2;

// add the sphere to the scene
scene.add(sphere);
Camera 추가
// position and point the camera to the center of the scene
// x, y, z 속성을 사용해 카메라가 장면의 위에 떠다니도록 했다.
camera.position.x = -30;
camera.position.y = 40;
camera.position.z = 30;
camera.lookAt(scene.position); // lookAt : 장면의 중앙을 가리키도록 한다. 기본값은 (0,0,0)
Rendering
 // add the output of the renderer to the html element
document.getElementById("WebGL-output").appendChild(renderer.domElement);

// render the scene
renderer.render(scene, camera);
결과물
REFERENCE

꾸준히 새로운 것을 알아가는 것을 좋아합니다.