Proxy
네트워크에서의 프록시
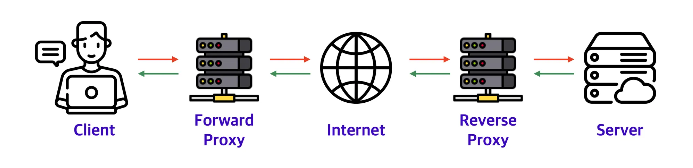
프록시 서버란?
- 클라이언트가 직접 서버에 요청하지 않고, 프록시 서버(Proxy Server)를 통해 간접적으로 요청을 처리하는 방식
- 보안 강화, 캐싱, 트래픽 제어 등을 목적으로 사용됨
Forward Proxy (네트워크 프록시)
- 클라이언트와 서버 사이에 위치하여 클라이언트 요청을 대신 서버에 전달
- 캐싱, 트래픽 제어, 보안과 프라이버시 보호를 위해 사용됨 (ex: VPN, 기업 내부망 프록시)
- HTTP 프록시, SOCKS 프록시
Reverse Proxy (시스템 프록시)
- 대용량 트래픽 처리를 해야하는 경우에는 서버를 여러 대를 두는데, 서버를 직접 노출하기 보단 로드 밸런서 주소만 공개
- 클라이언트는 로드 밸런서를 통해 서버에 접근하고, 실제 서버를 숨기거나 부하를 분산
- 대표적인 예: 로드 밸런서(Load Balancer), API Gateway, NGINX
- AWS에서는 ECS, ELB(Elastic Load Balancer) 등에서 사용됨
로드 밸런서 작동 방식
- 클라이언트는 로드 밸런서의 주소로 요청을 보냄
- 로드 밸런서는 내부 알고리즘을 통해 요청을 여러 서버로 분배
- 서버는 응답을 보내고, 로드 밸런서는 클라이언트에게 전달
디자인 패턴에서의 프록시 패턴
대상 객체에 접근하기 전, 대리자(Proxy 객체)를 통해 간접적으로 접근하도록 만들어 주는 구조적 패턴
"프록시 객체는 원본 객체를 감싸고 있으며, 원본 객체의 메서드를 대신 실행하는 역할을 한다."
- 원본 객체를 직접 변경하지 않고 공통 기능(AOP, 로깅, 캐싱 등)을 적용 가능
- 객체 생성을 지연시켜 성능 최적화 가능 (Lazy Initialization, Caching)
- 원격 호출을 로컬 객체처럼 사용할 수 있음 (Remote Proxy)용
=> proxy 객체를 동일한 객체처럼 다뤄야하기 때문에 인터페이스를 그대로 구현,
proxy 객체는 원본 객체를 컴포지션으로 가짐 -> 원본 객체의 메소드나 필드 호출 가능
왜 사용하는가?
1. 접근 제어
- 원본 객체에 직접 접근하기 전에, 권한 체크, 로깅, 네트워크 연결 준비 등 추가 처리 수행
// 원본 객체
public class RealService implements Service {
    @Override
    public String method1(String input) {
        return "RealService 실행: " + input;
    }
}

// 프록시 객체 - 추가 작업을 해주고 원본 객체의 메소드를 호출
public class ProxyService implements Service {
    private final RealService realService;

    // Service를 구현한 모든 구현체에 대해 프록시 객체를 만들기 위해 생성자 주입
    public ProxyService(RealService realService) {
        this.realService = realService;
    }

    @Override
    public String method1(String input) {
        System.out.println("🔍 ProxyService: method1 호출 전 로깅");
        String result = realService.method1(input);
        System.out.println("✅ ProxyService: method1 호출 후 로깅");
        return result;
    }
}

// 클라이언트 - 프록시 객체를 호출
public class Client {
    public static void main(String[] args) {
        RealService realService = new RealService();
        Service proxy = new ProxyService(realService); // 프록시 객체 사용

        String result = proxy.method1("Hello");
        System.out.println(result);
    }
}- 프록시 객체가 내부적으로 AOP 로직을 수행한 뒤, 객체 A의 method1()을 실행
- Proxy 객체는 원본 객체를 컴포지션으로 갖고있기 때문에, Proxy 객체의 메소드에서 원본 객체의 메소드를 호출 가능
=> 원본 객체의 메소드를 호출하기 전에 앞뒤로 권한체크, 로깅 등 AOP 작업을 먼저 해주고 원본 객체의 메소드 실행 가능
2. 지연 초기화 및 캐싱
- 무거운 객체를 즉시 로딩하면 부하가 심하므로, 경랑 proxy 객체(빈 껍데기)로 먼저 대응하고 필요한 시점에만 실제 객체 생성
✅ 지연 초기화(Lazy Initialization)
필요한 순간까지 객체를 생성하지 않음 → 초기 부하 감소
프록시 객체를 통해 원본 DB 연결 객체 생성을 지연시킴
(DB 연결을 안해도 돼서 네트워크 I/O, DB Connection pool 준비 과정 등이 없어져서 부하 감소)
객체를 참조하려고 할 때 비로소 DB 연결을 수행
✅ 캐싱(Caching)
한 번 생성된 객체를 캐싱하여 반복 생성 방지
객체 재사용으로 성능 최적화
✅ 즉, 처음에는 가짜(Proxy) 객체를 반환하고, 필요할 때만 실제 객체를 생성하는 방식!
public interface Image {
    void displayImage();
}

// 실제 객체 (이미지 로딩)
public class RealImage implements Image {
    private String filename;

    public RealImage(String filename) {
        this.filename = filename;
        loadFromDisk(filename);
    }

    private void loadFromDisk(String filename) {
        System.out.println(filename + " 로 이미지를 로딩 중...");
    }

    @Override
    public void displayImage() {
        System.out.println(filename + " 이미지를 화면에 표시합니다.");
    }
}

// 프록시 객체 (지연 로딩)
public class ProxyImage implements Image {
    private String filename;
    private RealImage realImage;

    public ProxyImage(String filename) {
        this.filename = filename;
    }

    @Override
    public void displayImage() {
        if (realImage == null) {
            realImage = new RealImage(filename); // 실제 객체 생성 (지연 로딩)
        }
        realImage.displayImage();
    }
}- 이미지 객체를 미리 로딩하지 않고, 프록시 객체만 로딩해줌 -> displayImage()가 호출될 때만 로딩하여 성능 최적화
즉시 로딩 vs 지연 로딩
즉시 로딩 : 엔티티를 조회할 때 자신과 연관되는 엔티티를 조인(join)을 통해 함께 조회하는 방식 (쿼리가 한번 나감)
지연 로딩 : 엔티티를 조회할 때, 자신만 로딩하고 연관되는 엔티티는 그 객체가 조회될 때 로딩 (쿼리가 두 번 나간다)
3. 원격 프록시
- 원격지(다른 서버나 네트워크 등)에 있는 객체를 로컬에서 쓰듯이 사용하기 위해, 동일한 인터페이스를 구현한 proxy 객체가 원격 호출을 대신 처리
- 객체 B에서 네트워크 열고, 요청보내고, 응답 받는걸 하는게 아니라, 객체 A의 proxy A를 만들어서 A를 원격 호출(네트워크 열고 호출하고 닫고)하는 작업을 담고, proxy A를 사용
- proxy A를 사용하는 객체 B의 입장에서는 그냥 객체를 사용하는 것처럼 사용!
ex) OAuth2 AuthService의 authenticate 기능을 AuthServiceProxy가 구현하여 대신 네트워크 API(원격 AuthService)와 통신하여 인증을 수행
클라이언트(UserController)는 로컬 메서드 호출 방식으로 인증을 수행하지만,
실제로는 AuthServiceProxy를 통해 원격 OAuth2 서버와 통신.
public interface AuthService {
    String authenticate(String username, String password);
}


// 프록시 객체
@Service
public class AuthServiceProxy implements AuthService {
    private final RestTemplate restTemplate;

    public AuthServiceProxy(RestTemplate restTemplate) {
        this.restTemplate = restTemplate;
    }

    @Override
    public String authenticate(String username, String password) {
        String authServerUrl = "https://oauth2-server.com/authenticate"; // 원격 서버 URL

        HttpHeaders headers = new HttpHeaders();
        headers.setContentType(MediaType.APPLICATION_JSON);

        String requestBody = String.format("{\"username\": \"%s\", \"password\": \"%s\"}", username, password);
        HttpEntity<String> request = new HttpEntity<>(requestBody, headers);

        ResponseEntity<String> response = restTemplate.postForEntity(authServerUrl, request, String.class);

        return response.getBody(); // 액세스 토큰 반환
    }
}

// 클라이언트에서는 프록시 객체로 로컬 메소드를 사용하는 것처럼 authService를 이용하지만, 프록시 객체에 네트워크 연결이 들어있음
@RestController
@RequestMapping("/user")
public class UserController {
    private final AuthService authService;

    public UserController(AuthService authService) {
        this.authService = authService; // 프록시 객체 주입
    }

    @PostMapping("/login")
    public String login(@RequestParam String username, @RequestParam String password) {
        return authService.authenticate(username, password);
    }
}
스프링에서의 프록시 객체
- 스프링 프레임워크는 트랜잭션 관리, 보안, 리모팅(Remoting) 등 다양한 영역에서 프록시 객체를 폭넓게 활용
- IoC 컨테이너에서 프록시 객체를 등록하면, 원본 객체는 IoC 컨테이너에 등록되지 않고, 프록시가 원본 객체를 참조하는 식으로 사용됨 (원본은 IoC 컨테이너에 등록 x)
- AOP에서도 프록시 객체를 이용해 로직을 먼저 적용!
- 스프링의 AOP는 프록시 패턴을 이용해 구현되어있기 때문에, AOP 어노테이션을 달아주면 알아서 프록시 객체를 생성하고 거기에 적용함 (@EnableAspectJAutoProxy)
- 스프링이 런타임 시점에 동적 프록시(직접 만드는게 아니라 자동으로)를 생성하여, 비즈니스 로직 호출을 가로채서 횡단 관심사를 적용한 뒤 실제 객체 메서드를 호출
- @Transactional이 붙은 메서드는 프록시 객체로 감싸져서, 메서드 호출 시 트랜잭션이 시작되고 종료되는 로직이 앞뒤로 자동으로 추가됨
- 원격 프록시 - 원격 서비스에 대한 호출을 로컬 인터페이스로 사용하는 형태를 제공할 때, 프록시 객체가 네트워크 송수신을 대신 처리
- Security - Spring Security또한 필터 계층이나 인터셉터를 거쳐, 프록시 객체가 가로채서 인증/권한 로직을 수행
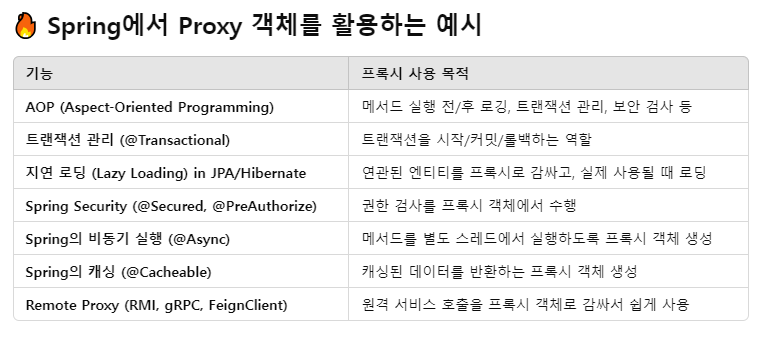 => 스프링에서 AOP를 활영하여 이미 @Aspect로 모듈화 해놓은 기능들이 많다. (@Transactional, @Cacheable, @Async 등)
- @Aspect + @EnableAspectJAutoProxy를 달아주면 프록시 객체를 생성해서 적용
- 해당 기능이 필요하다면 어노테이션으로 가져다 쓰면 되고, 그 외의 공통 관심사를 만들어서 묶어주고 싶다면 @Aspect를 직접 만들어주기
- 직접 객체에 대한 접근을 막고싶을 때 원본 객체를 필드로 갖는 프록시 객체를 만들어 원본 객체 호출
- 또는 원격 프록시를 만들어서 네트워크 송수신을 대신 처리하게 할 수 있음
Spring proxy 객체의 특징
- 대상 객체와 동일한 인터페이스(또는 클래스 상속)를 구현해, 동일한 메소드 시그니처를 가짐
- Method Invocation을 가로채서, 공통 기능을 수행한 뒤 실제 객체의 메서드를 호출
- 클라이언트 입장에서는 마치 실제 객체를 접근하듯 메서드를 호출
- Proxy 객체에 원본 객체를 컴포지션 해주고, 사용하려는 곳에서 Proxy 객체를 의존성 주입
public class ProxyUserService implements UserService {
    private final UserService realUserService;

    public ProxyUserService(UserService realUserService) {
        this.realUserService = realUserService;
    }

    @Override
    public void someMethod() {
        // 추가적인 로직 (예: 캐싱, 로깅, 접근 제어 등)
        realUserService.someMethod(); // 원본 객체의 메소드를 호출
    }
}

@RestController
public class UserController {
    private final UserService userService;

    public UserController(UserService proxyUserService) {
        this.userService = proxyUserService;
    }
}
AOP란?
- Aspect Oriented Programming의 약자로 관점 지향 프로그래밍
- 어떤 로직을 기준으로 핵심적인 관점, 부가적인 관점으로 나누어서 보고 그 관점을 기준으로 각각 모듈화하겠다는 것
- 공통적으로 흩어진 횡단 관심사를 Aspect로 모듈화하고 비즈니스 로직과 분리하여 재사용!
- AOP가 적용된 객체는 객체 생성 시점에 원본 객체가 아닌 프록시 객체가 IoC Container에 등록됨 -> 원본 객체의 메소드를 호출 (원본 객체는 등록 X)
- Aspect: 공통 기능을 모듈화한 것. 예를 들어, 로깅 기능을 Aspect로 정의할 수 있습니다.
- Join Point: Aspect가 적용될 수 있는 지점. 메서드 호출 시점이 대표적입니다.
- Advice: 특정 Join Point에서 실행되는 코드. 종류로는 @Before, @After, @Around 등이 있습니다.
- Pointcut: Advice가 적용될 Join Point를 지정하는 표현식.
- Weaving: Aspect와 비즈니스 로직을 결합하는 과정.
AOP의 동작 방식
+--------+          +---------+          +--------------+
| Client | ----->   |  Proxy  | ----->   | Target Object|
+--------+          +---------+          +--------------+
                      ↑    |
                      |    |
               [Advice (예: 로깅, 트랜잭션 관리)]
- Target Object의 메서드를 대신 호출하는 중간 객체입니다.
- 클라이언트의 요청을 가로채서 Advice를 실행한 후, 실제 Target Object의 메서드를 호출합니다.
- 프록시는 Target Object와 동일한 인터페이스를 구현하여 클라이언트가 프록시를 통해 Target Object에 접근하는 것처럼 보이게 합니다.
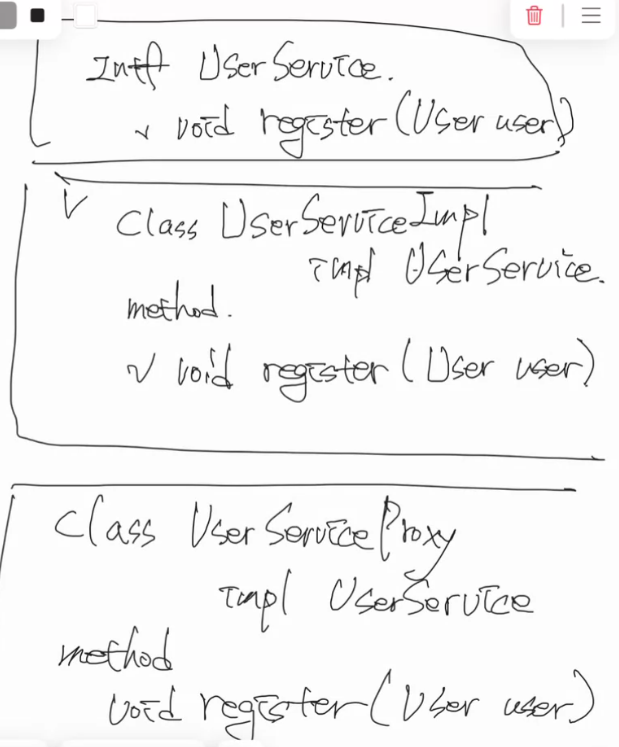
실행 흐름
- 클라이언트가 userServiceImpl.registerUser() 호출
- Spring이 userServiceImpl의 프록시 객체를 먼저 실행
- 프록시 객체에서 @Before Aspect를 먼저 실행
- Aspect가 끝난 후 userServiceImpl.registerUser() 호출
AOP를 직접 구현해보자
- implementation 'org.springframework.boot:spring-boot-starter-aop'로 AOP를 사용 가능
@Aspect
@Component
public class ServiceLoggingAspect {

    @Before("execution(* com.sprint.mission.springdemo.service.UserServiceImpl.registerUser(..))")
    public void beforeRegisterUser() {
        System.out.println("Before registerUser");

    }
}- Aspect도 Component 선언이 필요
- Join Point, 즉 @Before 등으로 어느 클래스의 어느 함수에 Aspect를 실행할지 지정
@EnableAspectJAutoProxy
public class SpringdemoApplication {
SpringApplication.run(SpringdemoApplication.class, args);
}
@Service
public class UserServiceImpl implements UserService {
@Override
public UUID registerUser(String userName) {
User user = new User(UUID.randomUUID(), userName);
userRepository.save(user);
UserEvent event = new UserEvent(this, UserEventType.REGISTERED, "User registerd: " + userName);
eventPublisher.publishEvent(event);
return user.id();
}
}- @EnableAspectJAutoProxy를 해야 Aspect를 사용할 수 있다. (AOP 자동 프록시 생성 활성화)
UserController에 UserService를 주입할 때, UserServiceImpl이 아니라 동적으로 생성된 UserServiceImplProxy를 주입
=> proxy 객체에서 원본 객체의 registerUser전에 Aspect가 실행됨! - 코드를 실행하면, userServiceImpl의 프록시 객체가 생성되고,
- 프록시 객체에서 @Before Aspect를 먼저 실행하고, userServiceImpl의 registerUser()를 호출해줌
- @Aspect를 달면, 스프링이 해당 메소드의 Join Point를 보고, execution에 있는 원본 객체를 기반으로 프록시 객체를 bean등록 해줌
-> 해당 메소드가 실행되면 프록시 객체가 가로채어 Aspect를 호출하고 실제 객체의 함수를 호출
캐싱 직접 구현 (@Cacheable로 구현되어 있지만, 직접 구현해보자)
getUser할 때, 한 번 호출된 적이 있다면 다음에는 캐싱하여 호출하는 기능
@Aspect
@Component
public class UserServiceCache {

    private final Map<UUID, User> cache = new ConcurrentHashMap<>();

    @Around("execution(* com.sprint.mission.springdemo.pr1.service.UserServiceImpl.getUser(..))")
    public User chcheUser(ProceedingJoinPoint joinPoint) throws  Throwable {
        // 메소드 호출 파라미터 가져오기
        Object[] args = joinPoint.getArgs();
        UUID userId = (UUID) args[0];
        if (cache.containsKey(userId)) {
            System.out.println("Cache hit");
            return cache.get(userId); //cache에 있다면 반환
        }
        Object result = joinPoint.proceed(args); // 아니라면 joinPoint를 실행 (getUser 메소드 실행)
        User user = (User) result;
        cache.put(userId, user); // 캐시에 넣고
        return user;
    }
}
- ProceedingJoinPoint는 AOP (Aspect-Oriented Programming)에서 Around Advice를 구현할 때 사용되는 객체로,
원래 실행될 대상 메서드를 감싸고, 실행 여부를 제어할 수 있도록 해주는 기능 / @Around에만 사용 가능
(원본 객체에 대한 정보가 없으므로, 객체의 메소드를 직접 호출할 수가 없음)
ex) getUser 메소드를 감쌈
joinPoint.getArgs() - 메소드 호출 파라미터를 가져옴
joinPoint.proceed() - 메소드 실행
=> 하지만 이 AOP는 공통 관심사가 아니라 하나의 메소드에 대해 적용되므로, AOP와는 거리가 멀다고 볼 수 있음
AOP <-> 이벤트리스너
: AOP는 공통적인 횡단 관심사를 모듈화한 것, 이벤트리스너는 독립적인 사건 하나에 대해 부가적인 것들을 할 수 있음
위의 예시는 간단히 구현해서 AOP와 이벤트리스너가 비슷한 것처럼 느껴질 수 있음! 하지만 목적이 다르다.
이번에는 AOP를 좀 더 일반적인 관점에서 구현해보자.
캐싱
@Retention(RetentionPolicy.RUNTIME)
@Target(ElementType.METHOD)
public @interface ServiceCache {
}


@Aspect
@Component
public class ServiceCacheAspect {

    private final Map<String, Object> cache = new ConcurrentHashMap<>();

    @Around("@annotation(com.sprint.mission.springdemo.pr1.cache.ServiceCache)") // ServiceCache라는 어노테이션이 달려있는 메소드에만 Aspect 적용
    public Object cacheResult(ProceedingJoinPoint joinPoint) throws  Throwable {
        String cacheKey = generateKey(joinPoint);

        if (cache.containsKey(cacheKey)) {
            return cache.get(cacheKey);
        }

        Object result = joinPoint.proceed();

        cache.put(cacheKey, result);
        return result;
    }

    // 캐시의 키값을 직접 생성 - 같은 메소드가 같은 인자를 가지면 같은 키값을 가지도록!
    private String generateKey(ProceedingJoinPoint joinPoint) {
        StringBuilder key = new StringBuilder();
        key.append(joinPoint.getSignature().toShortString()); // 메소드 이름을 받아와서 문자열로 바꾸기
        for (Object arg : joinPoint.getArgs()) {
            key.append("-").append(arg.toString()); // 호출하는 인자들도 하나씩 다 붙여줌
        }
        return key.toString();
    }
}

@Service
public class UserServiceImpl implements UserService {
    @Override
    @ServiceCache
    public User getUser(UUID userId) {
        return userRepository.findById(userId);
    }
}- AOP를 직접 만들 때, 일반적으로 적용해야하므로 Annotation을 구현해서 사용! (Annotation이 붙은 곳 어디든 사용 가능)
- 어떤 메소드에든 호출할 수 있도록 Object 타입을 다룸
- 제너릭은 객체를 정의할 때 사용하는건데, AOP의 경우 객체를 사용하는 것이므로 제너릭 사용은 어렵다!
- 키값을 메소드 + 인자로 생성하여, 같은 메소드가 같은 인자를 가지면 같은 키값을 가지도록 함
=> 이 형태로 만들면, 어떤 메소드든 다 적용 가능! - @Cacheable을 사용하면 설정에 따라 Redis나 서버 메모리 등에 캐싱을 할 수 있음
- 값을 조회할 때, 외부에서 API 호출을 해와서 네트워크나 파일I/O 부하가 심하거나, 값이 많아 조회 시간이 오래걸리는 경우 캐시를 사용!
+ 자주 변경되지 않는 데이터의 경우 사용! / 자주 변경된다면 캐시와 DB 데이터가 달라지는 경우가 많음 - 보통은 글로벌 스토어인 Redis에 key-value 구조로 캐시값을 저장 -> 분산 환경에서 여러 서버가 동일한 캐시를 공유 가능
(글로벌 스토어가 뻗으면 서버가 다 죽는다는 단점이..)
로깅
@Retention(RetentionPolicy.RUNTIME)
@Target(ElementType.METHOD)
public @interface ServiceLogging {
}

@Aspect
@Component
@Order(1)
public class ServiceLoggingAspect {

    private static final Logger logger = LoggerFactory.getLogger(ServiceLoggingAspect.class); // 로그를 레벨별로 나눠서 출력 가능

    @Around("@annotation(com.sprint.mission.springdemo.pr1.logging.ServiceLogging)")
    public Object loggingResult(ProceedingJoinPoint joinPoint) throws Throwable {
        // before
        String methodName = joinPoint.getSignature().toShortString();
        logger.info(methodName + " 메소드 실행. 인자값 : " + joinPoint.getArgs()[0]);
        Object result = joinPoint.proceed();
        // after
        logger.info(methodName + " 메소드 결과값 : " + result);
        return result;
    }

}

    @Override
    @ServiceCache
    @ServiceLogging  // 캐싱이 된 상태라면, joinPoint.proceed()가 실행이 안되므로 ServiceLogging도 실행 X
    public User getUser(UUID userId) {
        return userRepository.findById(userId);
    }
- Cache와 Logging을 동시에 적용했을 때, 처음 실행할 땐 Logging이 정상적으로 동작하지만, 두번째부터는 동작 X
- why? 캐싱이 되면, 캐싱에서 joinPoint.proceed()를 실행 안하므로, 로깅 AOP를 호출 안하고, 로깅에서도 joinPoint.proceed()가 실행되지 않음
=> Order(1)를 통해 로깅이 먼저 실행되게끔 하면 메소드를 실행할때마다 로깅 작동!
실사용 예시
- @Transactional도 AOP로 구현되어, 하나라도 잘못되면 전체를 롤백
- 공통적인 횡단 관심사가 있다면 (앞뒤로 공통으로 처리해야하는 게 있다면), + Spring에서 @Aspect를 제공하지 않는다면, AOP를 이용해 Aspect 구현해주고 사용하면 좋다!
- 프록시 기반이므로 final 클래스나 private 메서드에는 적용이 어렵다.
- 잘못 사용하면 불필요한 오버헤드를 초래할 수도 있음!
=> 이러한 매커니즘 덕에, 비즈니스 로직 코드에 공통 기능을 흩뿌려놓지 않아도 되고, 설정이나 어노테이션만으로 관심사 분리를 할 수 있다.

백엔드 개발자