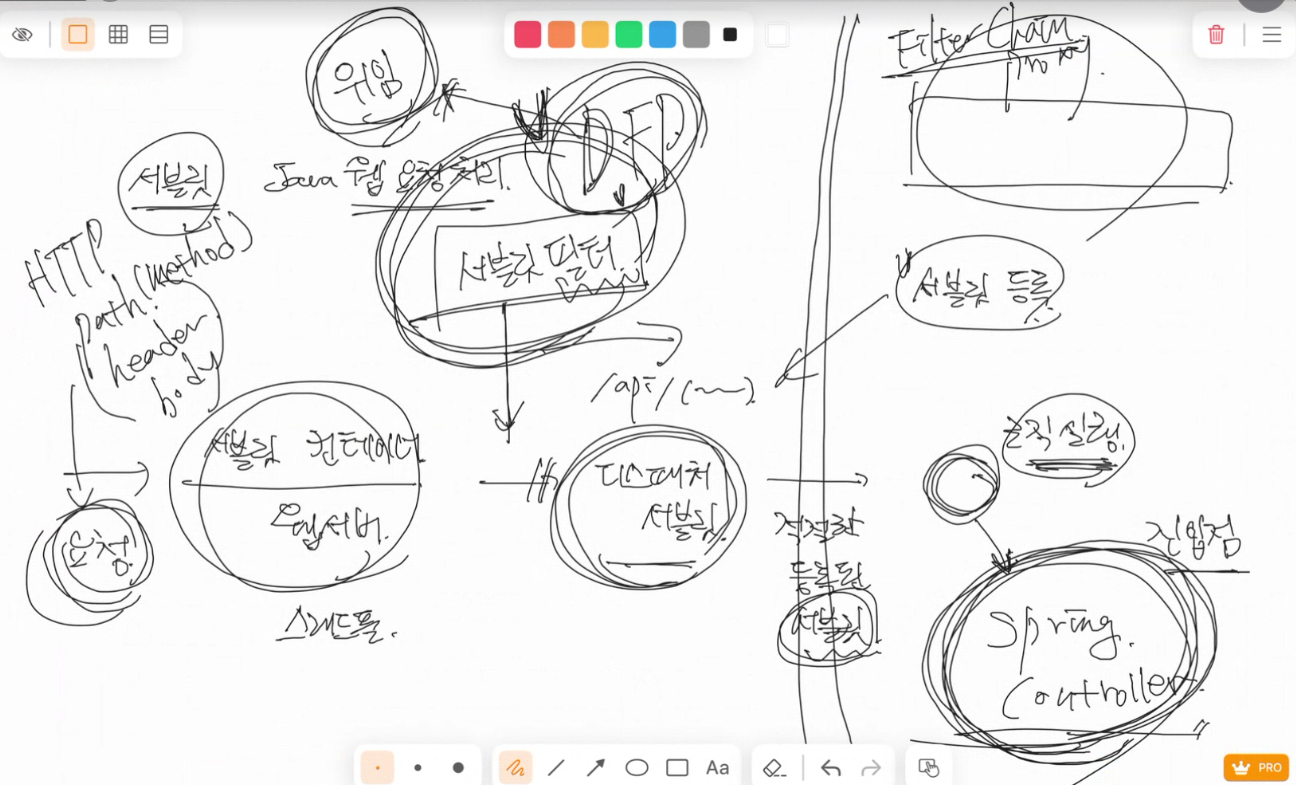
FilterChanin
작동 원리 요약
- 서블릿 필터는 톰캣 레벨에서 디스패처 서블릿보다 먼저 실행되어 모든 요청을 가로챌 수 있음
- ex) 인증, 로깅, CORS 처리 등 전역 관점의 처리
- 반면, 스프링 인터셉터(HandlerInterceptor)는 DispatcherServlet 뒤에서 동작하며, 컨트롤러 호출 전/후에 관여함
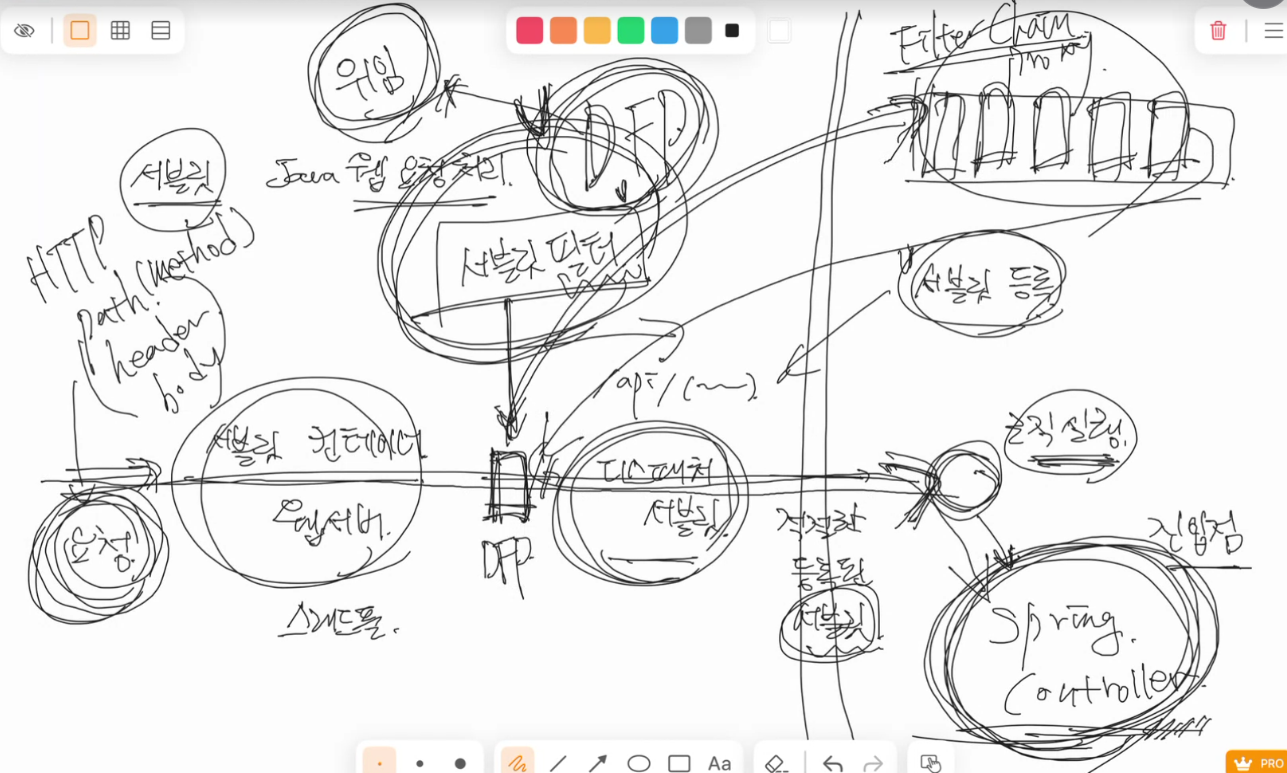
Spring Security의 FilterChain 처리
- Spring Security는 자체적으로 여러 개의 Security Filter를 가지고 있음 (
UsernamePasswordAuthenticationFilter,ExceptionTranslationFilter, etc.) - 이들은 Spring 환경 내부에서 동작하지만, 실제 HTTP 요청을 가로채기 위해서는 서블릿 필터 체인에 포함되어야 함
- 이를 위해 Spring은
DelegatingFilterProxy를 사용- 이 객체는 서블릿 필터이지만, 실제 처리를 Spring Bean으로 등록된
FilterChainProxy에 위임함 - 즉, 서블릿 컨테이너에서 Spring Security 필터 체인을 연결해주는 브릿지 역할
- 이 객체는 서블릿 필터이지만, 실제 처리를 Spring Bean으로 등록된
- Spring Security의 FilterChain은 Spring 컨텍스트에 Bean으로 등록되기 때문에, 우리가 작성한 커스텀 필터도 Spring Bean으로 관리할 수 있다.
- 이로써 스프링의 의존성 주입(DI)을 통해 서비스, 리포지토리 등 필요한 컴포넌트를 주입받는 필터를 만들 수 있음!
구조 요약
[톰캣 필터 체인]
   ↓
[DelegatingFilterProxy (서블릿 필터)]
   ↓
[FilterChainProxy (Spring Security 필터 체인)]
   ↓
[DispatcherServlet]
   ↓
[HandlerMapping → Controller 호출]
SecurityContext
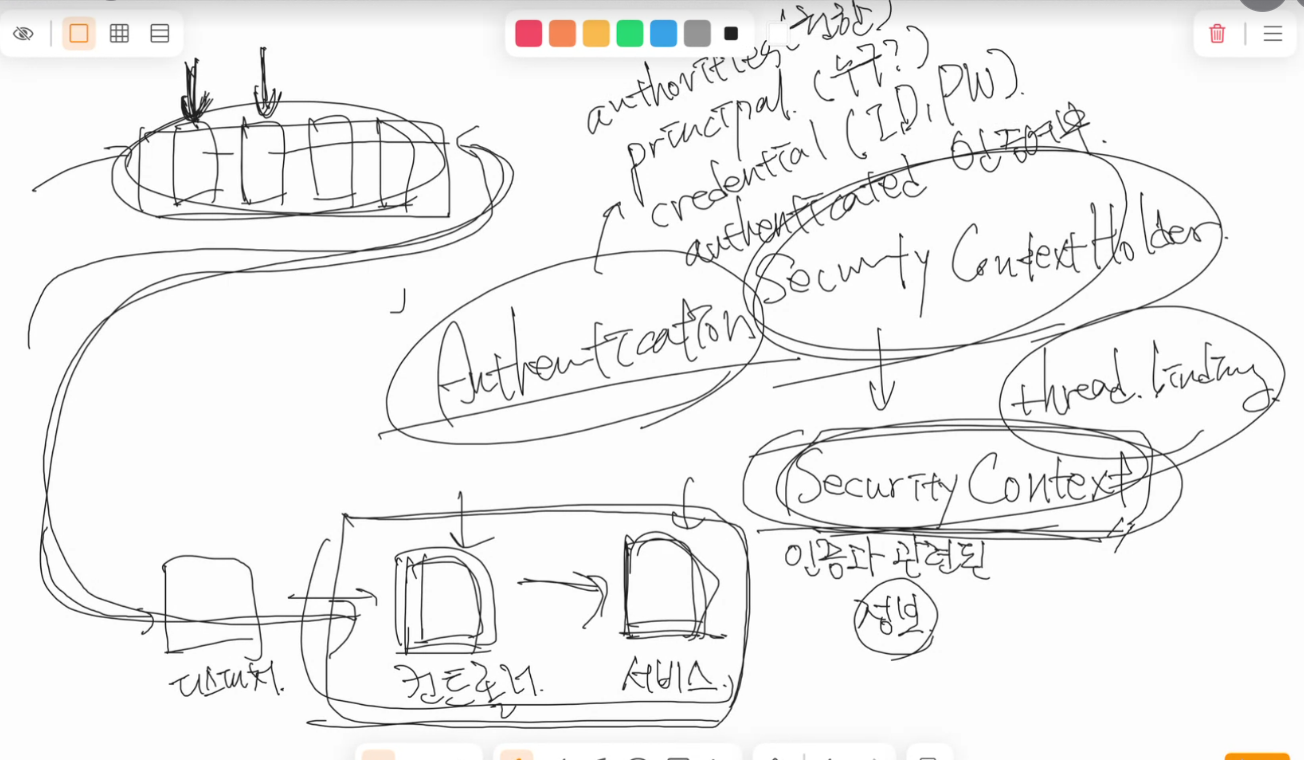
- 인증 정보가 필요한 곳에서는 언제든지 SecurityContextHolder를 통해 SecurityContext를 꺼내고, 그 안에 있는 Authentication 객체에서 현재 로그인한 사용자 정보를 확인할 수 있다.
(SecurityContextHolder.getContext().getAuthentication(), static이므로 그냥 꺼내다 쓰면 됨)- 이게 가능한 이유는 SecurityContext가 하나의 요청 - 하나의 쓰레드에 Thread binding되기 때문 (쓰레드 로컬에 인증 정보(Authentication)을 포함한 SecurityContext가 저장됨)
- 스레드 로컬(ThreadLocal)은 Java에서 "각 스레드마다 자신만의 독립된 변수를 가지도록 해주는 기술"
- 여러 스레드가 동시에 실행되는 프로그램에서, 공유된 전역 변수나 필드를 사용하면 경쟁 상태(Race Condition)가 발생할 수 있다.
→ 그래서 스레드마다 독립된 공간이 필요할 때 ThreadLocal을 사용 - public static int counter = 0; - 전역 변수, 모든 쓰레드가 같은 값을 공유
- private static final ThreadLocal contextHolder = new ThreadLocal<>(); - ThreadLocal 변수, 스레드마다 독립적
- 여러 스레드가 동시에 실행되는 프로그램에서, 공유된 전역 변수나 필드를 사용하면 경쟁 상태(Race Condition)가 발생할 수 있다.
- @AuthenticationPrincipal은 현재 스레드의 SecurityContextHolder에 저장된 Authentication 객체에서 principal(UserDetails)을 꺼내서 주입해주는 역할
쓰레드 로컬에 저장된다면, 동일 사용자의 다른 요청에 대해서는 어떻게 인증 정보를 가져오는가?
- 인증이 안돼있고, 세션에도 저장이 안돼있다면? -> SecurityContext에 인증 정보를 저장하고, HttpSession에도 Authentication 데이터 저장
- 추후 요청이 들어왔을 때, SessionId를 통해 HttpSession을 조회(메모리나 DB)해서 존재한다면 SecurityContext에 해당 Authentication 데이터 복원
1. 로그인(인증 성공) 시
- UsernamePasswordAuthenticationFilter 등이 인증 성공하면:
SecurityContextHolder.getContext().setAuthentication(authentication);- 이후 SecurityContextPersistenceFilter가 SecurityContext를 HttpSession에 저장:
HttpSession.setAttribute("SPRING_SECURITY_CONTEXT", securityContext);→ 이로써 "세션이 존재하고 인증 정보도 포함"된 상태가 된다.
2. 다음 요청이 들어왔을 때
- 요청에 JSESSIONID (SessionId) 쿠키가 포함되어 있으면:
- 서블릿이 해당 세션을 DB나 메모리에서 찾아서 SecurityContextPersistenceFilter가 세션에서 SPRING_SECURITY_CONTEXT 속성을 꺼냄
- 그 안의 Authentication을 SecurityContextHolder에 다시 주입

- DB라면 SPRING_SESSION, SPRING_SESSION_ATTRIBUTES 테이블 조회
- 여기서 attribute_bytes가 SecurityContext를 직렬화해서 DB에 저장한 값. 이걸 꺼내서 역직렬화하고 SecurityContext로 복원해서 SecurityContextHolder에 다시 주입한다.
- attribute_bytes에 CSRF 토큰도 함께 들어있음. JSESSIONID와 CSRF 토큰은 1:1 매핑되어 있어서, 요청을 보낼 때 이 둘의 관계가 맞아야 요청을 받아준다.
- 이중 안전 장치 같은 개념, JSESSIONID(세션 쿠키)가 탈취되었을 때 발생할 수 있는 공격을 방지하는 것!
- 여기서 attribute_bytes가 SecurityContext를 직렬화해서 DB에 저장한 값. 이걸 꺼내서 역직렬화하고 SecurityContext로 복원해서 SecurityContextHolder에 다시 주입한다.
SecurityContext context = (SecurityContext) session.getAttribute("SPRING_SECURITY_CONTEXT");
SecurityContextHolder.setContext(context);- 세션이 JVM 메모리에 있을 경우, SPRING_SECURITY_CONTEXT라는 이름으로 저장된 SecurityContext 객체를
직접 메모리에서 꺼내서 SecurityContextHolder에 주입하는 코드 - DB에 저장하더라도, DelegatingFilterProxy가 요청마다 세션 저장소에서 세션을 조회 -> 내부 구현상으로 attribute_bytes를 역직렬화하여 "SPRING_SECURITY_CONTEXT"라는 이름으로 SecurityContext 객체 복원 -> 위 코드처럼 꺼내쓰면 됨
→ 즉, 매 요청마다 세션에서 인증 정보를 복원 → ThreadLocal에 저장하는 구조
브라우저에서는 어떻게 알고 쿠키에 JSessionId를 넣어주는가?
- 사용자가 로그인 요청 (또는 아무 요청)을 보냄
- 서버(Tomcat 등)가 세션을 새로 생성하고 → JSESSIONID를 부여함
- 응답 시 Set-Cookie 헤더로 브라우저에게 전달함
- 브라우저는 JSESSIONID를 쿠키에 저장하고, 같은 도메인/경로(JSESSIONID 쿠키의 Path값) 요청마다 자동으로 JSESSIONID를 다시 보냄
-> 브라우저마다 독립적인 쿠키 저장소를 사용하기 때문에, 사용자들의 JSESSIONID가 꼬일 일이 없다.
서버 응답 헤더
HTTP/1.1 200 OK
Set-Cookie: JSESSIONID=ABC123XYZ456; Path=/; HttpOnly
→ 브라우저는 이 헤더를 보고 JSESSIONID=ABC123XYZ456 쿠키를 저장
이후 브라우저의 요청
GET /me HTTP/1.1
Host: example.com
Cookie: JSESSIONID=ABC123XYZ456
→ 브라우저가 같은 도메인, 같은 Path일 경우 자동으로 쿠키를 포함해서 보냄
인증 과정
-
로그인 방식에 따라
UsernamePasswordAuthenticationFilter또는 커스텀 필터(JsonUsernamePasswordAuthenticationFilter등)가 로그인 요청을 처리한다. -
로그인 요청 본문을 파싱하여
LoginRequest객체로 만든 후,
이를 기반으로UsernamePasswordAuthenticationToken을 생성하여
AuthenticationManager.authenticate()에 전달한다. -
AuthenticationManager는 등록된AuthenticationProvider를 통해
실제 인증 처리를 위임한다. -
AuthenticationProvider는 내부적으로UserDetailsService.loadUserByUsername()를 호출하여
해당 사용자의 정보를 조회하고,
PasswordEncoder.matches(raw, encoded)로 비밀번호 검증을 수행한다.- 유저 정보를 DB에서 조회해야하는 경우, UserDetailsService를 커스터마이징 해서 DB를 조회하도록 로직을 짜고, DaoAuthenticationProvider에 이를 주입해서 유저 검증에 쓰게끔 하면 된다. + PasswordEncoder도 주입해서 동일한 PasswordEncoder를 쓰게끔! 굳이 안해줘도 UserDetailsService와 PasswordEncoder가 Bean등록 되어있다면 자동 Autowired됨, 하지만 역할 계층을 넣어주려면 직접 생성해줘야함!!)
-
인증에 성공하면,
Authentication객체를 반환하며,
이 객체 안의principal은UserDetails구현체이고,
credentials(비밀번호)는 보안상 null로 처리되어 반환된다. -
반환된
Authentication은SecurityContextHolder.getContext().setAuthentication(...)를 통해
SecurityContext에 저장된다.
@Service
@RequiredArgsConstructor
// Spring Security의 인증 과정에서 사용자 정보를 로딩하기 위한 핵심 인터페이스이고,
// DaoAuthenticationProvider가 이걸 이용해서 사용자(username)를 조회
// 비밀번호 검증은 PasswordEncoder 사용
public class BlogUserDetailsService implements UserDetailsService {

  private final UserRepository userRepository;
  private final UserMapper userMapper;

  @Transactional(readOnly = true)
  @Override
  public UserDetails loadUserByUsername(String username) throws UsernameNotFoundException {
    User user = userRepository.findByUsername(username)
        .orElseThrow(() -> new UserNotFoundException("User with username " + username + " not found"));

    return new BlogUserDetails(userMapper.toDto(user), user.getPassword());
  }
}

// SecurityConfig, 굳이 안해줘도 UserDetailsService와 PasswordEncoder가 Bean등록 되어있다면 자동 Autowired됨, 하지만 역할 계층을 넣어주려면 이렇게 생성해줘야한다!!
  @Bean
  public DaoAuthenticationProvider daoAuthenticationProvider(
      UserDetailsService userDetailsService,
      PasswordEncoder passwordEncoder,
      RoleHierarchy roleHierarchy
  ) {
    DaoAuthenticationProvider provider = new DaoAuthenticationProvider();
    provider.setUserDetailsService(userDetailsService);
    provider.setPasswordEncoder(passwordEncoder);
    // 등록해줘야만 Spring Security에서 역할 계층(Role Hierarchy)이 실제로 적용됨
    // provider에서 인증 후 UserDetailsService로부터 조회한 UserDetails.getAuthorities()를 AuthoritiesMapper를 통해 가공한 뒤,
    // 이 권한 목록을 Authentication 객체의 GrantedAuthorities에 세팅
    provider.setAuthoritiesMapper(new RoleHierarchyAuthoritiesMapper(roleHierarchy));
    return provider;
  }
cf) 인증객체 꺼내는법
- Authentication authentication 파라미터로 받아서 형변환 해서 꺼내쓰기
  public ResponseEntity<UpdateReadStatusResponseDTO> updateReadStatus(
      Authentication authentication) {
        UUID id = ((CustomUserDetails)authentication.getPrincipal()).getUserDto().id());
} - @AuthenticationPrincipal CustomUserDetails principaa로 바로 인증 객체 받아쓰기 (권장)
  public ResponseEntity<UpdateReadStatusResponseDTO> updateReadStatus(
      @AuthenticationPrincipal CustomUserDetails principal) {
        UUID id = principal.getUserDto().id());
} - 코드가 가장 깔끔하고 의도가 명확함, 형변환 불필요, 가장 권장하는 방식
- SecurityContextHolder에서 꺼내쓰기
UUID id = ((CustomUserDetails)SecurityContextHolder.getContext().getAuthentication().getPrincipal()).getUserDto().id()- 컨트롤러 외부에서 인증 객체 꺼내야할 때 사용 (서비스 레이어 등)