1. 커널
커널 모듈에 대해 학습하기 전에, 커널에 대해 간단히 정리해보자.
커널은 운영체제의 핵심 구성요소이며, 컴퓨터 하드웨어와 프로세스를 잇는 핵심 인터페이스다.
기능
- 메모리 관리 : 메모리가 어디에서 무엇을 저장하는 데 얼마나 사용되는지를 추적한다.
- 프로세스 관리 : 어느 프로세스가 CPU를 언제 얼마나 오랫동안 사용할지 결정한다.
- 디바이스 드라이버 : 하드웨어와 프로세스 사이에서 중재자/인터프리터 역할을 수행한다.
- 시스템 호출 및 보안 : 프로세스의 서비스 요청을 수신한다.
유저 영역 vs 커널 영역
- 유저 영역 (User Space) : 일반 사용자 프로그램이 실행되는 공간
- 커널 영역 (Kernel Space) : 운영체제의 핵심 기능이 실행되는 공간
커널 영역은 안정성과 보안을 위해 유저 영역과 분리된다.
사용자 프로그램이 커널 기능을 사용하려면 시스템 콜을 통해 접근해야 한다.
2. 커널 모듈
모듈은 필요에 따라 커널에 로드 및 언로드 할 수 있는 코드 조각이다.
모듈을 이용하여 시스템을 재부팅하지 않고도 커널의 기능을 확장할 수 있다.
예를 들어, 모듈의 한 유형인 디바이스 드라이버는 커널이 시스템에 연결된 하드웨어에 접근할 수 있게 해준다.
만약 모듈이 없다면 커널에 기능을 추가하기 위해 커널 이미지에 직접 새 기능을 추가해야 할 것이다. 그렇게 되면 커널의 덩치가 커질 뿐 아니라, 새로운 기능을 넣을 때마다 커널을 다시 빌드하고 재부팅해야 하는 귀찮은 상황이 생기게 된다.
3. kmod / linux-headers 설치하기
kmod는 "kernel module tools"의 줄임말로 modprobe, insmod, depmod 등의 명령을 제공한다.
linux-headers 패키지는 커널의 내부 구조, 인터페이스, 자료구조 등을 정의하는 파일을 제공한다.
커널 모듈 개발을 위해선 두 패키지를 반드시 설치해야 한다.
Ubuntu의 경우 기본적으로 설치되어 있을 가능성이 높다.
Ubuntu/Debian:
sudo apt-get install build-essential kmod linux-headers-`uname -r`
4. 가장 간단한 모듈
다음과 같은 hello-1.c 파일을 작성해보자.
#include <linux/module.h>   /* Needed by all modules */
#include <linux/printk.h>   /* Needed for pr_info() */

int init_module(void)
{
    pr_info("Hello world 1.\n");

    /* A nonzero return means init_module failed; module can't be loaded. */
    return 0;
}

void cleanup_module(void)
{
    pr_info("Goodbye world 1.\n");
}

MODULE_LICENSE("GPL");
이제 Makefile을 작성해보자.
obj-m += hello-1.o

PWD := $(CURDIR)

all:
	make -C /lib/modules/$(shell uname -r)/build M=$(PWD) modules

clean:
	make -C /lib/modules/$(shell uname -r)/build M=$(PWD) clean
마지막으로 직접 make를 실행해보자
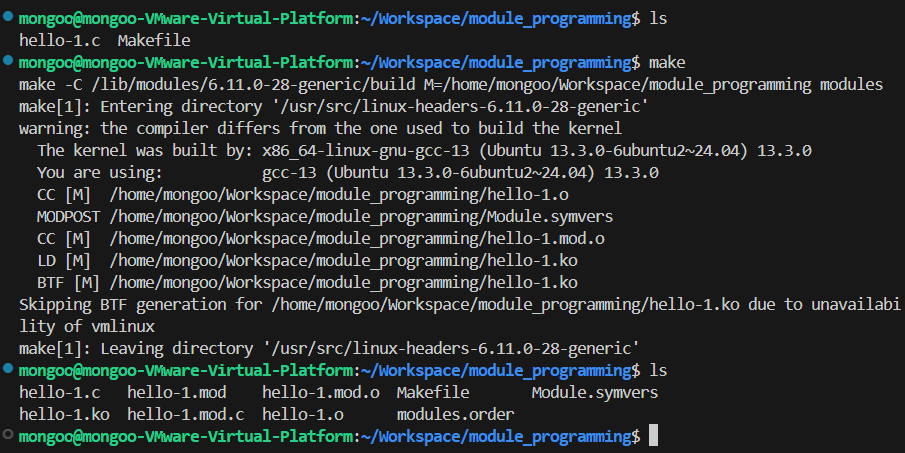
make
모든 작업이 순조롭게 진행되면 hello-1.ko 모듈이 컴파일 된 것을 확인할 수 있다.
hello-1.ko모듈이 있는 것을 확인할 수 있다.
make수행 과정에서 발생한 warning은 무시해도 된다.
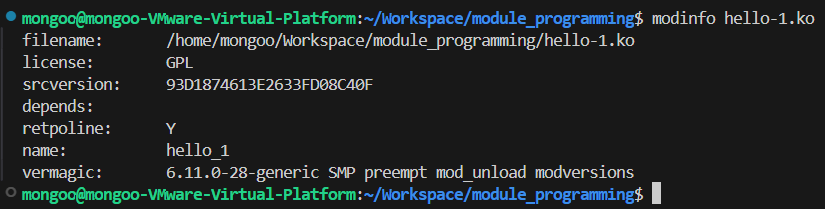
modinfo를 통해 모듈의 정보를 확인할 수 있다.
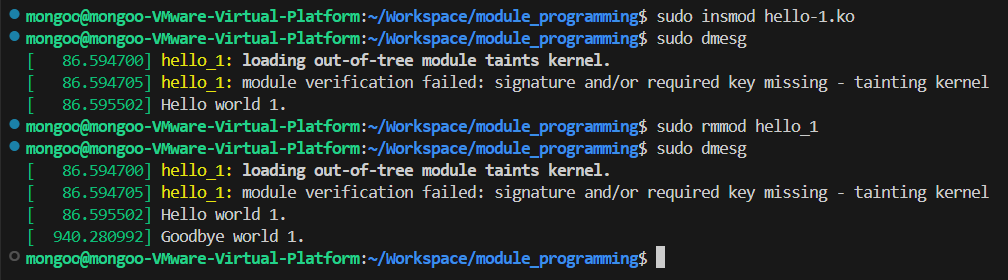
insmod를 통해 방금 만든 모듈을 로드하고, rmmod를 통해 로드한 모듈을 삭제할 수 있다.
sudo insmod hello-1.ko
sudo rmmod hello_1
dmesg 명령어를 통해 커널 로그를 조회할 수 있다.
dmesg -C명령어를 먼저 실행하여 버퍼를 삭제한 후insmod명령어를 실행하면 로그를 편하게 확인할 수 있다.
out-of-tree module: 커널 트리 밖에서 작성된 비공식 모듈이라는 의미이다.taints kernel: 시스템에 문제가 생기면 커널 개발자가 해당 문제를 디버깅하지 않겠다는 면책 표시.module verification failed: signature and/or required key missing: Secure Boot이 적용된 시스템에서 서명 없는 모듈을 로딩하면 경고를 발생한다.위 경고 메시지 모두 무시해도 괜찮다.
Hello world 1.메시지가 출력되었다는 것은 모듈이 정상적으로 로드되었다는 뜻이다.
Goodbye world 1.메시지가 출력되었다는 것은 모듈이 정상적으로 제거되었다는 뜻이다.
초기화 함수, 종료 함수
커널 모듈에는 모듈이 커널에 insmod 될 때 호출되는 init_module()이라는 시작(초기화) 함수와, 커널에서 제거되기 직전에 호출되는 cleanup_module()이라는 종료(정리) 함수가 있어야 한다.
일반적으로 init_module()는 커널에 무언가에 대한 핸들러를 등록하거나, 커널 함수 중 하나를 자체 코드로 대체한다. 따라서 cleanup_module()은 init_module()이 수행한 모든 작업을 되돌려 모듈을 안전하게 언로드할 수 있도록 해야한다.
초기화 함수는 반드시 0을 반환해야 한다. 0이 아닌 반환값은 init_module()이 실패했음을 의미한다.
5. init_module()은 구식이야
초기 커널 버전에서는 위의 예제에서와 같이 init_module 및 cleanup_module 함수를 사용해야 했지만, 요즘에는(사실 꽤 오래전부터) module_init 및 module_exit 매크로를 사용하여 원하는 대로 이름을 지정할 수 있다. 이러한 매크로는 include/linux/module.h에 정의되어 있다.
include/linux/module.h일부/* Each module must use one module_init(). */ #define module_init(initfn) \ static inline initcall_t __maybe_unused __inittest(void) \ { return initfn; } \ int init_module(void) __copy(initfn) \ __attribute__((alias(#initfn))); \ ___ADDRESSABLE(init_module, __initdata); /* This is only required if you want to be unloadable. */ #define module_exit(exitfn) \ static inline exitcall_t __maybe_unused __exittest(void) \ { return exitfn; } \ void cleanup_module(void) __copy(exitfn) \ __attribute__((alias(#exitfn))); \ ___ADDRESSABLE(cleanup_module, __exitdata);
위 매크로 사용에 대한 유일한 요구사항은 매크로를 호출하기 전에 반드시 초기화 및 정리 함수를 정의해야 한다는 것이다.
이 기법을 적용한 커널 모듈 hello-2.c를 작성해보자.
#include <linux/init.h>     /* Needed for the macros */
#include <linux/module.h>   /* Needed by all modules */
#include <linux/printk.h>   /* Needed for pr_info() */

static int __init hello_2_init(void)
{
    pr_info("Hello, world 2\n");
    return 0;
}

static void __exit hello_2_exit(void)
{
    pr_info("Goodbye, world 2\n");
}

module_init(hello_2_init);
module_exit(hello_2_exit);

MODULE_LICENSE("GPL");Makefile을 다음과 같이 수정하면 간단하게 모듈을 추가할 수 있다.
obj-m += hello-1.o
obj-m += hello-2.o

PWD := $(CURDIR)

all:
	make -C /lib/modules/$(shell uname -r)/build M=$(PWD) modules

clean:
	make -C /lib/modules/$(shell uname -r)/build M=$(PWD) clean
make 명령어 실행 후에 hello-2.ko 모듈을 추가 및 제거하고 커널 로그를 확인해보자.

모듈이 정상적으로 추가되고 삭제되었다는 것을 알 수 있다.
__init, __exit 매크로
초기화 함수를 정의할 때 __init 매크로를 사용하는 것을 볼 수 있다.
__init 매크로는 초기화 함수를 부팅 과정 중에만 커널 메모리에 유지하도록 표시하는 역할을 한다. 커널 부팅이 끝나면 해당 함수 메모리를 자동으로 해제하여 낭비를 줄인다.
커널 내장 모듈에만 적용되고 로드 가능한 모듈(.ko)에는 이 최적화가 적용되지 않는다.
__init과 유사하게 작동하지만 초기 변수에 대해 작동하는 __initdata 매크로도 있다.
__exit 매크로는 커널 내장 모듈인 경우 정리 함수가 컴파일조차 안 되게 하는 역할을 한다. 이를 통해 메모리를 절약한다.
이 또한 로드 가능한 모듈에 대해서는 적용되지 않는다. (해당 모듈이 rmmod 될 수 있으므로)
include/linux/init.h일부#define __init __section(".init.text") __cold __latent_entropy __noinitretpoline #define __initdata __section(".init.data") #define __exit __section(".exit.text") __exitused __cold notrace커널 내장 모듈인 경우:
__init매크로가 적용된 함수는.init.text섹션으로 이동__initdata매크로가 적용된 변수는.init.data섹션으로 이동__exit매크로가 적용된 함수는.exit.text섹션으로 이동위 섹션들은 커널 초기화 과정 이후 메모리에서 해제되는 영역이다.
6. 모듈에 Command Line Argument 전달하기
모듈도 일반적인 프로그램처럼 command line argument를 받을 수 있다. 하지만 우리에게 익숙한 argc/argv는 사용할 수 없다.
Argument를 모듈에 전달하려면 argument 값을 받아올 변수를 전역으로 선언한 다음 module_param() 매크로를 사용해야 한다.
그리고 모듈을 추가할 때 insmod mymodule.ko myvariable=5와 같은 명령어 형식으로 변수를 채우면 된다.
변수 선언과 매크로는 명확성을 위해 모듈의 시작 부분에 배치하는 것이 좋다.
module_param() 매크로에는 변수 이름, 변수 타입, sysfs에 대한 권한를 전달해야 한다.
정수 또는 문자열 배열을 사용하려면 module_param_array() 및 module_param_string() 매크로를 이용하면 된다.
include/linux/moduleparam.h일부#define module_param(name, type, perm) \ module_param_named(name, name, type, perm) #define module_param_array(name, type, nump, perm) \ module_param_array_named(name, name, type, nump, perm) #define module_param_string(name, string, len, perm) \ static const struct kparam_string __param_string_##name \ = { len, string }; \ __module_param_call(MODULE_PARAM_PREFIX, name, \ ¶m_ops_string, \ .str = &__param_string_##name, perm, -1, 0);\ __MODULE_PARM_TYPE(name, "string")배열 요소 개수를 추적하고 싶은 경우 카운트 변수에 대한 포인터를 nump 매개변수로 전달해야 한다. 원하는 경우 카운트를 무시하고 대신
NULL을 전달할 수도 있다.
모듈에 전달하려는 변수는 항상 기본값을 설정하는 것이 좋다.
- 쓰레기값을 전달하여 시스템 오류가 발생할 수 있다.
- 포트, I/O 주소 등을 자동감지 하는 것에 대해 실패할 가능성
- 그 자체로 문서화 역할
이제 Command Line Argument를 적용한 모듈 hello-3.c를 작성해보자.
#include <linux/init.h>
#include <linux/kernel.h>
#include <linux/module.h>
#include <linux/moduleparam.h>
#include <linux/printk.h>
#include <linux/stat.h>

static short int myshort = 1;
static int myint = 420;
static long int mylong = 9999;
static char *mystring = "blah";
static int myintarray[2] = { 420, 420 };
static int arr_argc = 0;

module_param(myshort, short, S_IRUSR | S_IWUSR | S_IRGRP | S_IWGRP);
MODULE_PARM_DESC(myshort, "A short integer");
module_param(myint, int, S_IRUSR | S_IWUSR | S_IRGRP | S_IWGRP);
MODULE_PARM_DESC(myint, "An integer");
module_param(mylong, long, S_IRUSR);
MODULE_PARM_DESC(mylong, "A long integer");
module_param(mystring, charp, 0000);
MODULE_PARM_DESC(mystring, "A character string");
module_param_array(myintarray, int, &arr_argc, 0000);
MODULE_PARM_DESC(myintarray, "An array of integers");

static int __init hello_3_init(void)
{
    int i;

    pr_info("Hello, world 3\n============\n");
    pr_info("myshort is a short integer: %hd\n", myshort);
    pr_info("myint is an integer: %d\n", myint);
    pr_info("mylong is a long integer: %ld\n", mylong);
    pr_info("mystring is a string: %s\n", mystring);

    for (i = 0; i < ARRAY_SIZE(myintarray); i++)
        pr_info("myintarray[%d] = %d\n", i, myintarray[i]);

    pr_info("got %d arguments for myintarray.\n", arr_argc);

    return 0;
}

static void __exit hello_3_exit(void)
{
    pr_info("Goodbye, world 3\n");
}

module_init(hello_3_init);
module_exit(hello_3_exit);

MODULE_LICENSE("GPL");
make 이후 다음과 같이 argument를 설정하면서 모듈을 추가할 수 있다.
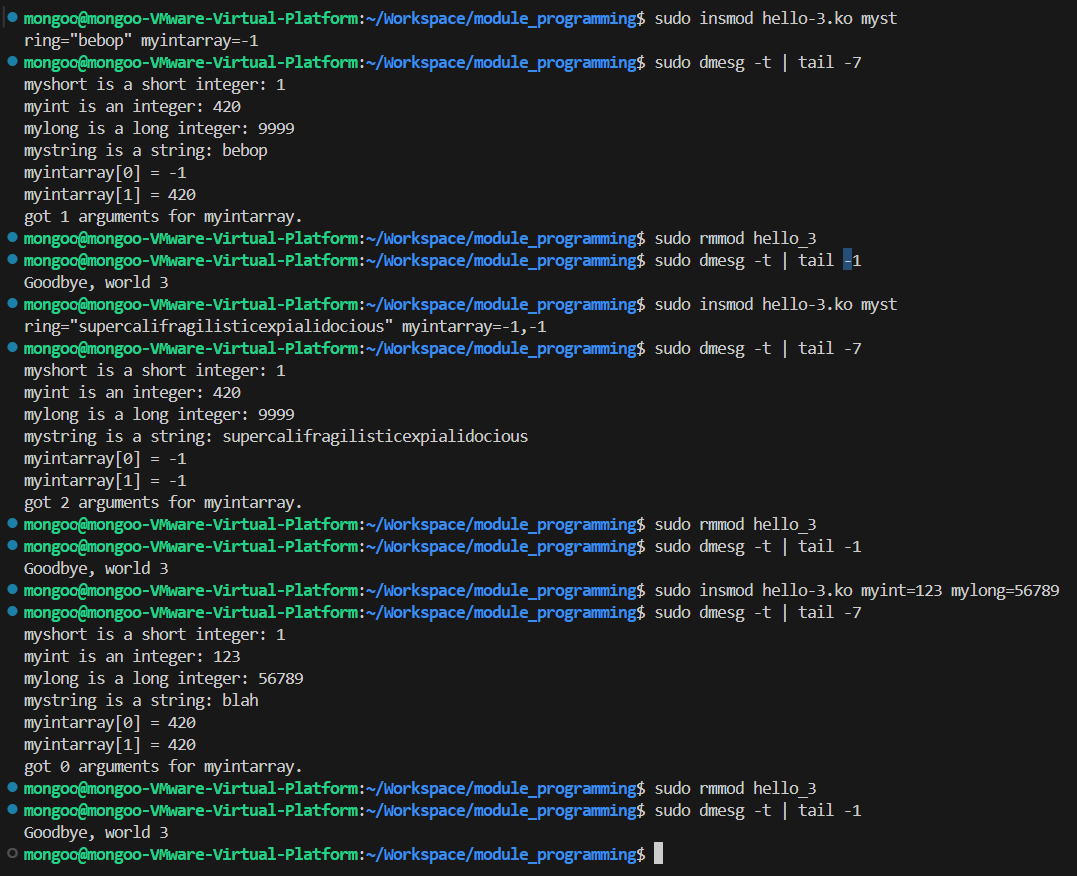
끝.