1. 개요
이번 프로젝트에서 보안을 담당하며 Spring Security와 JWT를 연동하여 인증 시스템을 구축하였다. 단순히 코드를 복사하는 것이 아니라, 전체적인 데이터 흐름(Request ~ Response)을 파악하기 위해 구조도를 정리해 보았다.
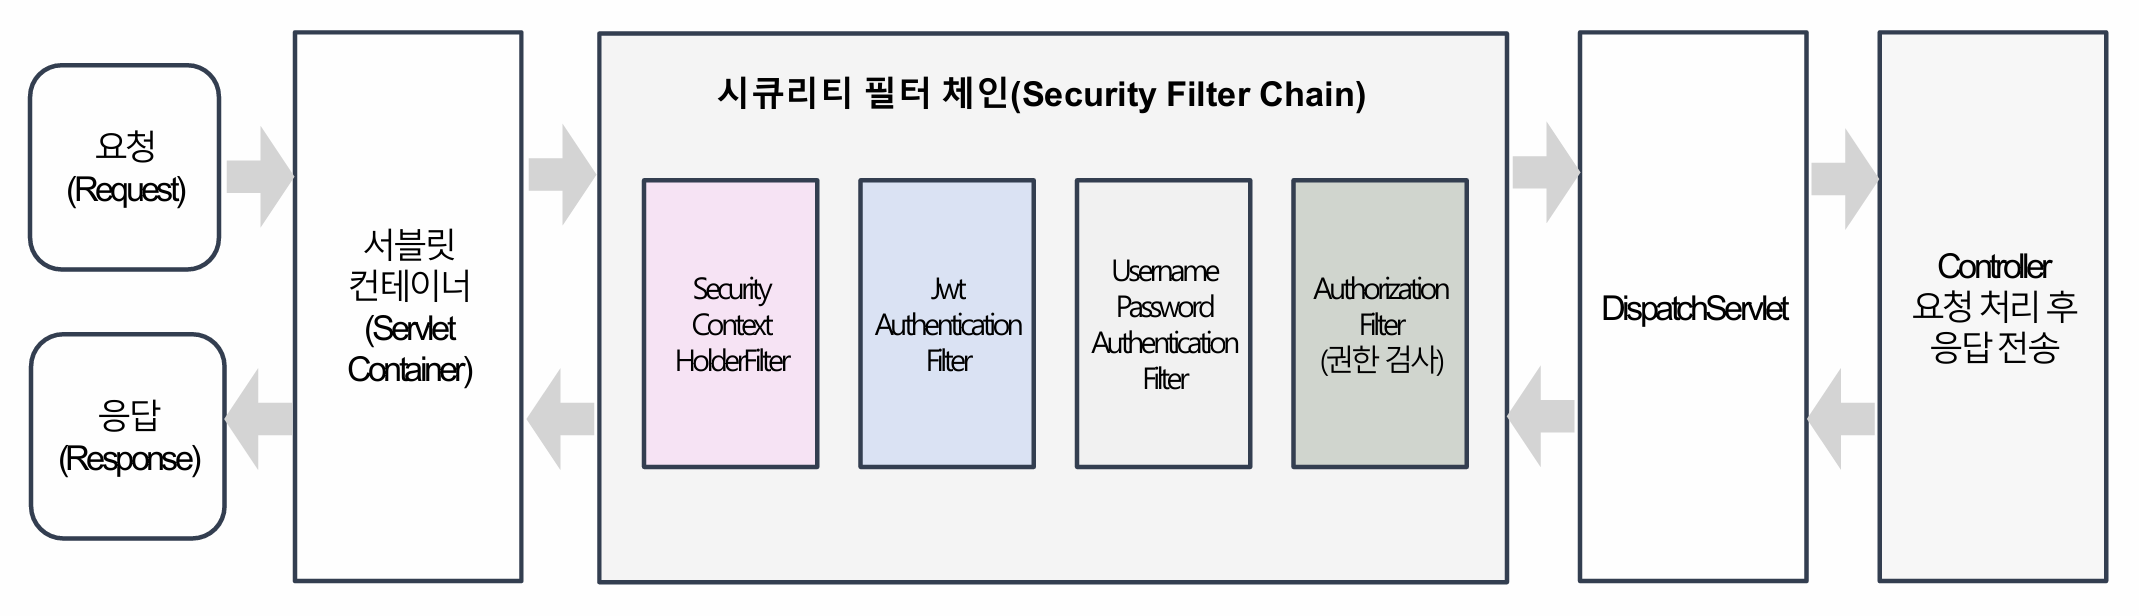
2. Spring Security Filter Chain 구조
Spring Security는 기본적으로 필터(Filter) 기반으로 동작함. 사용자 요청이 Controller에 도달하기 전, Servlet Container와 DispatcherServlet 사이에서 보안 검사를 수행함.
핵심 필터 설명
-
JwtAuthenticationFilter (커스텀 필터):
- HTTP Header에서 JWT 토큰을 추출하고 유효성을 검증함.
- 검증이 완료되면 Authentication 객체를 생성하여 사용자가 '인증된 사용자'임을 증명함.
-
SecurityContextHolder:
- 인증된 사용자의 상세 정보를 저장하는 저장소. 이후 로직에서 "현재 로그인한 유저"를 식별할 때 사용됨.
-
AuthorizationFilter (권한 검사):
- 인증된 사용자가 해당 리소스(API)에 접근할 수 있는 권한(ROLE_USER, ROLE_ADMIN 등)이 있는지 최종 확인.
3. 인증 프로세스 (Flow)
- Request: 클라이언트가 Header에 토큰을 담아 요청 전송.
- Filter: JwtAuthenticationFilter에서 토큰 위변조 확인 및 만료 시간 체크.
- Authentication: 유효한 토큰일 경우 '출입증(Authentication)' 발급 후 ContextHolder에 저장.
- Authorization: 요청한 API에 대한 접근 권한 확인.
- DispatchServlet: 모든 관문을 통과하면 실제 컨트롤러로 요청 전달.
4. 핵심 코드 리뷰
@Component
@RequiredArgsConstructor
public class JwtAuthenticationFilter extends OncePerRequestFilter {

    private final JwtUtil jwtUtil;
    private final ObjectMapper objectMapper;

    @Override
    protected boolean shouldNotFilter(HttpServletRequest request) {
        String path = request.getRequestURI();
        return path.equals("/admin/login") || path.equals("/admin/signup");
    }

    @Override
    protected void doFilterInternal(HttpServletRequest request,
                                    HttpServletResponse response,
                                    FilterChain filterChain)
            throws ServletException, IOException {

        String authHeader = request.getHeader("Authorization");

        // 토큰 없으면 401 (인증 에러 발생)
        // 공통된 에러 응답 메세지 출력을 위해 별도로 구현
        if (authHeader == null || !authHeader.startsWith("Bearer ")) {
            writeUnauthorized(request, response, AuthErrorCode.TOKEN_MISSING);
            return;
        }
        String token = authHeader.substring(7);

        try {
            // 토큰 서명검증, 유효기간 검증 성공 시 try문 실행, 실패시 catch문에서 예외 처리
            jwtUtil.validateOrThrow(token);

            // 검증이 끝난 토큰으로 authentication 새로 생성
            // JWT - 신분증, Authentication - 출입증, 매번 요청시 출입증 발급
            Authentication authentication = jwtUtil.getAuthenticationFromToken(token);
            SecurityContextHolder.getContext().setAuthentication(authentication);

            filterChain.doFilter(request, response);

        } catch (UnauthorizedException e) {
            writeUnauthorized(request, response, e.getAuthErrorCode());

        } catch (Exception e) {
            writeUnauthorized(request, response, AuthErrorCode.TOKEN_INVALID);

        }
    }
5. 마무리
- Spring Security와 JWT에 대해서 조금은 이해를 할 수 있었다. Security가 단순히 막는것이 아닌 출입증을 가진 유저를 안내하는 가이드라는 것을 알게 되었다.
- 아래 그림과 같이 작동 구조를 그림으로 작성해서 보니 이해에 도움이 많이 되었다.

개발공부 처음해보는 사람