4-6 반복문 사용하기 (별찍기 숙제)
	// 별찍기 1 ~ 5
        let n = 1
        while(n <= 5){
            console.log('*'.repeat(n));
            n ++
        }
        // 별찍기 5 ~ 1
        let n = 0
        while(n <= 5){
            console.log('*'.repeat(5 - n));
            n --
        }
        // 공백포함 별찍기
        let n = 1
        while(n <= 5){
            console.log(' '.repeat(5 - n) + '*'.repeat(n))
            n++
        }
4-7 별찍기 숙제 정답
        // 별찍기 13531
        let n = 4
        while(n >= -4){
            console.log('*'.repeat(5 - Math.abs(n)))
            n -= 2
        }

        // 별찍기 다이아몬드
        let n = 4
        while(n >= -4){
            console.log(' '.repeat(Math.abs(n)/2) + '*'.repeat(5 - Math.abs(n)))
            n -= 2
        }
4-8 중복없이 뽑기
배열의 다양한 메서드 알아보기
1) 요소 추가, 제거 메서드 : 배열의 맨 앞이나 끝에 메서드를 추거하거나 제거하는 메서드이다.
- arr.push(items) : 배열의 맨 끝에 요소 추가
- arr.pop(items) : 배열의 맨 끝 요소 제거
- arr.shift(items) : 배열의 맨 앞 요소 제거
- arr.unshift(items) : 배열의 맨 앞에 요소 추가
2) 요소를 자유자재로 다룰 수 있는 메서드
-
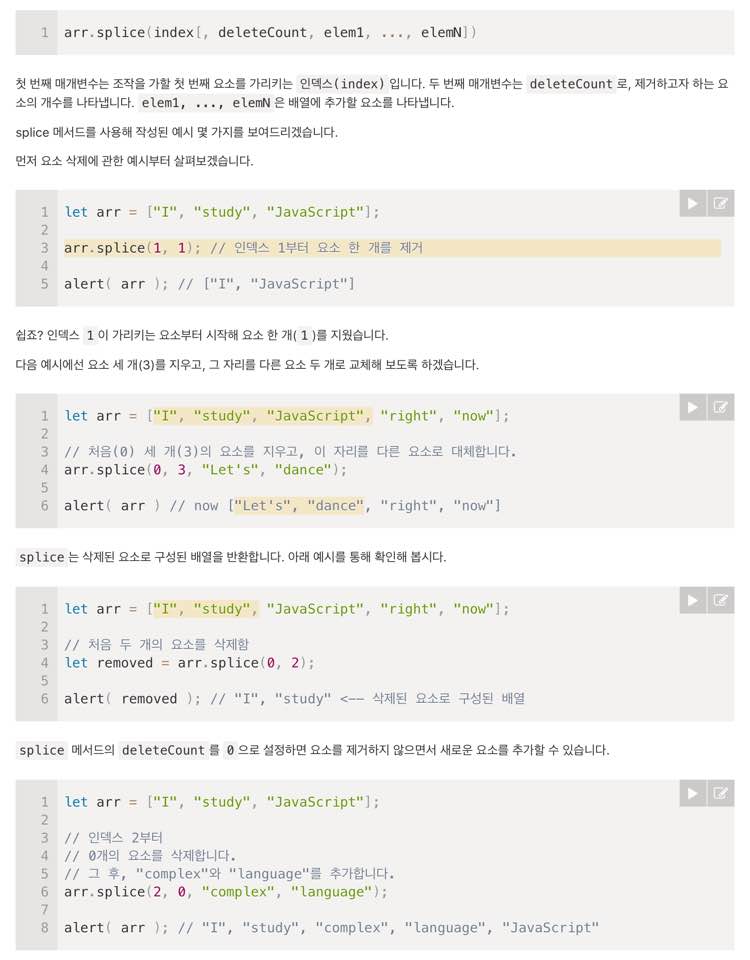
arr.splice() : 배열에 요소 추가,삭제,교체가 모두 가능한 메서드이다.
-
arr.splice(indexNumber, deleteCount) : arr의 indexNumber에서부터 deleteCount 숫자만큼의 요소를 지운다. 또한, 변수에 splice를 담아 삭제된 값을 반환 할 수 있다.
-
arr.splice(0, 2, element1, element2) : arr의 0번 index에서부터 요소 2개를 지우고 그 자리에 element1, element2로 교체한다.
-
arr.splice(2, 0, element1, element2) : arr의 2번 index에서부터 0개의 요소를 지운 후 element1, element2를 추가한다. // splice 메서드에 deleteCount를 0으로 설정하면 요소를 제거하지 않으면서 새로운 요소를 추가할 수 있다.
-
- 숫자야구에 활용
        while(n <= 3){
            const index = Math.floor(Math.random() * (10 - n))
            answer.push(numbers[index])
            numbers.splice(index,1)
            n += 1
        }
4-9 for문과 배열 비교
자바스크립트의 대표적인 반복문 : for, while
- for문은 반복 횟수를 정할 수 있기 때문에 반복되는 횟수가 정해져있을 때 주로 사용하고, while은 반복되는 횟수가 조건으로 정해지기 때문에 둘의 사용법이 조금 다르다.
1) for문 사용하기
- for문 구성 : for(시작; 조건; 끝){내용} === for ([initialization]; [condition]; [final-expression])
// example 1)
// n이 10보다 작거나 같을 때 까지 n에 1씩 더하고 콘솔에 출력한다.

for(let n = 1; n <= 10; n++){
    console.log(n) // 1,2,3,4,5,6,7,8,9,10
}
2) while문 사용하기
- while문 구성 : while(조건){내용}
// example 2)
// i가 10보다 작거나 같을 때 까지 i에 1씩 더하고 콘솔에 출력한다.

let i = 0
while(i <= 10){
  console.log(i) // 0,1,2,3,4,5,6,7,8,9,10
  i++
}- 만일 while문이 실행되는 중간에 탈출을 하고 싶다면 조건문을 써준후 break를 넣어 탈출할 수 있다.
//example 3)
// n이 10보다 작거나 같을 때 까지 n에 1씩 더한 후 콘솔에 출력한다.
// 단, n이 5보다 같거나 크다면 **탈출한다**
let n = 0;
while (n <= 10) {
  if (n >= 5) {
    break;
  }
  console.log(n); // 0,1,2,3,4
  n++;
}- break와 비슷하게 continue도 사용된다. continue는 continue가 사용된 조건문을 제외하고 반복문을 실행한다.
//example 3)
// n이 10보다 작거나 같을 때 까지 n에 1씩 더한 후 콘솔에 출력한다.
// 단, n이 5보다 같거나 크다면 **탈출한다**

let n = 0;
while (n <= 10) {
  n++;
  if (n % 2 === 0) {
    // n%2 === 0 : 2로 나눈 나머지가 0인 수, 즉 2의 배수이자 짝수 인 수를 제외하고 출력한다.
    continue;
  }
  console.log(n);
}
3) 배열 비교하기
- 배열은 객체기 때문에 배열을 === 으로 비교하면 false가 나올 수 있다. 배열의 값을 하나씩 가져와서 비교해야한다.
4-10 스트라이크, 볼 세기
- for문의 또다른 사용법 : forEach / for of(배열 순환) / for in(객체 순환)
- forEach() 문은 주어진 함수를 배열 요소 각각에 대해 실행하는 메서드로 배열의 요소들을 반복해서 작업을 수행할 수 있다. 때문에 Array 개체에서만 사용가능하다. (ES6 부터는 Map, Set도 지원)
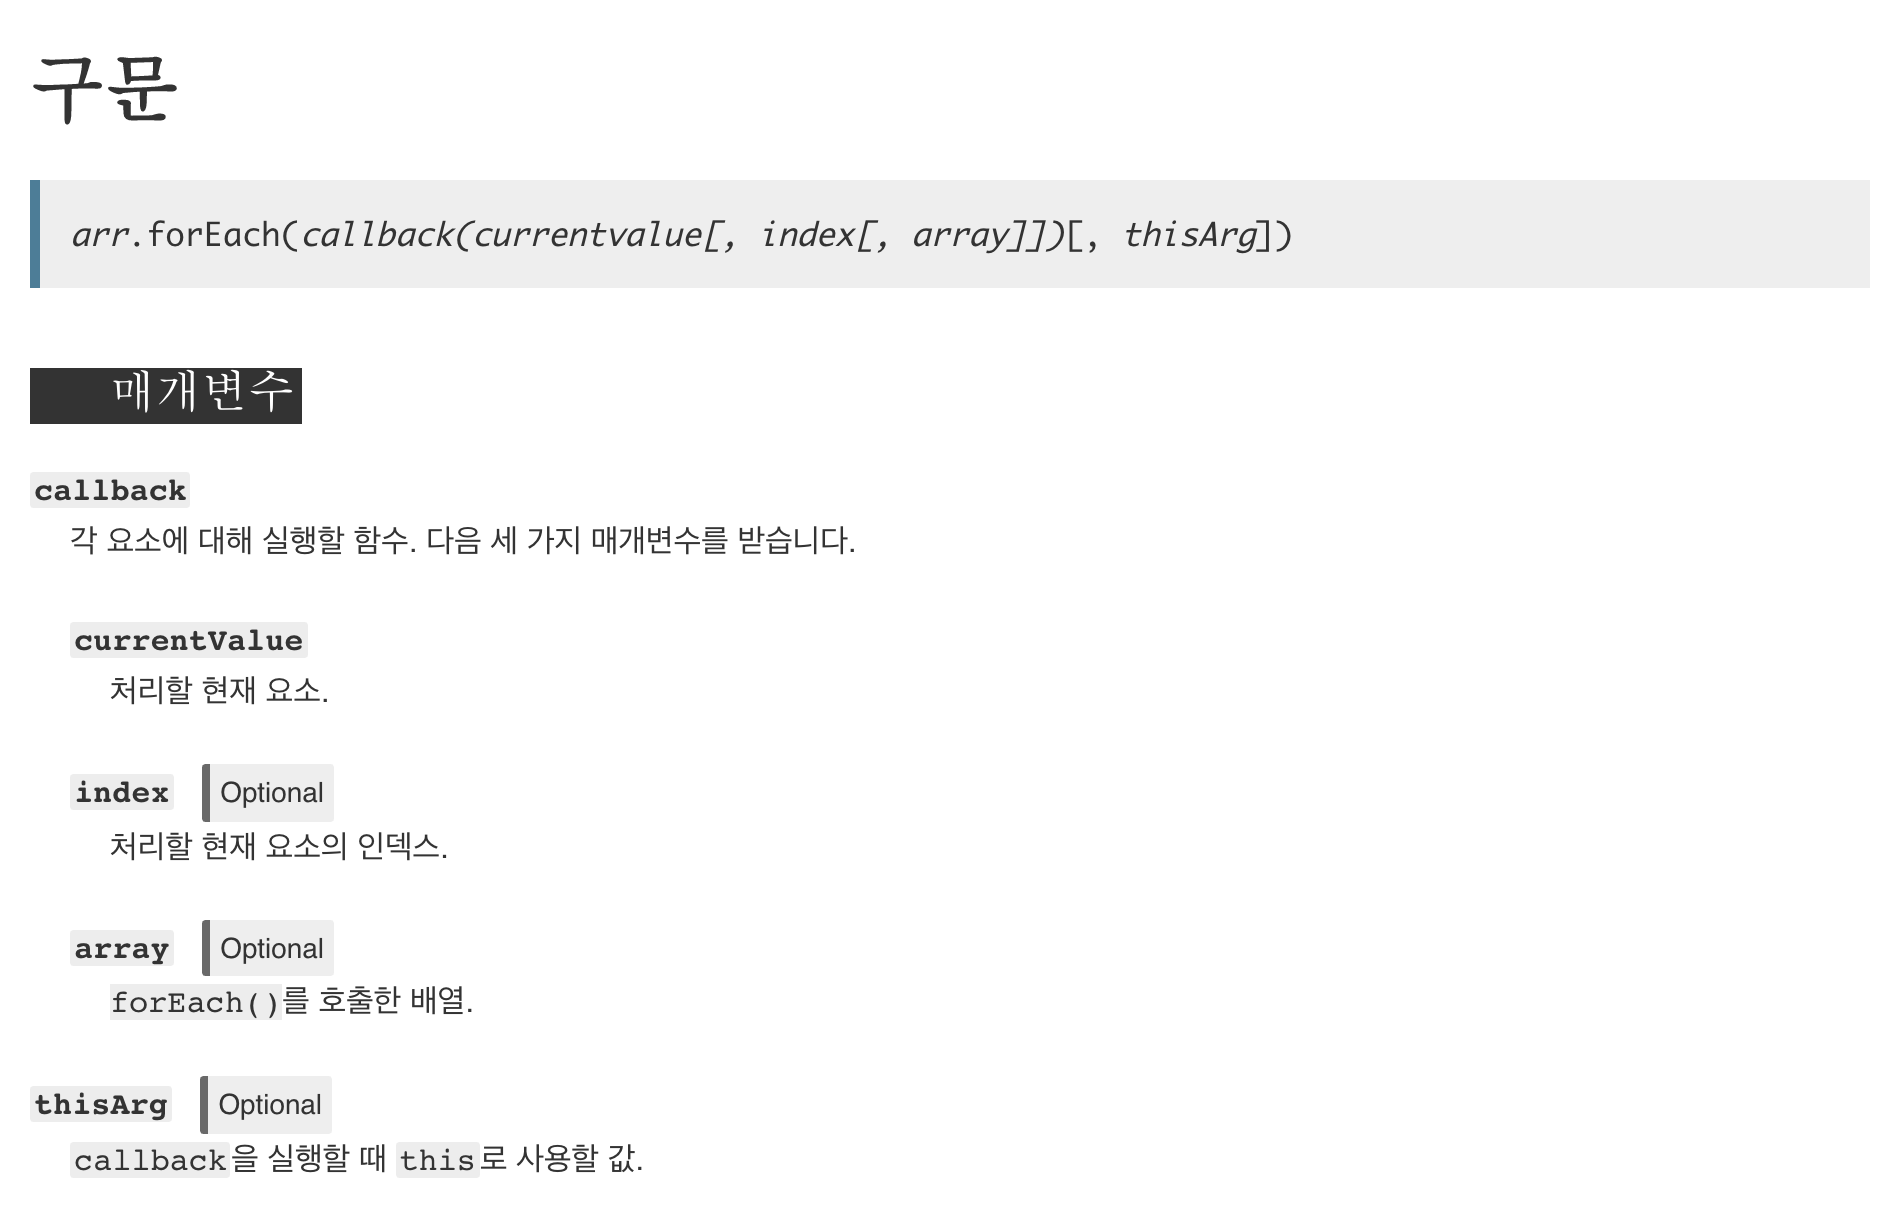
- forEach() 문은 주어진 함수를 배열 요소 각각에 대해 실행하는 메서드로 배열의 요소들을 반복해서 작업을 수행할 수 있다. 때문에 Array 개체에서만 사용가능하다. (ES6 부터는 Map, Set도 지원)
// example 1)
// arr.forEach(callback(currentvalue[, index[, array]])[, thisArg])
//currentvalue === element //index === index // array === array
const arr = ['가', '나', '다', '라'];
arr.forEach(function(element, index, array){
    console.log(`${array}의 ${index}번째 요소 : ${element}`);
});
/*
가,나,다,라의 0번째 요소 : 가
가,나,다,라의 1번째 요소 : 나
가,나,다,라의 2번째 요소 : 다
가,나,다,라의 3번째 요소 : 라
*/

// example 2)
// 숏코드
// 배열의 첫번째부터 마지막까지 반복하며 출력가능

array = ['엄마','아빠', '오빠']
array.forEach(family => console.log(family))
array.forEach(function(family){
    template = `내가 사랑하는 ${family}`
    console.log(template)
})- for...of 명령문은 반복가능한 객체 (Array, Map, Set, String, TypedArray, arguments 객체 등을 포함)에 대해서 반복하고 각 개별 속성값에 대해 실행되는 문이 있는 사용자 정의 반복 후크를 호출하는 루프를 생성한다. // for of를 사용하기 위해선 컬렉션 객체가 [Symbor.iterator] 속성을 가지고 있어야한다.
const arr = [1, 2, 3];
for (const item of arr) {
  console.log(item); // 1, 2, 3
}- for...in 문은 상속된 열거 가능한 속성들, 객체에서 문자열로 키가 지정된 모든 열거 가능한 속성에 대해 반복한다. (Symbol로 키가 지정된 속성은 무시)
// example 1)
// for of 와 똑같은 코드를 적용했을 때 객체에 해당하는 key값이 출력된다. 배열로 따지면 index가 출력된다.

const arr = [1, 2, 3];
for (const item in arr) {
  console.log(item); // 0, 1, 2
}


// example 2)
// 객체를 탐색할 경우

const obj = {
    a: 1,
    b: 2,
    c: 3
  };

for (const item in obj) {
    console.log(item) // a, b, c
    console.log(obj[item]) // 1,2,3

    answer = obj[item]
    console.log(`${item} : ${answer}`) // a:1, b:1, c:3
}
- Object.entries() : 객체가 가지고 있는 모든 프로퍼티를 키와 값 쌍을 배열 형태로 반환한다.
// example 1)
test = {
    a: 1,
    b: 2,
    c: 3
};

console.log(Object.entries(test))
// [ [ 'a', 1 ], [ 'b', 2 ], [ 'c', 3 ] ]

//example 2)
const object1 = {
    a: 'somestring',
    b: 42
  };

for (const [key, value] of Object.entries(object1)) {
    console.log(`${key}: ${value}`);
}- Array.entries() : 메서드는 배열에 사용하는 반복자(interator)로 실행 시 키(key)와 밸류(value)를 얻을 수 있다.
test = [1,2,3,4]

for(const[index,element] of test.entries()){
  console.log(index,element);
}
/*
0 1
1 2
2 3
3 4
*/
4-11 템플릿 문자열 (백틱)
- Template literal(템플릿 문자열) : 문자열을 만들 때 따옴표 대신 백틱(`)을 사용해서 변수는 ${}로 감싸주고 +없이 문자열을 넣어 간편히 사용할 수 있다.
        logs.appendChild(document.createTextNode(strike + 'strike' + ball + 'ball'))
        logs.appendChild(document.createTextNode(`${strike} strike ${ball} ball`))
4-12 appendChild와 Q&A
- append / appendChild
- .textcontent : 기존글자를 싹 다 지우고 새로운 글자 삽입 / appendChild.creatTextnode : 기존글자 놔두고 추가하는것
- array() fill() map()
완성된 코드
<script>
    const input = document.querySelector('#input');
    const check = document.querySelector('#check');
    const logs = document.querySelector('#logs');

    // map이 나오면 함수형 프로그램
    // let numbers = Array(10).fill().map(v,i => i)
    let numbers = []
    for(let n = 0; n <= 9; n++){
        numbers.push(n)
    }
    let answer = []
    let n = 0
    for(let n = 0; n <= 3; n += 1){
        const index = Math.floor(Math.random() * numbers.length)
        answer.push(numbers[index])
        numbers.splice(index,1)
    }
    console.log(answer)

    let count = 0;
    check.addEventListener('click', () => {
        const value = input.value
        if(value && value.length === 4){
            if(answer.join('') === value){
                logs.append(document.createTextNode('HR'))
                input.value = ''
                input.focus()
            }else{
                let strike = 0
                let ball = 0
                for(const [aIndex, aNumber] of answer.entries()){
                    for(const [iIndex, iString] of input.value.split('').entries()){
                        if(aNumber === Number(iString)){
                            if(aIndex === iIndex){
                                strike += 1
                            }else{
                                ball += 1
                            }
                        }
                    }
                }
                logs.append(`${input.value}: ${strike} strike ${ball} ball`, document.createElement('br'))
                input.value = ''
                input.focus()
                if(count > 10){
                    logs.append(`Game Over: ${answer.join('')}`)
                    input.value = ''
                    input.focus()
                }else{
                    count++
                }
            }
        }else{
            logs.append('에러 : 4개의 숫자를 작성해주세요.', document.createElement('br'))
            input.value = ''
            input.focus()
        }
    });
</script>
출처:
1) https://www.zerocho.com/category/JavaScript/post/57341f84420974fa1f92a761
2) https://developer.mozilla.org/ko/docs/Web/JavaScript/Reference/Global_Objects/Array/join
