파이썬의 기초와 pymongo를 활용한 mongoDB사용, 그리고 BeautifulSoup을 사용한 웹스크래핑의 기초를 배웠다.
Javascript 복습
로딩후 바로실행
$(document).ready(function(){
listing();
});
function listing() {
console.log('화면 로딩 후 잘 실행되었습니다');
}
출력하기
for 사용한 반복문
$.ajax({
type: "GET",
url: "http://spartacodingclub.shop/post",
data: {},
success: function(response){
let articles = response['articles'];
for (let i = 0; i < articles.length; i++) {
let article = articles[i];
console.log(article);
}
}
})
먼저 있던 것들 지우기
empty() 사용
$(document).ready(function () {
$('#cards-box').empty();
listing();
});
Python 기초
print('Hello, world')
파이썬 기초 문법
1.변수 & 기본연산
a = 3 // 3을 a에 넣는다
b = a // a를 b에 넣는다
a = a + 1 // a+1을 다시 a에 넣는다
num1 = a*b // a*b의 값을 num1이라는 변수에 넣는다
num2 = 99 // 99의 값을 num2이라는 변수에 넣는다
2.자료형
-
숫자, 문장형
name = 'bob' # 변수에는 문자열이 들어갈 수도 있고,
num = 12 # 숫자가 들어갈 수도 있고,
is_number = True # True 또는 False -> "Boolean"형이 들어갈 수도 있습니다. -
리스트형
a_list = []
a_list.append(1) # 리스트에 값을 넣는다
a_list.append([2,3]) # 리스트에 [2,3]이라는 리스트를 다시 넣는다
a_list의 값은? [1,[2,3]]
a_list[0]의 값은? 1
a_list[1]의 값은? [2,3]
a_list[1][0]의 값은? 2 -
Dictionary형
a_dict = {}
a_dict = {'name':'bob','age':21}
a_dict['height'] = 178
a_dict의 값은? {'name':'bob','age':21, 'height':178}
a_dict['name']의 값은? 'bob'
a_dict['age']의 값은? 21
a_dict['height']의 값은? 178 -
딕셔너리 + 리스트
people = [{'name':'bob','age':20},{'name':'carry','age':38}]
people[0]['name']의 값은? 'bob'
people[1]['name']의 값은? 'carry'
person = {'name':'john','age':7}
people.append(person)
people의 값은? [{'name':'bob','age':20},{'name':'carry','age':38},{'name':'john','age':7}]
people[2]['name']의 값은? 'john'
3. 함수
-
함수의 정의
f(x) = 2*x+3 y = f(2) y의 값은? 7 자바스크립트에서는 function f(x) { return 2*x+3 } 파이썬에서 def f(x): return 2*x+3 y = f(2) y의 값은? 7 -
함수의 응용
def sum_all(a,b,c):
return a+b+c
def mul(a,b):
return a*b
result = sum_all(1,2,3) + mul(10,10) = 106
4. 조건문
if/else
def oddeven(num):
	if num % 2 == 0:
		return True
	else:
		return False
result = oddeven(20) = True
5. 반복문
"파이썬에서의 반복문은, 리스트의 요소들을 하나씩 꺼내쓰는 형태입니다."
fruits = ['사과','배','감','귤']
for fruit in fruits:
	print(fruit)
fruits = ['사과','배','배','감','수박','귤','딸기','사과','배','수박']
count = 0
for fruit in fruits:
	if fruit == '사과':
		count += 1
print(count)
사과의 갯수를 세어 줌
def count_fruits(target):
	count = 0
	for fruit in fruits:
		if fruit == target:
			count += 1
	return count
subak_count = count_fruits('수박')
print(subak_count)
수박의 갯수
gam_count = count_fruits('감')
print(gam_count)
감의 갯수
people = [{'name': 'bob', 'age': 20},
{'name': 'carry', 'age': 38},
{'name': 'john', 'age': 7},
{'name': 'smith', 'age': 17},
{'name': 'ben', 'age': 27}]
 모든 사람의 이름과 나이를 출력해봅시다.
for person in people:
	print(person['name'], person['age'])
 이번엔, 반복문과 조건문을 응용한 함수를 만들어봅시다.
 이름을 받으면, age를 리턴해주는 함수
def get_age(myname):
	for person in people:
		if person['name'] == myname:
			return person['age']
	return '해당하는 이름이 없습니다'
print(get_age('bob'))
print(get_age('kay'))
파이썬 패키지 설치
패키지? 라이브러리?
Python 에서 패키지는 모듈(일종의 기능들 묶음)을 모아 놓은 단위입니다. 이런 패키지 의 묶음을 라이브러리 라고 볼 수 있습니다. 지금 여기서는 외부 라이브러리를 사용하기 위해서 패키지를 설치합니다.
즉, 여기서는 패키지 설치 = 외부 라이브러리 설치!
가상 환경(virtual environment) 이란? - 프로젝트별로 패키지들을 담을 공구함
내가 쓴 라이브러리들 (pip)
request : Python에서 HTTP 요청
bs4 : 데이터 스크래핑, 크롤링
pymongo : mongoDB 접근
flask : 서버제공
requests 써보기
import requests
r = requests.get('http://openapi.seoul.go.kr:8088/6d4d776b466c656533356a4b4b5872/json/RealtimeCityAir/1/99')
rjson = r.json()
print(rjson['RealtimeCityAir']['row'][0]['NO2'])
모든 구의 IDEX_MVL 값
import requests
r = requests.get('http://openapi.seoul.go.kr:8088/6d4d776b466c656533356a4b4b5872/json/RealtimeCityAir/1/99')
rjson = r.json()
gus = rjson['RealtimeCityAir']['row']
for gu in gus:
	print(gu['MSRSTE_NM'], gu['IDEX_MVL'])
IDEX_MVL 값이 60 미만인 구
import requests
r = requests.get('http://openapi.seoul.go.kr:8088/6d4d776b466c656533356a4b4b5872/json/RealtimeCityAir/1/99')
rjson = r.json()
gus = rjson['RealtimeCityAir']['row']
for gu in gus:
	if gu['IDEX_MVL'] < 60:
		print (gu['MSRSTE_NM'], gu['IDEX_MVL'])
웹스크래핑(크롤링) 기초
requests, bs4 설치 필수
네이버 영화 크롤링 해보기
크롤링 기본 세팅
import requests
from bs4 import BeautifulSoup
headers = {'User-Agent' : 'Mozilla/5.0 (Windows NT 10.0; Win64; x64)AppleWebKit/537.36 (KHTML, like Gecko) Chrome/73.
0.3683.86 Safari/537.36'}
data = requests.get('https://movie.naver.com/movie/sdb/rank/rmovie.nhn?sel=pnt&date=20200303',headers=headers)
soup = BeautifulSoup(data.text, 'html.parser')
여기에 코딩시작
타겟 URL을 읽어서 HTML를 받아옴
HTML을 BeautifulSoup이라는 라이브러리를 활용해 검색하기 용이한 상태로 만듦
soup이라는 변수에 "파싱 용이해진 html"이 담긴 상태가 됨
이제 코딩을 통해 필요한 부분을 추출하면 된다.
select, select_one 사용법
import requests
from bs4 import BeautifulSoup
headers = {'User-Agent' : 'Mozilla/5.0 (Windows NT 10.0; Win64; x64)AppleWebKit/537.36 (KHTML, like Gecko) Chrome/73.0.3683.86
data = requests.get('https://movie.naver.com/movie/sdb/rank/rmovie.nhn?sel=pnt&date=20200303',headers=headers)
soup = BeautifulSoup(data.text, 'html.parser')
movies = soup.select('#old_content > table > tbody > tr')
for movie in movies:
	a_tag = movie.select_one('td.title > div > a')
	if a_tag is not None:
		print (a_tag.text)
beautifulsoup 내 select에 미리 정의된 다른 방법
선택자를 사용하는 방법 (copy selector)
soup.select('태그명')
soup.select('.클래스명')
soup.select('#아이디명')
soup.select('상위태그명 > 하위태그명 > 하위태그명')
soup.select('상위태그명.클래스명 > 하위태그명.클래스명')
태그와 속성값으로 찾는 방법
soup.select('태그명[속성="값"]')
한 개만 가져오고 싶은 경우
soup.select_one('위와 동일')
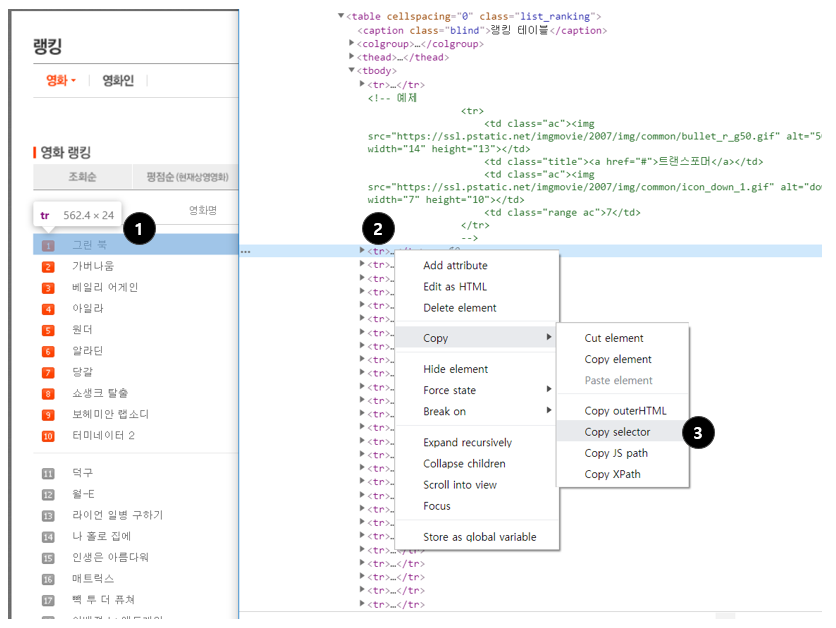
크롬 개발자도구를 참고
- 원하는 부분에서 마우스 오른쪽 클릭 → 검사
- 원하는 태그에서 마우스 오른쪽 클릭
- Copy → Copy selector로 선택자를 복사할 수 있음
웹스크래핑 예시(순위, 제목, 별점)
import requests
from bs4 import BeautifulSoup
headers = {'User-Agent' : 'Mozilla/5.0 (Windows NT 10.0; Win64; x64)AppleWebKit/537.36 (KHTML, like Gecko) Chrome/73.0.3683.86
data = requests.get('https://movie.naver.com/movie/sdb/rank/rmovie.nhn?sel=pnt&date=20200303',headers=headers)
soup = BeautifulSoup(data.text, 'html.parser')
movies = soup.select('#old_content > table > tbody > tr')
for movie in movies:
	a_tag = movie.select_one('td.title > div > a')
	if a_tag is not None:
		rank = movie.select_one('td:nth-child(1) > img')['alt']
		title = a_tag.text
		star = movie.select_one('td.point').text
		print(rank,title,star)
DB
db확인
"DB가 잘 작동하는지 확인합니다. 크롬 창에 localhost:27017을 쳤을 때,
'It looks like you are trying to access MongoDB over HTTP on the native driver port.'
문구가 나오면 mongoDB가 돌아가고 있는 것입니다."
robo 3T 설치
DB개괄
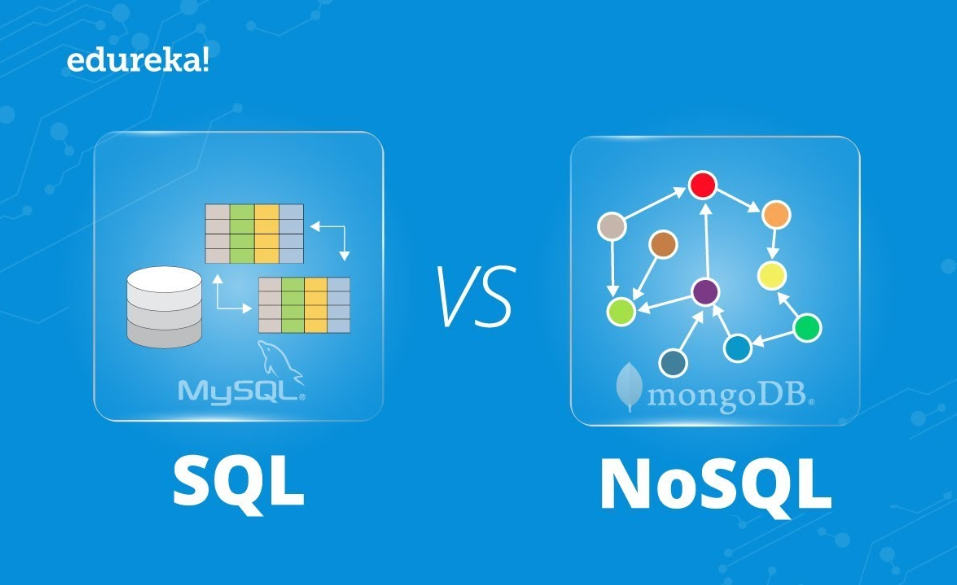
RDBMS(SQL)
행/열의 생김새가 정해진 엑셀에 데이터를 저장하는 것과 유사합니다. 데이터 50만 개가 적재된 상태에서, 갑자기 중간에 열을 하나 더하기는 어려울 것입니다. 그러나, 정형화되어 있는 만큼, 데이터의 일관성이나 / 분석에 용이할 수 있습니다.
ex) MS-SQL, My-SQL 등
No-SQL
딕셔너리 형태로 데이터를 저장해두는 DB입니다. 고로 데이터 하나 하나 마다 같은 값들을 가질 필요가 없게 됩니다. 자유로운 형태의 데이터 적재에 유리한 대신, 일관성이 부족할 수 있습니다.
ex) MongoDB
pymongo로 DB조작하기
mongoDB 라는 프로그램을 조작하려면 라이브러리 pymongo가 필요
pymongo 기본코드
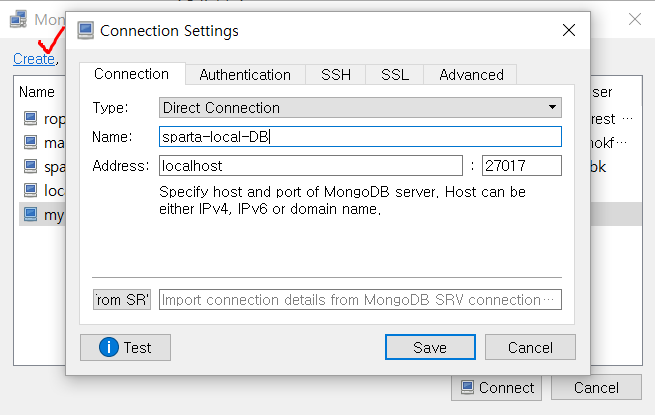
from pymongo import MongoClient
client = MongoClient('localhost', 27017)
db = client.dbsparta
//dbsparta는 저장된 db의 이름
// 코딩 시작
from pymongo import MongoClient
client = MongoClient('localhost', 27017)
db = client.dbsparta
코딩 시작 insert/find/update/delete
저장 - 예시
doc = {'name':'bobby','age':21}
db.users.insert_one(doc)
한 개 찾기 - 예시
user = db.users.find_one({'name':'bobby'})
여러개 찾기 - 예시 ( _id 값은 제외하고 출력)
MongoDB에서 데이터 모두 보기
all_users = list(db.users.find({}))
MongoDB에서 특정 조건의 데이터 모두 보기
same_ages = list(db.users.find({'age':21},{'_id':False}))
바꾸기 - 예시
db.users.update_one({'name':'bobby'},{'$set':{'age':19}})
지우기 - 예시
db.users.delete_one({'name':'bobby'})
웹스크래핑 결과 저장 예시
import requests
from bs4 import BeautifulSoup
from pymongo import MongoClient
client = MongoClient('localhost', 27017)
db = client.dbsparta
headers = {'User-Agent' : 'Mozilla/5.0 (Windows NT 10.0; Win64; x64)AppleWebKit/537.36 (KHTML, like Gecko) Chrome/73.0.3683.86
data = requests.get('https://movie.naver.com/movie/sdb/rank/rmovie.nhn?sel=pnt&date=20200303',headers=headers)
soup = BeautifulSoup(data.text, 'html.parser')
movies = soup.select('#old_content > table > tbody > tr')
for movie in movies:
	a_tag = movie.select_one('td.title > div > a')
	if a_tag is not None:
		rank = movie.select_one('td:nth-child(1) > img')['alt']
		title = a_tag.text
		star = movie.select_one('td.point').text
		doc = {
			'rank' : rank,
			'title' : title,
			'star' : star
		}
		db.movies.insert_one(doc)
웹스크래핑 결과 이용
매트릭스의 점수가져오기
from pymongo import MongoClient
client = MongoClient('localhost', 27017)
db = client.dbsparta
target_movie = db.movies.find_one({'title':'매트릭스'})
print (target_movie['star'])
매트릭스와 평점이 같은 영화제목 불러오기
from pymongo import MongoClient
client = MongoClient('localhost', 27017)
db = client.dbsparta
target_movie = db.movies.find_one({'title':'매트릭스'})
target_star = target_movie['star']
movies = list(db.movies.find({'star':target_star}))
for movie in movies:
	print(movie['title'])
매트릭스 점수 바꾸기
from pymongo import MongoClient
client = MongoClient('localhost', 27017)
db = client.dbsparta
db.movies.update_one({'title':'매트릭스'},{'$set':{'star':'0'}})