Vue란?
Vue.js는 사용자 인터페이스를 만들기 위한 동적 JavaScript 프레임워크 입니다. 이 시스템은 가파른 학습 곡선으로 잘 알려져 있습니다. 그러나 HTML, CSS 및 JavaScript에 대한 기본적인 이해만으로 Vue.js에서 웹 앱 구성을 시작할 수 있는 액세스 가능하고 간단한 프레임워크입니다.
대부분의 빌드 도구는 Vue 프로젝트에서 Single File Component (SFC)로 화면의 특정 영역에 대한 HTML, CSS, JS 코드를 한 파일에서 관리하는 방법을 사용하여 Vue 구성 요소를 작성합니다 .
<template>
  <button @click="count++">Count is: {{ count }}</button>
</template>

<script>
export default {
  data() {
    return {
      count: 0
    }
  }
}
</script>

<style scoped>
button {
  font-weight: bold;
}
</style>
Options API vs Composition API
Vue 구성 요소는 두 가지 다른 API 스타일인 Options API 및 Composition API 로 구분될 수 있습니다.
Options API
<script>
export default {
  // Properties returned from data() become reactive state
  // and will be exposed on `this`.
  data() {
    return {
      count: 0
    }
  },

  // Methods are functions that mutate state and trigger updates.
  // They can be bound as event listeners in templates.
  methods: {
    increment() {
      this.count++
    }
  },

  // Lifecycle hooks are called at different stages
  // of a component's lifecycle.
  // This function will be called when the component is mounted.
  mounted() {
    console.log(`The initial count is ${this.count}.`)
  }
}
</script>

<template>
  <button @click="increment">Count is: {{ count }}</button>
</template>
Composition API
<script setup>
import { ref, onMounted } from 'vue'

// reactive state
const count = ref(0)

// functions that mutate state and trigger updates
function increment() {
  count.value++
}

// lifecycle hooks
onMounted(() => {
  console.log(`The initial count is ${count.value}.`)
})
</script>

<template>
  <button @click="increment">Count is: {{ count }}</button>
</template>- Options API와 다르게 Composition API에서는 setup()함수 내부에 data속성과 method, lifeCycle hook, watch를 입력합니다. 그 다음 setup()함수내에서 생성한 함수들을 return 해주어야 해당 함수들을 사용할 수 있습니다.
- vue2 버전에서부터 사용하던 Options API에서는 상위 컴포넌트에서 내려받은 props에 this를 사용해 접근했으나, Composition API의 setup()내부에서는 this사용이 불가하여, props인자를 이용해 this의 무분별한 사용을 막게 해줍니다.
- Options API는 this.$emit을 이용해 상위 컴포넌트로 이벤트를 전달 할 수 있었지만, Composition API는 setup()함수의 두 번째 인자인 context를 이용해 emit을 사용할 수 있습니다.
컴포넌트 등록
컴포넌트를 어디에서 사용하냐에 따라 두 가지 등록 방법이 있습니다.
전역 등록
app.component를 이용해서 컴포넌트를 등록하면, 컴포넌트는 애플리케이션 전역 등록이 되어 모든 컴포넌트 인스턴스의 템플릿 내부에서 사용할 수 있습니다.
const app = createApp({ ... })
app.component('BookComponent', BookComponent)
지역 등록
컴포넌트를 전역 등록 하게 되면 컴포넌트를 사용하지 않더라도 계속해서 최종 빌드에 해당 컴포넌트가 포함되므로, 자바스크립트 파일의 크기를 불필요하게 증가시키기에 지역 등록하여 사용하는 것을 권장합니다. Vue 인스턴스의 components 속성 안에 정의하면 Vue 인스턴스에서 지역 등록된 컴포넌트를 사용할 수 있습니다.
const app = createApp({
	components: {
		BookComponent: BookComponent
	}
})
컴포넌트 시스템
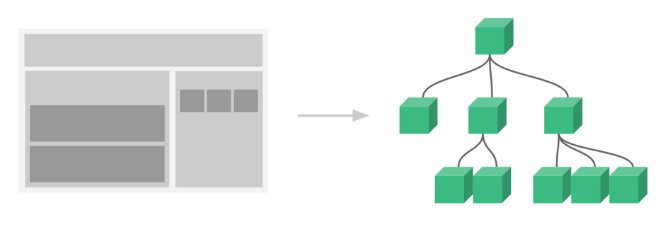
컴포넌트는 화면의 영역을 구분하여 개발할 수 있는 뷰의 기능입니다. 컴포넌트 기반으로 화면을 개발하게 되면 코드의 재사용성이 올라가고 빠르게 화면을 제작할 수 있습니다.
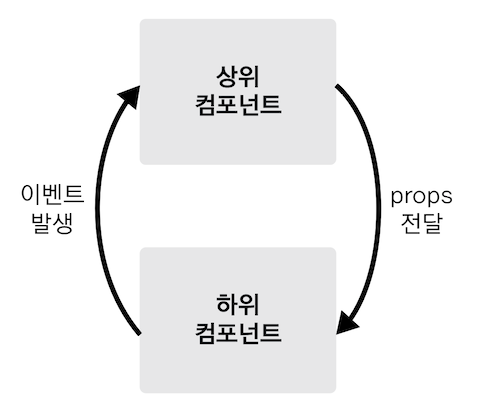
컴포넌트 통신 방식(props , Event Emit)
props
프롭스 속성은 컴포넌트 간에 데이터를 전달할 수 있는 컴포넌트 통신 방법입니다. 프롭스 속성을 기억할 때는 상위 컴포넌트에서 하위 컴포넌트로 내려보내는 데이터 속성
props 속성 코드 형식
// 하위 컴포넌트의 내용
var childComponent = {
  props: ['프롭스 속성 명']
}<!-- 상위 컴포넌트의 템플릿 -->
<div id="app">
<child-component v-bind:프롭스 속성 명="상위 컴포넌트의 data 속성"></child-component>
</div>
Event Emit
이벤트 발생은 컴포넌트의 통신 방법 중 하위 컴포넌트에서 상위 컴포넌트로 통신하는 방식
Event Emit 코드 형식
// 하위 컴포넌트의 내용
this.$emit('이벤트 명');<!-- 상위 컴포넌트의 템플릿 -->
<div id="app">
<child-component v-on:이벤트 명="상위 컴포넌트의 실행할 메서드 명 또는 연산"></child-component>
</div>기본 문법
속성지정
- v-bind
v-bind는 뷰 인스턴스의 데이터 속성을 해당 HTML 요소에 연결할 때 사용하는 디렉티브다.
<div id="app">
    <p v-bind:id="uuid" v-bind:class="name">{{num}}</p>
	//v-bind는 생략해서 사용가능
</div>
<script>
    new Vue({
      el:'#app',
      data:{
        num:10,
        uuid:'abcd1234',
        name:'text-blue',
        loading : true,
        message: ''
      }
     })
</script>- v-on
v-on는 해당 HTML 요소의 이벤트를 뷰 인스턴스의 로직과 연결할 때 사용하는 디렉티브다.
<div id="app">
    <button v-on:click="logText">click me</button>
	//v-on은 @로 축약해서 사용가능
    <input type="text" v-on:keyup.enter="logText">
    <button>add</button>
 </div>
 <script>
    new Vue({
      el:'#app',
      methods:{
        logText:function(){
          console.log('clicked')
        }
      }
    })
</script>- v-model
v-model은 양방향 데이터 바인딩 디렉티브다.
<div>
  <input type="text" v-model="message" placeholder="edit me">
  <p>message is : {{message}}</p>
</div>
<script>
    new Vue({
      el:'#app',
      data:{
        message: ''
      },
    })

  </script>
