전체 구조: U-Net
Encoder에 사용된 MobileNet2V(가중치 x)
여기서 가중치가 없다는 것은 pretrained된 모델을 사용하지 않았다는 뜻이다.
(정리할 것)
참고: https://seongkyun.github.io/papers/2019/01/09/mobilenetv2/
https://www.notion.so/mobilenet-V1-V2-bb3b0e3b514a40ff9d8d38256e8acf56
decoder에 사용된 pix2pix
이미지로부터 이미지를 생성하는 모델.
예: 야간촬영 이미지-> 낮에 촬영한 이미지 (혹은 그 반대)
흑백 이미지 채색 -> 컬러 이미지
스케치 -> 이미지
넓게는 CGAN(Conditional GAN)의 한 종류. 그러나 CGAN은 '조건 벡터와 이미지'를 학습데이터로 대응관계를 학습하나 pix2pix는 '조건 이미지와 이미지'를 학습데이터로 그 대응관계를 학습
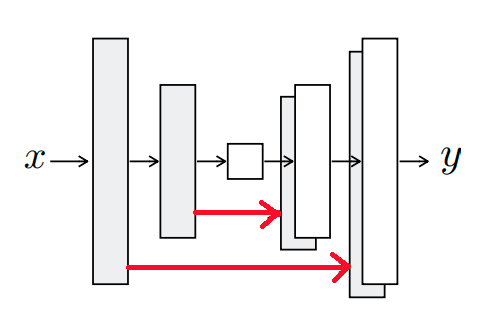
pix2pix의 기본 구성
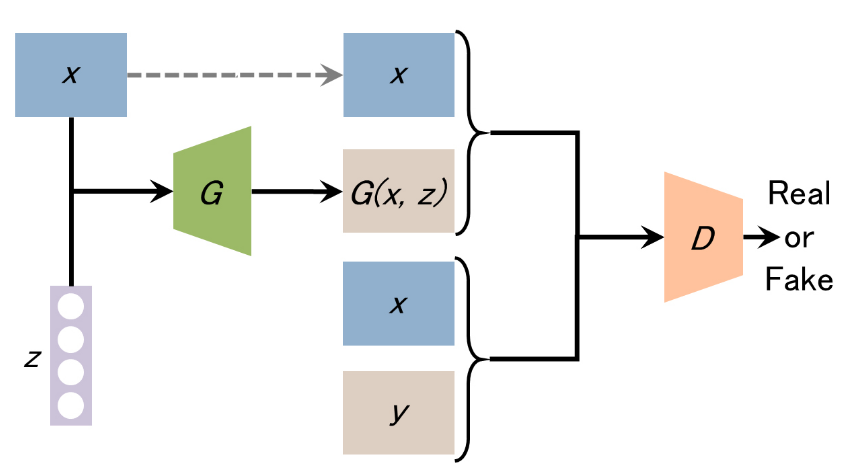
(G: Generator, D: Discriminator, x: conditional data(training data), y: real image(training data), z: noise vector, G(x, z): fake image from G)
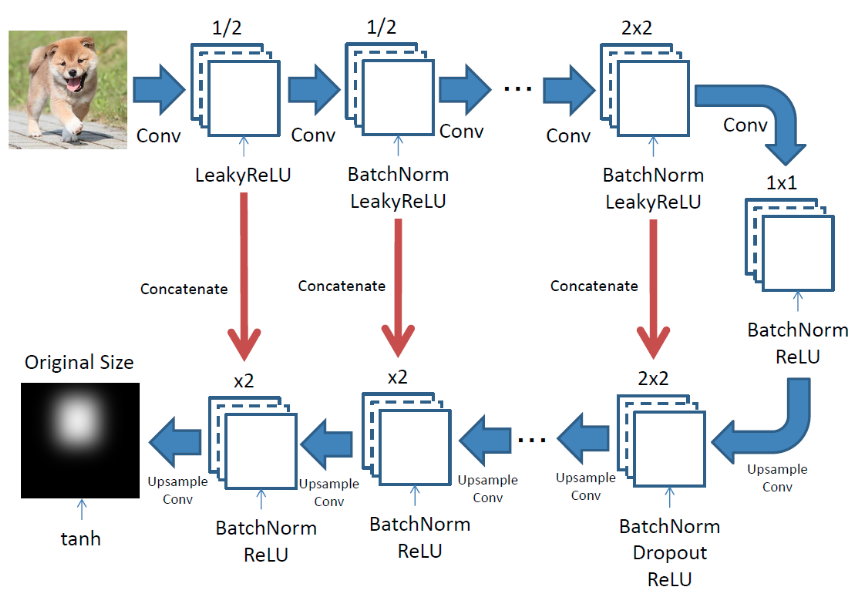
Generator의 구조는 수정된 U-Net를 사용했다. (U-Net: Encoder - Skip connection - Decoder)
Encoder의 각 층은 'Conv - Batchnorm - Leaky ReLU'로 구성되어 있고, Decoder의 각 층은 'Transposed Conv -> Batchnorm -> Dropout(applied to the first 3 blocks) -> ReLU'로 구성된다.
Generator는 조건 이미지 x와 노이즈 벡터 z(x, z가 입력)로부터 이미지 G(x, z)를 생성한다. Discriminator은 '조건 이미지 x와 실제이미지 y'와 '조건 이미지x와 생성이미지G(x,z)'를 비교해서 조건 이미지 x가 진짜인지 아닌지를 판별한다. 이 과정을 통해 Generator가 조건 이미지로부터 진짜와 같은 이미지를 생성할 수 있도록 두 이미지의 관계 를 학습한다.
Generator 설명
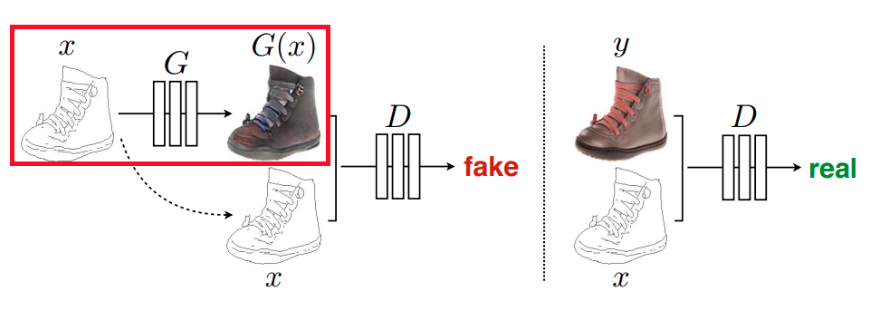
pix2pix는 조건 이미지 x를 어떻게 주느냐에 따라 output을 원하는 대로 바꿀 수 있다. 노이즈 z는 출력 이미지가 고정된 이미지만 생성하는 것을 방지하기 위해 사용한다. 그러나 노이즈가 반드시 gaussian noise일 필요가 없어서 dropout의 형태로 G에 포함시켰다. 그래서 아래의 신발 그림에서는 z가 없다.
Disriminator 설명
Discrimination는 Generator로 생성한 이미지와 조건 이미지와의 관계와 실제 이미지와 조건 이미지와의 관계를 비교한다. (설명 추가할 것!)
U-Net
pix2pix에서는 encoder-decoder로 U-Net 구조를 사용한다 그 이유는 U-Net이 low level feature와 high level feature 모두를 전달하여 더 정확한 표현을 가능하기 때문이다.
얕은 층에서는 low level feature가, 깊은 층에서는 high level feature가 추츨되는데 층이 깊을수록 low level feature는 제대로 전달되지 못하는 문제가 있다. U-Net은 skip connection을 사용하여 low level feature가 깊은 층에 전달되하여 low level과 high level feature가 모두 사용될 수 있도록 한다.
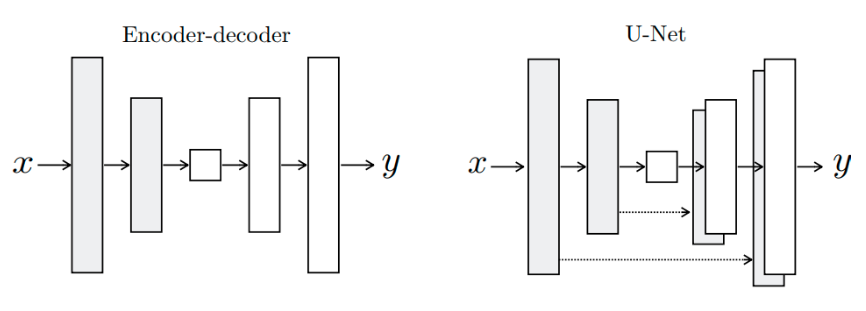
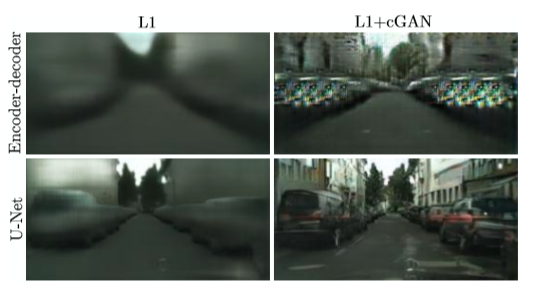
[Encoder-decoder와 U-Net의 출력값 비교 - 출처: https://yun905.tistory.com/m/21?category=876803]
pix2pix의 모델
pix2pix는 U-Net모델의 네트워크를 사용하여 Convolution했을 때의 정보를 upsampling 할 때 사용한다.
Encoder: Convolution, Decoder: Upsampling
Decoder의 블록에서는 Upsampling하는 데이터와 대응하는 Encoder데이터를 전달하여 중간에서 결합한다. (빨간 선: skip-connection)
 출처:
[pix2pix](https://www.tensorflow.org/tutorials/generative/pix2pix#%EC%83%9D%EC%84%B1%EA%B8%B0_%EB%B9%8C%EB%93%9C%ED%95%98%EA%B8%B0)
출처:
[pix2pix](https://www.tensorflow.org/tutorials/generative/pix2pix#%EC%83%9D%EC%84%B1%EA%B8%B0_%EB%B9%8C%EB%93%9C%ED%95%98%EA%B8%B0)
코드 비교
pix2pix의 Generator
- upsample() 함수
def upsample(filters, size, apply_dropout=False):
  initializer = tf.random_normal_initializer(0., 0.02)

  result = tf.keras.Sequential()
  result.add(
    tf.keras.layers.Conv2DTranspose(filters, size, strides=2,
                                    padding='same',
                                    kernel_initializer=initializer,
                                    use_bias=False))

  result.add(tf.keras.layers.BatchNormalization())

  if apply_dropout:
      result.add(tf.keras.layers.Dropout(0.5))

  result.add(tf.keras.layers.ReLU())

return result- pix2pix의 Generator() 함수
def Generator():
  inputs = tf.keras.layers.Input(shape=[256, 256, 3])

  down_stack = [
    downsample(64, 4, apply_batchnorm=False),  # (bs, 128, 128, 64)
    downsample(128, 4),  # (bs, 64, 64, 128)
    downsample(256, 4),  # (bs, 32, 32, 256)
    downsample(512, 4),  # (bs, 16, 16, 512)
    downsample(512, 4),  # (bs, 8, 8, 512)
    downsample(512, 4),  # (bs, 4, 4, 512)
    downsample(512, 4),  # (bs, 2, 2, 512)
    downsample(512, 4),  # (bs, 1, 1, 512)
  ]

  up_stack = [
    upsample(512, 4, apply_dropout=True),  # (bs, 2, 2, 1024)
    upsample(512, 4, apply_dropout=True),  # (bs, 4, 4, 1024)
    upsample(512, 4, apply_dropout=True),  # (bs, 8, 8, 1024)
    upsample(512, 4),  # (bs, 16, 16, 1024)
    upsample(256, 4),  # (bs, 32, 32, 512)
    upsample(128, 4),  # (bs, 64, 64, 256)
    upsample(64, 4),  # (bs, 128, 128, 128)
  ]

  initializer = tf.random_normal_initializer(0., 0.02)
  last = tf.keras.layers.Conv2DTranspose(OUTPUT_CHANNELS, 4,
                                         strides=2,
                                         padding='same',
                                         kernel_initializer=initializer,
                                         activation='tanh')  # (bs, 256, 256, 3)

  x = inputs

  # Downsampling through the model
  skips = []
  for down in down_stack:
    x = down(x)
    skips.append(x)

  skips = reversed(skips[:-1])

  # Upsampling and establishing the skip connections
  for up, skip in zip(up_stack, skips):
    x = up(x)
    x = tf.keras.layers.Concatenate()([x, skip])

  x = last(x)

  return tf.keras.Model(inputs=inputs, outputs=x)
pix2pix 모델의 Generator 함수는 위와 같다. 베이스라인에서는 이 부분을 가져다가 사용하여 이미지를 upsampling해준다.
베이스라인의 Decoder
class Decoder(tf.keras.Model):
    def __init__(self, ):
        super(Decoder, self).__init__()
        self.ups = [pix2pix.upsample(256, 4, apply_dropout = True),
                    pix2pix.upsample(128, 4, apply_dropout = True),
                    pix2pix.upsample(64, 4),
                    pix2pix.upsample(32, 4)]

        self.convT = tf.keras.layers.Conv2DTranspose(32, 3, strides = 2, padding = "same")
        self.bn = tf.keras.layers.BatchNormalization()
        self.relu = tf.keras.layers.ReLU()
self.conv2d = tf.keras.layers.Conv2D(1, 1, activation = "sigmoid")-
베이스라인에서는 decoder에서 conv2DT -> Upsampling2D를 제안
-
해빙 예측의 베이스라인은 Image Segmentation을 참고하였음.