ModelMapper
객체의 필드 값을 다른 객체의 필드 값으로 자동으로 맵핑
- JPA에서는 Entity와 DTO(Data Transfer Object)가 구분되어 사용
- DTO form에서 입력한 데이터를 DB에 저장하는 경우 DTO -> Entity 변환 과정이 필요하며, DB에서 데이터를 조회하여 form 형태로 보여주는 경우 Entity -> DTO 변환 과정이 필요
- 해당 과정들을 수행하기 위해서는 직접 객체에 필드 값을 세팅해야하는 반복적인 작업이 필요
JPA의 변경감지 (dirtyCheck) 기능을 ModelMapper를 사용하여 구현해보겠다.
의존성 추가(Gradle)
implementation 'org.modelmapper:modelmapper:2.4.2'
ModelMapper Bean으로 등록
@Configuration
public class AppConfig {

    @Bean
    public ModelMapper modelMapper() {
        ModelMapper modelMapper = new ModelMapper();
        modelMapper.getConfiguration()
                .setDestinationNameTokenizer(NameTokenizers.UNDERSCORE)
                .setSourceNameTokenizer(NameTokenizers.UNDERSCORE);
        return modelMapper;
    }

}
ModelMapper를 빈으로 등록할 때 UNDERSCORE방식으로 Mapping되게 설정해주어야한다. 그렇지 않다면 클래스의 필드명이 다를 경우 에러가 발생한다.
- ModelMapper 사용 전 🔽
   public void updateNotification(Account account , Notifications notifications) {
        log.info("알림 정보 :{}", notifications);
        account.changeNotifiacation(notifications);
        accountRepository.save(account);
    }
account는 Detached 객체라서 영속성 컨텍스트의 관리에 다시 놓이게 마지막에 save()를 해주었다.
- 도메인 주도 설계 변경감지 알림 수정 메서드
@Service
@Transactional
@Slf4j
@RequiredArgsConstructor
public class AccountService implements UserDetailsService {

 private final AccountRepository accountRepository;

 public void changeNotifiacation(Notifications notifications) {
        this.studyCreatedByEmail = notifications.isStudyCreatedByEmail();
        this.studyCreatedByWeb = notifications.isStudyCreatedByWeb();
        this.studyEnrollmentResultByEmail = notifications.isStudyEnrollmentResultByEmail();
        this.studyEnrollmentResultByWeb = notifications.isStudyEnrollmentResultByWeb();
        this.studyUpdatedByEmail = notifications.isStudyUpdatedByEmail();
        this.studyUpdatedByWeb = notifications.isStudyUpdatedByWeb();
    }
}
위의 코드는 장점과 단점이 둘 다 존재한다. 장점은 setter의 사용을 막을 수 있고 또 하나는 도메인 주도 설계방식으로 가져간 것 이다.
하지만 단점으로는 하나하나 코드를 직접 짜주어야한다는 것이다.
- ModelMapper를 사용한 변경🔽
@Service
@Transactional
@Slf4j
@RequiredArgsConstructor
public class AccountService implements UserDetailsService {

    private final AccountRepository accountRepository;
    private final ModelMapper modelMapper;

    public void updateNotification(Account account , Notifications notifications) {
        log.info("알림 정보 :{}", notifications);
        modelMapper.map(notifications,account);
        accountRepository.save(account);
    }
modelMapper.map(notifications,account);
소스 : notifications
목적지 : account
notifiacations의 값을 account에 매핑해준다.
Setter의 사용을 금지하고 싶을 때는?
ModelMapper를 사용하기 위해서는 매핑 목적지 클래스에는 setter가 존재해야 작동한다. 하지만 setter는 개발 시에 지양하는게 좋다. 왜냐하면 값을 쉽게 바꿀 수 있기 때문이다. 그래서 나는 modelMapper가 좋은 기능인가에 대한 의문이 들었다.
Destination class에 setter가 존재하지 않는다면 아래와 같은 에러가 발생한다.🔽
org.springframework.dao.DataIntegrityViolationException: could not execute statement; SQL [n/a]; constraint [null]; nested exception is org.hibernate.exception.ConstraintViolationException: could not execute statement
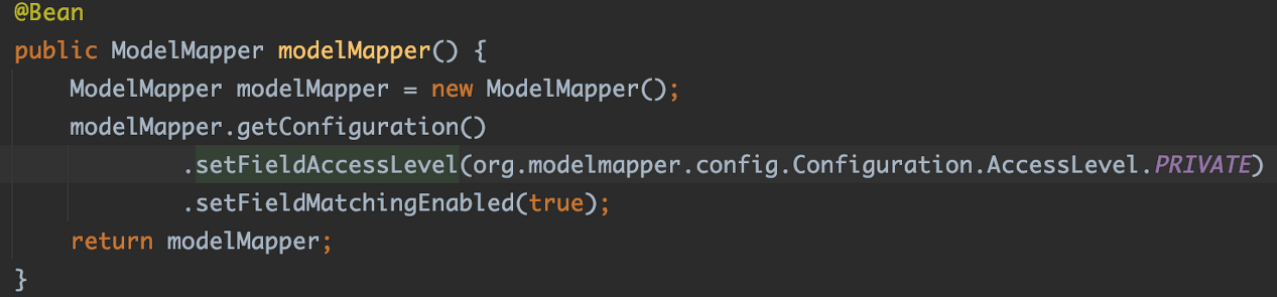
Caused by: org.hibernate.exception.ConstraintViolationException: could not execute statementSetter없이 쓸 수 있는 ModelMapper
ModelMapper는 Access level 이 디폴트로 public 인것을 볼 수 있다.
이를 Private 레벨로 바꾸면 setter 없이도 필드명이 같을 때 자동 매핑 처리를 할 수 있다.
- 아래와 같이 설정에서 Acess Level을 Private으로 해주자!