알림의 기능과 목적
현재 프로젝트에서 스터디를 생성 할 때 해당 스터디의 주제와 지역을 설정 할 수 있다. 또한 회원은 프로필 설정에서 자신이 관심있는 주제와 지역을 선택할 수 있다. 그래서 알림의 목적은 회원의 관심주제와 지역에 맞는 스터디가 개설이 된다면 알림이 발생하게 할 것이다. 하지만 스터디 생성하는 부분에서 알림 또한 생성하는 로직이 들어간다면 메인 로직에 영향을 줗 수있고 응답시간에도 영향을 준다. 따라서 이벤트를 던지면 이벤트를 처리할 수 있는 이벤트 기반으로 알림을 처리할 것이다.
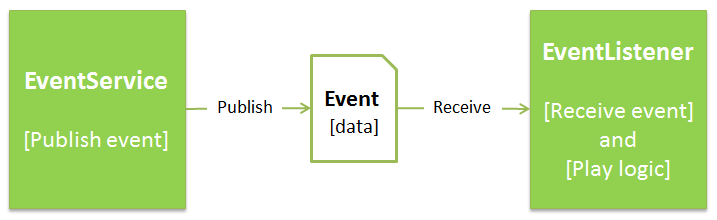
💡 이벤트 기반 프로그래망?
Event 객체가 있고, Event 객체를 다루는 EventHandler 객체가 존재하는 것
스프링 @Async 비동기 기능 설정
@Async 는 비동기적으로 처리를 할 수 있게끔 스프링에서 제공하는 어노테이션이다. 해당 어노테이션을 붙이게 되면 각기 다른 쓰레드로 실행이 된다. 즉, 호출자는 해당 메서드가 완료되는 것을 기다릴 필요가 없다.
📢 즉 스터디의 공개와 알림 발생은 서로 각기 다른 쓰레드에서 실행되는 것이다.
이 어노테이션을 사용하기 위해서는 @EnableAsync 가 달려있는 configuration 클래스가 우선적으로 필요하다.
@Slf4j
@Configuration
@EnableAsync
public class AsyncConfig implements AsyncConfigurer {

    @Override
    public Executor getAsyncExecutor() {
        ThreadPoolTaskExecutor executor = new ThreadPoolTaskExecutor();
        int processors = Runtime.getRuntime().availableProcessors();
        log.info("processor count {}",processors);
        executor.setCorePoolSize(processors);
        executor.setMaxPoolSize(processors * 2);
        executor.setQueueCapacity(50);
        executor.setKeepAliveSeconds(60);
        executor.setThreadNamePrefix("AsyncExecutor-");
        executor.initialize();
        return executor;
    }
}
ApplicationEventPublisher
이벤트 프로그래밍을 사용하기위해서는 우선적으로 ApplicationEventPublisher가 필요하다.
- 이벤트 프로그래밍에 필요한 인터페이스 제공
- publishEvent 메소드 제공 → 스프링 기반 어플리케이션에 이벤트 발생
그럼 이제 다음으로 스터디를 공개하는 부분에서 알림을 발생시켜줘야한다.
알림 PublishEvent() 부분
@Service
@Transactional
@RequiredArgsConstructor
public class StudyService {

    private final StudyRepository studyRepository;
    private final ApplicationEventPublisher eventPublisher;
    /**스터디 오픈하기**/
    public void publish(Study study) {
        study.publishStudyState();
        //이벤트 생성 부분📢🔽
        eventPublisher.publishEvent(new StudyCreatedEvent(study));
    }
}
StudyCreatedEvent(이벤트를 전달할 알림 객체)
스터디를 오픈했을 때 알림에 들어가야 할 스터디(Study)의 정보를 넣어줄 알림객체가 필요하다.🔽
@Getter
@RequiredArgsConstructor
public class StudyCreatedEvent {
    private final Study study;
}
스터디 알림 생성을 처리해 줄 EventListener
1. @Async를 사용한 이유
위에서 AsyncConfigurer 인터페이스를 구현하여 getAsyncExecutor() 를 오버라이딩 함으로써 default Executor가 내가 설정해둔 Executor가 된다. 애플리케이션에서 @Async 를 사용했을 때 해당 Executor를 사용하게 된다.
2. 매개변수에는 전달된 이벤트 객체를 쓰자
@EventListener가 붙은 메서드의 매개변수에는 전달 된 이벤트 객체를 써주자. 그러면 해당 이벤트를 받아서 처리할 수 있다. 말그대로 @EventLister는 이벤트를 듣고 처리해주는 것이다.
@Async
@Transactional
@RequiredArgsConstructor
@Component
public class StudyEventListener {

    @EventListener
    public void handleStudyCreatedEvent(StudyCreatedEvent studyCreatedEvent) {
    	..(추후 설명)..
    }
알림의 종류와 발생조건
앞서 말하기는 했지만 회원의 관심주제와 선호 지역에 맞는 스터디가 개설된다면 해당 회원에게 알림을 보내줘야한다. 알림의 종류는 2개를 만들어줬다.
1. 이메일 알림 발송
2. 웹 알림 발송
이 두개의 알림 종류가 있는데, 이는 프로필에서 알림 설정을 해줄 수 있다.JPA 기본 지원 메서드로 할 수 있을까?
잘 생각해보아하는데 JPA 기본 메서드만으로 해당 알림 조건을 충족시키는 쿼리를 짤 수 있을까? 매우 어려울 것이다. 그래서 QueryDsl를 사용하여 해당 조건에 맞을 때 알람을 발송 시킬 것 이다.
기존 repository에 Querydsl 인터페이스 추가하기
Querydsl 의존성을 추가하여 새로 빌드하면 Querydsl를 사용할 수 있다.
그리고 기존의 repository에 QuerydslPredicateExecutor을 추가해주자.
@Transactional(readOnly = true)
public interface AccountRepository extends JpaRepository<Account, Long>, QuerydslPredicateExecutor<Account> {

    boolean existsByEmail(String email);

    boolean existsByNickname(String nickname);

    Account findByEmail(String email);

    Account findByNickname(String nickName);
}
JpaRepository와 유사하지만 전달하는 파라미터가 Predicate이다, 이는 querydsl에서 제공하는 조건절에 해당하는 타입이다.
따라서 tags, zones에 포함되는 계정을 찾기위한 Predicate를 파라미터로 전달
AccountPredicates (Querydsl 매개변수에 사용될 객체)
바로 아래의 QueryDsl이 알림의 조건의 메서드이다.
QAccount 타입의 객체에서 tags(관심주제)와 zones(지역)를 포함하고 있는 회원을 반환 하는것이다.
매개변수로들어온 tags ,zones를 매칭하여 any().in(tags) 를 하면 관심주제에 해당하는 회원을 반환하고 .any().in(zones)를 사용하여 지역에 맞는 회원을 반환 해준다.🔽
import com.querydsl.core.types.Predicate;
import com.studyhere.studyhere.domain.entity.QAccount;

public class AccountPredicates {

    public static Predicate findByTagsAndZones(Set<Tag> tags , Set<Zone> zones) {
        QAccount account = QAccount.account;
        return account.zones.any().in(zones).and(account.tags.any().in(tags));
    }
}
이벤트 리스너로 돌아오기
이제 다시 이벤트를 처리해줄 이벤트리스너로 돌아와서 코드를 봐보자.
@Async
@Transactional
@RequiredArgsConstructor
@Component
public class StudyEventListener {

    private final StudyRepository studyRepository;
    private final AccountRepository accountRepository;
    private final NotificationRepository notificationRepository;
    private final EmailService emailService;
    private final TemplateEngine templateEngine;
    private final AppProperties appProperties;

    @EventListener
    public void handleStudyCreatedEvent(StudyCreatedEvent studyCreatedEvent) {
        //tags 정보와 지역정보를 참조할 수 있는 study
        Study study = studyRepository.findStudyWithTagAndZoneById(studyCreatedEvent.getStudy().getId());
        Iterable<Account> accounts
                = accountRepository.findAll(AccountPredicates.findByTagsAndZones(study.getTags(), study.getZones()));


        }

    }
위의 코드를 보면 개설 된 study의 id로 tags 정보와 지역정보를 참조할 수 있는 study를 조회한다. 🔽
studyRepository.findStudyWithTagAndZoneById(studyCreatedEvent.getStudy().getId());그 후에 QueryDsl의 findAll(Predicate predicate)의 메서드를 사용하여 해당 조건에 맞는 회원들을 돌려받자. 그럼이제 해야할일은 반환된 회원들을 반복문을 돌면서 이메일 발송을 해줄 것인지, 웹 알림으로 보내줄 것인지 check하여 진행해야한다.
다음과정은? 알림의 종류를 선택하여 발송하기
웹 알림 시 : 알림 생성
데이터베이스에 저장될 알림을 생성해주자
    /**알림 생성**/
    private void createNotification(Study study, Account account, String message, NotificationType notificationType) {
        Notification notification = new Notification();
        notification.setTitle(study.getTitle());
        notification.setLink("/study/" + study.encodePath());
        notification.setChecked(false);
        notification.setCreatedDateTime(LocalDateTime.now());
        notification.setMessage(message);
        notification.setAccount(account);
        notification.setNotificationType(notificationType);
        notificationRepository.save(notification);
    }
이메일 발송 시
    /**관심주제 지역 스터디 생성 시 이메일 발송**/
    private void sendStudyCreatedEmail(Study study, Account account, String contextMessage, String emailSubject) {
        Context context = new Context();
        context.setVariable("nickname", account.getNickname());
        context.setVariable("link", "/study/" + study.encodePath());
        context.setVariable("linkName", study.getTitle());
        context.setVariable("message", contextMessage);
        context.setVariable("host", appProperties.getHost());
        String message = templateEngine.process("mail/simple-link", context);

        EmailMessage emailMessage = EmailMessage.builder()
                .subject(emailSubject)
                .to(account.getEmail())
                .message(message)
                .build();

        emailService.sendEmail(emailMessage);
    }
위 의 2개의 메서드는 각각 상황에 따라 알림을 생성해주는 메서드이고 위의 메서드는 다음과 같이 @EventListener 에서 사용된다.
  @EventListener
    public void handleStudyCreatedEvent(StudyCreatedEvent studyCreatedEvent) {
        //tags 정보와 지역정보를 참조할 수 있는 study
        Study study = studyRepository.findStudyWithTagAndZoneById(studyCreatedEvent.getStudy().getId());
        Iterable<Account> accounts
                = accountRepository.findAll(AccountPredicates.findByTagsAndZones(study.getTags(), study.getZones()));

        for (Account account : accounts) {
            /**이메일 발송**/
            if (account.isStudyCreatedByEmail()) {
                sendStudyCreatedEmail(study, account, "새로운 스터디가 생겼습니다",
                        "스터디히어 : '" + study.getTitle() + "' 스터디가 생겼습니다.");
            }
            /**알림 생성성**/
           if (account.isStudyCreatedByWeb()) {
               createNotification(study,account,study.getShortDescription(), NotificationType.STUDY_CREATED);
            }
        }

    }
account의 알림 정보를 확인하여 각각 다르게 알림을 생성해준다.