ReadinessProbe
- Pod2가 어떠한 문제로 죽게 되었다 -> 그럼 사용자는 다른 Pod1로 가서 사용한다.
- Pod1에 트래픽이 몰려서 문제가 생길 수 있으니, 곧바로 레플리카 셋이나 컨트롤러가 Pod2를 새로 만든다.
- 하지만 pod2가 재생성 되는 순간 바로 사용자가 유입한다.
- 그럼 준비가 되지 않은 pod2의 사용자들은 에러페이지를 본다.
- 위와같은 문제를 ReadinessProbe가 방지해준다.
- ReadinessProbe는 앱이 구동되기 전까지는 서비스와 연결을 막아주고 앱이 준비된게 확인되면 해당 Pod으로 트래픽을 보낸다.
LivenessProbe
- Pod과 컨테이너에는 문제가 없다면 Running이 뜨겠지만. 오버플로우나 앱 자체에 문제 발생시 Pod과 컨테이너는 이를 인지하지 못하고 계속 Running 상태가 뜬다.
- 그럼 분명 문제가 발생했지만 인지하지 못하고 해결하지 못한다.
- 이를 막기위해 LivenessProbe가 있다.
- LivenessProbe는 주기적으로 어플리케이션 컨테이너가 정상적인지 확인하고, 만약 문제 발생 시 Pod을 바로 재실행하여 지속적인 에러를 방지하여준다.
ReadinessProbe, LivenessProbe 사용법
- 기본적으로 전반적인 속성값은 2개 모두 비슷하다.
ReadinessProbe, LivenessProbe 공통속성
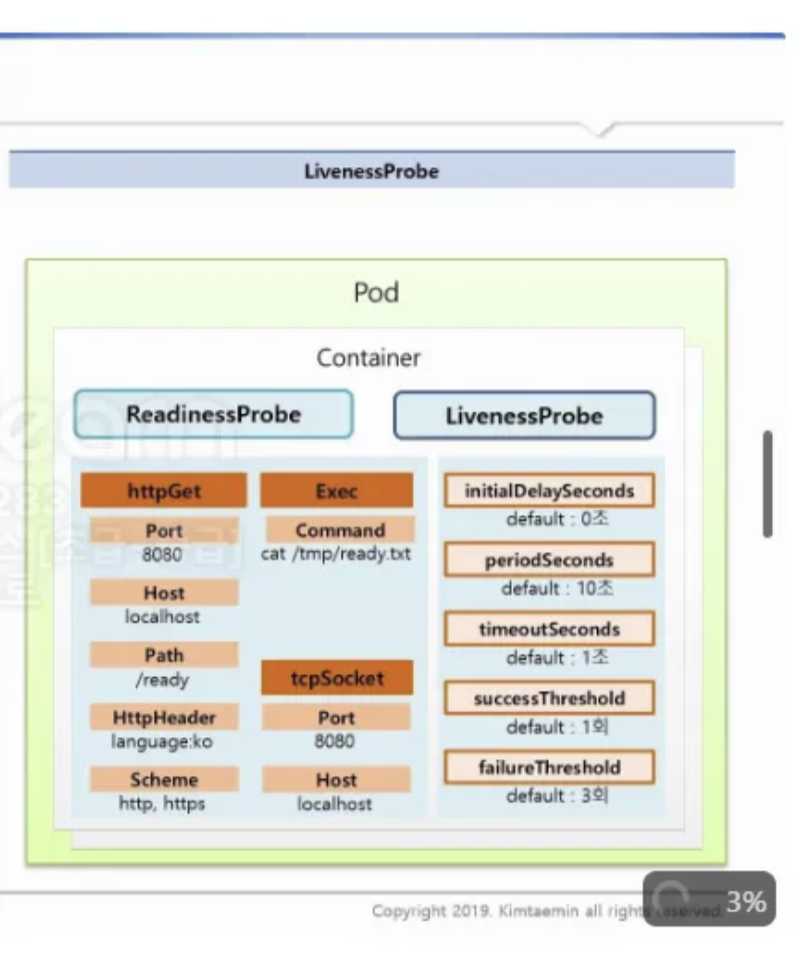
- httpGet, Exec, tcpSocker의 속성을 가지고 있다.
- httpGet : 포트번호, host 이름, path, httpHeader, Schema를 체크
- exec : 특정 명령어를 날려, 그에 따른 결과 체크
- tcpSocker : 포트 번호, 호스트명 체크해서 Readiness나 Liveness프로브 성공여부 확인
- 그외 설정 값
- initailDelaySeconds : 최초 프로브를 시작하기 전, 딜레이 시간
- periodSeconds : 프로브를 체크하는 시간의 간격
- timeoutSeconds : 지정된 시간까지 결과가 도착해야함.
- successThreshold : 몇번 성공을 해야 성공을 인정할껀가
- failureThreshold : 몇번 실패해야 실패로 인정할껀가.
- 만약 해당 속성값을 지정하지 않으면 Default값이 들어감.
Readiness 동작흐름
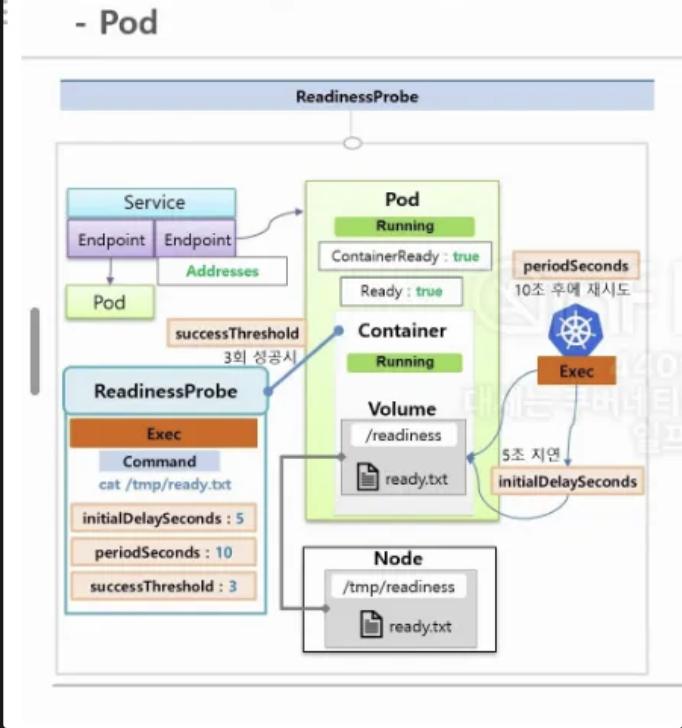
- 위 사진은 ReadinessProbe의 흐름을 그렸다. 세부설명을 작성하겠다.
- 5초동안 지연 후, 10초간의 간격으로 시도, 3번의 성공을하면 정상 동작으로 판단한다.
- 성공 확인 시도 할때마다, ready.txt파일이 있는지 확인.
- ready.txt 파일이 확인되지 않는다면 상태는 NotReadyAddr 상태.
- ready.txt 파일이 존재한다면 addresses로 상태변경, ContainerReady또한 true, Ready또한 true로 상태 변경
LivenessProbe 동작흐름
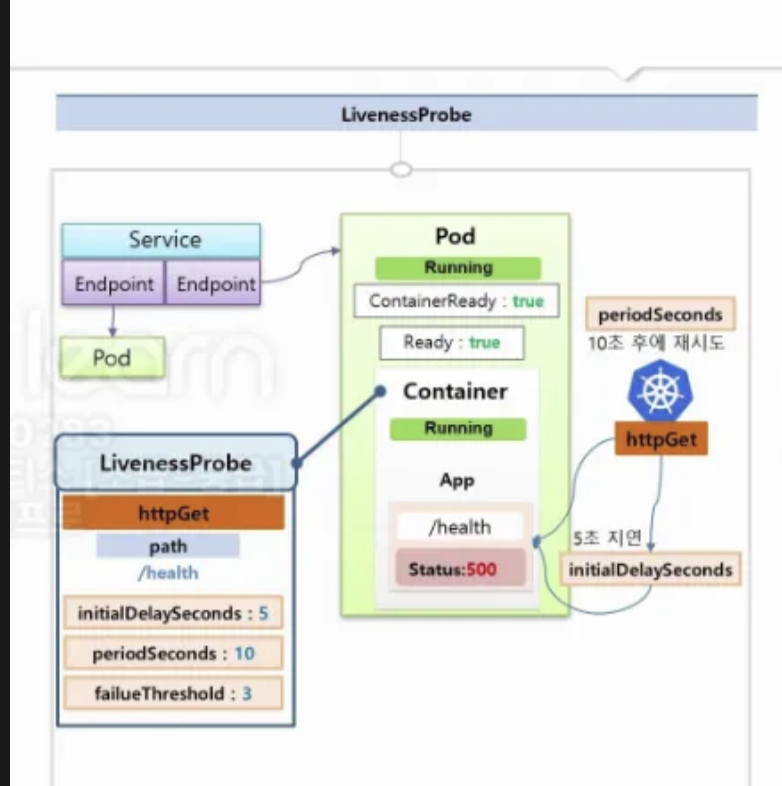
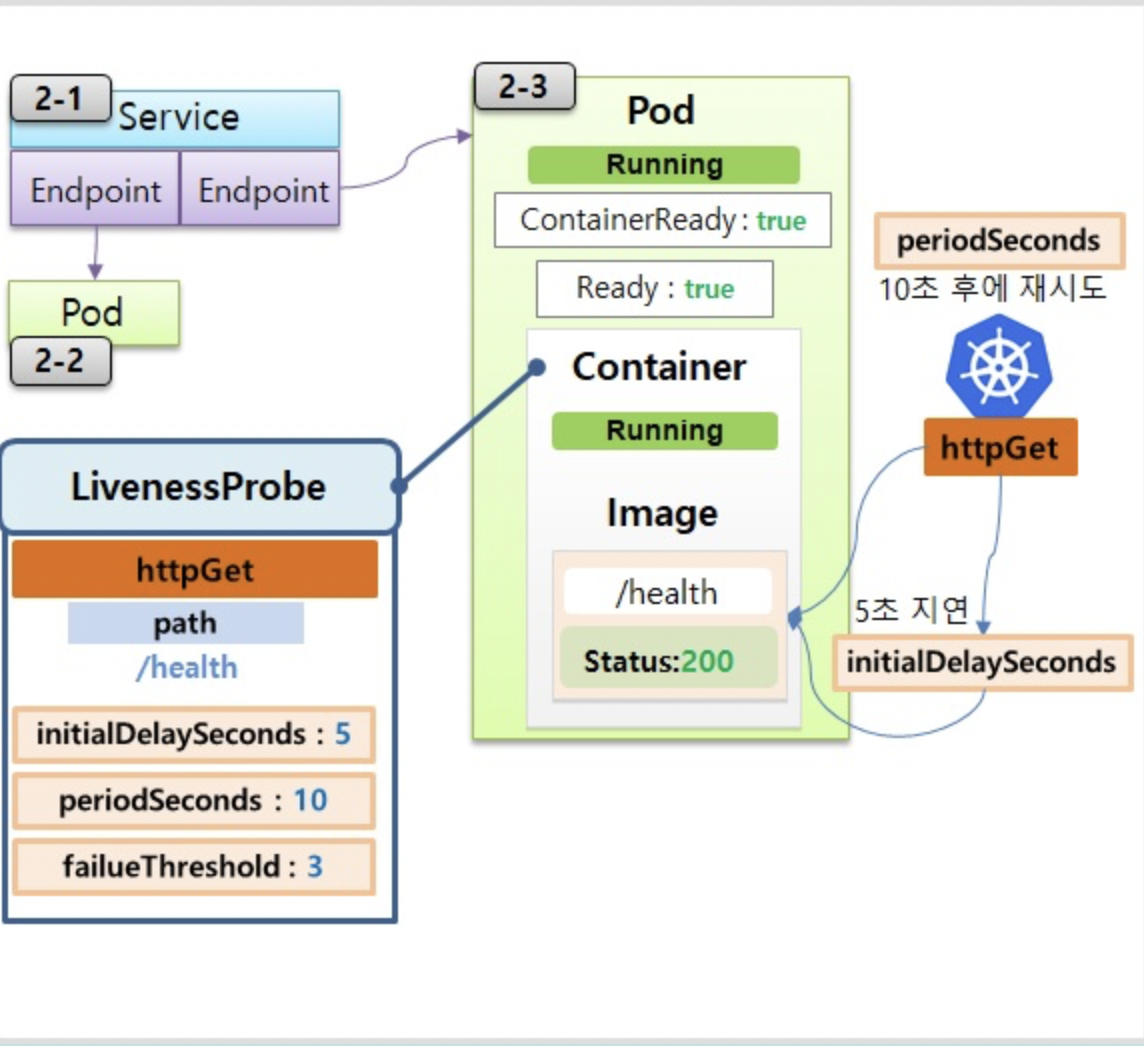
- 위 사진은 LivenessProbe의 흐름이다. 세부 설명은 아래
- httpGet에 설정해놓은 경로를 통해 Pod상태를 확인
- 5초동안 대기, 10초 간격으로 시도, 3번실패시 실패로 간주 -> 실패시 LivenessProbe는 바로 Pod을 Restart
ReadinessProbe, LivenessProbe 실습
ReadinessProbe
Service
apiVersion: v1
kind: Service
metadata:
  name: svc-readiness
spec:
  selector:
    app: readiness
  ports:
  - port: 8080
    targetPort: 8080
Pod1
apiVersion: v1
kind: Pod
metadata:
  name: pod1
  labels:
    app: readiness
spec:
  containers:
  - name: container
    image: kubetm/app
    ports:
    - containerPort: 8080
terminationGracePeriodSeconds: 0- 해당 Pod과 Service를 연결하고, Service에
while true; do date && curl 10.97.190.80:8080/hostname; sleep 1; done명령어를 날린다. - 그렴 명령어를 통해 Pod의 hostName이 출력된다.
Pod2
apiVersion: v1
kind: Pod
metadata:
  name: pod-readiness-exec1
  labels:
    app: readiness
spec:
  containers:
  - name: readiness
    image: kubetm/app
    ports:
    - containerPort: 8080
    readinessProbe:
      exec:
        command: ["cat", "/readiness/ready.txt"]
      initialDelaySeconds: 5
      periodSeconds: 10
      successThreshold: 3
    volumeMounts:
    - name: host-path
      mountPath: /readiness
  volumes:
  - name : host-path
    hostPath:
      path: /tmp/readiness
      type: DirectoryOrCreate
terminationGracePeriodSeconds: 0- exec를 통해 해당경로에 ready.txt파일이 있는지 확인.
- 호스트패스를 통해 노드와 볼륨을 연결
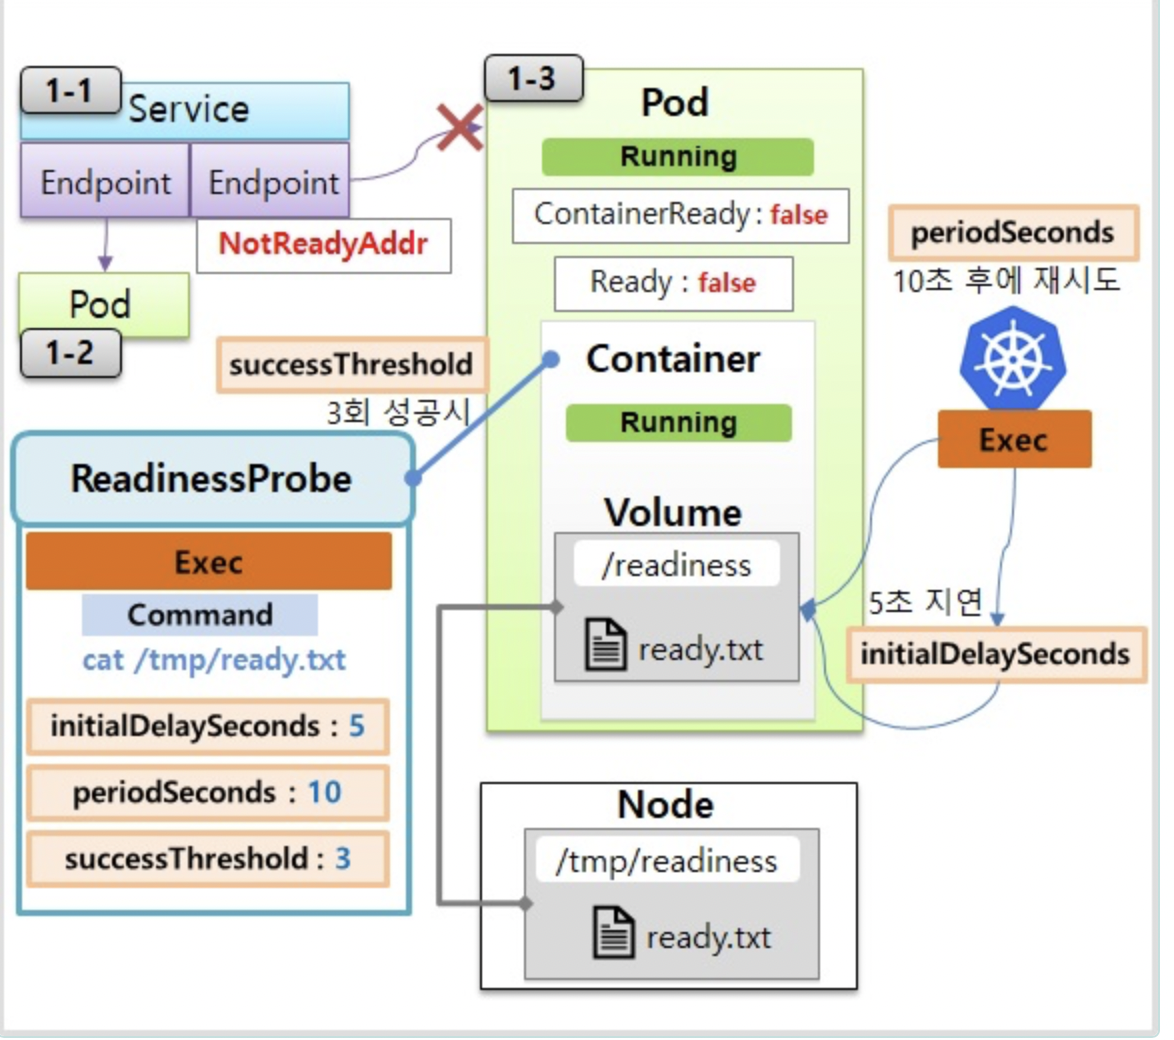
- 다음 Pod엔 Readiness 설정을 하고, 볼륨도 hostPath를 통해 ready.txt 없을 땐 계속 실패가 뜬다.
kubectl get events -w | grep pod-readiness-exec1
kubectl describe pod pod-readiness-exec1 | grep -A5 Conditions
kubectl describe endpoints svc-readiness
touch ready.txt- 해당 명령어들로 readinessProbe가 실패하고 있는지 확인하고, 컨테이너의 상태와 엔드포인트가 non-ready-address인지 확인할 수 있다.
- 그리고 hostPath로 연결한 볼륨에 ready.txt파일을 만들면 readinessProbe는 연결 성공시키고 ContainerReady,Ready,엔드포인트 모두 준비가 완료 표시와 함께 non-ready-address는 Addresses로 바뀌고 Pod2도 연결된다
LivenessProbe
Service
apiVersion: v1
kind: Service
metadata:
  name: svc-readiness
spec:
  selector:
    app: readiness
  ports:
  - port: 8080
    targetPort: 8080
Pod1
apiVersion: v1
kind: Pod
metadata:
  name: pod2
  labels:
    app: liveness
spec:
  containers:
  - name: container
    image: kubetm/app
    ports:
    - containerPort: 8080
  terminationGracePeriodSeconds: 0
Pod2
apiVersion: v1
kind: Pod
metadata:
  name: pod-liveness-httpget1
  labels:
    app: liveness
spec:
  containers:
  - name: liveness
    image: kubetm/app
    ports:
    - containerPort: 8080
    livenessProbe:
      httpGet:
        path: /health
        port: 8080
      initialDelaySeconds: 5
      periodSeconds: 10
      failureThreshold: 3
terminationGracePeriodSeconds: 0- 위와 마찬가지로 LivenessProbe 설정을 넣지않은 Pod1과 넣은 Pod2를 생성
- /health경로를 모니터링, 5초 지연 후에 pod을 확인, 10초마다 확인하고, 3번 실패시 컨테이너를 재시작함
while true; do date && curl 10.103.160.58:8080/health; sleep 1; done
watch "kubectl describe pod pod-liveness-httpget1 | grep -A10 Events"
curl 20.109.131.43:8080/status500- while true; do date && curl 10.103.160.58:8080/health; sleep 1; done
위 명령어를 통하여 계속 해당 IP의 /health 상태를 확인. - watch "kubectl describe pod pod-liveness-httpget1 | grep -A10 Events" 명령어를 사용하여 Pod의 이벤트 로그를 실시간으로 모니터링
- 해당 방법을 통해 컨테이너의 실시간 안정성을 확인할 수 있다.

우왕좌왕 개발