앱을 보다 보면 다양한 바텀 네비게이션이 있다.
정말 수많은 UI들이 있는데 이번엔 안드로이드 스튜디오에서 제공하는 코드만으로
가운데가 움푹들어간 바텀 네비게이션을 만들 것 이다.
BottomAppbar
BottomAppbar는 Android Material Design 컴포넌트 라이브러리의 일부로
가운데에 큰 'FloatingActionButton'을 두어 주요 액션을 강조할 수 있는 공간을 만들 수 있는데
fabAlignmentMode, fabCradleMargin, fabCradleRoundedCornerRadius를 이용해서 구현 할수 있다.
fabAlignmentMode는 fab버튼을 끝부분 혹은 가운데에 위치시킬수 있다.
바텀 앱바에서는 fab버튼이 중요한데, 이 fab의 위치를 기준으로 모양을 바꿀 수 있기 때문이다
fabCradleMargin으로 fab버튼과 앱바 사이의 공백을 지정하는데, 이걸로 주변에 빈공간을 만들어 낼수 있다.
fabCradleRoundedCornerRadius는 fabCradleMargin으로 앱바를 비워내면 U모양으로 되어있을것이다.
이 부분에서 각진 부분을 둥글게 만들어 자연스럽게 뷰를 연결시키게 만들수 있다.
<com.google.android.material.bottomappbar.BottomAppBar
            android:id="@+id/main_bottom_appbar"
            android:layout_width="match_parent"
            android:layout_height="wrap_content"
            android:layout_gravity="bottom"
            android:backgroundTint="@color/white"
            app:elevation="8dp"
            app:fabAlignmentMode="center"
            app:fabCradleMargin="12dp"
            app:fabCradleRoundedCornerRadius="56dp">
바텀 앱바를 이렇게 설정하면
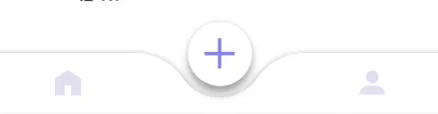
위 이미지와 같은 형태가 된다.
플로팅 버튼은 현재 투명색이라 저렇게 표현됨
BottomNavigation
바텀 네비게이션은 평소처럼 구현하면되는데
바텀 앱바로 시작부분이 벌어진만큼 끝 부분을 16dp 마진을 줘서 균형을 맞춰 준다.
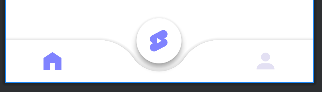
그리고 플로팅버튼으로 휘어진건 바텀 네비가 아닌 바텀 앱바 임으로 바텀네비의 모양은 바뀌지 않는다 (menu가 없으면 얘도 휘어진다)
그렇기 때문에 배경색을 transparent로 설정해줘 투명하게 만들어주면 아이콘만 보이게 되
가운데가 휘어진 바텀 네비게이션을 만들 수 있다.
MotionLayout
이제 특정 프래그먼트에 접속했을때
버튼을 누르면 숨겨진 버튼이 나오는 애니메이션을 만들거다
모션레이아웃을 이용해서 간단하게 구현할 수 있다.
일단 방금 만든 코디네이터 레이아웃 바텀앱바와 숨길 버튼들을 모션레이아웃으로 감싸준다.
<androidx.constraintlayout.motion.widget.MotionLayout
    android:id="@+id/main_motion"
    android:layout_width="match_parent"
    android:layout_height="match_parent"
    android:background="@color/white"
    app:layoutDescription="@xml/activity_main_scene">

    <com.google.android.material.bottomappbar.BottomAppBar
    ...
여기서 일단 숨길 버튼들의 위치가 중요한대 플로팅 버튼 뒤에, 그리고 visibility를 Gone으로 설정해준다
MotionScence.xml
<Constraint
            android:id="@+id/main_fab_share"
            android:layout_width="wrap_content"
            android:layout_height="wrap_content"
            android:visibility="gone"
            app:layout_constraintStart_toStartOf="@+id/main_fab"
            app:layout_constraintEnd_toEndOf="@+id/main_fab"
            app:layout_constraintBottom_toBottomOf="@+id/main_fab"
            app:layout_constraintTop_toTopOf="@+id/main_fab" />
        <Constraint
            android:id="@+id/main_fab_pin"
            android:layout_width="wrap_content"
            android:layout_height="wrap_content"
            android:visibility="gone"
            app:layout_constraintStart_toStartOf="@+id/main_fab"
            app:layout_constraintEnd_toEndOf="@+id/main_fab"
            app:layout_constraintBottom_toBottomOf="@+id/main_fab"
            app:layout_constraintTop_toTopOf="@+id/main_fab" />
        <Constraint
            android:id="@+id/main_fab"
            app:layout_constraintEnd_toEndOf="parent"
            android:layout_width="wrap_content"
            android:layout_height="wrap_content"
            app:layout_constraintTop_toTopOf="@+id/main_coordinator"
            app:layout_constraintStart_toStartOf="parent"
            app:layout_constraintBottom_toBottomOf="parent"
            app:layout_constraintVertical_bias="0.38" />
그런 다음 버튼들이 위치를 정해주고 visibility를 풀어주는 트랜지션 end를 만든다.
mainFab.setOnClickListener {
            if (currentFragment == R.id.navigation_detail) {
                if (mainMotion.currentState == mainMotion.startState) {
                    mainMotion.transitionToEnd()
                } else {
                    mainMotion.transitionToStart()
                }
            } else {
                startActivity(
                    Intent(
                        this@MainActivity,
                        ShortsActivity::class.java
                    )
                )
            }
        }
이제 버튼을 클릭했을때 트랜지션을 end로 이동시키고 다시 눌렀을땐 start로 이동하게 하면 된다.