
지난번에 FCM으로 알림을 보내는 기능을 만들었다.
이번엔 알림 데이터로 알림창을 꾸며줄 거다.
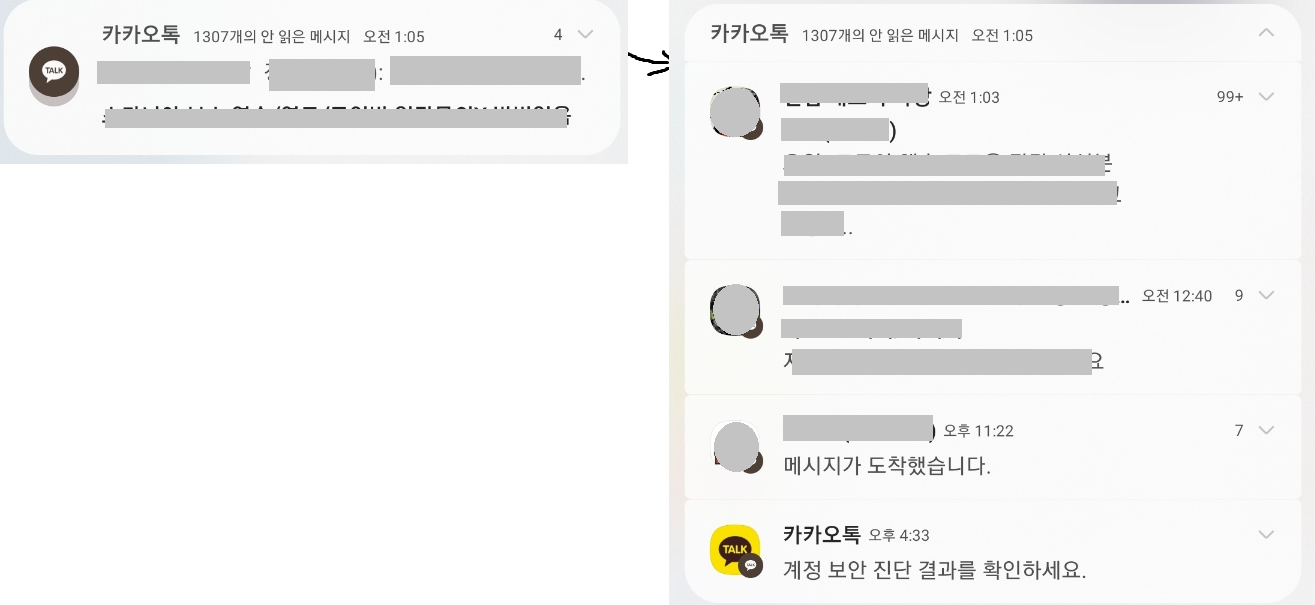
요즘 앱들을 보면 알림을 받을때 그냥 알림 하나만 있고 클릭시 바로이동 하는 경우 보다
눌렀을때 확장되면서 상세한 내용을 보여주는 경우가 많다.

그리고 카카오톡 같은 경우 메세지를 받을때, 뷰를 새로 만든거 아니야? 라는 생각이 들정도로 많이 바뀐다.
이런 알림들은 어떻게 만드는 걸까?
디벨로퍼에 친절히 설명이 되어 있다.
단순 확장 할수 있는 확장형 알림
https://developer.android.com/develop/ui/views/notifications/expanded?hl=ko
커스텀 하는 맞춤 알림
https://developer.android.com/develop/ui/views/notifications/custom-notification?hl=ko
확장형 알림
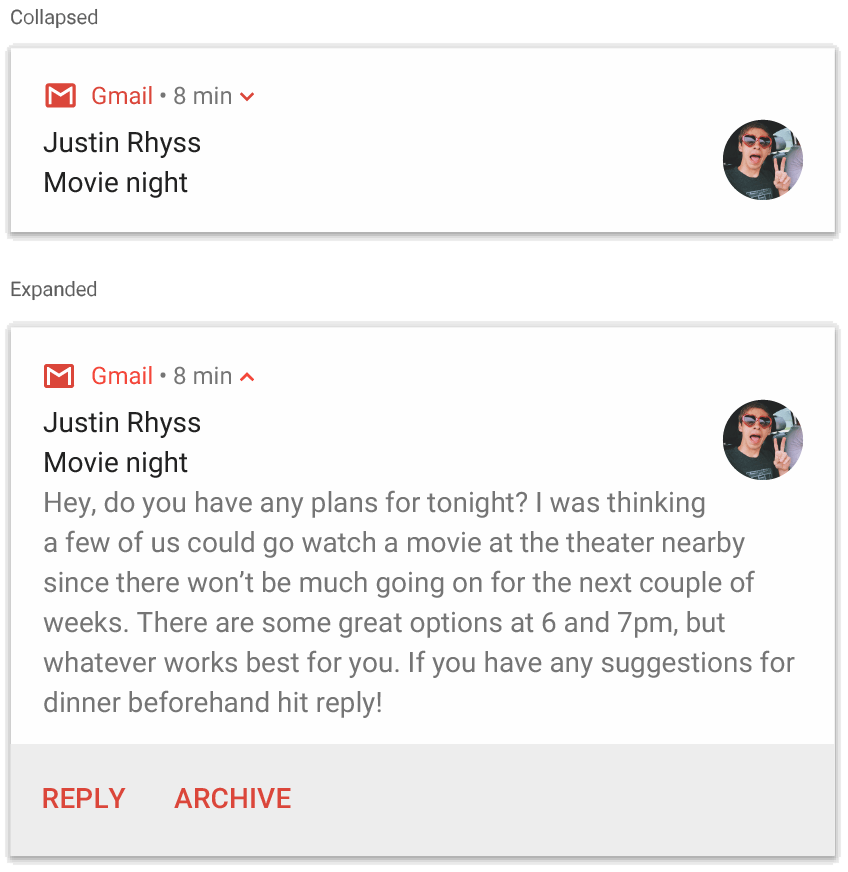
우선 단순히 텍스트가 펼쳐지는 확장형 알림을 만들어 보자
val notification = NotificationCompat.Builder(context, CHANNEL_ID)
        .setSmallIcon(R.drawable.new_mail)
        .setContentTitle(emailObject.getSenderName())
        .setContentText(emailObject.getSubject())
        .setLargeIcon(emailObject.getSenderAvatar())
여기선 기본적인 알림 설정을 해주고 아래에
        .setStyle(NotificationCompat.BigTextStyle()
                .bigText(emailObject.getSubjectAndSnippet()))
        .build()
를 추가해주면 extend되는 확장형 알림을 만들 수 있다.
		.setStyle(NotificationCompat.BigPictureStyle ()
                .bigPicture(myBitmap))
        .build()
스타일을 BigPictureStyle를 사용해서 이미지를 펼쳐줄 수도 있다.
채팅 처럼 조금 복잡한 UI는 어떻게 만들까?
remoteView를 이용하면 구현할수 있다.
맞춤알림
맞춤 레이아웃이 필요한 경우는 알림에 NotificationCompat.DecoratedCustomViewStyle를 적용하면 된다.
우선 사용할 레이아웃을 준비 해야한다.
레이아웃은 확장되기전 small 확장된후 large 총 2가지 레이아웃이 필요하다.
채팅을 표시해주기 위해 다음과 같이 만들었다.


이제 이전에 만든
FirebaseMessagingService로 돌아가서
알림을 만드는 함수 sendNotification을 작성할 것이다.
    @RequiresApi(Build.VERSION_CODES.P)
    private fun sendNotification(
        title: String,
        name: String,
        message: String,
        img: String,
        channelId: String,
        registeredDate: String
    ) {
        val intent = Intent(this, MainActivity::class.java)
        intent.addFlags(Intent.FLAG_ACTIVITY_CLEAR_TOP)
        val pendingIntent = PendingIntent.getActivity(
            this, 0, intent,
            PendingIntent.FLAG_ONE_SHOT or PendingIntent.FLAG_IMMUTABLE
        )
우선 네비게이션을 눌렀을때 이동할 Intent를 만들어준다.
FLAG_ACTIVITY_CLEAR_TOP 은 액티비티의 스택을 관리해주는데, 메인 액티비티가 열리면서 스택은 깨끗하게 만들어준다.
PendingIntent는 위에 설정한 intent를 수행해준다.
        val notificationManager =
            getSystemService(Context.NOTIFICATION_SERVICE) as NotificationManager
        val notificationLayout =
            RemoteViews("com.seven.colink", R.layout.util_custom_chat_notify_small)
        val notificationLayoutExpanded =
            RemoteViews("com.seven.colink", R.layout.util_custom_chat_notify_large)

        notificationLayout.apply {
            setTextViewText(R.id.notification_title, name)
            setTextViewText(R.id.notification_description, message)
        }

        notificationLayoutExpanded.apply {
            if (title == name) setViewVisibility(R.id.notification_chat_title, View.GONE)
            setTextViewText(R.id.notification_chat_title, title)
            setTextViewText(R.id.notification_chat_name, name)
            setTextViewText(R.id.notification_chat_description, message)
            setTextViewText(R.id.notification_chat_time, registeredDate.convertTime())
        }
만들어둔 레이아웃을 RemoteViews로 설정해주고 받아온 데이터들을 세팅해준다.
받는 데이터는
class FirebaseMessagingService : FirebaseMessagingService() {

    override fun onMessageReceived(remoteMessage: RemoteMessage) {
    else if (remoteMessage.data.isNotEmpty()) {

            if (Build.VERSION.SDK_INT >= Build.VERSION_CODES.P) {
                remoteMessage.data["type"]?.let { type ->
                    remoteMessage.data["title"]?.let { title ->
                        remoteMessage.data["message"]?.let { message ->
                            when (NotifyType.fromTitle(type)) {
                                NotifyType.CHAT -> {
                                    remoteMessage.data["name"]?.let { name ->
                                        remoteMessage.data["img"]?.let { img ->
                                            remoteMessage.data["registeredDate"]?.let { registeredDate ->
                                                sendNotification(
                                                    title = title,
                                                    name = name,
                                                    message = message,
                                                    img = img,
                                                    channelId = "channel_$type",
                                                    registeredDate = registeredDate
                                                )
                                            }
                                        }
                                    }
                                }
지난 번에 선언한 onMessageReceived에서 알림을 받고 그 데이터들로 세팅해준다.
여기서 이미지가 있는데 이미지는 url로 구성되어 있다.
사용자의 프로필 이미지를 나타내는 부분인데, RemoteViews에선 coil과 같은 라이브러리를 사용할수 없다.
그렇기 때문에 url을 비트맵으로 변환 해줄 함수를 만들것 이다.
suspend fun Context.loadImageBitmap(imageUrl: String) = try {
    val request = ImageRequest.Builder(this)
        .data(imageUrl)
        .build()
    request.context.imageLoader.execute(request).drawable?.toBitmap()
} catch (e: Exception) {
    Log.e("loadImageBitmap", "Image loading failed: ${e.message}")
    (ContextCompat.getDrawable(this, R.drawable.ic_profile) as? BitmapDrawable)?.bitmap
} CoroutineScope(SupervisorJob()).launch(Dispatchers.IO) {
val bitmap = this@FirebaseMessagingService.loadImageBitmap(img)
withContext(Dispatchers.Main) {
notificationLayoutExpanded.setImageViewBitmap(
R.id.notification_thumbnail,
bitmap
)url을 bitmap으로 전환한뒤 세팅해준다.
                val notificationBuilder =
                    NotificationCompat.Builder(this@FirebaseMessagingService, channelId)
                        .setContentTitle(title) // 제목
                        .setContentText(message) // 내용
                        .setStyle(messageStyle)
                        .setSmallIcon(R.drawable.ic_colink_chat) // 아이콘
                        .setAutoCancel(true)
                        .setSound(defaultSoundUri)
                        .setContentIntent(pendingIntent)
                        .setCustomContentView(notificationLayout)
                        .setCustomBigContentView(notificationLayoutExpanded)


                val channel = NotificationChannel(
                    channelId,
                    "알림 메세지",
                    NotificationManager.IMPORTANCE_HIGH
                )
                notificationManager.createNotificationChannel(channel)

                notificationManager.notify(0, notificationBuilder.build()) // 알림 생성
그런후 빌더를 만들어주고 빌드해주면 알림을 받을 수 있다.

알림을 좀더 디테일하게 해서 카톡처럼 아이콘 -> 프로필 이미지로 전환하게 만들고 싶다.
다음에 어떻게든 방법을 알아내야지