useParams
Link to Profile
Profile 컴포넌트로 이동하는 Link를 프로필 사진과 유저이름에 걸어준다.
// Header.tsx
...
<Link to={`/users/${data.me.username}`}>
	<Avatar url={data?.me?.avatar} />
</Link>
...
useParams
Profile 컴포넌트를 만든 후, Route를 설정한다. 이때, path를 ":"과 함께 유저이름으로 설정한다.
// App.tsx
...
<Route path={`/users/:username`}>
	<Profile />
</Route>
...useParams로 파라미터의 값을 가져온다. 이제, ":" 뒤에 붙은 username에 해당하는 값을 Profile 컴포넌트에서 사용할 수 있다.
// profile.tsx
...
function Profile() {
  const { username } = useParams();
  return ...
}
Queries & Fragments
Fragments
GraphQL 요청을 위한 코드를 작성할 때, 중복되는 요소들을 fragments로 저장해두면 어디서든지 다른 요청에서 재사용이 가능하다.
Spread Operator로 fragments 객체를 GraphQL 객체 안에 할당해준다. 그리고 아래에서 fragment 이름을 적어 import한다. fragment를 만들 때, 백엔드에서 사용했던 타입 이름을 그대로 사용해야 한다.
Fragments
// fragments.ts
export const PHOTO_FRAGMENT = gql`
  fragment PhotoFragment on Photo { // 백엔드와 같은 이름
    id
    file
    likes
    commentNumber
    isLiked
  }
`;

export const COMMENT_FRAGMENT = gql`
  fragment CommentFragment on Comment {
    id
    user {
      username
      avatar
    }
    payload
    isMine
    createdAt
  }
`;
GraphQL Code
// Home.tsx
...
export const FEED_QUERY = gql`
  query seeFeed {
    seeFeed {
      ...PhotoFragment
      user {
        username
        avatar
      }
      caption
      likes
      comments {
        ...CommentFragment
      }
      createdAt
      isMine
    }
  }
  ${PHOTO_FRAGMENT} // import
  ${COMMENT_FRAGMENT}
`;

// Profile.tsx
...
const SEE_PROFILE_QUERY = gql`
  query seeProfile($username: String!) {
    seeProfile(username: $username) {
      firstName
      lastName
      username
      bio
      avatar
      photos {
        ...PhotoFragment
      }
      totalFollowing
      totalFollowers
      isMe
      isFollowing
    }
  }
  ${PHOTO_FRAGMENT}
`;
keyFields
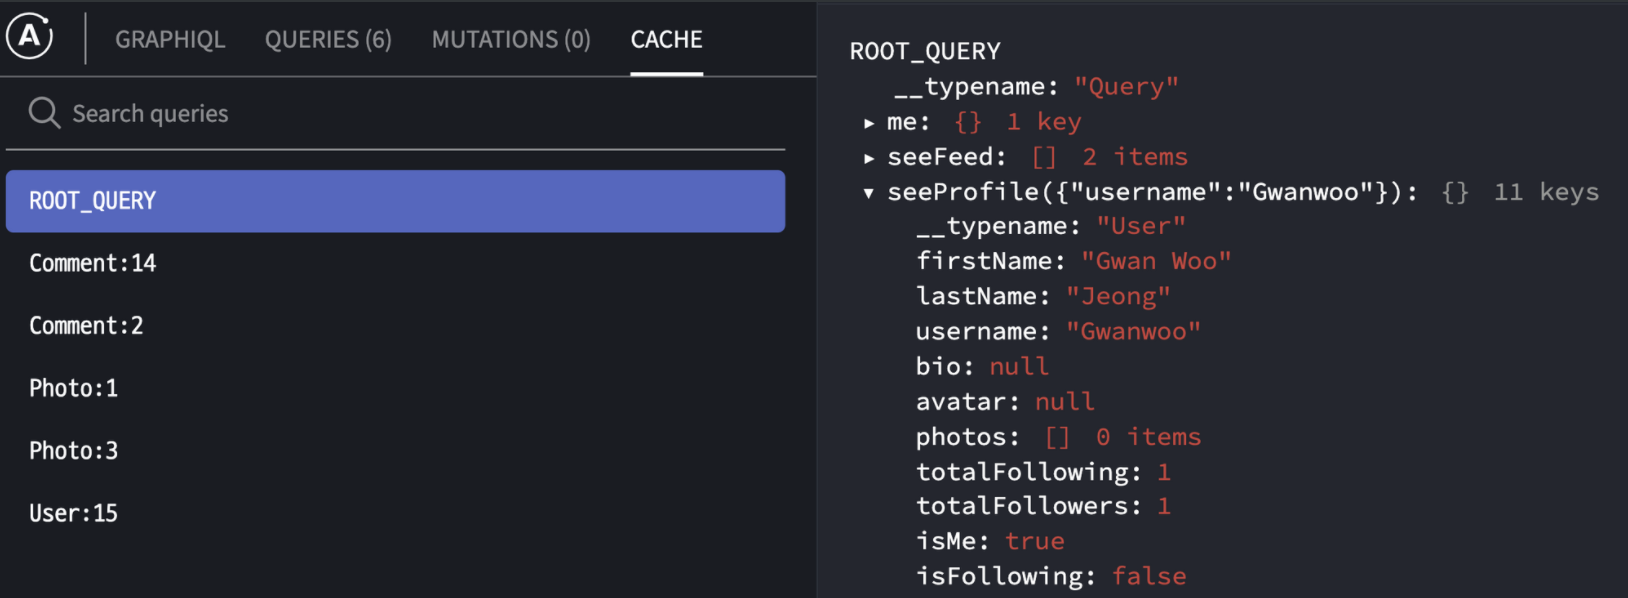
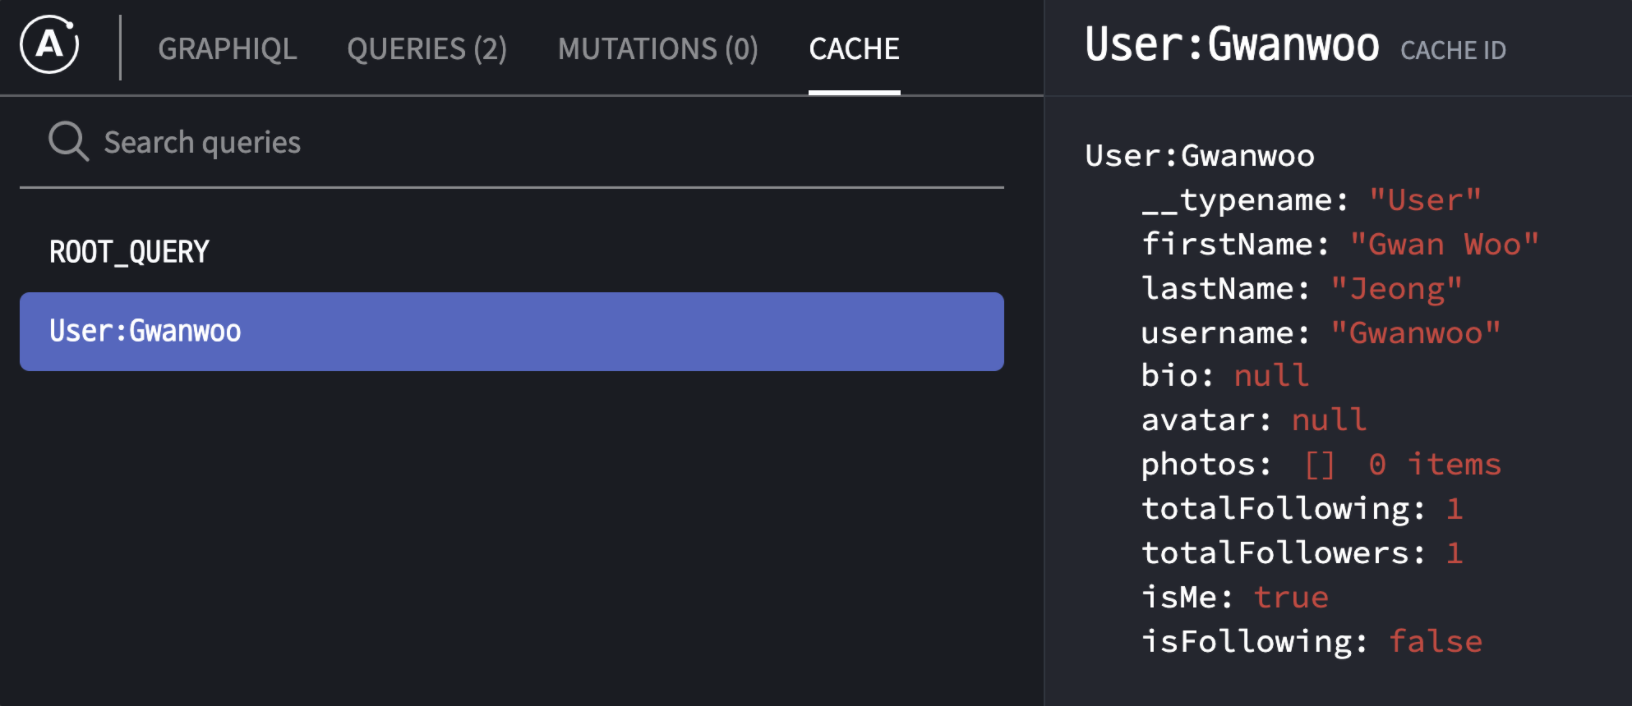
Apollo는 query에서 우선적으로 id를 찾아 cache를 만든다. 아래 그림을 보면, id가 없기 때문에 Apollo는 cache를 만들지 않고 응답 데이터를 그대로 seeProfile 배열 안에 저장하는 것을 볼 수 있다.
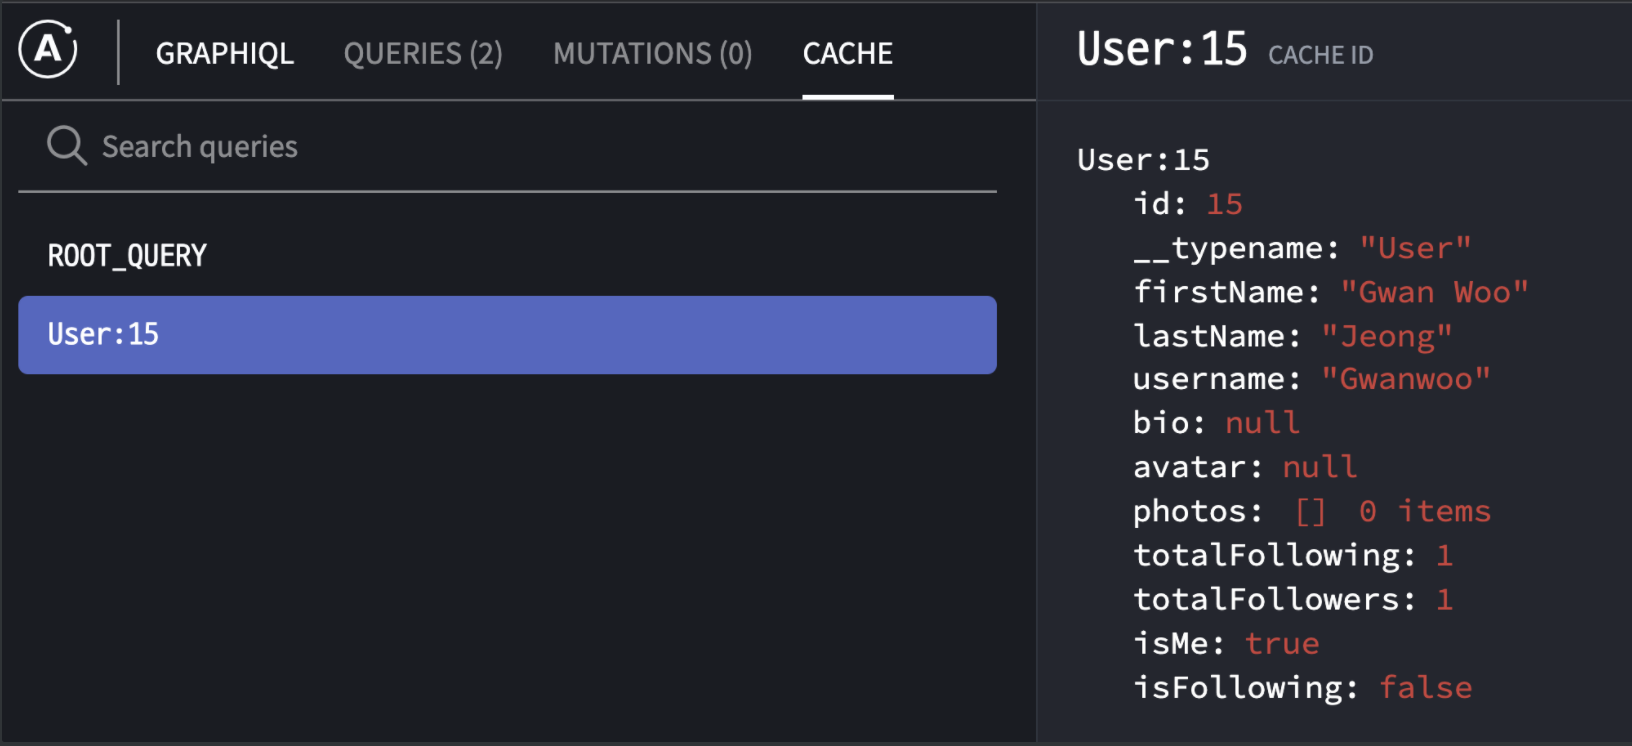
다시 query에 id를 추가하면, Apollo가 id를 참조하여 User의 id : 15가 일치하는 것을 확인한 후 같은 유저라고 판단하여 저장된 cache에 가져온 데이터를 덮어쓴다. (아래 그림 참고)

// Profile.tsx
...
const SEE_PROFILE_QUERY = gql`
query seeProfile($username: String!) {
seeProfile(username: $username) {
id
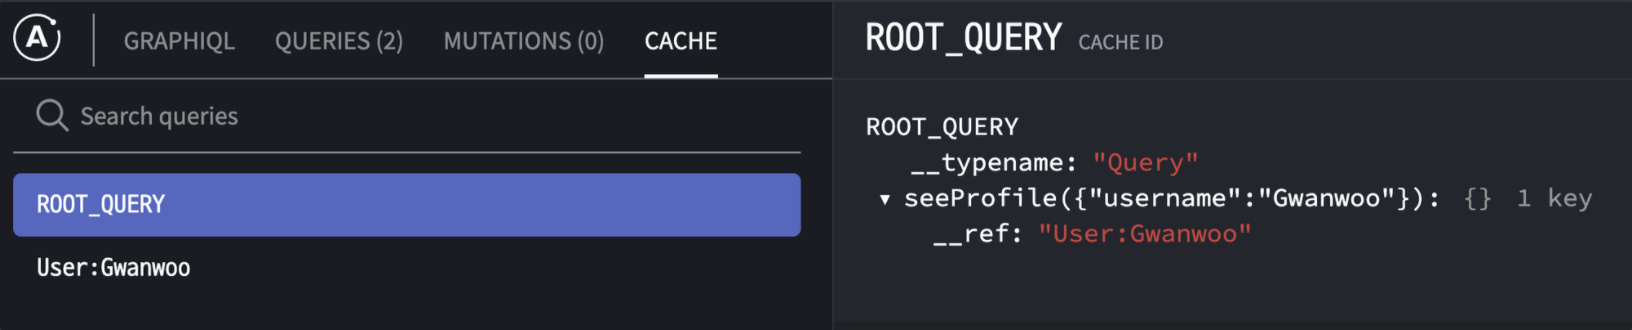
...그런데, 만약에 id가 없거나 id 말고 다른 고유식별자(unique)로 cache를 저장하고 싶다면 keyFields를 사용하면 된다. Apollo가 cache에 고유식별자를 만들어 내는 방식을 구축하는 것이다. 다음과 같이 구현할 수 있다.
// apollo.ts
...
export const client = new ApolloClient({
  link: authLink.concat(httpLink),
  cache: new InMemoryCache({
    typePolicies: {
      // 변경하고자 하는 타입의 이름
      User: {
        // 어떤 필드를 고유식별자(unique)로 설정할지?
        keyFields: (obj) => `User:${obj.username}`,
      },
...
이제 Apollo는 id가 아닌 username으로 user를 식별하여 cache를 만들어주는 것을 확인할 수 있다.
Follow & Unfollow
Overall
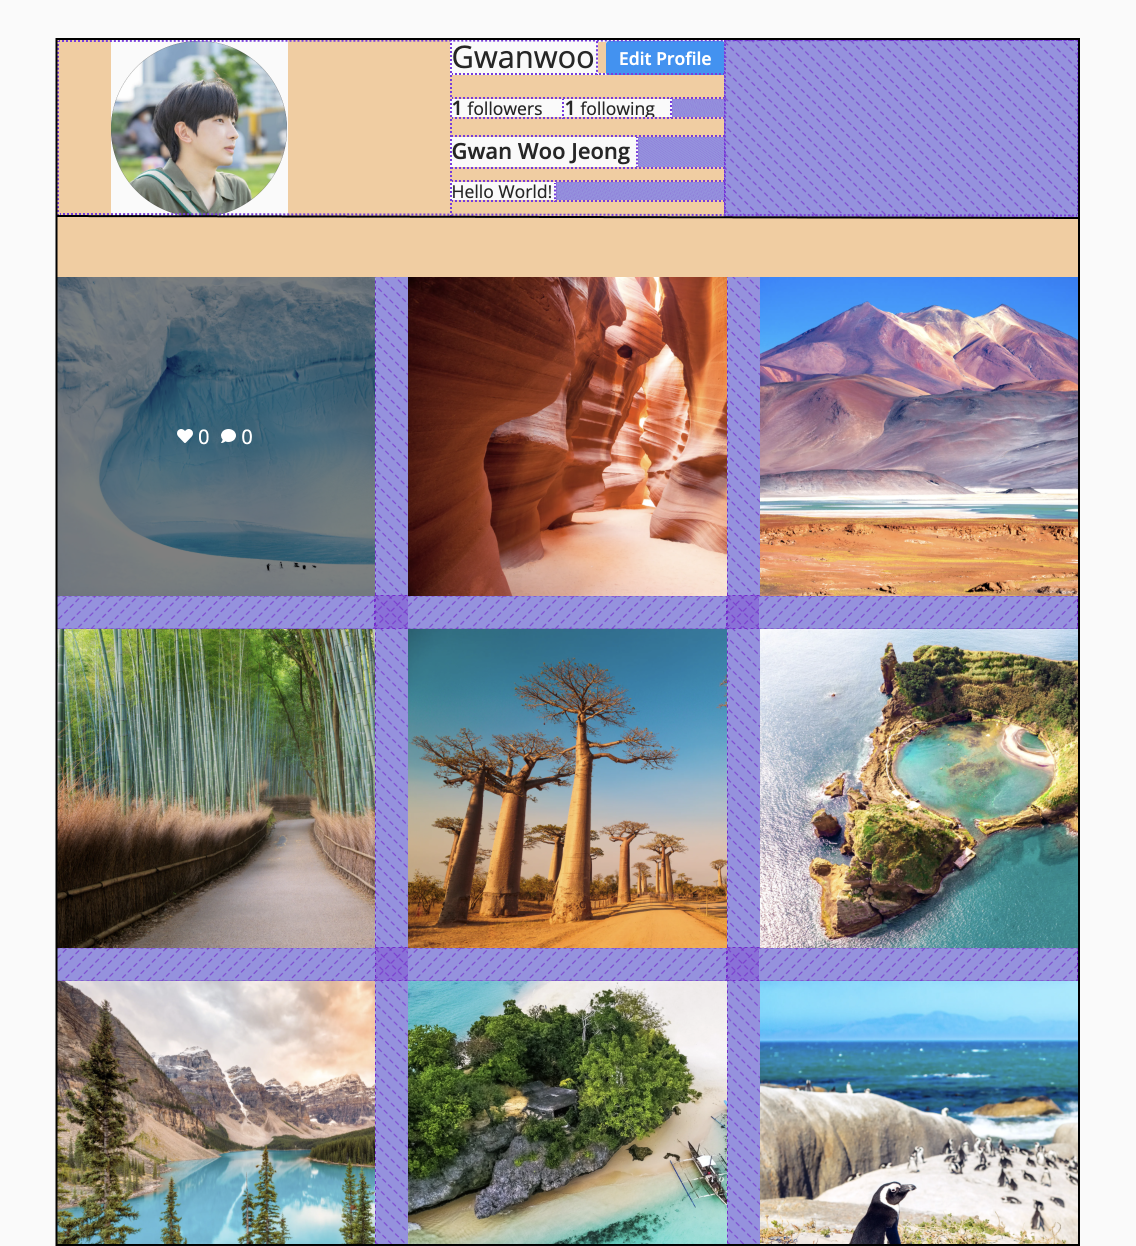
Profile 페이지의 CSS는 다음과 같이 되어있다.
Grid
Grid를 이용해 사진을 3 X 3으로 배치했다.
// Profile.tsx
...
const Grid = styled.div`
  display: grid;
  grid-auto-rows: 290px; // 한 칸당 290px X 290px
  grid-template-columns: repeat(3, 1fr); // 3열
  gap: 30px; // 칸 사이 공간
  margin-top: 50px;
`;
...
return (
	...
	<Grid>
        {data?.seeProfile?.photos?.map((photo) => (
          <Photo key={photo?.id} bg={photo?.file}>
            ...
          </Photo>
        ))}
   </Grid>
	...
)
Hover Effect
사진 위에 커서를 올리면 좋아요와 댓글 수가 나타난다. 사진을 이미지가 아닌 div의 백그라운드로 사진을 띄운 후, 그 위에 hover 효과를 준 반투명한 div를 쌓는 방법으로 구현할 수 있다.
// Profile.tsx
...
const Photo = styled.div<bgType>`
  background-image: url(${(props) => props.bg});
  background-size: cover;
  position: relative;
`;

const Icons = styled.div`
  position: absolute;
  display: flex;
  justify-content: center;
  align-items: center;
  width: 100%;
  height: 100%;
  background-color: rgba(0, 0, 0, 0.5);
  opacity: 0;
  &:hover {
    opacity: 1;
  }
`;

const Icon = styled.span`
  display: flex;
  align-items: center;
  ...
`;

...
return (
	...
	<Photo key={photo?.id} bg={photo?.file}>
     <Icons>
	       <Icon>
	         ... // 좋아요
         </Icon>
         <Icon>
	         ... // 댓글 수
         </Icon>
     </Icons>
  </Photo>
)
attrs
어떤 Styled Components의 스타일링을 가져다 쓰고 싶은데 HTML 태그가 다를 경우, attrs라는 메서드를 사용하여 태그를 변경할 수 있다. Extend와 똑같이 기존 스타일에 다른 스타일을 섞는 것도 가능하다.
// input 태그 => span 태그
const ProfileBtn = styled(Button).attrs({ as: "span" })`
  margin-left: 10px;
  margin-top: 0px;
  padding: 8px 12px;
`;
중첩 삼항 연산자
JSX에서 삼항 연산자가 중첩될 경우 코드의 가독성이 매우 나빠진다. 이럴 경우, 리턴 밖에서 따로 함수로 만들어준 다음 JSX에서 함수를 실행시켜주는 것이 좋다.
// Profile.tsx
...
const getButton = (seeProfile: seeProfile_seeProfile) => {
    const { isMe, isFollowing } = seeProfile;
    // 로그인 유저의 프로필일 경우
    if (isMe) {
      // 프로필 수정 버튼 띄우기
      return <ProfileBtn>Edit Profile</ProfileBtn>;
    }
    // 팔로잉하는 유저의 프로필일 경우
    if (isFollowing) {
      // 언팔로우 버튼 띄우기
      return <ProfileBtn>Unfollow</ProfileBtn>;
    // 팔로잉이 아니면
    } else {
      // 팔로우 버튼 띄우기
      return <ProfileBtn>Follow</ProfileBtn>;
    }
  };

return (
	...
	// query의 data(seeProfile)가 들어온 후 함수 실행
	{data?.seeProfile && getButton(data.seeProfile)}
	...
)
RefetchQueries
저번 Feed와 마찬가지로 refetchQueries를 이용하여 follow & unfollow mutation 요청 후, 프론트를 업데이트한다. 이번에는 follow / unfollow 유저와 로그인 유저의 프로필을 두 번 받아와야하기 때문에, refetch를 두 번 한다.
// Profile.tsx
...
const [followUser] = useMutation<followUser>(FOLLOW_USER_MUTATION, {
    variables: { username },
    refetchQueries: [
      { query: SEE_PROFILE_QUERY, variables: { username } }, // 팔로우 한 유저
      {
        query: SEE_PROFILE_QUERY,
        variables: { username: userData?.me?.username }, // 로그인 유저
      },
    ],
  });

const [unFollowUser] = // query 이름을 제외하고 위와 동일...
...
하지만, 이 방법은 필요 없는 데이터를 받을 뿐더러 refetch를 두 번이나 하기 때문에 효율적이지 못하다. Cache를 직접 고쳐서 프론트를 변경하는 것이 성능적으로 더 좋다.
Modifying Cache
update mutation function이 아닌 onCompleted function으로 cache를 조작할 수 있다. Function에 cache가 제공되진 않지만, useApolloClient로 client.cache에 접근할 수 있다.
// Profile.tsx
...
  const followUserCompleted = (data: followUser) => {
    const { ok } = data.followUser;
    if (!ok) {
      return;
    }
    // apollo client로 cahce 접근
    // mutation이 없을 때도, cache를 조작할 수 있다
    const { cache } = client;
    cache.modify({
      id: `User:${username}`,
      // cache 안의 User의 모든 fields를 담는 객체
      // 각 fields를 함수로 변경할 수 있음
      fields: {
        // 팔로잉
        isFollowing(prev) {
          return true;
        },
        // 팔로워 1 추가
        totalFollowers(prev) {
          return prev + 1;
        },
      },
    });

    // 로그인 유저 프로필
    cache.modify({
      id: `User:${userData.me.username}`,
      fields: {
	// 팔로우 1 추가
        totalFollowing(prev) {
          return prev + 1;
        },
      },
    });
  };

  const [followUser] = useMutation<followUser, followUserVariables>(
    FOLLOW_USER_MUTATION,
    {
      variables: { username },
      onCompleted: followUserCompleted,
    }
  );
...