
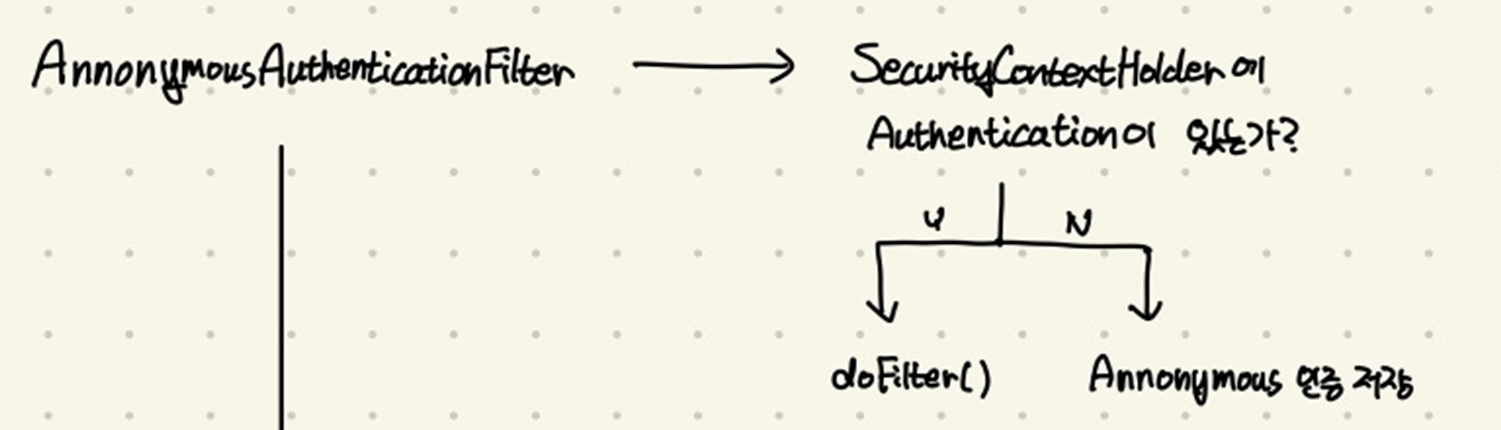
⚠️ 그림과 글에 틀린 내용이 있습니다. ExceptionTranslationFilter는 AuthorizationFilter 전에 위치합니다. AuthorizationFilter에서 던져진 AccessDeinedException이 사용자가 Annonymous인 경우 AuthenticationException으로 변환되어 처리됩니다.
전체 내용 수정 예정
들어가며
<빨랐죠> 리포지토리
https://github.com/gyehyun-bak/ppalatjyo
개인 프로젝트 채팅 퀴즈 게임 <빨랐죠>를 진행하면서 인증/인가를 위해서 이전에 하던 것처럼 Spring Security를 도입하였습니다. 이전에는 어떻게든 원하는 결과만 뱉어내도록 구현하는 데에 집중했지만, 이번에는 공식 문서도 차분히 읽고 전체 아키텍처에 어울리게 개발할 방법을 고민해보았습니다. 해당 과정에서의 오해와 개선한 과정을 기록해보고자 합니다.
기존 코드
옛날 코드
스프링 시큐리티에 대한 학습이 전무하여 인터넷에 나온 예시와 G선생의 도움을 받아 구현했을 때는 다음과 같이 단순하게 구현하였습니다.
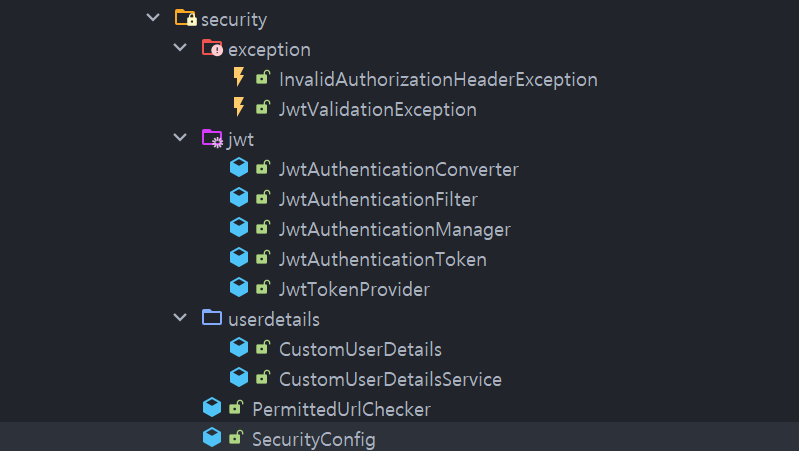
JwtTokenProvider: JWT 토큰에 대한 유효성을 검사하고, 내부에서 userId를 추출합니다.JwtAuthenticationFilter: 인증 헤더로부터 토큰을 검사하고 SecurityContextHolder에 인증을 추가합니다. 만약 인증에 실패하는 경우 HttpServletResponse에 오류 메시지를 작성하고 doFilter하지 않고 return을 하는 방식으로 오류 응답을 반환하였습니다.CustomUserDetail과CustomUserDetailsService: 저장될 Authentication에 저장될 복합 Principal 객체와 이를 제공할 DAO 인증 제공 클래스입니다. 각각 기존에 정의된 인터페이스를 구현한 구현체입니다. JwtAuthenticationFilter에서 바로 사용하였습니다.
개선 코드
스프링 시큐리티를 조금 아시는 분들은 감이 오시겠지만 저렇게 하면 몇 가지 문제가 있습니다만(뒤에 하나씩 다룹니다), 가장 큰 문제는 일단 JwtAuthenticationFilter가 아주 거대해진다는 점입니다.
그래서 내부에 이 로직을 각 역할에 맞게 분할해야겠다고 생각하여, 기존에 구현된 다른 AuthenticationFilter를 참고하였습니다.
스프링에서 기본 동작하는 UsernamePasswordAuthenticationFilter와 BasicAuthenticationFilter를 살펴보았습니다. 이들은 각각 "로그인 url로 매핑된 요청에서 username과 password 필드로 인증 생성"을 하는 필터와, "Basic 헤더를 통해 인증 생성"을 하는 필터입니다.
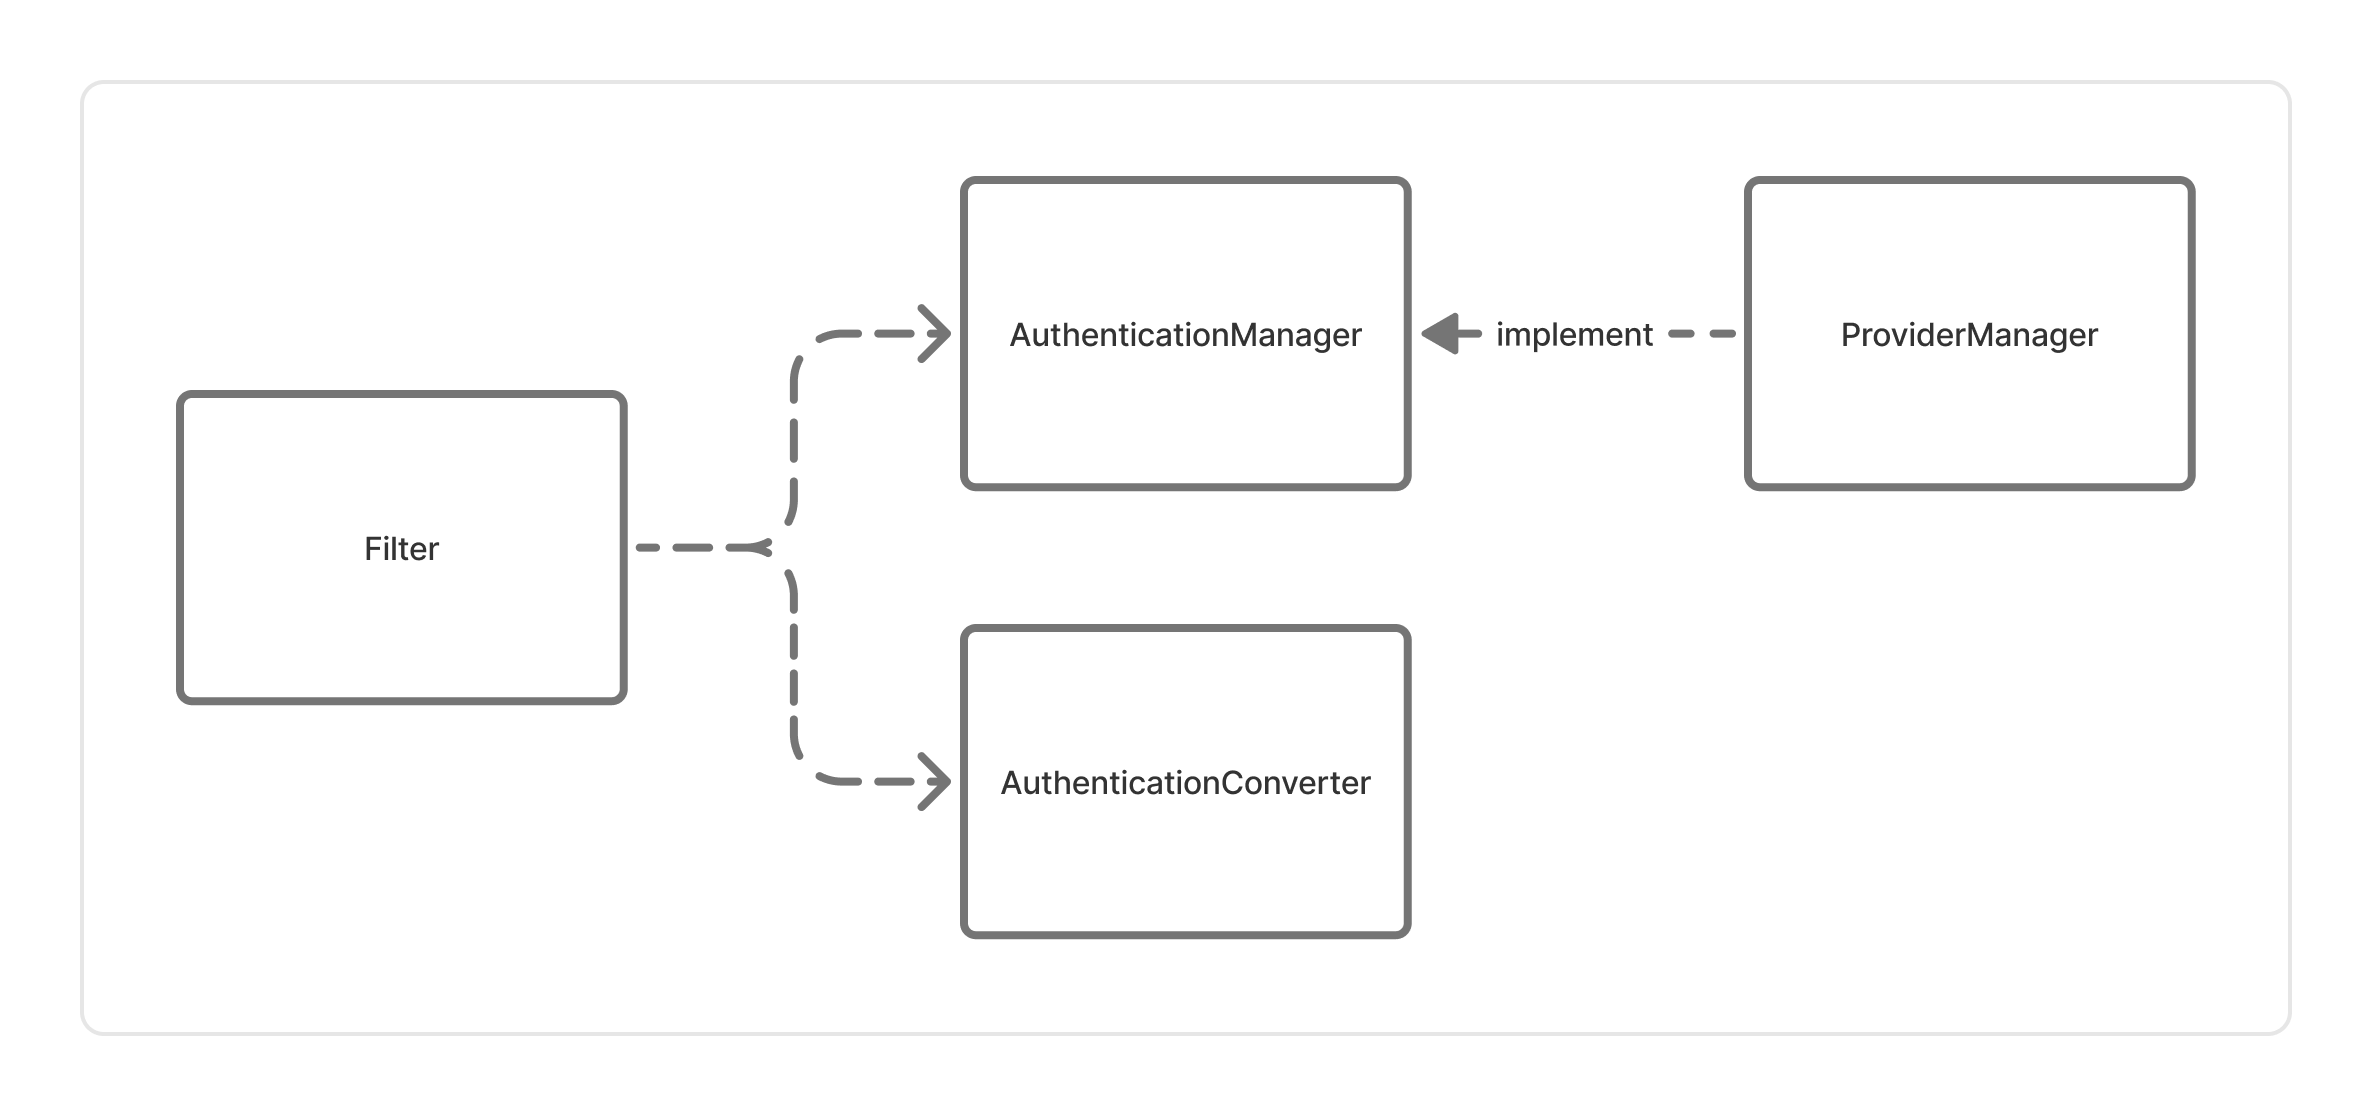
두 필터 모두 내부적으로 AuthenticationManager를 주입받아서 사용하고, AuthenticationConverter를 내부 필드로 초기화하여 사용하고 있습니다.
세부 구현은 다르지만 대략 다음과 같은 형태를 공통적으로 띄고 있습니다.
@Override
protected void doFilterInternal(HttpServletRequest request, HttpServletResponse response, FilterChain filterChain) throws ServletException, IOException {
    try {
    	// 요청으로부터 인증되지 않은 인증 객체 생성
        Authentication authenticationRequest = authenticationConverter.convert(request);
        // 인증 객체를 인증
        Authentication authenticationResult = authenticationManager.authenticate(authenticationRequest);

		// 성공 처리
        onSuccessfulAuthentication(request, response, authenticationResult);

		// 다음 필터로
        filterChain.doFilter(request, response);
    } catch (Exception e) {
    	// 예외 발생시 실패 처리
        onUnsuccessfulAuthentication(request, response, e);
    }
}
인증 필터(AuthenticationFilter)는 요청을 받아 Authentication을 만드는 AuthenticationConverter와 실제 인증을 진행하는 AuthenticationManager를 연결하고, 성공과 실패 시의 로직을 담당하도록 각 역할이 명확하게 나뉘어진 것을 볼 수 있었습니다.
그래서 일단 따라해보았습니다! (코드 많음 주의)
JwtAuthenticationFilter
@Component
@RequiredArgsConstructor
@Slf4j
public class JwtAuthenticationFilter extends OncePerRequestFilter {

    private final AuthenticationConverter authenticationConverter;
    private final AuthenticationManager authenticationManager;
    private final ObjectMapper objectMapper;

    @Override
    protected void doFilterInternal(HttpServletRequest request, HttpServletResponse response, FilterChain filterChain) throws ServletException, IOException {

        try {
            Authentication authenticationRequest = authenticationConverter.convert(request);
            Authentication authenticationResult = authenticationManager.authenticate(authenticationRequest);

            onSuccessfulAuthentication(request, response, authenticationResult);

            filterChain.doFilter(request, response);
        } catch (Exception e) {
            onUnsuccessfulAuthentication(request, response, e);
        }
    }

    private void onSuccessfulAuthentication(HttpServletRequest request, HttpServletResponse response, Authentication authenticationResult) {
        SecurityContextHolder.getContext().setAuthentication(authenticationResult);
    }

    private void onUnsuccessfulAuthentication(HttpServletRequest request, HttpServletResponse response, Exception ex) throws IOException {
        log.debug("Authentication Failed", ex);

        String errorMessage = "Authentication Failed.";
        HttpStatus status = HttpStatus.UNAUTHORIZED;
        ResponseErrorDto errorDto = ResponseErrorDto.commonError(errorMessage, request.getRequestURI());
        ResponseDto<Void> responseDto = ResponseDto.error(status, errorDto).getBody();

        response.setStatus(status.value());
        response.setContentType("application/json");
        response.setCharacterEncoding("UTF-8");
        objectMapper.writeValue(response.getWriter(), responseDto);
    }
}
JwtAuthenticationConverter
@Component
@RequiredArgsConstructor
public class JwtAuthenticationConverter implements AuthenticationConverter {

    @Override
    public JwtAuthenticationToken convert(HttpServletRequest request) {
        String authorizationHeader = request.getHeader("Authorization");
        if (authorizationHeader == null) {
            throw new InvalidAuthorizationHeaderException("No authorization header found");
        } else if (!authorizationHeader.startsWith("Bearer ")) {
            throw new InvalidAuthorizationHeaderException("Authorization header should start with 'Bearer'");
        }

        String token = authorizationHeader.substring(7);
        if (token.isEmpty()) {
            throw new InvalidAuthorizationHeaderException("Token is not provided after 'Bearer'");
        }

        return JwtAuthenticationToken.unauthenticated(token);
    }
}
JwtAuthenticationManager
@Component
@RequiredArgsConstructor
public class JwtAuthenticationManager implements AuthenticationManager {

    private final JwtTokenProvider jwtTokenProvider;
    private final UserDetailsService userDetailsService;

    @Override
    public Authentication authenticate(Authentication authentication) throws AuthenticationException {
        String token = (String) authentication.getCredentials();

        try {
            jwtTokenProvider.validateToken(token); // 여기서 예외가 발생하면 catch로 넘어감

            String userId = jwtTokenProvider.getUserIdFromToken(token);
            UserDetails userDetails = userDetailsService.loadUserByUsername(userId); // throws UsernameNotFoundException

            return JwtAuthenticationToken.authenticated(
                    userDetails,
                    token,
                    userDetails.getAuthorities());
        } catch (ExpiredJwtException e) {
            throw new JwtValidationException("Token has expired");
        } catch (MalformedJwtException e) {
            throw new JwtValidationException("Token is invalid");
        } catch (SignatureException e) {
            throw new JwtValidationException("Token signature exception");
        } catch (UnsupportedJwtException e) {
            throw new JwtValidationException("Unsupported token");
        } catch (IllegalArgumentException e) {
            throw new JwtValidationException("Invalid JWT token");
        } catch (Exception e) {
            throw new JwtValidationException("Unexpected JWT token Exception");
        }
    }
}
앞서 말한데로 JwtAuthenticationFilter는 AuthenticationConverter와 AuthenticationManager를 활용하고 응답을 처리하도록 구현하였고, 각 JwtAuthenticationConverter가 요청에서 토큰을 찾아 커스텀 Authentication 객체로 만들도록, JwtAuthenticationManager가 해당 객체로 실제 인증을 진행하도록 구현을 하였습니다.
또한 기존 많은 예시에서 Authentication 구현체로 UsernamePasswordToken을 그대로 사용하는 것을 보고, JWT 관련 데이터임을 명확하게 하기 위해 JwtAuthenticationToken을 따로 구현하였습니다.
CustomUserDetailsService는 DAO인 UserRepository에서 ID로 유저를 찾기 위해 구현을 했습니다. CustomUserDetails도 사용자 ID 필드를 저장하기 위해 따로 구현하였습니다.
문제점
나름 깔끔하게 잘 되었다고 생각했습니다만 문제가 생겨 트러블 슈팅하는 과정에 몇 가지 의문점이 생겼습니다.
허가된 경로 설정
API 요청에 JWT 토큰을 필요로 하지 않는 경로를 설정하고자 하여 SecurityFilterChain 설정에서 다음과 같이 코드를 추가해줬습니다.
.authorizeHttpRequests(authorize -> authorize
                        .requestMatchers("/permitted").permitAll()
                        .anyRequest().authenticated())
/permitted 경로에서는 Filter가 동작하지 않으리라고 단순히 생각하고 추가하였으나 그렇지 않았습니다. 이건 스프링 시큐리티의 동작 방식에 대한 공부가 부족했던 탓인데, requestMatchers에 경로를 추가한다고 인증 필터가 동작하지 않는 것이 아니었습니다.
FilterChain 내 모든 필터는 이전 필터에서 return을 해버리지 않는 이상 doFilter()로 인해 호출이 됩니다.
authorizeHttpRequests의 requestMatchers에 등록되는 URL이 적용되는 부분은 이름에도 나와있듯이 인가(Authorization) 부분입니다.
기본 설정에 따른 스프링 시큐리티의 흐름에서는 모든 인증 필터에 의해 인증 객체가 SecurityContextHolder에 저장되지 않은 경우,
다시 말해서 인증 필터의 마지막까지 SecurityContextHolder에 인증이 없는 경우, AnnonymousAuthenticationFilter에 의해 익명 사용자 인증이 생성되어 SecurityContextHolder에 저장됩니다.
이렇게 인증 과정이 끝나면, AuthorizationFilter에 의해 URL에 대한 인가 과정이 시작됩니다.
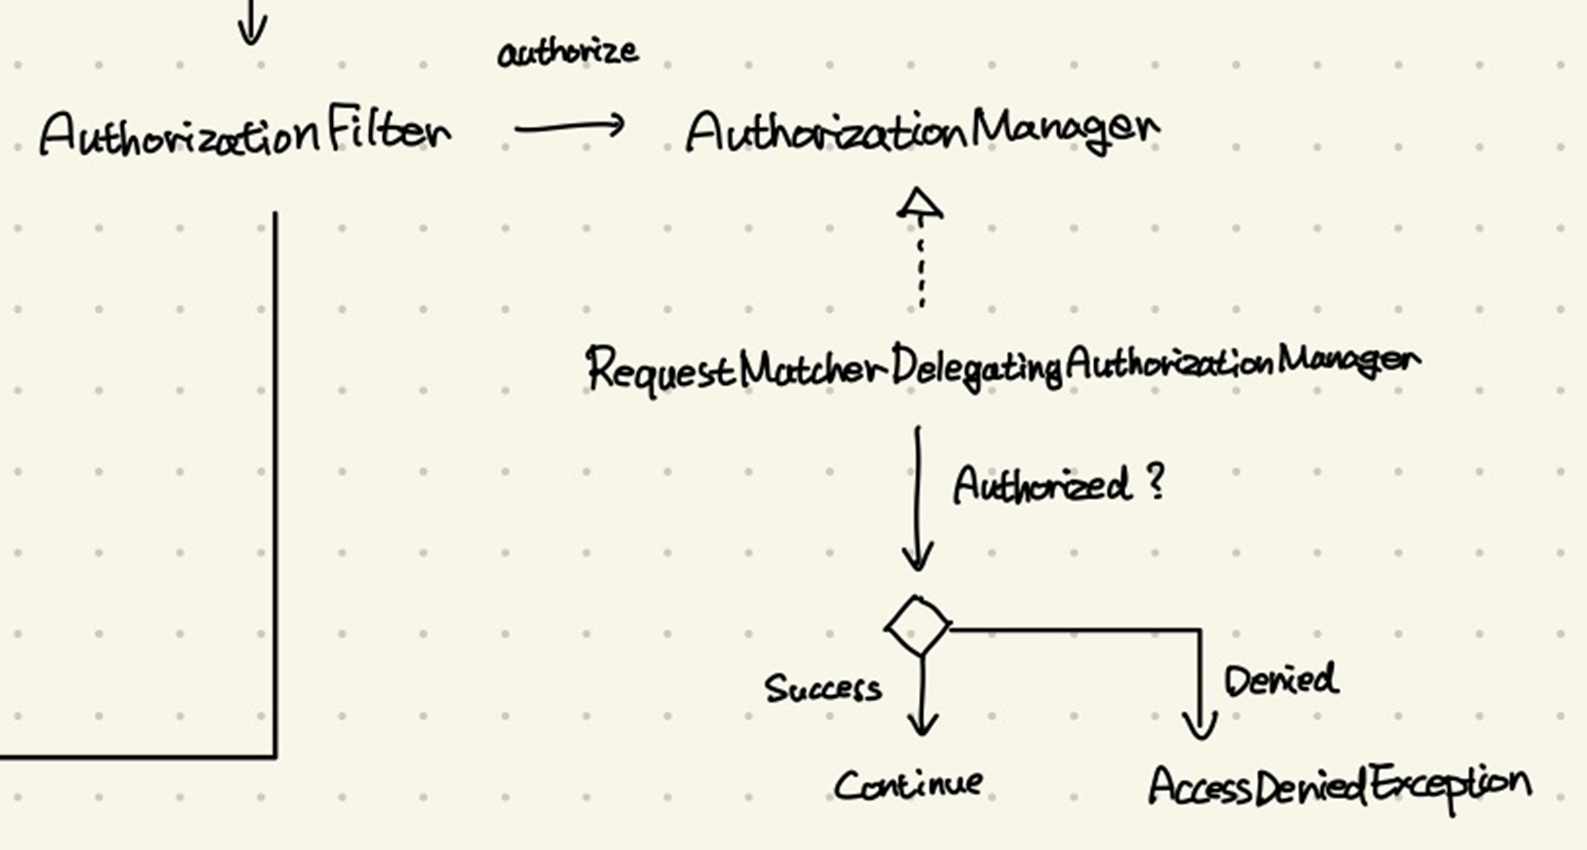
여기서 내부적으로 RequestMatcherDelegatingAuthorizationManager에 의해 이전에 등록했던 URL에 대해서 익명 사용자(Annonymous)여도 접근을 허용할 것인지, 아니면 예외를 발생시킬 것인지 판단하게 됩니다.
즉, 인증 필터에서 막혀버린 요청은 여기까지 도달하지 못하는 것입니다.
해결 - 임시
어떻게 해결할까 고민하던 끝에, 아직 시큐리티 내부 동작에 자신이 없었던 터라, 단순히 JwtAuthenticationFilter에서 허가된 URL인지 확인을 하자는 생각에 도달하게 됩니다.
@Override
protected void doFilterInternal(HttpServletRequest request, HttpServletResponse response, FilterChain filterChain) throws ServletException, IOException {
	// 여기서 필터 적용 여부를 직접 확인
    if (permittedUrlChecker.isPermitted(request.getRequestURI())) {
        filterChain.doFilter(request, response);
        return;
    }

    try {
        Authentication authenticationRequest = authenticationConverter.convert(request);
        Authentication authenticationResult = authenticationManager.authenticate(authenticationRequest);

        onSuccessfulAuthentication(request, response, authenticationResult);

        filterChain.doFilter(request, response);
    } catch (Exception e) {
        onUnsuccessfulAuthentication(request, response, e);
    }
}
하드 코딩으로 URL을 추가해가는 방법은 아무래도 양심에 걸려서, 이를 담당하는 PermittedUrlChecker라는 클래스를 만들어서 SecurityConfig에서도 함께 사용했습니다.
공통 응답 형식
모든 API에 대한 공통 응답 형식(ResponseDto)를 반환하도록 구현을 했습니다. 이것을 @RestControllerAdvice 등을 활용하여, 필터 단에서 던져진 예외를 처리하도록 하고자 하였습니다. 그런데 시큐리티 필터에 의한 예외에는 @RestControllerAdvice가 적용되지 않는 문제가 있었습니다.
이것은 @RestControllerAdvice 등 바깥에서 예외를 핸들링하여 응답을 반환하는 기능이, 컨트롤러에 요청이 들어가야지만 적용되기 때문이었습니다.
해결 - 임시
따라서 기존 JwtAuthenticationFilter에서 예외를 잡아서 HttpServletResponse에 응답을 직접 써서 공통 형식의 응답을 반환하도록 구현하였습니다.
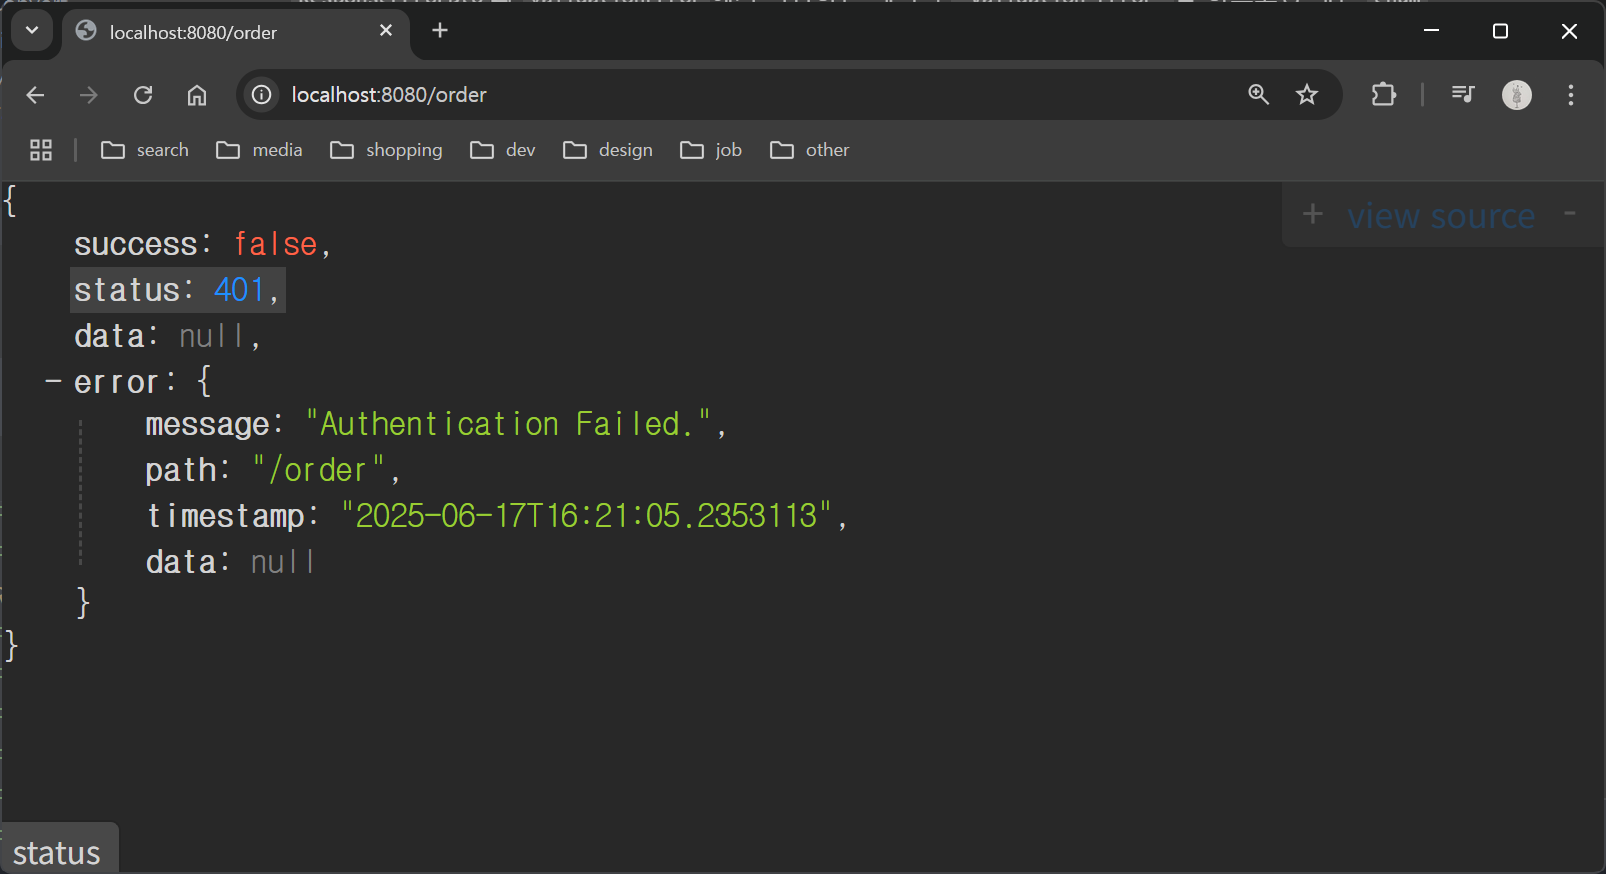
private void onUnsuccessfulAuthentication(HttpServletRequest request, HttpServletResponse response, Exception ex) throws IOException {
    log.debug("Authentication Failed", ex);

    String errorMessage = "Authentication Failed.";
    HttpStatus status = HttpStatus.UNAUTHORIZED;
    ResponseErrorDto errorDto = ResponseErrorDto.commonError(errorMessage, request.getRequestURI());
    ResponseDto<Void> responseDto = ResponseDto.error(status, errorDto).getBody();

    response.setStatus(status.value());
    response.setContentType("application/json");
    response.setCharacterEncoding("UTF-8");
    objectMapper.writeValue(response.getWriter(), responseDto);
}
문제점
인증 필터가 인가 처리를 하고 있다는 생각이 들었습니다. 앞서 언급했듯이 스프링 시큐리티는 제공된 필터에서 인증이 실패하는 경우 익명 인증을 만들고, 해당 익명 인증에 대해 인가 여부에 대해서는 인가 필터에서 진행합니다.
이렇게 인증/인가가 분리되어 있기 때문에 인증 예외인 AuthenticationException과 인가 예외인 AccessDeniedException을 나누어 처리할 수 있게 구현되어 있고,
이를 처리하는 것은 최종적으로 ExceptionTranslationFilter가 하도록 구현이 되어 있습니다.
Spring Security 전체 흐름 정리

이러한 문제점들에 대해, 스프링 시큐리티가 의도한 아키텍처에 더 맞는 구현으로 개선하기 위해서 전체 흐름을 정리해보았습니다. (현재는 손 그림인데 추후 그래픽으로 대체하겠습니다..)
전체 흐름은 다음과 같습니다.
진입 단계
- 요청 진입: 사용자의 요청이 Security Filter Chain으로 진입합니다.
ExceptionTranslationFilter가 맨 앞에서 나머지 필터의 처리를try-catch로 감쌉니다. (이후 필터에서 발생하는 예외는 이 친구가 잡습니다)
인증 단계
- 등록된 다수의
AuthenticationFilter₁ ~ ₙ가 실행됩니다 (ex.UsernamePasswordAuthenticationFilter,BasicAuthenticationFilter등).
3-1. 각AuthenticationFilter는 각각AuthenticationManager(기본적으로ProviderManager가 등록)와AuthenticationConverter(각 필터가 구현체 초기화)를 이용해 인증을 생성해 저장합니다. AnnonymousAuthenticationFilter에서 아직 생성된 인증이 없다면 익명 인증을 생성해 저장합니다.
- 이 단계에서는 AuthenticationException(죄송합니다 그림에 오탑니다)을 던집니다.
인가 단계
AuthorizationFilter가AuthorizationManager를 통해 현재 요청에 대한 인가 여부를 검증합니다.AuthorizationManager는 기본RequestMatcherDelegatingAuthorizationManager를 사용합니다.SecurityContextHolder에서 현재 인증을 가져와 인가 여부를 확인합니다. 거부되면AccessDeniedException을 던집니다.
확인 단계
ExceptionTranslationFilter에서 다른 필터들에서 던져진 예외를 잡아 처리합니다.
7-1.AuthenticationException인 경우AuthenticationEntryPoint가 이를 처리합니다.
7-2.AccessDeniedException인 경우AccessDeniedHandler가 이를 처리합니다.- 예외가 없다면 요청을 컨트롤러로 넘깁니다.
개선 방법
위 단계를 통해 Filter에서는 예외를 던지고, 이를 잡아 처리하는 건 AuthenticationEntryPoint 혹은 AccessDeniedHandler를 빈으로 등록하여 처리하는게 좋겠다는 결론에 도달하였습니다.
아직 전체 코드를 수정하지는 못했지만, 각 AuthenticationEntryPoint와 AccessDeniedHandler를 등록하는 예시를 첨부합니다.
SecurityConfig
@Configuration
@EnableWebSecurity
public class SecurityConfig {
@Bean
public SecurityFilterChain filterChain(HttpSecurity http) throws Exception {
http
.csrf(Customizer.withDefaults())
.httpBasic(Customizer.withDefaults())
.formLogin(Customizer.withDefaults())
.authorizeHttpRequests(authorize -> authorize
.requestMatchers("/permitted").permitAll()
.anyRequest().authenticated())
.exceptionHandling(configurer -> configurer
.authenticationEntryPoint(new CustomAuthenticationEntryPoint())
.accessDeniedHandler(new CustomAccessDeniedHandler())
);
return http.build();
}
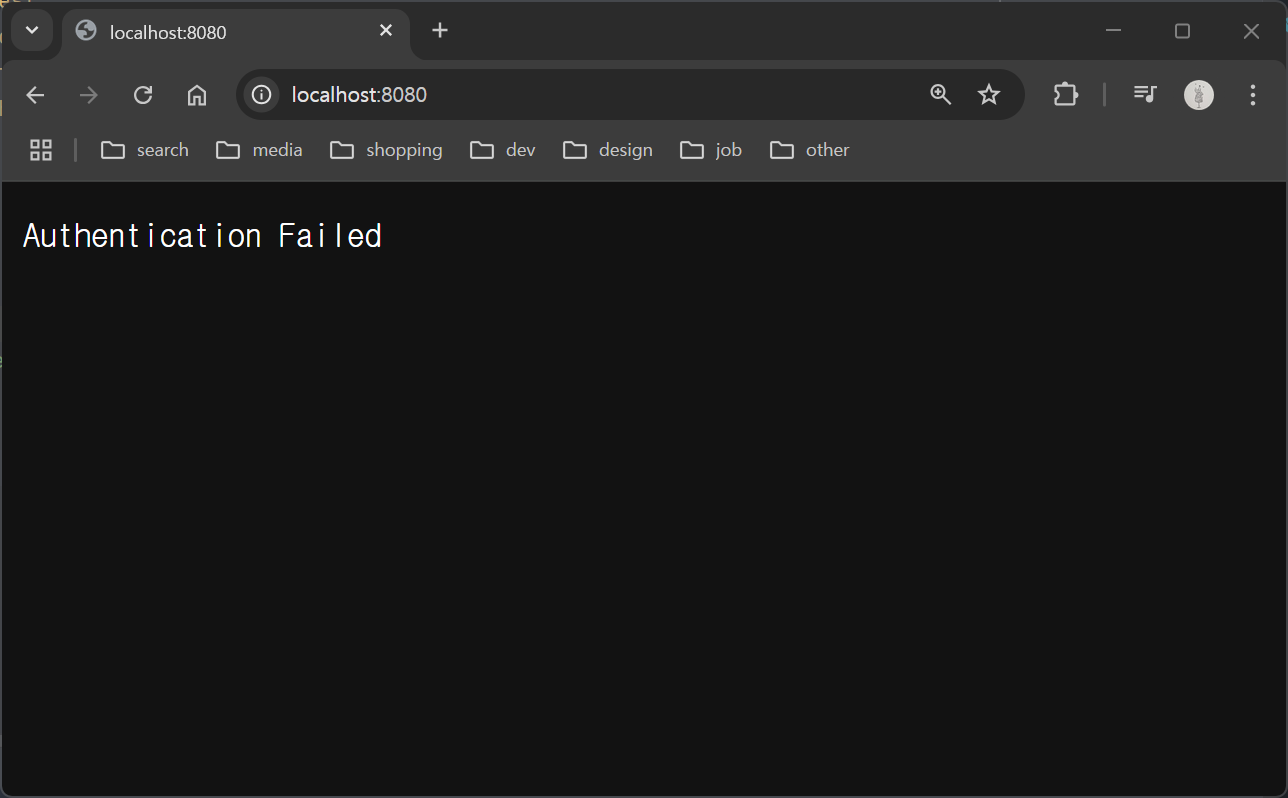
}CustomAuthenticationEntryPoint
import java.io.IOException;

public class CustomAuthenticationEntryPoint implements AuthenticationEntryPoint {
    @Override
    public void commence(HttpServletRequest request, HttpServletResponse response, AuthenticationException authException) throws IOException, ServletException {
        response.getWriter().write("Authentication Failed");
    }
}
실행 결과
마치며
스프링 시큐리티의 전체 흐름을 제대로 공부해볼 수 있어서 유익했습니다. 이제 이를 바탕으로 프로젝트를 개선해보려고 합니다.
참고 자료
