@Headers에 입력한 토큰은 강제로 입력한 토큰임.
이걸 어떻게 효율적으로 발급받아 사용할 수 있을까?
바로 토큰을 자동으로 관리하는 것!
이때 말하는 자동 관리란?
앱을 재시작 또는 다시 로그인했을 때 리프레시 토큰, 엑세스 토큰을 발급받는다.
그런데 엑세스 토큰이 만료됐을 땐 리프레시 토큰을 사용해
자동으로 엑세스 토큰을 다시 발급받고, 그렇게 다시 발급받은 엑세스 토큰을
Flutter Sercuer Storage에 저장하는 건 아직 배우지 않았다.
이게 자동으로 되면 401 에러가 났을 때 자동으로 리프레쉬 하는
URL로 쏴서 새로 발급받은 엑세스 토큰을 가지고서
다시 재요청하는 로직을 짤 수 있게 된다.
이를 Interceptor을 사용해서 구현할 수 있다.
dio.interceptors.add(
  InterceptorsWrapper(
    onRequest: (RequestOptions options, RequestInterceptorHandler handler) {
      // Do something before request is sent.
      // If you want to resolve the request with custom data,
      // you can resolve a `Response` using `handler.resolve(response)`.
      // If you want to reject the request with a error message,
      // you can reject with a `DioException` using `handler.reject(dioError)`.
      return handler.next(options);
    },
    onResponse: (Response response, ResponseInterceptorHandler handler) {
      // Do something with response data.
      // If you want to reject the request with a error message,
      // you can reject a `DioException` object using `handler.reject(dioError)`.
      return handler.next(response);
    },
    onError: (DioException error, ErrorInterceptorHandler handler) {
      // Do something with response error.
      // If you want to resolve the request with some custom data,
      // you can resolve a `Response` object using `handler.resolve(response)`.
      return handler.next(error);
    },
  ),
);
① common/dio/dio.dart 폴더 및 파일 생성
1) 요청을 보낼 때
2) 응답을 받을 때
3) 에러가 났을 때
Interceptor를 사용하면 이 3가지 경우에 대해서 요청 또는 응답, 에러를 중간에 가로챈 다음
또 다른 무언가로 변환해서 반환할 수 있음!
② Interceptor 클래스 만들기
CustomInterceptor라는 이름으로 Interceptor 클래스를 만들고, Interceptor를 상속받는다.
그럼 자동으로 import 'package:dio/dio.dart'; 가 임포트된다.
이를 통해 이는 Dio 패키지에서 불러오는 걸 알 수 있음!
③ dio에 Interceptor 추가하기
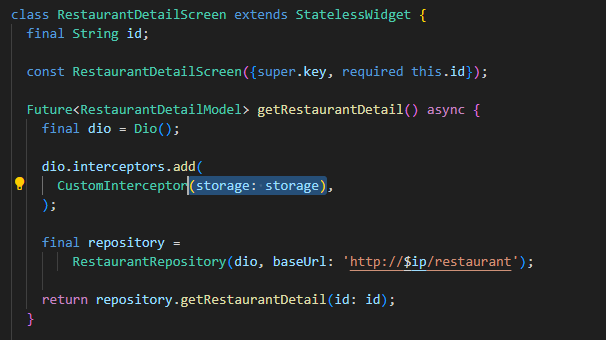
restaurant_detail_screen.dart로 가서 추가해주자.
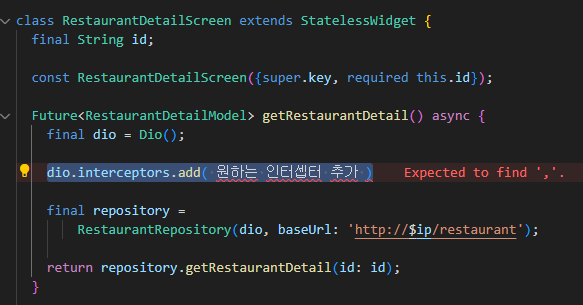
- dio에 interceptors 추가하는 방법
dio.interceptors.add( 원하는 인터셉터 추가 );1) 요청을 보낼 때
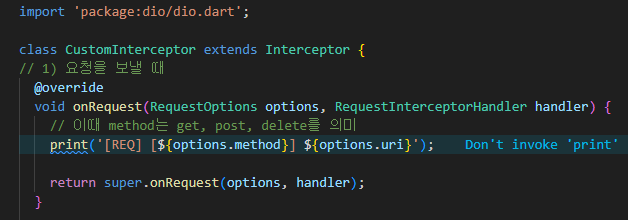
import 'package:dio/dio.dart';
class CustomInterceptor extends Interceptor {
// 1) 요청을 보낼 때
void onRequest(RequestOptions options, RequestInterceptorHandler handler) {
print('REQUEST');
print(options);
return super.onRequest(options, handler);
}onRequest가 어떻게 작용하는지,
void onRequest(RequestOptions options, RequestInterceptorHandler handler)의
파라미터가 뭔지 보기 위해 print로 찍어보자

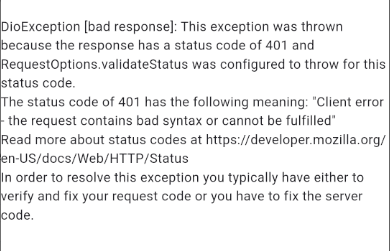
그리고 재시작 후, 상세 페이지로 가면 또 이렇게 에러가 발생한다.
왜냐면 옛날에 유효한 토큰을 넣어놨기 때문...
그럼 options에는 어떤 값들이 있고, 어디에 요청했는지 확인해보자.
로거를 하나 프린트 해보자.

Interceptor를 사용해 onRequest가 불리면서
요청이 이렇게 들어오고, 어디에다 요청했는지를 볼 수 있음.
④ onRequest 작업하기
onRequest를 통해 토큰을 자동으로 적용해보기
final FlutterSecureStorage storage;먼저 외부에서 flutter secure storage의 인스턴스를 가져온다.
flutter secure storage를 받아오는 이유는 스토리지 안에서
토큰을 가져와야하기 때문!
 CustomInterceptor({
    required this.storage,
  })
그리고 스토리지에 넣어준다.
this.storage를 입력받는다는 가정 하에 onRequest 안에서
storage를 통해서 값을 가져올 수 있음!
그런데 생각해 보면 이렇게 토큰을 직접 길게 지워넣는 건 말이 안됨....ㅎ
그래서 어떤 사인을 하나 주고받을 거임!
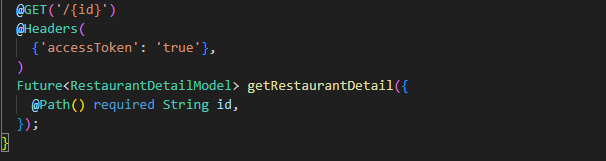
(
{'accessToken': 'true'},
) 이렇게 ~
이게 어떤 사인이냐면 accessToken이라는 헤더 안에 ture를 넣어주면
accessToken을 dio.dart 안에서 직접 붙인 다음
storage 안에서 가져와서 요청을 보내준다는 뭐 그런 사인이라고 보면 될 듯?
그런데 onRequest의 경우에는 요청이 보내질 때마다
그러니까 CustomInterceptor가 적용된 dio를 사용해서 요청을 보낼 때마다
onRequest가 무조건 불리기 때문에 만약에 accessToken이 true인 모든 요청에다가
토큰을 붙여 보내라고 하면 {'accessToken': 'true'} 작성한 @Headers가 있는
모든 요청에 토큰이 붙어가게 됨.
그래서 더이상 직접 토큰을 넣지 않아도 됨!
dio로 가서 적용해보자!
import 'package:dio/dio.dart';
import 'package:flutter_actual/common/const/data.dart';
import 'package:flutter_secure_storage/flutter_secure_storage.dart';
class CustomInterceptor extends Interceptor {
final FlutterSecureStorage storage;
// 스토리지에 넣어주기
CustomInterceptor({
required this.storage,
});
// 1) 요청을 보낼 때
// 요청이 보내질 때마다
// 만약에 요청의 Header에 accessToken: true 라는 값이 있다면,
// 실제 토큰을 storage에서 가져와서
// authorization : Bearer $token으로 Header를 변경
void onRequest(
RequestOptions options, RequestInterceptorHandler handler) async {
// 이때 method는 get, post, delete를 의미
print('[REQ] [${options.method}] ${options.uri}');
// headers = 실제 요청의 헤더 => @Headers({'accessToken': 'true'}, )
// headers에서 accessToken이란 값이 true라면 accessToken이라는 키를 삭제!
if (options.headers['accessToken'] == 'true') {
options.headers.remove('accessToken');
// 그리고 진짜 토큰으로 바꿔주기
final token = await storage.read(key: ACCESS_TOKEN_KEY);
// 토큰을 가져왔다면 어떻게 넣어야 할까?
//return super.onRequest(options, handler);
options.headers.addAll({'authorization': 'Bearer $token'});
return super.onRequest(options, handler);
}
return handler.next(options); // handler.next(options); 반드시 호출
}
// 2) 응답을 받을 때
// 3) 에러가 났을 때
}
}
CustomInterceptor에 storage를 넣어줘야 하니까
RestaurantDetailScreen에 가서 스토리지 넣어주기.

앱을 재실행하고 레스토랑을 누르면 상세 페이지로 잘 넘어가는 걸 볼 수 있다.
