① RestaurantCard 작업할 폴더 및 파일 생성하기
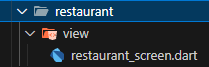
restaurant과 관련된 작업을 따로 묶어서 할 예정이므로 lib 폴더에 restaurant 폴더를 따로 생성해주자!
그리고 restaurant/view 폴더 생성하고 restaurant_screen.dart 파일 추가해준다.
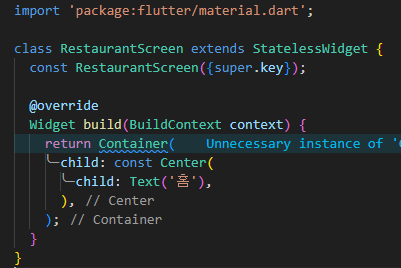
(+) return Container( );에 원래 메인 레이아웃을 넣어야 함.
그런데 스크린은 탭 안에 넣을 거임.
그리고 이 탭은 이미 default_layout.dart에 있음.
겨구미 딜리버리부터 하단 탭이 있는 공간까지만,
위젯을 넣을 거라서 RestaurantScreen에는 따로 Scaffold 넣을 필요 없음!
아무튼...
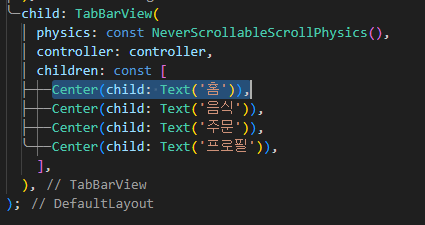
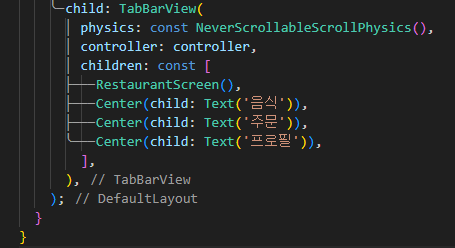
그러면 이제 root_tab.dart에 있는 이 코드는 필요없어지겠지?
지우고 RestaurantScreen() 추가
② 본격적인 RestaurantCard 만들기 도입
가게 메인 사진, 가게 이름, 메뉴, 평점, 배달료 등이 보이는 카드를 만들어 보자!
폴더 및 파일 생성해주기.
StatelessWidget 만들어주고...
카드에 필요한 내용 값 정의해주자.
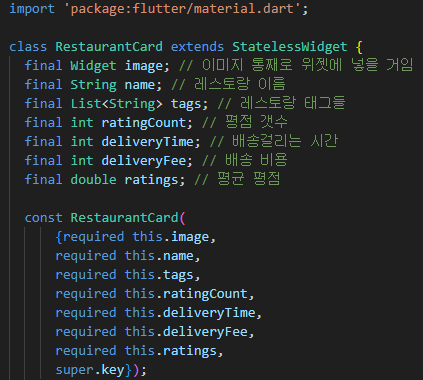
import 'package:flutter/material.dart';
class RestaurantCard extends StatelessWidget {
final Widget image; // 이미지 통째로 위젯에 넣을 거임
final String name; // 레스토랑 이름
final List<String> tags; // 레스토랑 태그들
final int ratingCount; // 평점 갯수
final int deliveryTime; // 배송걸리는 시간
final int deliveryFee; // 배송 비용
final double ratings; // 평균 평점
const RestaurantCard(
{required this.image,
required this.name,
required this.tags,
required this.ratingCount,
required this.deliveryTime,
required this.deliveryFee,
required this.ratings,
super.key});
Widget build(BuildContext context) {
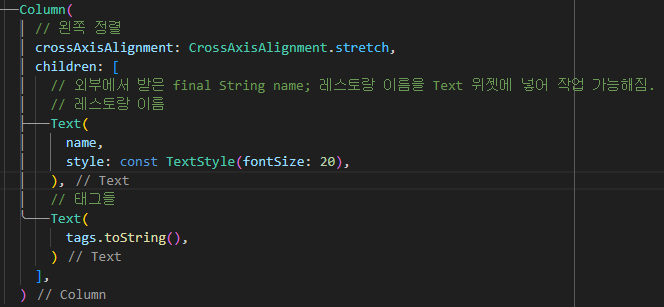
return Column(
children: [
// ClipRRect => 테두리 깎기
ClipRRect(
borderRadius: BorderRadius.circular(12.0), // 깎을 양, 모양
child: image, // 깎을 것
),
const SizedBox(height: 16),
Text(name), // 외부에서 받은 final String name; 레스토랑 이름을 Text 위젯에 넣어 작업 가능해짐.
],
);
}
}
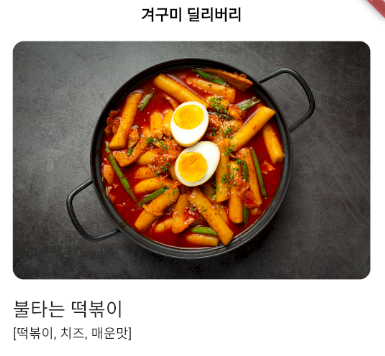
편하게 보면서 작업하게 restaurant_screen.dart로 가서 코드를 좀 수정해주자!
child: Text('홈')을 RestaurantCard( )으로 수정!
그리고 이 안에 많은 파라미터가 들어가게 되는데....
스타일 좀 추가해서 수정하면... 이렇게 나옴!
// 태그들 이렇게 작성해버리면???
   Text(
      tags.toString(),
   )
이렇게 리스트 값으로 나와버린다. 이 값들을 한 번에 합치려면???
Text(
   tags.join(' · '), // ( ) 이 안에는 합칠 때 넣고 싶은 문자 작성
)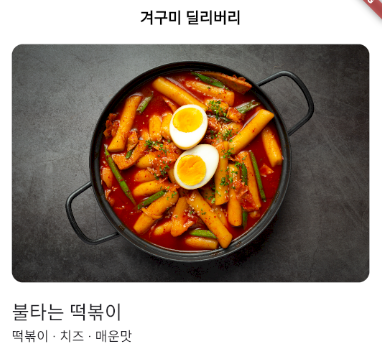
- restaurant_card.dart 전체 코드
import 'package:flutter/material.dart';
import 'package:flutter_actual/common/const/colors.dart';
class RestaurantCard extends StatelessWidget {
final Widget image; // 이미지 통째로 위젯에 넣을 거임
final String name; // 레스토랑 이름
final List<String> tags; // 레스토랑 태그들
final int ratingCount; // 평점 갯수
final int deliveryTime; // 배송걸리는 시간
final int deliveryFee; // 배송 비용
final double rating; // 평균 평점
const RestaurantCard(
{required this.image,
required this.name,
required this.tags,
required this.ratingCount,
required this.deliveryTime,
required this.deliveryFee,
required this.rating,
super.key});
Widget build(BuildContext context) {
return Column(
children: [
// ClipRRect => 테두리 깎기
ClipRRect(
borderRadius: BorderRadius.circular(12.0), // 깎을 양, 모양
child: image, // 깎을 것
),
const SizedBox(height: 16),
Column(
// 왼쪽 정렬
crossAxisAlignment: CrossAxisAlignment.stretch,
children: [
// 외부에서 받은 final String name; 레스토랑 이름을 Text 위젯에 넣어 작업 가능해짐.
// 레스토랑 이름
Text(
name,
style: const TextStyle(
fontSize: 20,
fontWeight: FontWeight.w600,
),
),
const SizedBox(height: 8),
// 태그들
Text(
tags.join(' · '), // ( ) 이 안에는 합칠 때 넣고 싶은 문자 작성
style: const TextStyle(
color: BODY_TEXT_COLOR,
fontSize: 14,
),
),
const SizedBox(height: 8),
Row(
children: [
_IconText(
icon: Icons.star,
label: rating.toString(),
),
renderDot(),
_IconText(
icon: Icons.receipt,
label: ratingCount.toString(),
),
renderDot(),
_IconText(
icon: Icons.timelapse_outlined,
label: '$deliveryTime 분',
),
renderDot(),
_IconText(
icon: Icons.timelapse_outlined,
label: deliveryFee == 0 ? '무료' : deliveryFee.toString(),
),
],
)
],
)
],
);
}
Widget renderDot() {
return const Padding(
padding: EdgeInsets.symmetric(horizontal: 8),
child: Text(
'·',
style: TextStyle(
fontSize: 12,
fontWeight: FontWeight.w500,
),
),
);
}
}
class _IconText extends StatelessWidget {
final IconData icon; // 아이콘
final String label; // 글자
const _IconText({super.key, required this.icon, required this.label});
Widget build(BuildContext context) {
return Row(
children: [
Icon(
icon,
color: PRIMARY_COLOR,
size: 14,
),
const SizedBox(
width: 8,
),
Text(
label,
style: const TextStyle(fontSize: 12, fontWeight: FontWeight.w500),
),
],
);
}
}
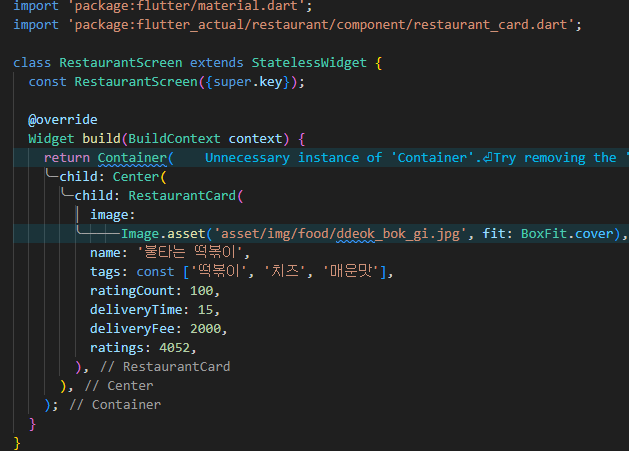
- restaurant_screen.dart 전체 코드
import 'package:flutter/material.dart';
import 'package:flutter_actual/restaurant/component/restaurant_card.dart';
class RestaurantScreen extends StatelessWidget {
const RestaurantScreen({super.key});
Widget build(BuildContext context) {
return Container(
child: Center(
child: Padding(
padding: const EdgeInsets.symmetric(horizontal: 16),
child: RestaurantCard(
image: Image.asset('asset/img/food/ddeok_bok_gi.jpg',
fit: BoxFit.cover),
name: '불타는 떡볶이',
tags: const ['떡볶이', '치즈', '매운맛'],
ratingCount: 100,
deliveryTime: 15,
deliveryFee: 2000,
rating: 4.52,
),
),
),
);
}
}
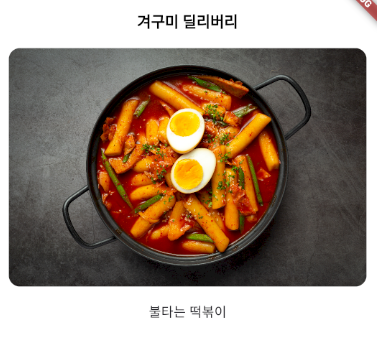
지금까지 최종 결과 화면...!

호떡 신문지에서 개발자로 환생