이번엔 특정 속성이 변경됐을 때만 build를 재실행하는
listen을 하든 watch를 하든 반응을 하는 기능을 사용해보자!
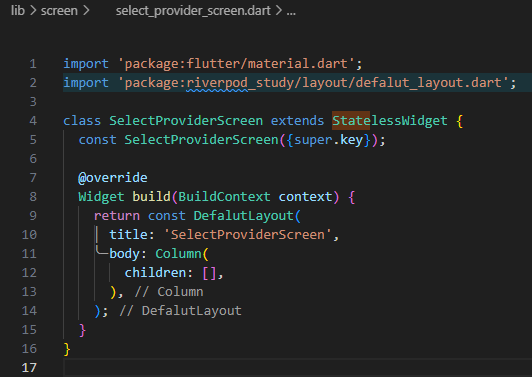
① screen/select_provider_screen.dart 파일 생성

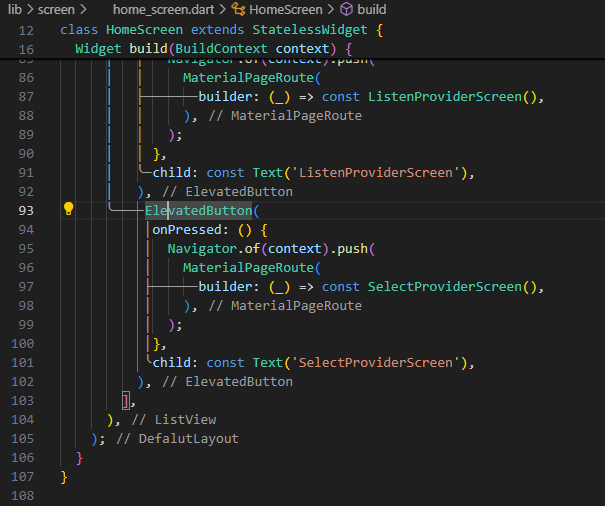
② ElevatedButton 추가하기
HomeScreen으로 가서 ElevatedButton 버튼 추가해주기
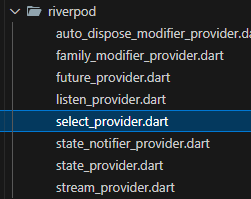
③ Provider 생성하기
riverpod/select_provider.dart 파일 생성
③-1. StateNotifierProvider 생성을 위한 class 선언하기
나는 StateNotifierProvider를 생성할거임!
근데 StateNotifierProvider를 생성하기 위해선 class를 선언해줘야 함!!!!
③-2. < >에 타입 넣어주기
내가 넣어줄 타입은 < ShoppingItemModel >
③-3. super에 기본 값 넣어주기
이 값들은 샘플로 그냥 만든 거임.
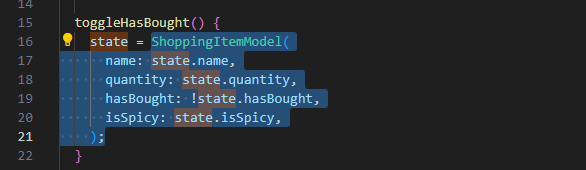
④ hasBought , isSpicy 값을 토글하는 기능 만들기
- select_provider.dart 코드
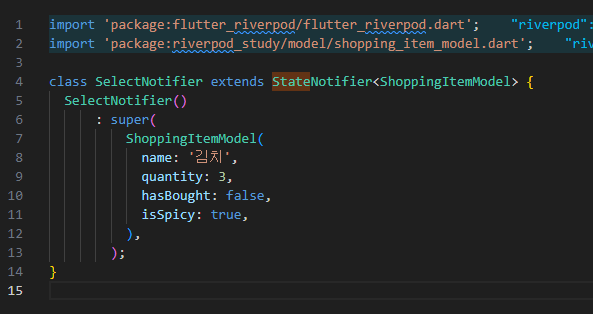
import 'package:flutter_riverpod/flutter_riverpod.dart';
import 'package:riverpod_study/model/shopping_item_model.dart';

class SelectNotifier extends StateNotifier<ShoppingItemModel> {
  SelectNotifier()
      : super(
          ShoppingItemModel(
            name: '김치',
            quantity: 3,
            hasBought: false,
            isSpicy: true,
          ),
        );

  toggleHasBought() {
    state = ShoppingItemModel(
      name: state.name,
      quantity: state.quantity,
      hasBought: !state.hasBought,
      isSpicy: state.isSpicy,
    );
  }

  // isSpicy를 반대로 돌리는 토글
  toogleIsSpicy() {
    state = ShoppingItemModel(
      name: state.name,
      quantity: state.quantity,
      hasBought: state.hasBought,
      isSpicy: !state.isSpicy,
    );
  }
}
⑤ CopyWith 기능 구현하기
음... 이렇게 다 구현해도 좋은데 너무 반복적임.
내가 실제로 바꾸고 싶은 건 hasBought랑 isSpicy뿐인데...
다른 값들을 그대로 다 넣어주고 있음.
이런 반복적인 작업을 하지 않도록 CopyWith 해주기!
⑤-1. copyWith 선언
ShoppingItemModel 정의로 가서 copyWith 선언하기
그리고 뭘 리턴할거냐면 ShoppingItemModel을 반환할거임!
⑤-2. 받을 값들 작성하기
copyWith( ) 함수 안에 { 받을 값 }을 작성해준다.
그렇다면 받을 값들은 뭘까?
ShoppingItemModel에 있는 모든 값들을 옵셔널(넣던지, 말던지)로 받는다.
그리고 final은 지워주고 옵셔널이니깐 물음표를 붙인다.
⑤-3. ShoppingItemModel을 리턴한다
- shopping_item_model.dart 코드
class ShoppingItemModel {
  final String name; // 이름
  final int quantity; // 갯수
  final bool hasBought; // 구매 여부
  final bool isSpicy; // 매운맛 여부

  ShoppingItemModel({
    required this.name,
    required this.quantity,
    required this.hasBought,
    required this.isSpicy,
  });

  ShoppingItemModel copyWith({
    String? name,
    int? quantity,
    bool? hasBought,
    bool? isSpicy,
  }) {
    return ShoppingItemModel(
      // null이 아니면 입력받은 name으로 집어 넣고,
      // 만약 입력받지 않았다면 this.name으로 저장(null일 때만 실행)
      name: name ?? this.name,
      quantity: quantity ?? this.quantity,
      hasBought: hasBought ?? this.hasBought,
      isSpicy: isSpicy ?? this.isSpicy,
    );
  }
}
⑥ select_provider.dart 코드 수정하기
그럼 드래그된 부분을 어떻게 바꿔줄 수 있냐면...
- select_provider.dart 코드
import 'package:flutter_riverpod/flutter_riverpod.dart';
import 'package:riverpod_study/model/shopping_item_model.dart';

class SelectNotifier extends StateNotifier<ShoppingItemModel> {
  SelectNotifier()
      : super(
          ShoppingItemModel(
            name: '김치',
            quantity: 3,
            hasBought: false,
            isSpicy: true,
          ),
        );

  toggleHasBought() {
    state = state.copyWith(
      hasBought: !state.hasBought,
    );
  }

  // isSpicy를 반대로 돌리는 토글
  toggleIsSpicy() {
    state = state.copyWith(
      isSpicy: !state.isSpicy,
    );
  }
}
이렇게 바꿔줄 수 있다!
⑦ SelectNotifier를 provider로 만들기
SelectNotifier를 만들었으니까 SelectNotifier를 provider로 만들어주자!
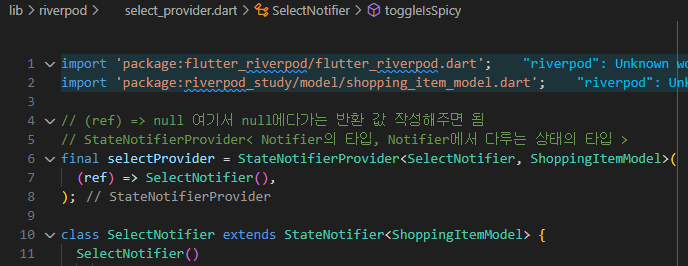
이렇게 하면 SelectNotifier를 provider로 생성해서 어디서든 쓸 수 있음!
⑧ watch 해주기
select_provider.dart 코드에 작성했던 값이 변경되는 걸 watch 해줘야 함!
SelectProviderScreen 코드에 watch를 작성해준다.
⑧-1. StatelessWidget을 ConsumerWidget로 변경
먼저 StatelessWidget을 ConsumerWidget로 변경해준다.
⑧-2. build 함수에 WidgetRef ref 파라미터 추가
⑧-3. watch 해주기
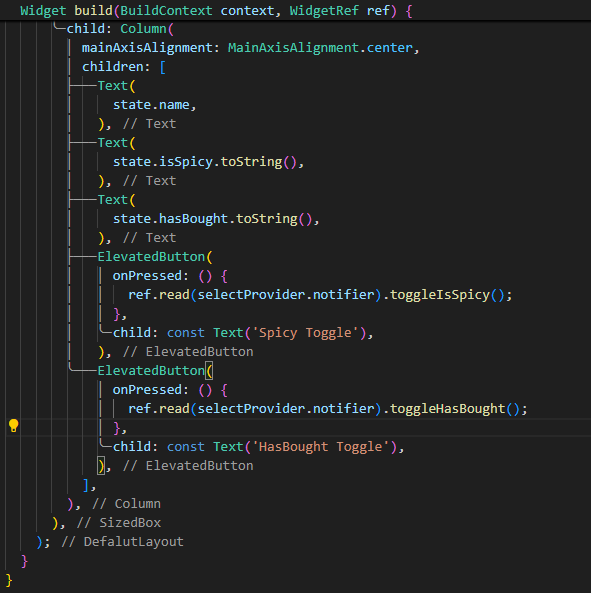
- select_provider_screen.dart 코드
import 'package:flutter/material.dart';
import 'package:flutter_riverpod/flutter_riverpod.dart';
import 'package:riverpod_study/layout/defalut_layout.dart';
import 'package:riverpod_study/riverpod/select_provider.dart';
class SelectProviderScreen extends ConsumerWidget {
const SelectProviderScreen({super.key});
Widget build(BuildContext context, WidgetRef ref) {
final state = ref.watch(selectProvider);
return DefalutLayout(
title: 'SelectProviderScreen',
body: SizedBox(
width: double.infinity,
child: Column(
mainAxisAlignment: MainAxisAlignment.center,
children: [
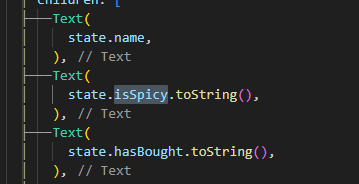
Text(
state.name,
),
Text(
state.isSpicy.toString(),
),
Text(
state.hasBought.toString(),
),
],
),
),
);
}
}
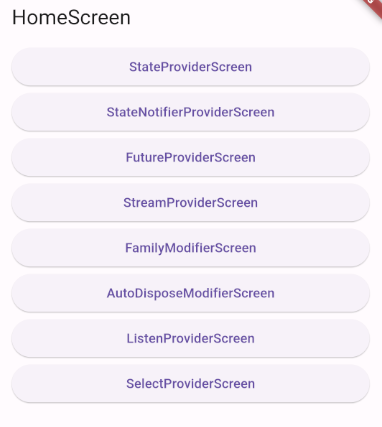
SelectProviderScreen 버튼이 생겨있고, 들어가면...
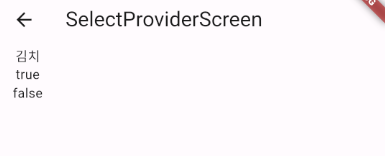
이렇게 화면이 나오는 걸 볼 수 있다.
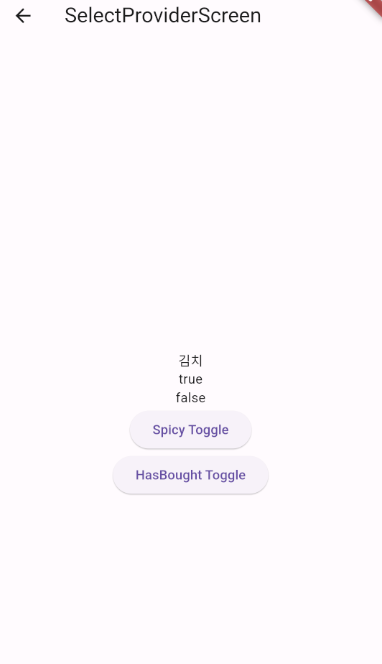
⑨ 각 토글 버튼 만들기
⑩ select 사용해보기
만약 isSpicy라는 값만 궁금하고 이 값이 변경됐을 때만 화면을 새로 랜더링 하고싶다면?

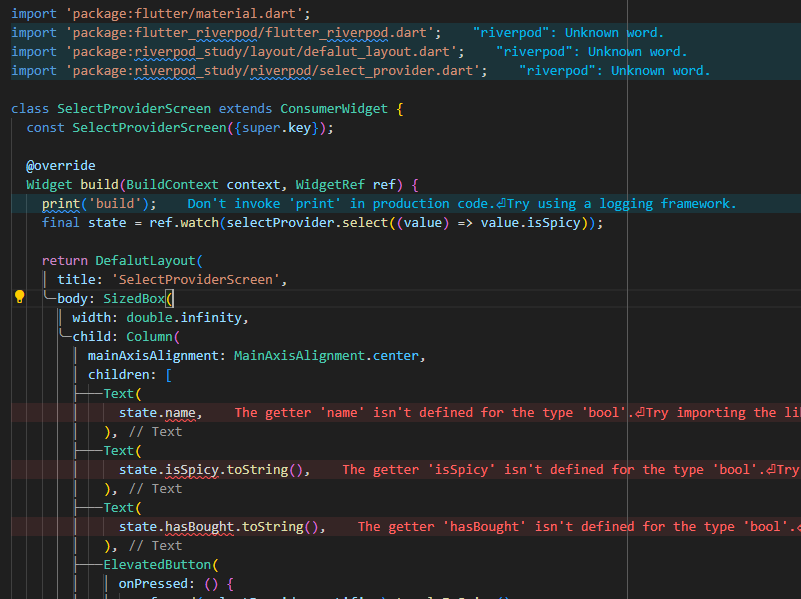
- value 👉 selectProvider의 상태
isSpicy만 관심있으니까 value.isSpicy를 해줌.
그랬더니 오류가 발생!!!
❓ 왜 에러가 났을까?
👉 final state는 원래 select 하기 전에는 그냥 ShoppingItenModel이었음!
그런데 isSpicy라는 값만 따로 선택했기 때문에
이제 final state는 불리언 값임! isSpicy가 불리언이기 때문에...
이 말이 무슨 말인지 확인해보자!
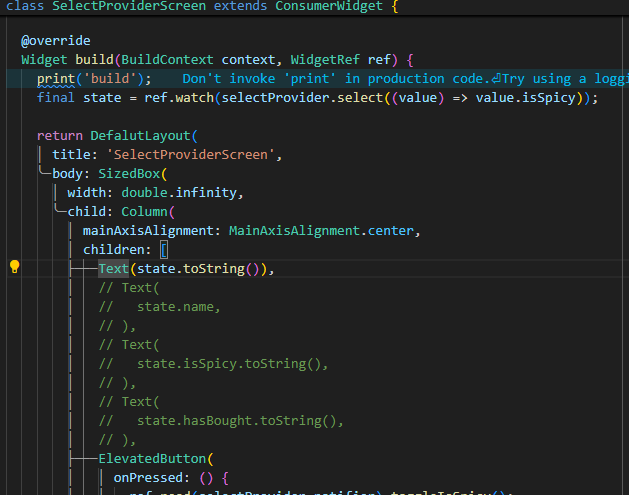
⑩-1. Text 주석 처리하기
Text 주석 처리하고 Text(state.toString( ) ) 하고 저장.
Spicy Toggle 버튼을 누르면 true, false가 바뀌면서 build가 계속 다시 실행됨.
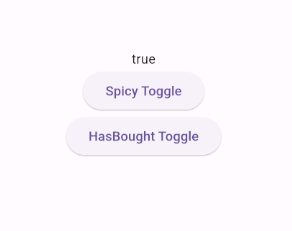
그런데 HasBought Toggle 버튼은 아무리 눌러도 build가 다시 실행되지 않음!
왜???
value.isSpicy 라는 특정 값!
isSpicy라는 값이 바뀔 때만 ref.watch 하라고 선언했기 때문에!
⑪ listen에 watch 적용보기
그리고 이 watch는 listen에도 똑같이 적용 가능함!!!
- select_provider_screen.dart 코드
import 'package:flutter/material.dart';
import 'package:flutter_riverpod/flutter_riverpod.dart';
import 'package:riverpod_study/layout/defalut_layout.dart';
import 'package:riverpod_study/riverpod/select_provider.dart';
class SelectProviderScreen extends ConsumerWidget {
const SelectProviderScreen({super.key});
Widget build(BuildContext context, WidgetRef ref) {
print('build');
final state = ref.watch(selectProvider.select((value) => value.isSpicy));
// hasBought가 바뀌었을 때만 값을 변경
ref.listen(selectProvider.select((value) => value.hasBought),
(previous, next) {
print('next: $next');
});
return DefalutLayout(
title: 'SelectProviderScreen',
body: SizedBox(
width: double.infinity,
child: Column(
mainAxisAlignment: MainAxisAlignment.center,
children: [
Text(state.toString()),
// Text(
// state.name,
// ),
// Text(
// state.isSpicy.toString(),
// ),
// Text(
// state.hasBought.toString(),
// ),
ElevatedButton(
onPressed: () {
ref.read(selectProvider.notifier).toggleIsSpicy();
},
child: const Text('Spicy Toggle'),
),
ElevatedButton(
onPressed: () {
ref.read(selectProvider.notifier).toggleHasBought();
},
child: const Text('HasBought Toggle'),
),
],
),
),
);
}
}
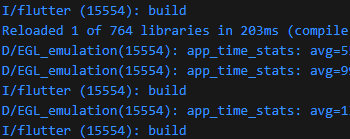
코드 작성 후 저장하면 watch의 경우엔 build를 재실행시킴!
그래서 Spicy Toggle 버튼을 누르면 build가 재실행 되는 걸 볼 수 있음.
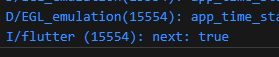
HasBought Toggle를 눌렀을 땐?
여전히 build가 재실행되진 않지만 이제는 next: true 라고 뜨는 걸 볼 수 있다.
왜?? ref.listen을 했으니깐!