이 포스트는 스프링 공식 가이드 https://spring.io/guides/gs/securing-web/ 을 보고 실습한 내용을 토대로 작성하였습니다.
기존에 진행하던 프로젝트에 Spring Security를 적용해 보려고 하였으나.. 기초가 많이 부족한 관계로 적용이 쉽지 않았습니다. (기본기의 중요성....)
그래서 스프링 공식 가이드를 따라해 보며 기초부터 Spring Security를 알아 보는게 좋을 것 같다 생각하였습니다.
Securing a Web Application
This guide walks you through the process of creating a simple web application with resources that are protected by Spring Security.
What You Will Build
You will build a Spring MVC application that secures the page with a login form that is backed by a fixed list of users.
이 가이드는 스프링 시큐리티를 통해 리소스를 보호하는 방법에 대해 간단히 알아보며 정해진 사용자 목록의 로그인 페이지를 지원하는 스프링 MVC 애플리케이션을 만들어 본다고 하는 것 같네요.
실습은 이미 만들어 둔 깃 소스(git clone https://github.com/spring-guides/gs-securing-web.git)로부터 받아올 수도 있지만 저는 Spring Initializr(https://start.spring.io/)를 통해 처음부터 만드는 방법으로 진행하였습니다.
Java, Gradle 프로젝트에 자바 버전은 11, Dependencies는 Spring Web과 Thymeleaf를 추가하였습니다.
Create an Unsecured Web Application
스프링 시큐리티를 적용하기 전에 먼저 작동하는 웹 애플리케이션을 구현해 봅니다. 간단하게 Home, Hello 두 개의 화면으로 이루어져 있습니다. 두 개의 html 파일을 만들어 보겠습니다.
<!DOCTYPE html>
<html xmlns="http://www.w3.org/1999/xhtml" xmlns:th="https://www.thymeleaf.org" xmlns:sec="https://www.thymeleaf.org/thymeleaf-extras-springsecurity3">
<head>
<title>Spring Security Example</title>
</head>
<body>
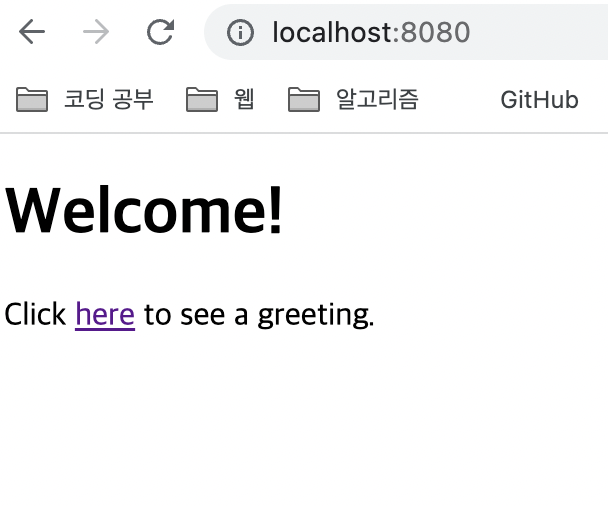
<h1>Welcome!</h1>
<p>Click <a th:href="@{/hello}">here</a> to see a greeting.</p>
</body>
</html>src/main/resources/templates/home.html
<!DOCTYPE html>
<html xmlns="http://www.w3.org/1999/xhtml" xmlns:th="https://www.thymeleaf.org"
xmlns:sec="https://www.thymeleaf.org/thymeleaf-extras-springsecurity3">
<head>
<title>Hello World!</title>
</head>
<body>
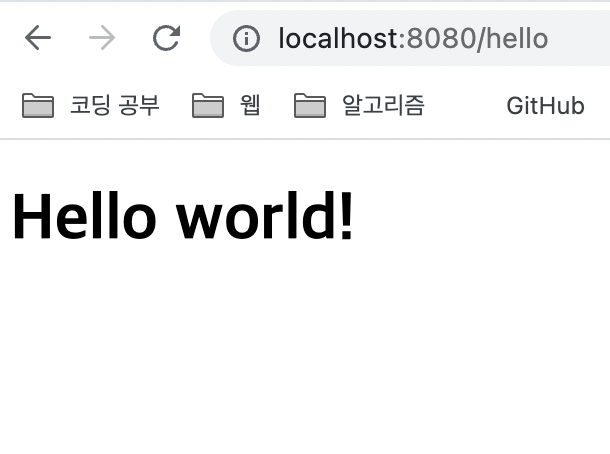
<h1>Hello world!</h1>
</body>
</html>src/main/resources/templates/hello.html
그리고 나서 만든 화면을 보여주기 위해 MvcConfig 파일을 생성하여 아래와 같이 작성합니다.
@Configuration
public class MvcConfig implements WebMvcConfigurer {

	public void addViewControllers(ViewControllerRegistry registry) {
		registry.addViewController("/home").setViewName("home");
		registry.addViewController("/").setViewName("home");
		registry.addViewController("/hello").setViewName("hello");
		registry.addViewController("/login").setViewName("login");
	}
}
보통은 컨트롤러를 생성하여 RequestMapping을 통해 View와 Controller을 연결하였는데 컨트롤러 없이도 위와 같은 설정을 통해 View를 등록할 수 있었습니다.
Set up Spring Security
이제 간단한 웹 애플리케이션을 갖게 되었으니 스프링 시큐리티를 적용해 볼 차례입니다. 가이드에서는 허가받지 않은 유저가 /hello 화면을 보는 것을 막으려고 합니다.
먼저 build.gradle 파일에 아래와 같이 스프링 시큐리티 의존성을 추가해 줍니다.
implementation 'org.springframework.boot:spring-boot-starter-security'
implementation 'org.springframework.security:spring-security-test'
스프링 시큐리티 의존성을 추가하는 것만으로도 기본적으로 애플리케이션을 보호할 수 있습니다. 애플리케이션을 실행해 보면 아래와 같이 비밀번호에 대한 로그를 볼 수 있습니다.
Using generated security password: 8584b740-9024-4e63-b4ff-2edd5a14b1a6그리고 다시 화면에 접속하려고 하면 아래와 같이 로그인 페이지가 뜨게 됩니다.
기본 Username과 Password가 설정이 되는데 아래 정보로 인증이 가능합니다.
- Username : user
- Password : 로그를 통해 확인 (ex. f8434b8c-91f7-452c-b7fe-1d49f1d75152)
기본 설정은 애플리케이션에 대한 모든 접근 시 인증을 요구하도록 되어 있습니다. 아래와 같이 Config 파일을 생성하여 새로 설정을 해보겠습니다.
@Configuration
@EnableWebSecurity
public class WebSecurityConfig extends WebSecurityConfigurerAdapter {

    @Override
    protected void configure(HttpSecurity http) throws Exception {
        http
                .authorizeRequests()
                    .antMatchers("/", "/home").permitAll()
                    .anyRequest().authenticated()
                    .and()
                .formLogin()
                    .loginPage("/login")
                    .permitAll()
                    .and()
                .logout()
                    .permitAll();
    }

    @Bean
    @Override
    public UserDetailsService userDetailsService() {
        UserDetails user = User.withDefaultPasswordEncoder()
                .username("user")
                .password("password")
                .roles("USER")
                .build();

        return new InMemoryUserDetailsManager(user);
    }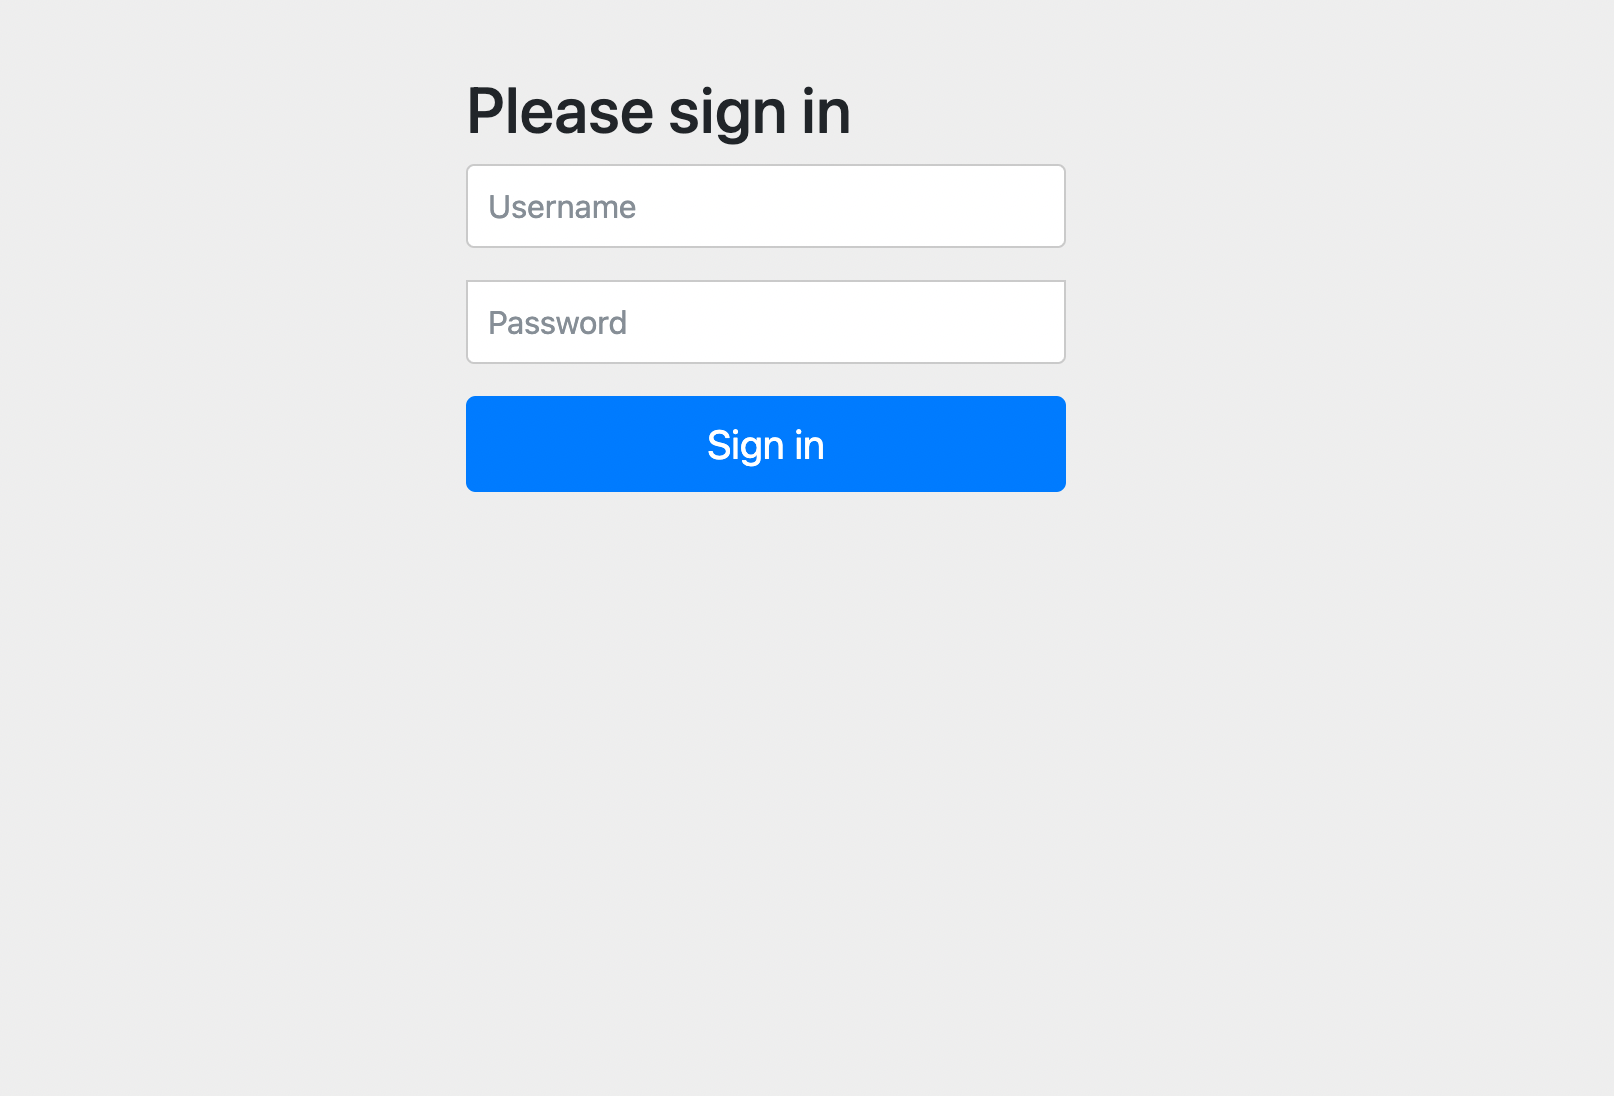
}/, /home 경로의 경우에는 인증하지 않고도 접근할 수 있지만 그 외 모든 요청은 인증 요구하도록 설정하였습니다. 인증되지 않은 경우 로그인 페이지 /login 로 가도록 합니다. 아까 MvcConfig에서 /login 과 login View 를 연결하도록 설정해 두었죠? 현재 로그인 페이지가 없으니 아래와 같이 생성하도록 하겠습니다.
<!DOCTYPE html>
<html xmlns="http://www.w3.org/1999/xhtml" xmlns:th="https://www.thymeleaf.org"
      xmlns:sec="https://www.thymeleaf.org/thymeleaf-extras-springsecurity3">
    <head>
        <title>Spring Security Example </title>
    </head>
    <body>
        <div th:if="${param.error}">
            Invalid username and password.
        </div>
        <div th:if="${param.logout}">
            You have been logged out.
        </div>
        <form th:action="@{/login}" method="post">
            <div><label> User Name : <input type="text" name="username"/> </label></div>
            <div><label> Password: <input type="password" name="password"/> </label></div>
            <div><input type="submit" value="Sign In"/></div>
        </form>
    </body>
</html>
이제 다시 애플리케이션을 실행해 보면 /, /home 으로는 인증 없이 접속이 되지만 다른 경로에 접속하면 아래와 같이 방금 만든 로그인 화면으로 리다이렉트 됩니다.

아까 위에서 말씀을 못드렸는데 작성한 WebSecurityConfig 파일 하단을 보시면 UserDetailsService 을 빈으로 생성하고 등록하였습니다. 그 안에서 유저를 생성하고 InMemoryUserDetailsManager에 등록하는데 이 때 유저의 username, password, role을 설정해 주었습니다.
설정한 username과 password로 인증해 보면 인증에 성공하는 것을 볼 수 있습니다!
로그아웃은 어떻게 해야 할까요?
아래와 같이 hello.html에 로그아웃을 위한 폼을 추가해 주도록 하겠습니다.
<!DOCTYPE html>
<html xmlns="http://www.w3.org/1999/xhtml" xmlns:th="https://www.thymeleaf.org"
      xmlns:sec="https://www.thymeleaf.org/thymeleaf-extras-springsecurity3">
    <head>
        <title>Hello World!</title>
    </head>
    <body>
        <h1 th:inline="text">Hello [[${#httpServletRequest.remoteUser}]]!</h1>
        <form th:action="@{/logout}" method="post">
            <input type="submit" value="Sign Out"/>
        </form>
    </body>
</html>/logout으로 POST 요청을 보내는 것만으로 로그아웃을 할 수 있습니다. (/logout 을 통해 로그아웃이 가능한 것은 기본 설정이며 WebSecurityConfig 파일 에서 .logout().logoutUrl("...")을 통해 설정할 수도 있습니다.)
그리고 템플릿에서 [[${#httpServletRequest.remoteUser}]] 를 통해서 username을 받아 올 수도 있네요!
추가로 스프링 시큐리티는 기본적으로 인증 시 세션을 이용하도록 되어 있습니다. 아래와 같이 매 요청 시 JSESSIONID 라는 쿠키를 생성하여 제공하고 있습니다.
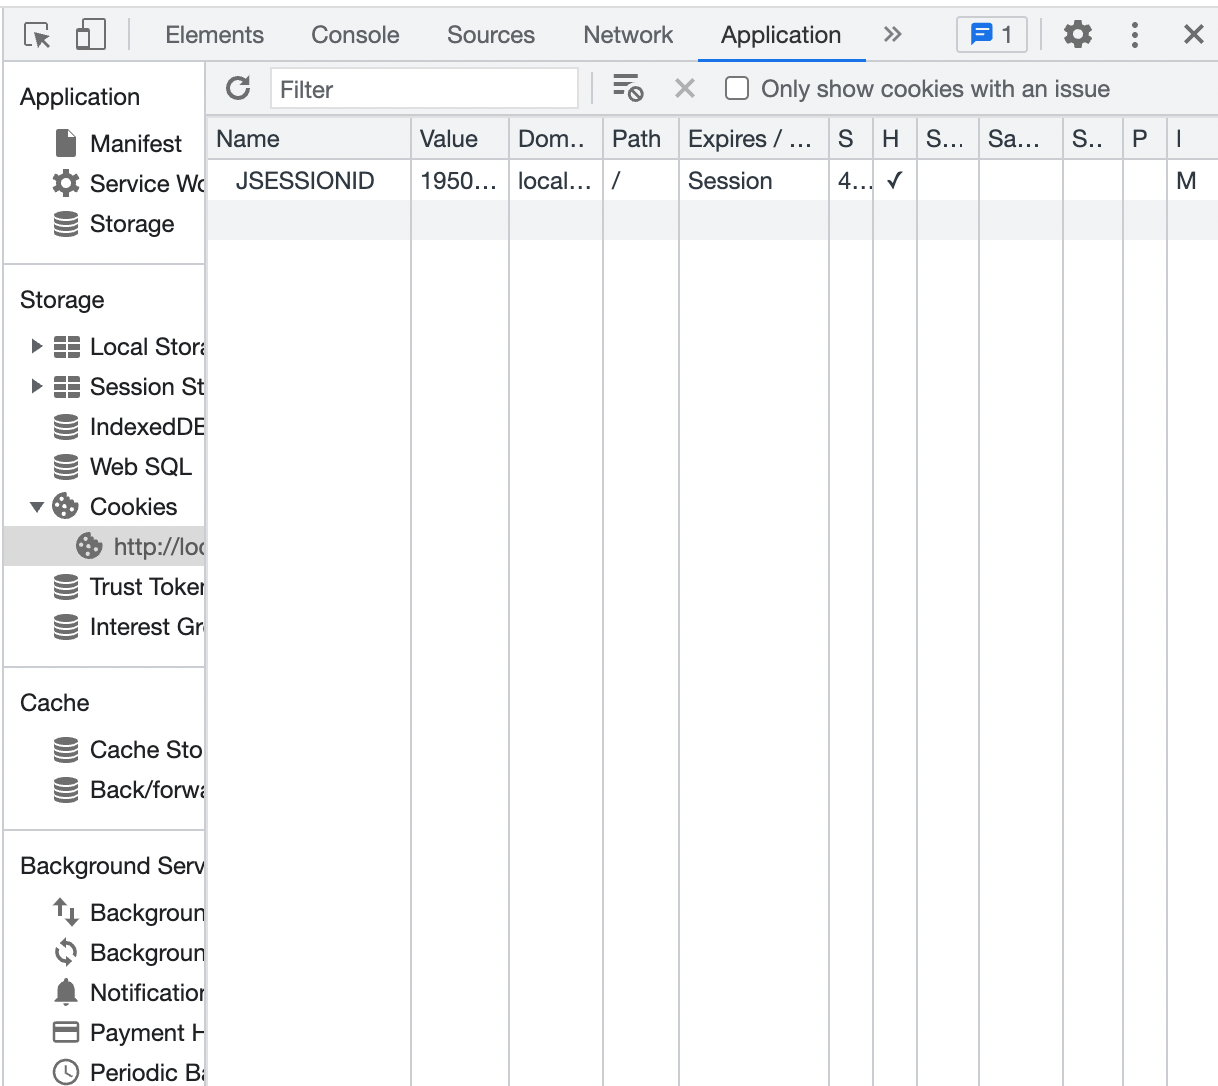
따라서 해당 쿠키를 삭제하여도 로그아웃이 된 것같은 효과를 낼 수 있습니다. (인증이 되어있던 세션 정보가 없어졌으니 그렇겠죠? 삭제한 쿠키를 다시 임의로 생성하면 다시 동작합니다!)
결론
지금까지 스프링 시큐리티 가이드를 따라해 보며 기본적인 동작에 대해 실습해 보았습니다. 워낙 기초적인 내용이었지만 스프링 시큐리티의 설정이 어떻게 이루어지는지 확인해 볼 수 있었습니다.
다음은 스프링 시큐리티 아키텍처(https://spring.io/guides/topicals/spring-security-architecture/)에 대한 문서를 읽으며 구조에 대해 공부해 보도록 하겠습니다.