JSON : JavaScript Object Notation
{ key : item, …. , key: item } 형식의 데이터
⇒ API를 사용할때 주고받는 데이터의 형식은 대부분 JSON
-
JSON ⊆ Javascript Object
→ 모든 JSON object는 Javascript object이다.
- Javascript object이지만 JSON은 아닌 예시 : object 안에 function이 포함될 경우
const user = {
     firstName: "Sam",
     lastName: "Green",
     getFullName: function() {
          return `${this.firstName} ${this.lastName}`
          }
}
- Javascript object이지만 JSON은 아닌 예시 : object 안에 function이 포함될 경우
-
JSON의 장점은 API가 무슨 프로그래밍 언어로 쓰였든 간에 JSON을 주고받을 수 있다면 다른 언어로도 API와 소통가능한 것이다.
-
JSON Operations
-
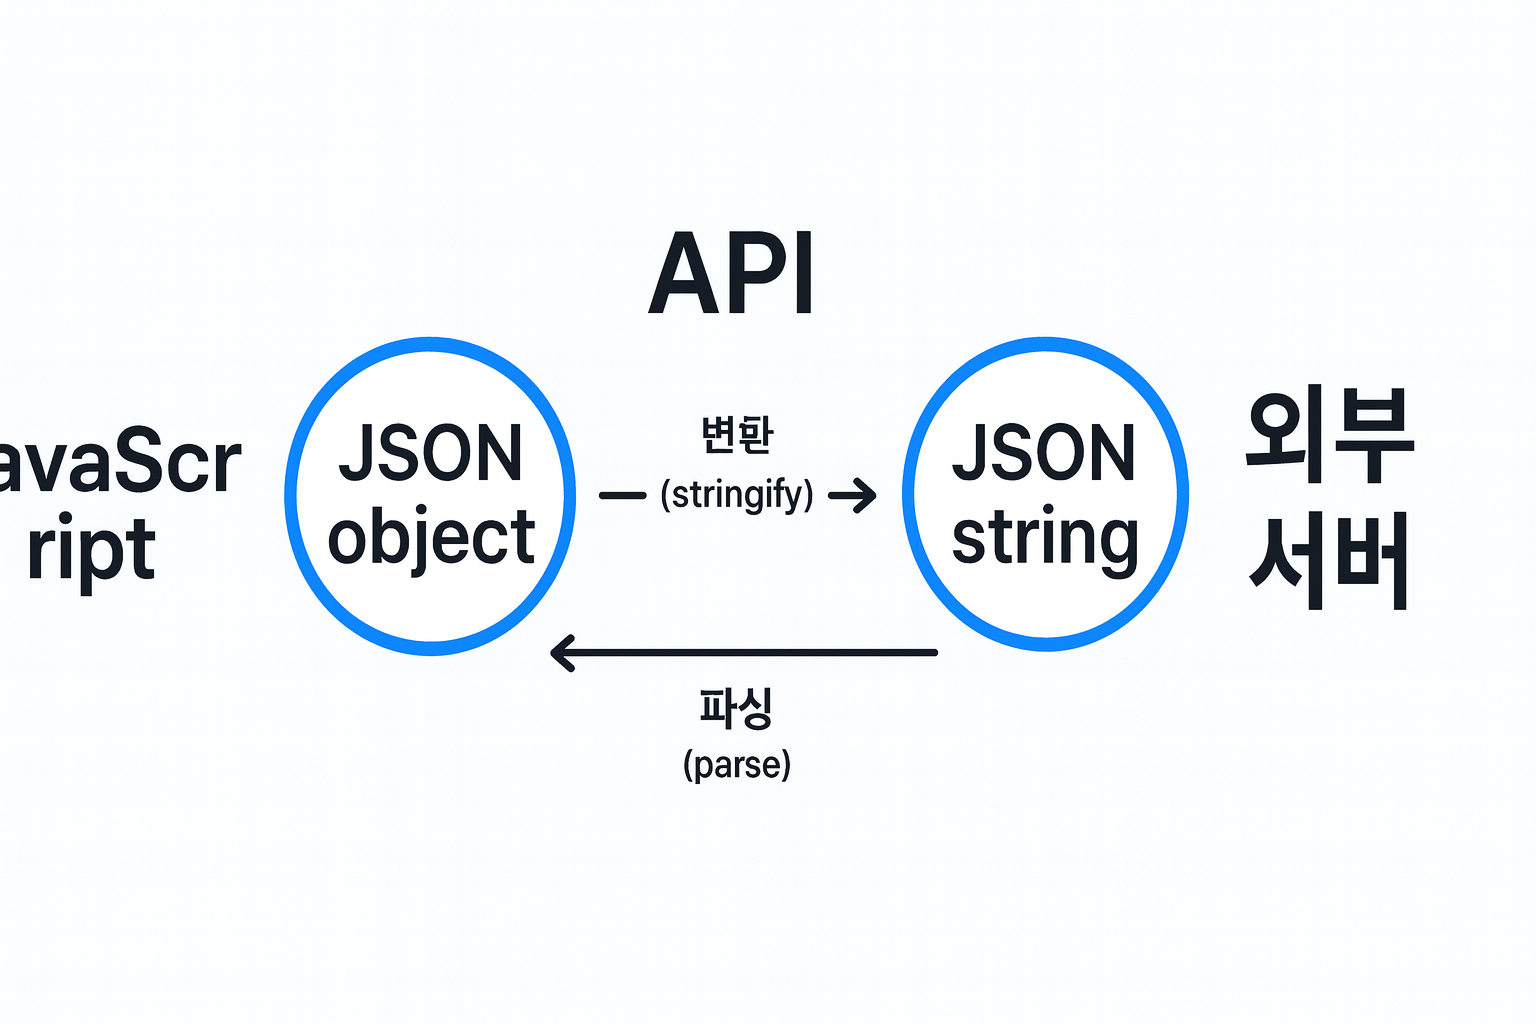
JSON string → Object :
JSON.parse(string)주로 API에서 받은 JSON 문자열을 자바스크립트 객체로 변환할 때 사용.
const string = '{"firstName":"Sam","lastName":"Green","age": 32}'; const person = JSON.parse(string); console.log(person.firstName); // "Sam" -
JSON object → string :
JSON.stringify(object)객체를 전송/저장에 적합한 문자열(JSON) 로 변환할 때 사용.
const person = {
  firstName: "Sam",
  lastName: "Green",
  age: 32
};

const string = JSON.stringify(person);
console.log(string);
-
API & HTTP methods
API : Application Programming Interface
→ 한 소프트웨어와 다른 소프트웨어가 서로 소통(데이터를 주거나 요구하는 등)하게 해주는 “통로” 같은 것.
“공공데이터 API”라고 하면, 공공데이터를 가지고 있는 기관이(서버) 다른 소프트웨어가 그 정보에 접근할 수 있도록 만든 인터페이스가 그 API라고 할 수 있다.
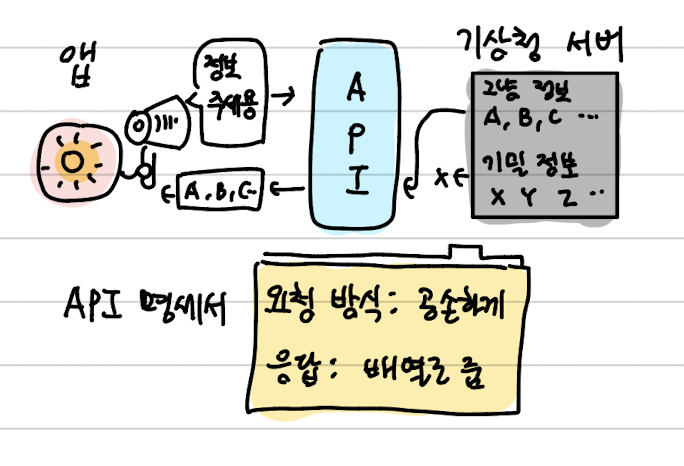
위 사진처럼, API는 앱과 서버 사이이 중계자라고 볼 수도 있다.
API를 통해 서버에게 무언가를 요구하는 것을 “API request”라고 하고, API에 요청한다고 하기도 한다.
요청의 결과 돌아오는 값 등을 API response라고 한다.
어떻게 요청을 해야 하고, 어떤 형식의 응답이 돌아오고 어떻게 활용해야할지는 주로 API 설명서 (기술 명세서)에서 확인할 수 있다.
⇒ 앱을 개발하면 기능 중에 오늘의 날씨를 표시하게 할 수도 있고, 환율을 보여줘야 할 수도 있는데 이런 개인이 마련하기 힘든 데이터 / 기능을 개발에 사용할 수 있도록 정부 혹은 기업에서 API를 제공하는 것이다.
chatGPT를 생각해보면, 원래 chatGPT는 따로 웹/앱에서 서비스가 존재하는데, 다른 앱에서도 chatGPT를 통한 AI 기능을 제공하는 경우가 많다. 이것도 openAI가 chatGPT API를 (유료로) 제공하기 때문이다.

HTTP protocol / method
- API에 규정된 소통 방식의 표준 중 하나가 HTTP protocol이다. :
- 특정 서버에 API 요청을 보낼 때, 무엇을 요청하느냐에 따라 요청 URL 뒤의 endpoint(목적지)가 달라진다. 이러한 API 요청을 HTTP 표준(=http protocol)에서는 4가지로 분류하는데, 이를 HTTP method라고 한다.
- 특정 서버에 API 요청을 보낼 때, 무엇을 요청하느냐에 따라 요청 URL 뒤의 endpoint(목적지)가 달라진다. 이러한 API 요청을 HTTP 표준(=http protocol)에서는 4가지로 분류하는데, 이를 HTTP method라고 한다.
- HTTP method
-
GET : 정보를 가져와달라는(”get”) 요청
-
POST : 특정 정보를 추가해달라는(”post”) 요청
-
PUT : 특정 정보를 어떻게 수정해달라는(”put” A in B) 요청
-
DELETE : 정보를 삭제해달라는 (”delete”) 요청
→ Get은 read 요청, 나머지 셋은 수정을 요하는 write 요청.
∴ POST, PUT, DELETE는 request URL과 별도로, “body”에 부가적인 data를 담아 요청해야 한다.
-
fetch(URL)
대표적인 asynchronous WebAPI 함수로, 브라우저에서 외부/내부 서버로 요청(request) 을 보낼 때 사용한다.
fetch()의 인자로 요청할 목적지 서버인 API endpoint(URL) 를 넣으면, 해당 URL로 요청을 보내고 응답(response) 을 받아온다.
응답의 본문은 보통 JSON 문자열(정보를 담은 텍스트)이다.
→ 기본적으로 GET request이며,
fetch(URL, {method: ..., headers: ..., body: ...}) 이렇게 추가적인 argument를 넣어줌으로써 POST, PUT, DELETE request가 가능하다.
Fetch (GET) 사용법
fetch(URL)의 반환값은 Promise
→ 따라서 반환값을 활용하기 위해 chaining으로.then(...),.catch(...),.finally(...)를 사용한다.
⇒ 서버에 요청을 보내고 응답을 받을 때까지 무작정 웹을 멈추고 기다리는 것을 막아준다.
Implicit Return 형식 :fetch(URL) .then((response) => { return response.json(); // JSON 본문을 파싱할 준비 });fetch(URL) .then((response) => response.json());response.json()- API response가 JSON 문자열일 때,
JSON.parse()처럼 JSON string → object 변환. 다만 차이점은JSON.parse()는 synchronous 함수이지만,.json()은 Asynchronous 함수로서 Promise를 반환한다. → 따라서 parse된 json object 활용을 위해 다음 단계에서 또.then(...)으로 결과를 받아야 한다.
형식
fetch(URL)
  .then((response) => response.json())
  // 1. response → JSON parsing (Promise)
  .then((data) => {
  // 2. use parsed object
    console.log(data);
  });
⇒ Promise chaining : fetch와 response.json() 모두 Promise를 반환하므로, .then()을 두 번 사용해주어야 한다.
- 관습적인 명명들 :
response: fetch에서 처음.then()으로 읽어오는 값, 진짜 데이터를 받기 전의 중간 과정data:response.json()에서.then()으로 받는 값이자 우리가 관심있는 데이터 (∴ 이름을 data로 할 것을 권장) API의 종류마다 데이터 타입이 다르므로 API 명세서 확인 후 (orconsole.log(data)로 확인) API에 맞게 데이터를 다루어야 한다.
URL & Endpoint :
하나의 서버는 base URL이 있고, 서버에 무슨 정보를 요청하는지에 따라 endpoint가 달라진다.
요청 보내는 URL = Base URL + endpoint
- e.g. 트위터 API의 base url :
https://twitter.com/api/v1- endpoints :
     /users.json
     /notifications.json
     /tweets.json
     /account/password.json
https://twitter.com/api/v1/users.json https://twitter.com/api/v1/notifications.json https://twitter.com/api/v1/tweets.json https://twitter.com/api/v1/account/password.json - endpoints :
fetch 사용 예시 :
fetch(”https://jsdemo-3f387-default-rtdb.europe-west1.firebasedatabase.app/chapters/all.json")
.then(response ⇒ response.json())
.then(data ⇒ console.log(data));
→ 위 API에서 받은 데이터가 다음과 같이 array of object일때,
[
  { id: 1, isCompleted: true, title: "Basic Functions" },
  { id: 2, isCompleted: true, title: "Strings" },
  { id: 3, isCompleted: false, title: "Numbers" },
  { id: 4, isCompleted: true, title: "Variables" },
  { id: 5, isCompleted: false, title: "Conditions" },
];
completed chapter만으로 구성된 새로운 array를 만들어서 displayCompletedChapters()에 넣어주고 싶다면 :
const getChapters = () => {
  fetch(
    "https://jsdemo-3f387-default-rtdb.europe-west1.firebasedatabase.app/chapters/all.json"
  )
    .then((response) => response.json())
    .then((data) => {
      console.log(data);
      const completedChapters = data.filter((data) => {
        return data.isCompleted == true;
      });
      displayCompletedChapters(completedChapters);
    });
};

function displayCompletedChapters(chapters) {
  console.log("Received", chapters);
}

getChapters();
Handling fetch errors :
-
response status code :
API에 fetch request를 보낸 후 받은 응답에는 100~600의 범위의, authentiation status code가 함께 반환되어 응답이 정상적으로 반환되었는지 등의 상태를 알려준다. (i.e HTTP 상태 코드 표)-
1XX (100~199) : informational response - 정보 제공. 임시 응답으로, 계속 진행하라는 의미
-
2XX (200~299) : 성공적인 응답! → 가장 흔히 볼 수 있는 숫자 범위
e.g. 200 + response text "OK" : 요청이 성공적으로 시행되었으므로 응답이 "OK"라는 뜻 -
3XX (300~399) : redirect - 특정 url에서 다른 url로 이동한 후 추가 동작이 필요한 시
e.g.
→ 301 + response text "Moved Permanently" : 요청할 URL이 이동되었으니 그 주소로 다시 시도
→ 302 + response text "Found" -
4XX (400~499) : client error - 에러의 이유가 클라이언트(나)에게 있다
e.g.
→ 401 + response text "Unauthorized" : 데이터가 인증(authentiation)을 필요로 하는 경우
→ 404 : 존재하지 않는 url을 입력한 경우 (404 not found) -
5XX (500~599) : server error - 에러의 이유가 서버 측에 있다
e.g.
→ 500 + status text "Internal Server Error" : 서버 측 코드에 버그가 있음
→ 504 + status text "Gateway Timeout" : 서버 트래픽 과다(추가 참고 : https://hongong.hanbit.co.kr/http-상태-코드-표-1xx-5xx-전체-요약-정리/)
-
-
Error catch
↓ 무언가 부족한 코드 예시fetch(URL) .then(response => response.json()) .then(data => { console.log(data); }) .catch(error => { console.error(error); });위 코드에서,
catch는fetch()가 반환하는 promise가 rejected state가 될 때 실행 : client-server 연결 문제의 network error의 경우.
하지만fetch()가 정상작동했지만 서버 측에서 에러 코드를 반환한 경우, catch가 에러를 잡지 못함.→ 즉
fetch.then()안에서 별도로 에러를 다루어주어야 함.⇒ 이 안에서의 구현, 즉 어떻게 에러를 다룰지는 API마다 다름.
json으로 전환되기 전의 response object는 fetch 성공 여부를 확인할 수 있는 “ok” 필드를 가지고 있는데, 이는 에러코드(response status code)가 2xx 범위일때(i.e,클라이언트/서버 에러 모두 없는 성공적인 응답일때) “ok” 값을 가진다.
→ 이용해서 에러 다룰 수 있음.
완전한 형식
fetch(URL)
	.then(response => {
		if(!response.ok) {
			// 4xx or 5xx error
			throw new Error(“API issues.”);
		}
		/* catch로 잡히지 않는 API error을 다룬다.
		=> throw문은 직접 promise를 reject
		*/
		return response.json();
	})
	.then(data => {
		console.log(data);
	})
	.catch(error => {
	/* catch문에서는 network error을 다룬다. */
		console.error(error);
	});
Fetch POST, PUT, DELETE 사용법
앞서 말했듯 fetch()는 기본적으로 GET 요청이며, POST / PUT / DELETE 요청을 하기 위해서는 method, headers, body가 명시된 Javascript Object를 url 다음의 argument에 넣어주어야 한다.
- Headers : 주로 보내는 요청에 관한 meta-data를 첨부하여 넣는다. 대표적인 항목은
“Content-Type”으로, 어떤 형식의 데이터를 주고받는지에 대한 설명이다. - Body : 요청에 대한 직접적인 data를 넣는다. (ex.수정할 데이터)
- JSON object를
JSON.stringify를 통해 string으로 변환하여 넣어주어야 한다. → API에서 응답을 받을 때는 string → object 변환이 이루어졌던 것처럼, API에 요청 시 object를 바로 주지 않고 API가 활용할 수 있는 형식인 string으로 변환하는 것이 필요하다.
- JSON object를
템플릿 :
fetch(URL, {
    method: "POST", // or PUT or DELETE
    headers: {
        "Content-Type": "application/json"
    },
    body: JSON.stringify({
        key1: 'value1', // replace with key/value based on documentation
        key2: 'value2', // same as above (if needed)
    })
})
.then(response => response.json())
.then(data => {
    console.log(data); // read server response
});
Fetch Wrapper 사용
- 웹을 만들다 보면 동일한 base url에다 endpoint만 다른 fetch 문을 많이 사용하게 됨 → fetch wrapper을 구현해서 사용할 시 더 간결. response를 json으로 미리 바꾸어주고, header의 Content-Type가 json으로 미리 설정되어 있도록, FetchWrapper class를 구현하여 사용할 수 있다.
- e.g.
- fetch wrapper 없이 fetch (GET, PUT)
fetch(`fetchURL/notifications/new.json`) .then(response => response.json()) .then(data => { console.log(data); }); fetch(`fetchURL/write.json`, { method: "PUT", headers: { "Content-Type": "application/json" }, body: JSON.stringify({ grade: 18 }) }) .then(response => response.json()) .then(data => { console.log(data); // read server response }); - fetch wrapper 사용 시 :
→ 두번째 argument로 body만 넣어주고, body의 stringify도 fetch wrapper에서 처리하고 있는 구현.const API = new FetchWrapper(“fetchURL/”); API.get(“notifications/new.json”).then(data => { console.log(data); }); API.put(“write.json”, { grade: 18 }).then(data => { console.log(data); });
- fetch wrapper 없이 fetch (GET, PUT)
Fetch Wrapper 구현
-
사용하는 API 및 사용자의 목적에 따라 customization이 가능하지만,
공통적으로는 base URL을 파라미터로 받는 constructor, 그리고 endpoint를 파라미터로 받는get,put,post,delete각각의 class method가 필요하다.→
get,put,post,delete메서드가 반환하는 결과에.then을 이용하여 asynchronous하게 데이터를 활용할 수 있도록, 각 method는 Promise를 return해야 한다.추가적으로는 반환되는 응답을 method에서 미리
response.json()을 처리해주거나,
필요 시 특정 header을 디폴트로 보내게 하거나,
요청의 body를 알아서 stringify하게끔 구현할 수도 있다.
→ get 이외의 put, post, delete 메서드들은 작동 방식이 비슷하기 때문에, 공통적으로 사용할 수 있는 private helper method를 정의해두고 사용할 수 있다.
class FetchWrapper {
	constructor(baseURL) {
		this.baseURL = baseURL
	}
	**get**(endpoint) {
		return fetch(this.baseURL + endpoint, {
			headers: {
				"Content-Type": "application/json"
			}
		}).then(response => response.json());
	}

	**post**(endpoint, body) {
		return this.#send("post", endpoint, body);
	}

	**put**(endpoint, body) {
		return this.#send("put", endpoint, body);
	}

	**delete**(endpoint, body) {
		return this.#send("delete", endpoint, body);
	}


	#send(method, endpoint, body) {
		return fetch(this.baseURL + endpoint, {
			method: method,
			headers: {
				"Content-Type": "application/json"
			},
			body: JSON.stringify(body)
		}).then(response => response.json());
	}
}
→ 필요시 wrapper에서 수행하는 작업에 authentication, error catch 등 필요한 기능을 추가할 수도 있다.