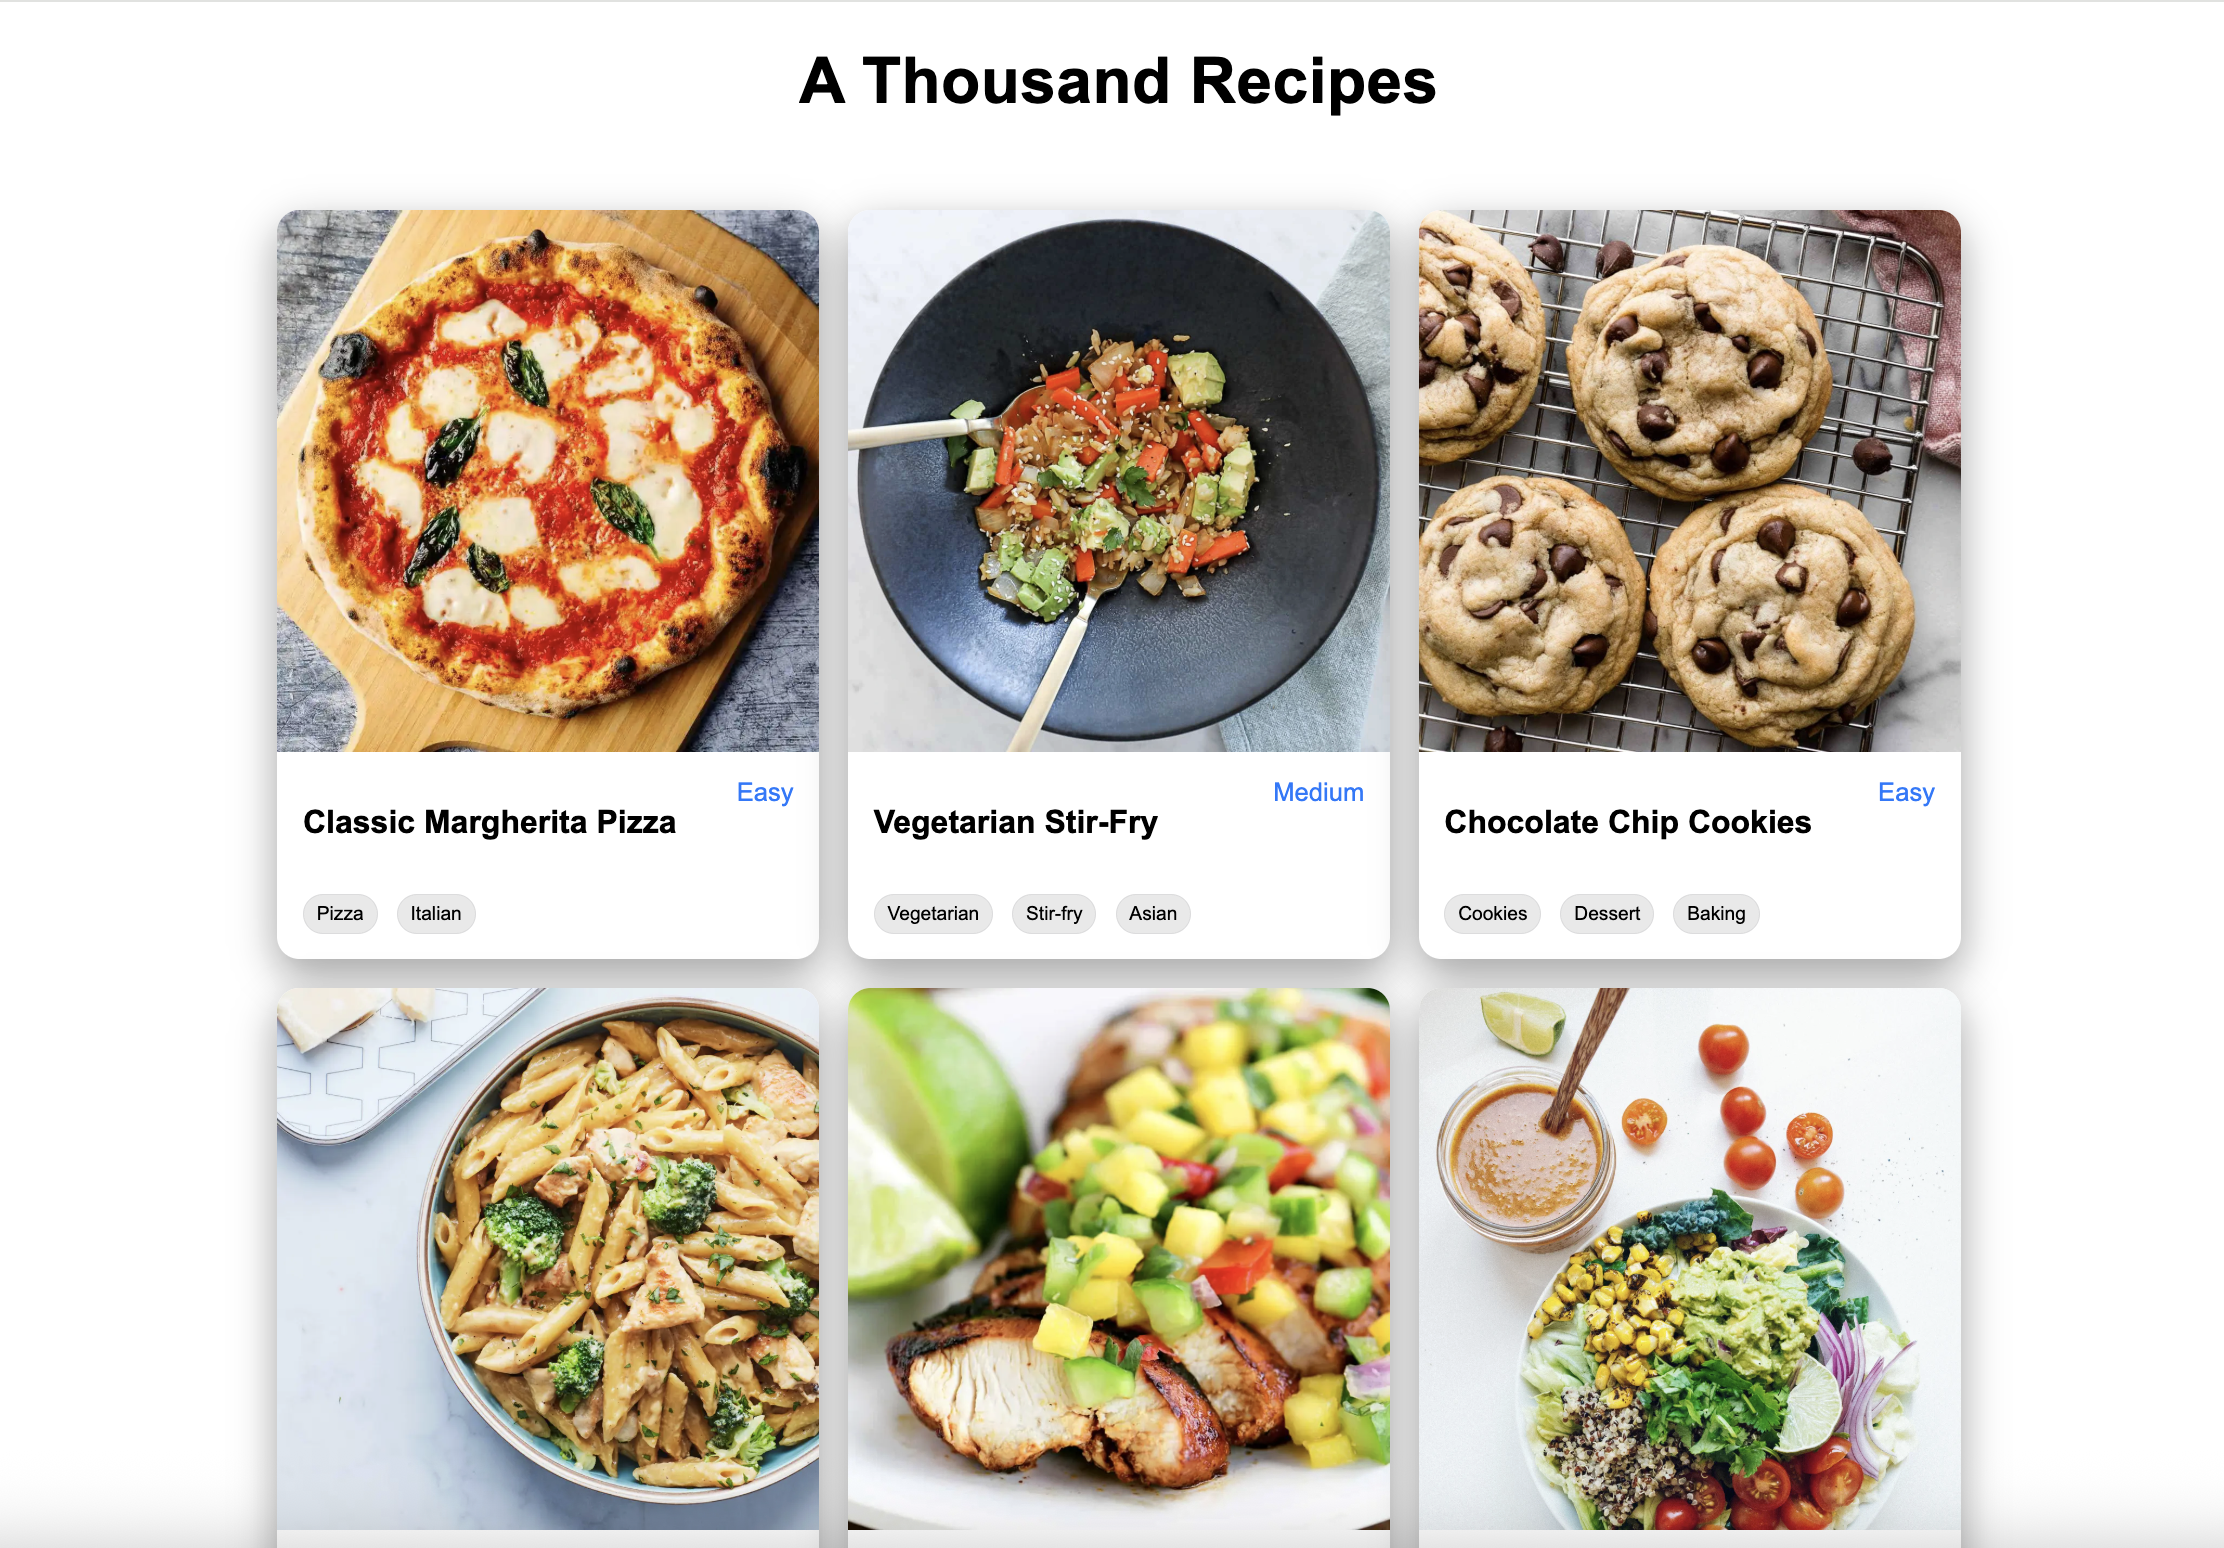
와플스튜디오 프론트엔드 세미나에서 React로 천개의레시피를 클론코딩하는 과제를 수행했다.
UI 구조와 디자인이 모두 정해져있어서 편리했고, 노마드코더의 리액트 초급 강의에서 들었던 내용을 활용할 수 있는 부분이 많았어서 2048 과제보다 더 쉽게 진행할 수 있었다.
react-dom-router을 이용해서 Multi-Page-App구현하기- 하나의 페이지 안에서 페이지 번호를 통해 이동하는 pagination 구현하기
- fetch로 원하는 데이터를 asynchronous하게 가져오고 가져온 데이터 저장 및 활용하기
이 3가지가 쟁점이 되었던 과제였다.
2048 클론 코딩을 하면서 열심히 코딩을 하더라도 기록하지 않으면 남는 것이 많이 없는 것 같다고 느껴서, 과제 제출 이후 개발 과정 및 에러 로그를 기록했다.
개발 과정
-
구조를 잡는다.
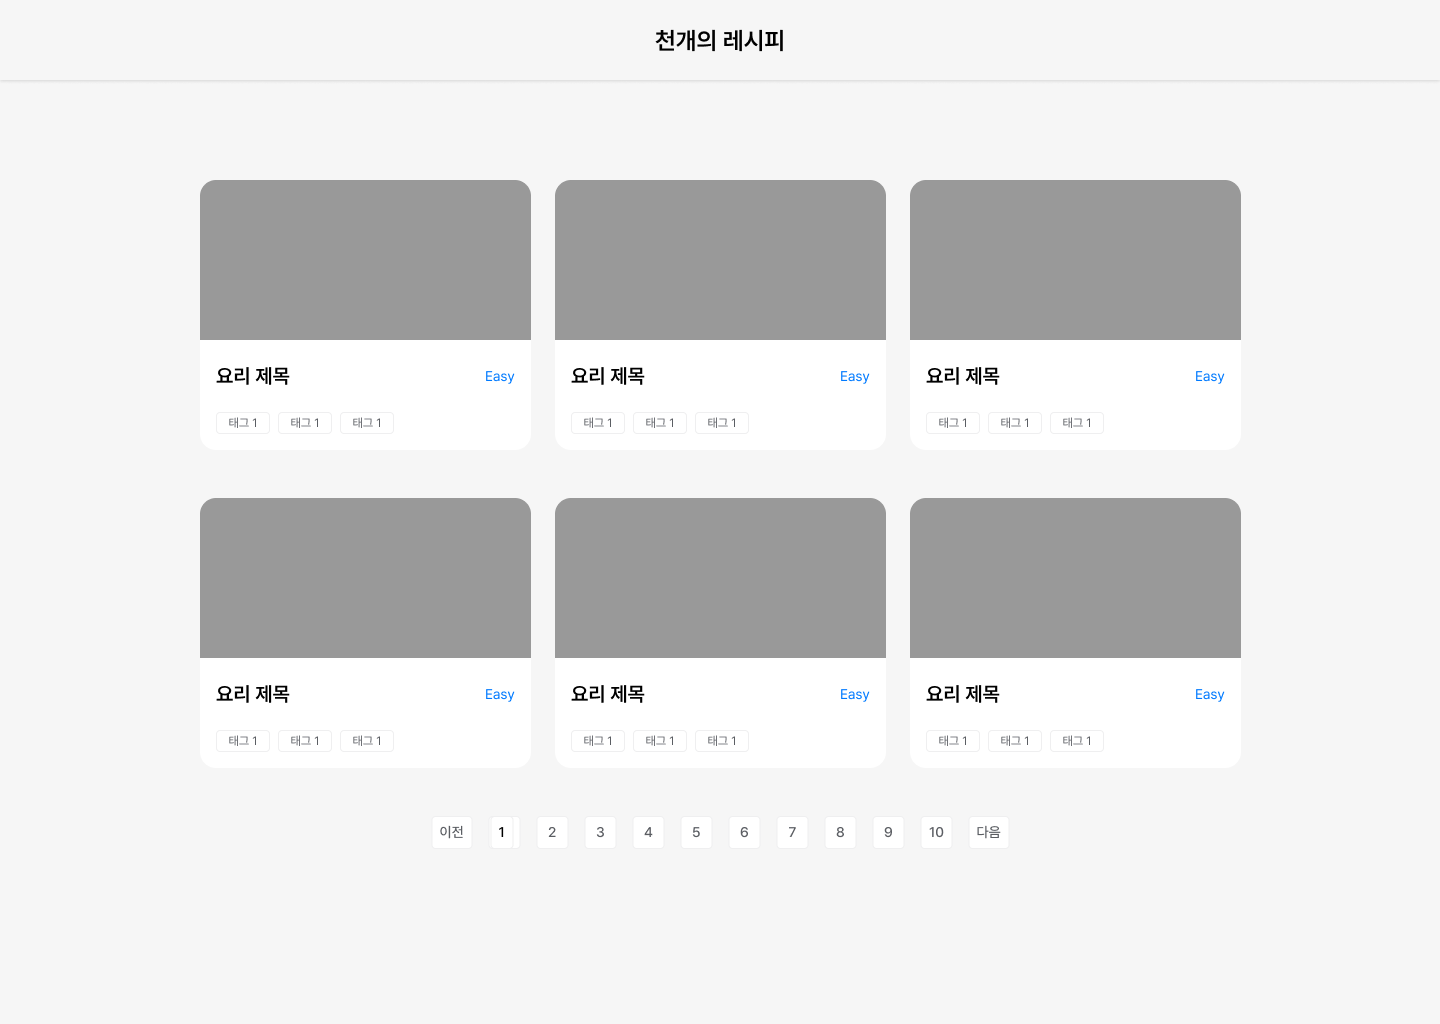
메인 페이지에서 각각의 레시피 카드를 클릭하면, 상세 레시피가 나타나는 별도 path의 페이지로 이동하는 방식이다.
따라서
react-router-dom라이브러리를 이용하고, 각 path에 해당하는 페이지들을routes/폴더의Home.tsx,Detail.tsx로 두었다.Home에 있는 레시피마다의 카드는 따로
components/폴더의Recipe.tsx로 분리했다. 페이지네이션 컴포넌트도 마찬가지로 따로Pagination.tsx로 두었다.├── src │ ├── App.tsx │ ├── components │ │ ├── Pagination.tsx │ │ └── Recipe.tsx │ ├── main.tsx │ ├── routes │ │ ├── Detail.tsx │ │ └── Home.tsx │ ├── styles │ │ ├── App.module.css │ │ ├── Detail.module.css │ │ ├── Home.module.css │ │ ├── Pagination.module.css │ │ └── Recipe.module.css -
Pagination 컴포넌트
React에서 pagination을 어떻게 구현할지 고민해보다가, pagination과 리액트 모두 익숙하지 않은 상황에서는 다른 사람의 코드를 검색해서 이해하는게 나을 것이라고 판단했다.
따라서 검색 후에 정말 깔끔하고 범용성있는 컴포넌트 코드를 https://imdaxsz.tistory.com/37 에서 발견하고, 코드를 살펴보며 이해한 후에, 일부 수정 후 프로젝트에 적용했다.
-
API 확인
사용할 api인 https://dummyjson.com/docs/recipes 의 설명을 확인해보았다.
- 전체 데이터 가져오기 : 한번에 전체 recipe data를 array로 가져오고 페이지에 맞게 slicing해서 이용하는 대신에, api의
limit과skipquery를 이용해서 현재 페이지에 필요한 item들을 그때그때 가져오는 식으로 구현했다.
구현은 덜 귀찮았던 것 같지만, 그때그때 fetch를 해서 그런지 이미지 로드에 시간이 좀 걸렸다.// Home.tsx const response = await fetch( `https://dummyjson.com/recipes?limit=${itemCountPerPage}&skip=${(currentPage - 1) * itemCountPerPage}&select=name,image,difficulty,tags` );
-
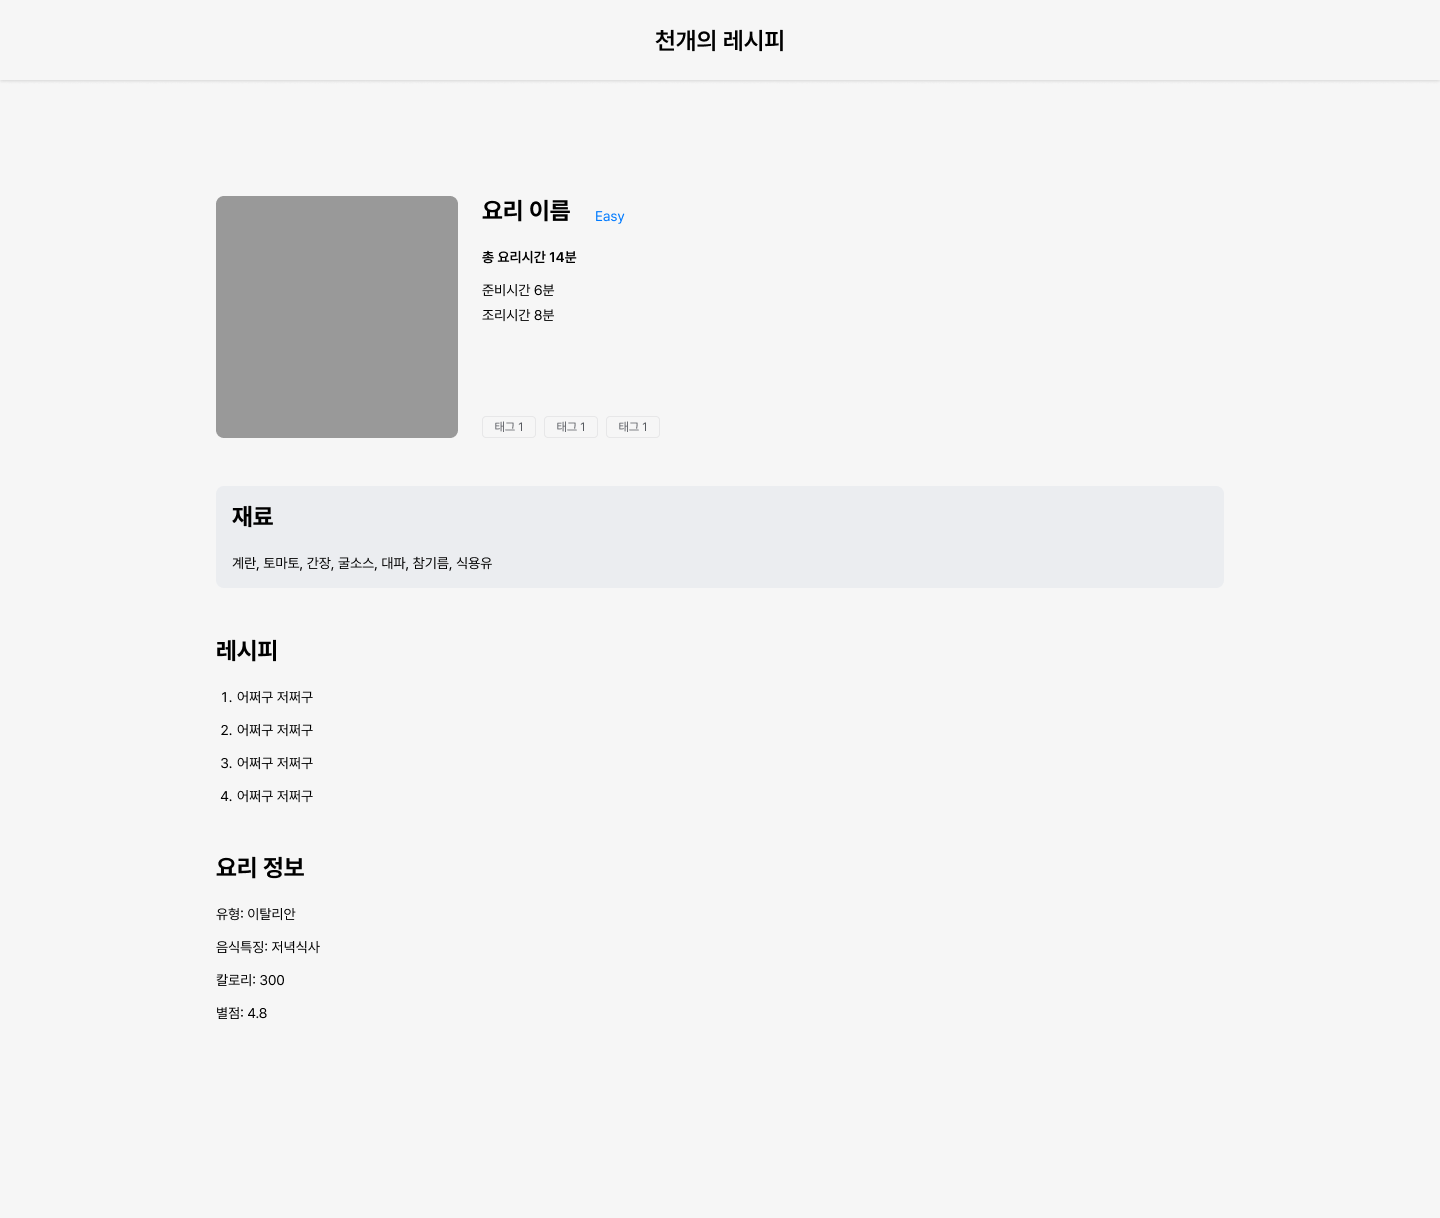
Detail에서 일부 데이터 가져오기 :
Detail로 이동할때, 클릭된 레시피의 정보를 어떻게 전달해주어야 할까 고민했다. 모든 레시피를 가져오고 id와 같은 identifier 값을 바탕으로 찾는 레시피 데이터가 나올때까지 순회하는 것은 너무 비효율적인듯하였는데 공식 링크에서는 id 값만으로 item을 가져오는 설명이 따로 없었다.⇒ 대충 전체를 가져오는 링크
https://dummyjson.com/recipes/를 바탕으로 url을 조금씩 변경해보면서 결국https://dummyjson.com/recipes/2를 시도해보았는데, 정말로 id를 통해서 하나의 object를 가져오는 valid fetch url이었다 (? 시도의 중요성)⇒ 따라서
Detail.tsx에서 해당 링크를 바탕으로fetch를 하고, 필요한id파라미터 값을 url 파라미터의 형식으로Recipe.tsx에서 전달받기로 결정했다.
- 전체 데이터 가져오기 : 한번에 전체 recipe data를 array로 가져오고 페이지에 맞게 slicing해서 이용하는 대신에, api의
-
상위
App.tsx에서 Route 구조 잡기<Router> <Routes> <Route path="/" element={<Home />} /> <Route path="/recipe/:id" element={<Detail />} /> </Routes> </Router>→
<Detail />에 이동 시 id 파라미터를 전달하기 위해/recipe/:id명시 필요
-
Home.tsx구현하기 &Recipe.tsx구현하기typescript를 이용하는 만큼, Home에서<Recipe />로 전달해줄 prop을interface를 통해서 prop 제약을 걸어두었다.// Home.tsx export interface RecipeProps { id: number; name: string; image: string; difficulty: string; tags: Array<string>; } ... const [recipes, setRecipes] = useState<RecipeProps[]>();Home에서는 pagination에서 전달된
?page={pagenum}파라미터를useSearchParams()로 받아오고, 이를 바탕으로 page에 맞는 데이터를 fetch해오는 로직이 메인이 된다.// Home.tsx ... useEffect(() => { setCurrentPage(parseInt(searchParams.get('page') || '1', 10)); }, [searchParams]); ... const response = await fetch( `https://dummyjson.com/recipes?limit=${itemCountPerPage}&skip=${(currentPage - 1) * itemCountPerPage}&select=name,image,difficulty,tags`);받아온 데이터는
recipesstate에 저장해두고,.map을 통해서 각각의 데이터에 따라<Recipe />컴포넌트를 만든다.// Home.tsx ... <div className={styles.recipeGrid}> {recipes?.map((recipe) => ( <Recipe key={recipe.id} id={recipe.id} name={recipe.name} image={recipe.image} difficulty={recipe.difficulty} tags={recipe.tags} /> ))} </div>Recipe에서는 받은 prop을 바탕으로 card 구조를 구현하는 것이 다이기 때문에 구조에는 css가 더 중요했다. 이외에는 Recipe 카드를 클릭했을때 Detail로 넘어갈 수 있도록, 전체 컴포넌트를
<Link>로 감싸주고,id파라미터를 전달해주었다.//Recipe.tsx ... <Link to={`/recipe/${id}`} className={styles.recipeCard} key={id}> ... </Link>
-
Detail.tsx구현하기Detail에서도 id를 바탕으로 fetch해올 개별 object의 구조의 type를 명시해두었다.
interface RecipeDetail {
  id: number;
  name: string;
  ingredients: string[];
  instructions: string[];
  prepTimeMinutes: number;
  cookTimeMinutes: number;
  servings: number;
  difficulty: string;
  cuisine: string;
  caloriesPerServing: number;
  tags: string[];
  image: string;
  rating: number;
  reviewCount: number;
  mealType: string[];
}

...
  const [recipe, setRecipe] = useState<RecipeDetail>();
ingredients는 string[] 형식으로 받아서, 한 줄로 출력하기 위해
ingredients.join(' / ')을 이용했다.const Detail = () => { const [loading, setLoading] = useState(true); const [recipe, setRecipe] = useState<RecipeDetail>(); const { id } = useParams<{ id: string }>(); useEffect(() => { const getRecipe = async () => { const response = await fetch(`https://dummyjson.com/recipes/${id}`); const data = await response.json(); setRecipe(data); setLoading(false); }; getRecipe(); }, [id]);
-
component마다 styling 적용
Movie clone, 2048 clone에서는 모듈별로 css를 적용해주지 않고 하나의 style sheet에서 모든 것을 해결했는데 이번에는 각각의 모듈별 style sheet을 만들었다. (ex.
styles/Home.module.css)→ 확실히 컴포넌트별 css 파일을 작성하는 것이 유지보수 및 수정이 더 간편하게 느껴지고, react의 장점을 더 살리는 방법이라고 느껴졌다.
→ 다음에는 row, col과 같은 공통되게 사용되는 class들을 공통된 style sheet나 상위의 style sheet에 두고 사용하는 보다 체계적인 방식을 사용할 예정이다.
-
플로팅 바 만들기 :
Home과 Detail 모두에 공통적으로 ‘천개의 레시피’ 상단 바가 있다. 따라서 이 바는
App.tsx에Router안,Routes의 밖에 따로 두어서 공통적으로 생기게 했다.
Troubleshooting
React
- 에러 메시지 :
Uncaught Error: Too many re-renders. React limits the number of renders to prevent an infinite loop.-
원인 코드 :
```tsx

const Home = () => {
  // Page state
  const [currentPage, setCurrentPage] = useState<number>(1);
  const [loading, setLoading] = useState<boolean>(true);
  const [recipes, setRecipes] = useState<RecipeProps[]>();
  const [totalItems, setTotalItems] = useState<number>(0);

  // current page & other parameters
  const [searchParams] = useSearchParams();
  const ITEM_COUNT_PER_PAGE = 6;
  const PAGE_COUNT = 10;

  // 문제의 줄
  setCurrentPage(parseInt(searchParams.get('page') || '1', 10));

```

→ state의 setter 함수를 컴포넌트 body의 최상위 레벨에 직접적으로 호출하니, render 시 state가 바뀌고 바뀐 state 다시 render을 발생시키면서 앱이 무한히 render되게 됨.
⇒ 교훈 : ⭐ state setter 함수를 컴포넌트의 메인 body에 넣어서는 안된다.
⇒ 해결책 :
useEffect사용하기useEffect(() => { const pageFromURL = parseInt(searchParams.get('page') || '1', 10); setCurrentPage(pageFromURL); }, [searchParams])
-
<Link>이용 :<Link>태그에 클릭가능하게 만들고자 하는 요소들을 감싸서 넣어주어야 한다는 사실을 인지하지 못하고,<Link ... > </Link>로 비어있는<Link>를 사용해서 링크 태그가 잘 작동하지 않았다. →<Link>가 전체 element를 감싸게 하기
Detail.tsx에서useParams()로id가져오기 :
와 같이 실행했더니, 브라우저 콘솔에서 fetch link의 id 부분이 깨져있었다. →const id = useParams(); ... useEffect(() => { ... const response = await fetch(`https://dummyjson.com/recipes/${id}`);const {id} = useParams<{ id: string }>();로, 상단에서 정의한RecipeDetail의 type를 이용해서 string을 받아오는 것을 명시해주었다. 그러니 문제가 해결되었다.
CSS
classList="class-name"과 같은 형식이 아니라, 모듈별 css를 이용하며classList={styles.className}과 같이 css class를 적용했기 때문에
class의 이름을 camelCase로 작성하지 않아서 style class가 제대로 적용되지 않았다.⇒ css class를 애초에 camelCase로 명명하거나, bracket notation으로 `classList={styles['class-name']}`과 같이 이용하자.
Detail의 css는 만들기 귀찮아서 gemini에게 외주맡겼다. 그랬더니 recipe instructions와 menu info에 있는<ul>과<ol>의<li>요소들이 정상적으로 줄바꿈되지 않고,inline형식으로 나열되었다. 브라우저의 devtools에서<li>의 computed styles를 확인해 보니, padding이 이상할 만큼 크게 설정되어 있고float속성이 있었다. 상위 css sheet에서 무언가
위와 같이 초기화해주니 적용되었다.ol, ul { display: block; } li { float: none; display: list-item; }