
항해99 사전 스터디 4주차
4주차에는 클라이언트와 서버가 만났다.
서버가 존재하는 하나의 완성된 홈페이지를 만들었다.
잡담하지 않고 빠르게 배운 것을 리뷰해보겠다.
Flask
Flask는 프레임워크다. 서버를 직접 구동 시킬려면 너무 할 것도 많고 복잡하다.
그래서 Flask가 그것들을 도와주는 것이다.
일단 Flask 서버를 만들 때는 항상 기본 폴더 구조가 있다.
static 폴더 / templates 폴더 / app.py 파일
이렇게 3가지가 필요하다.
사실 그렇게 중요해 보이지는 않는다.
프로젝트
드디어 Flask 프레임워크를 이용하여 서버와 클라이언트로 프로젝트를 만든다.
POST
먼저 API 쪽 코드부터 하나하나씩 보겠다.
from flask import Flask, render_template, request, jsonify
app = Flask(__name__)

from pymongo import MongoClient
client = MongoClient('mongodb+srv://test:sparta@cluster0.wo6rlkp.mongodb.net/Cluster0?retryWrites=true&w=majority')
db = client.dbsparta
일단 import로 프레임워크와 필요한 것들을 불러왔다. 패키지에 설치한 Flask도 보인다.
그 다음은 이전 3주차에서도 했던 MongoDB를 연결하였다.
@app.route('/')
def home():
    return render_template('index.html')
위 코드는 간단하다. template라는 폴더에 'index.html'을 불러오는 것이다.
@app.route("/mars", methods=["POST"])
def web_mars_post():
    name_receive = request.form['name_give']
    address_receive = request.form['address_give']
    size_receive = request.form['size_give']
    doc= {
        'name':name_receive,
        'address':address_receive,
        'size':size_receive
    }
    db.mars.insert_one(doc)
    return jsonify({'msg': '주문 완료!'})
일단 눈에 POST라는 것이 확 띄인다. '/mars'에서 POST로 정보를 받고 있다.
코드 밑에서는 'name_give', 'address_give', 'size_give'를 찾아서 변수에 넣고 있다.
이 후에 저장을 하기위에 3주차에 dbprac을 통해 배웠던 것처럼 딕셔너리에 정보를 담아서 mars라는 DB공간에 insert를 하였다.
이후에 서버에서는 '주문 완료'라는 value가 담겨져있는 'msg' 키 값을 돌려주었다.
API를 보았으니 프론트엔드를 보자면 이러하다.
        function save_order() {
            let name = $('#name').val()
            let address = $('#address').val()
            let size = $('#size').val()

            $.ajax({
                type: 'POST',
                url: '/mars',
                data: {name_give: name, address_give: address, size_give: size},
                success: function (response) {
                    alert(response['msg'])
                    window.location.reload()
                }
            });
        }
프론트엔드에서는 가져갈 정보를 입력해야 한다.
맨 위부터 보면, 1주차에 배운데로, HTML에서 입력한 정보(value)를 jQuery로 변수에 저장한다.
이후에 다시 2주차에 배운 ajax가 등장한다. 여기에도 POST가 눈에 확 띄인다.
POST 방식으로 '/mars' url로 가져가고 있다.
data는 api쪽을 보면 알 수 있다. api쪽에서 name_give, address_give, size_give로 가져가기로 하였기 때문에 위와 같이 작성하였다. name_give에는 name이라는 값이 들어가고, address_give에는 address가 들어가고, size_give에는 size가 들어간다. 전부 키와 value 형식으로 data에 들어가게 된다.
이후에 이게 성공하면 서버쪽에서 이전에 마지막에 return한 'msg'를 띄워주게 된다.
마지막으로 새로고침을 하였다.
이렇게 서버와 클라이언트의 POST가 완성되었다.
GET
역시나 서버쪽 코드부터 보겠다.
@app.route("/mars", methods=["GET"])
def web_mars_get():
    order_list = list(db.mars.find({}, {'_id': False}))
    return jsonify({'orders':order_list})
GET은 POST에 비해 매우 간단하다.
일단 POST로 DB에 저장한 정보들 모두 다 받아온다.
역시나 dbprac에서 해봤던 것을 그대로 사용하였다.
이게 끝이다.
그 다음 프론트엔드쪽을 보겠다.
   $(document).ready(function () {
            show_order();
        });
위 코드는 실행하자마자 show_order() 함수를 실행시킨다.
function show_order() {
            $.ajax({
                type: 'GET',
                url: '/mars',
                data: {},
                success: function (response) {
                    let rows = response['orders']
                    for(let i = 0; i < rows.length; i++){
                        let name = rows[i]['name']
                        let address = rows[i]['address']
                        let size = rows[i]['size']

                        let temp_html =  `<tr>
                                            <td>${name}</td>
                                            <td>${address}</td>
                                            <td>${size}</td>
                                        </tr>`
                        $('#order_box').append(temp_html)
                    }
                }
            });
        }
역시나 ajax를 통해서 GET방식으로 '/mars'에서 정보를 받아오고 있다.
이후에 success안에 함수는 이전에 3주차에서 이미 했던 것이다.
객체에 있는 정보들을 rows 변수에 담아 for문으로 돌려 원하는 정보만 변수에 저장한다.
이후에 클라이언트에게 보여질 HTML을 찾아서 temp_html에 저장하여 append로 붙였다.
이렇게 GET과 POST가 다 끝나면 밑에와 같이 작동된다.
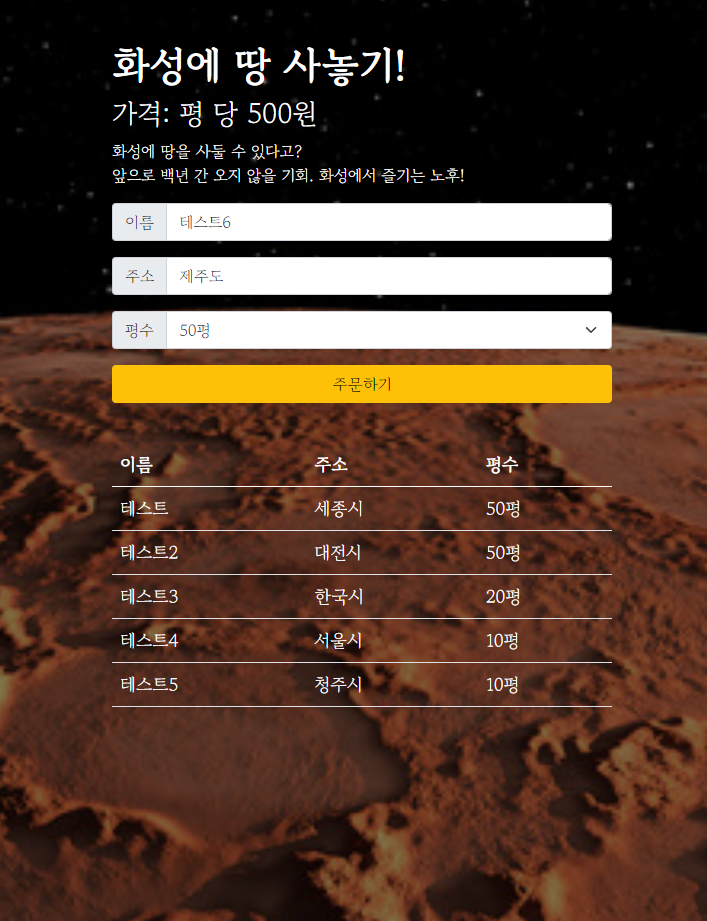
이미 많은 땅을 화성에 사놓은 나...
그러나 하나 더 사겠다. 주문하기를 누르면???
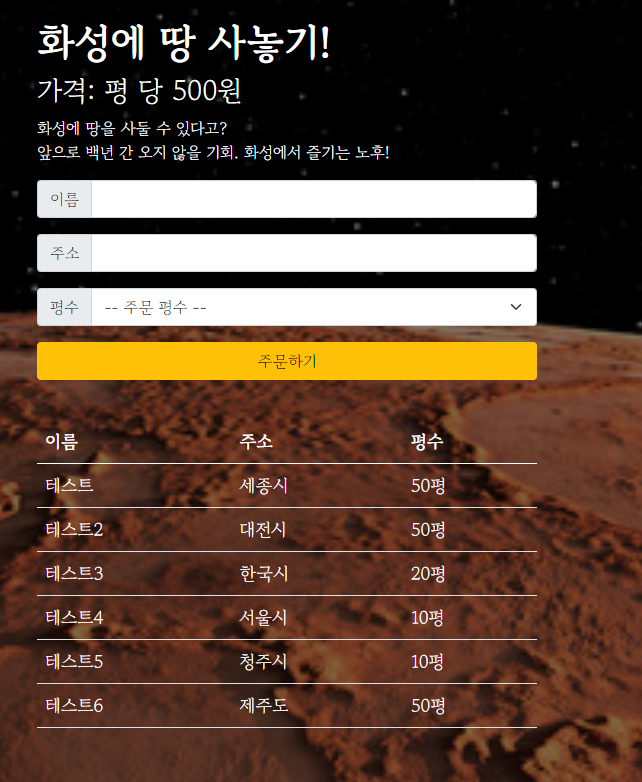
맨 밑에 내가 방금 산 제주도 땅이 보인다 ㅋㅋㅋㅋㅋㅋㅋ
너무 꿀잼인걸?
4주차 과제
from flask import Flask, render_template, request, jsonify
app = Flask(__name__)

from pymongo import MongoClient
client = MongoClient('mongodb+srv://test:sparta@cluster0.wo6rlkp.mongodb.net/Cluster0?retryWrites=true&w=majority')
db = client.dbsparta

@app.route('/')
def home():
    return render_template('index.html')

@app.route("/homework", methods=["POST"])
def homework_post():
    id_name = request.form['id_give']
    comment_receive = request.form['comment_give']

    doc={
        'name': id_name,
        'comment': comment_receive
    }
    db.marvel.insert_one(doc)
    return jsonify({'msg':'코멘트 작성 완료!'})

@app.route("/homework", methods=["GET"])
def homework_get():
    all_users = list(db.marvel.find({}, {'_id': False}))
    return jsonify({'msg': all_users})

if __name__ == '__main__':
    app.run('0.0.0.0', port=5000, debug=True)
위에는 서버쪽 코드다.
밑에는 클라이언트쪽 코드다.
<!DOCTYPE html>
<html lang="en">
<head>
    <meta charset="UTF-8">
    <meta http-equiv="X-UA-Compatible" content="IE=edge">
    <meta name="viewport" content="width=device-width, initial-scale=1.0">

    <link href="https://cdn.jsdelivr.net/npm/bootstrap@5.0.2/dist/css/bootstrap.min.css" rel="stylesheet"
          integrity="sha384-EVSTQN3/azprG1Anm3QDgpJLIm9Nao0Yz1ztcQTwFspd3yD65VohhpuuCOmLASjC" crossorigin="anonymous">
    <script src="https://ajax.googleapis.com/ajax/libs/jquery/3.5.1/jquery.min.js"></script>
    <script src="https://cdn.jsdelivr.net/npm/bootstrap@5.0.2/dist/js/bootstrap.bundle.min.js"
            integrity="sha384-MrcW6ZMFYlzcLA8Nl+NtUVF0sA7MsXsP1UyJoMp4YLEuNSfAP+JcXn/tWtIaxVXM"
            crossorigin="anonymous"></script>

    <title>초미니홈피 - 팬명록</title>
    <link href="https://fonts.googleapis.com/css2?family=Do+Hyeon&display=swap" rel="stylesheet">

    <style>
        * {
            font-family: 'Do Hyeon', sans-serif;
        }

        .mypic {
            width: 100%;
            height: 300px;

            background-image: linear-gradient(0deg, rgba(0, 0, 0, 0.5), rgba(0, 0, 0, 0.5)), url("https://i.annihil.us/u/prod/marvel/i/mg/b/f0/5a6a3c922daf3/clean.jpg");
            background-position: center 30%;
            background-size: cover;

            color: white;

            display: flex;
            flex-direction: column;
            align-items: center;
            justify-content: center;
        }

        .mypost {
            width: 95%;
            max-width: 500px;
            margin: 20px auto 20px auto;

            box-shadow: 0px 0px 3px 0px black;
            padding: 20px;
        }

        .mypost > button {
            margin-top: 15px;
        }

        .mycards {
            width: 95%;
            max-width: 500px;
            margin: auto;
        }

        .mycards > .card {
            margin-top: 10px;
            margin-bottom: 10px;
        }
    </style>
    <script>
        $(document).ready(function () {
            set_temp()
            show_comment()
        });

        function set_temp() {
            $.ajax({
                type: "GET",
                url: "http://spartacodingclub.shop/sparta_api/weather/seoul",
                data: {},
                success: function (response) {
                    $('#temp').text(response['temp'])
                }
            })
        }

        function save_comment() {
            let name = $('#name').val()
            let comment = $('#comment').val()

            $.ajax({
                type: 'POST',
                url: '/homework',
                data: {id_give: name, comment_give: comment},
                success: function (response) {
                    alert(response['msg'])
                    window.location.reload()
                }
            })
        }

        function show_comment() {
            $.ajax({
                type: "GET",
                url: "/homework",
                data: {},
                success: function (response) {
                    let rows = response['msg']
                    for(let i = 0; i < rows.length; i++){
                        let name = rows[i]['name']
                        let comment = rows[i]['comment']
                        let temp_html = `    <div class="card">
                                                <div class="card-body">
                                                    <blockquote class="blockquote mb-0">
                                                        <p>${comment}</p>
                                                        <footer class="blockquote-footer">${name}</footer>
                                                    </blockquote>
                                                </div>
                                            </div>`
                         $('#comment-list').append(temp_html)
                    }
                }
            });
        }
    </script>
</head>
<body>
<div class="mypic">
    <h1>MAVEL 팬명록</h1>
    <p>현재기온: <span id="temp">36</span>도</p>
</div>
<div class="mypost">
    <div class="form-floating mb-3">
        <input type="text" class="form-control" id="name" placeholder="url">
        <label for="floatingInput">닉네임</label>
    </div>
    <div class="form-floating">
<textarea class="form-control" placeholder="Leave a comment here" id="comment"
          style="height: 100px"></textarea>
        <label for="floatingTextarea2">응원댓글</label>
    </div>
    <button onclick="save_comment()" type="button" class="btn btn-dark">응원 남기기</button>
</div>
<div class="mycards" id="comment-list">
</div>
</body>
</html>
4주차 과제는 내가 이전에 1주차 과제로 만들어 두었던 방명록에 서버를 추가하는 것이었다.
P.S. 이전에 NodeJS와 MongoDB 그리고 pug를 이용해 만들었을 때보다 더 쉽고 이해가 잘 가는것 같다. 기분 탓인가?