Handler란?

A Handler allows you to send and process [Message](https://developer.android.com/reference/android/os/Message.html) and Runnable objects associated with a thread's [MessageQueue](https://developer.android.com/reference/android/os/MessageQueue.html). - 구글문서
구글문서에는 Message 와 MessageQueue 를 통해 설명하고 있다. Handler 를 이해하기 위해서는 Message, MessageQueue 그리고 Looper 에 대해 알고 있어야 한다.

Thread
프로그램 안에서 실행을 담당하는 하나의 흐름
MessageQueue
Message 를 담는 자료구조
Message
Parcelable 형태의 객체로 Message 클래스를 보면 어떤 형태의 데이터가 전달되는지 확인 할 수 있다.
public final class Message implements Parcelable {
    public static final Creator<Message> CREATOR = null;
    public int arg1;
    public int arg2;
    public Object obj;
    public Messenger replyTo;
    public int sendingUid = -1;
    public int what;

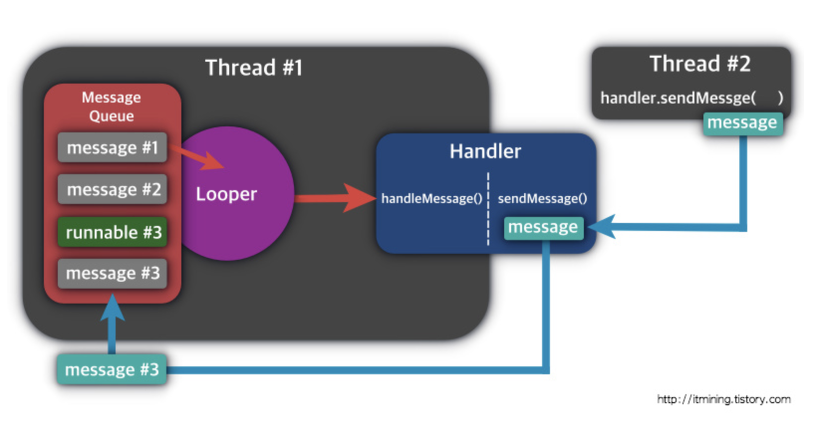
....그림에서와 같이 스레드당 1개씩 가지고 있습니다. 또한 Looper 별로 MessageQueue를 가지고 있습니다. MessageQueue 에서 Message 를 꺼내 Handler 로 전달하는 작업을 처리합니다. 메인스레드에서는 Looper 를 이미 가지고 있어 개발자가 관여하지 않아도 되지만 작업스레드에서는 Looper 를 직접 작성하고 실행시켜야 합니다.
<Looper를 생성하는 방법>
Looper.prepare() : 작업스레드를 위한 루퍼를 준비한다.
Looper.loop() : 큐에서 메시지를 꺼내 핸들러로 전달
class LooperThread extends Thread {
    public Handler mHandler;

    @Override
    public void run() {
        Looper.prepare();
        mHandler = new Handler() {
            @Override
            public void handleMessage(Message msg) {

            }
        };
        Looper.loop();
}-
서로 다른 쓰레드간의 통신을 위한 장치로 쓰인다
-
MessageQueue 에 보낼 데이터를 넣고 Looper 를 통해 처리할 데이터를 받고 보내는 중간 브로커 같은 역활을 한다.
-
기본 생성자를 통해 Handler 를 생성하면 해당 Handler 를 호출한 스레드의 MessageQueue 와 Looper 에 자동 연결된다.
예제)
public class MainActivity extends AppCompatActivity {

    private int mMainValue = 0;
    private int mSubValue = 0;

    private TextView mainText, subText;

    private Handler mHandler;

    @Override
    protected void onCreate(@Nullable Bundle savedInstanceState) {
        super.onCreate(savedInstanceState);
        setContentView(R.layout.activity_main);

        mainText = findViewById(R.id.mainText);
        subText = findViewById(R.id.subText);

        findViewById(R.id.btnIncrease).setOnClickListener(view -> {
            mMainValue++;
            mainText.setText(String.valueOf(mMainValue));
        });

        // 기본 생성자를 통해 Handler 를 생성하면
        // 해당 Handler 를 호출한 스레드의 MessageQueue 와 Looper 와 자동 연결된다.
        mHandler = new Handler() {
            @Override
            public void handleMessage(Message msg) {
                if(msg.what == 0) {
                    subText.setText(String.valueOf(mSubValue));
                }
            }
        };

        Thread thread = new Thread(new Runnable() {
            @Override
            public void run() {
                while (true) {
                    mSubValue++;
                    //sendEmptyMessage 함수를 통해 데이터 전달
                    //파라미터로 보낸 값은 message의 what에 대입된다.
                    mHandler.sendEmptyMessage(0);
                    try {
                        Thread.sleep(1000);
                    } catch (InterruptedException e) {
                        e.printStackTrace();
                    }
                }
            }
        });
        thread.setDaemon(true);
        thread.start();
    }
}

// ----------------------------------------------------------------------------

// MainAcitivty.class 외부에서 초기화 하는 예제

public class ExerciseActivity extends AppCompatActivity {

    private int mMainValue = 0;
    private int mSubValue = 0;

    private TextView mainText, subText;

    private Handler mHandler;

    @Override
    protected void onCreate(@Nullable Bundle savedInstanceState) {
        super.onCreate(savedInstanceState);
        setContentView(R.layout.activity_exercise);

        mainText = findViewById(R.id.mainText);
        subText = findViewById(R.id.subText);

        findViewById(R.id.btnIncrease).setOnClickListener(view -> {
            mMainValue++;
            mainText.setText(String.valueOf(mMainValue));
        });

        mHandler = new Handler() {
            @Override
            public void handleMessage(Message msg) {
                if(msg.what == 0) {

                    mSubValue = msg.arg1;
                    subText.setText(String.valueOf(mSubValue));
                }
            }
        };

        BackThread backThread = new BackThread(mHandler);
        backThread.setDaemon(true);
        backThread.start();

    }
}

class BackThread extends Thread {

    int backValue = 0;
    Handler handler;

    BackThread(Handler handler){
        this.handler = handler;
    }

    @Override
    public void run() {
        while(true){
            backValue++;

            // 메세지를 생성
            //Message msg = new Message();
            Message msg = Message.obtain();

            msg.what = 0;
            msg.arg1 = backValue;
            handler.sendMessage(msg);   // 메인스레드의 핸들러에 메세지 보내기

            try {
                Thread.sleep(1000);
            } catch (InterruptedException e) {
                e.printStackTrace();
            }

        }
    }
}
Handler 를 BackThread의 생성자로 보내 외부 클래스에서 메인스레드에 접근할 수 있는 중간 브로커 역활을 해줌
정리
안드로이드 앱에서는 오직 Main 스레드에서만 View 를 업데이트 할 수 있습니다. 이러한 점을 명심하고 Thread 와 Handler 를 사용하면 더욱 안정적인 멋진 앱을 만들 수 있다.
