(1) Hello 서블릿
스프링 부트 환경에서 서블릿 등록하고 사용해보자
1. 스프링 부트 서블릿 환경 구성
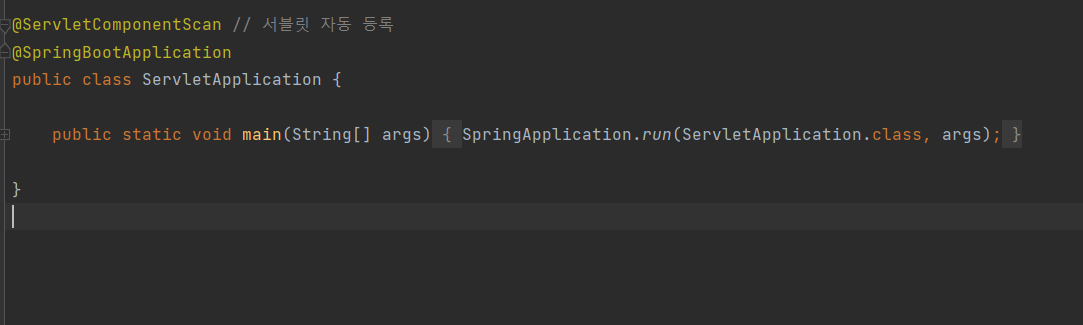
- ServletApplication.java
- @ServletComponentScan
: 스프링부트가 서블릿을 직접 등록해서 사용할 수 있도록 지원
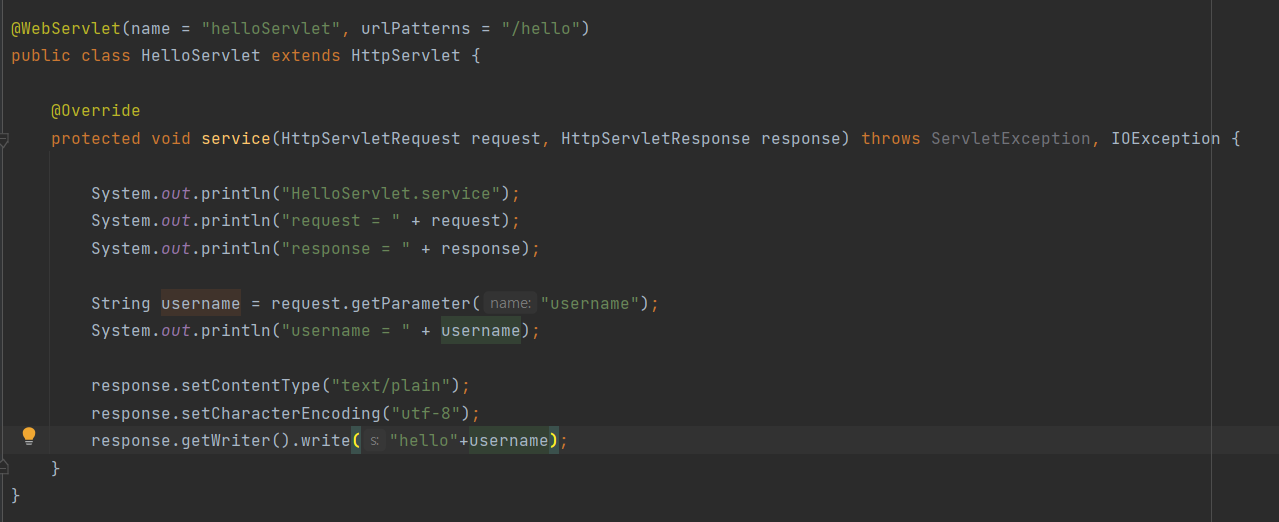
- HelloServlet.java
- @WebServlet: 서블릿 애노테이션
-> name : 서블릿 이름
-> urlPatterns : url 매핑- HTTP 요청을 통해 매핑된 URL이 호출되면 서블릿 컨테이너는 다음 메서드를 실행한다.
-> protected void service(HttpServletRequest request, HttpServletResponse response)
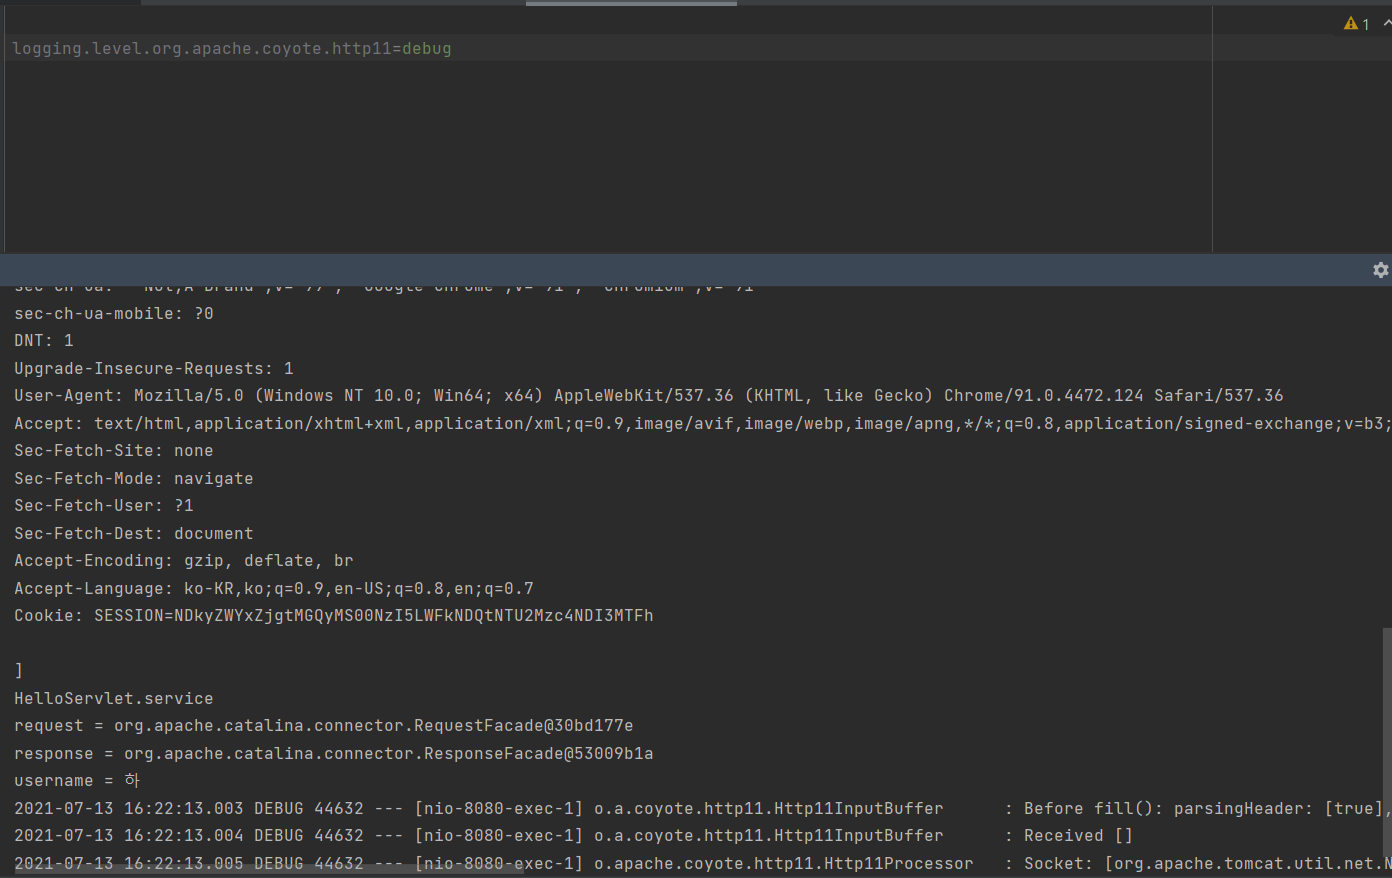
2. HTTP 요청 메시지 로그로 확인하기
- application.properties에 다음 내용 추가
logging.level.org.apache.coyote.http11=debug-> HTTP 메시지 정보 확인 가능
-> 운영서버에서는 성능 저하 등의 이유로 사용하지 말 것
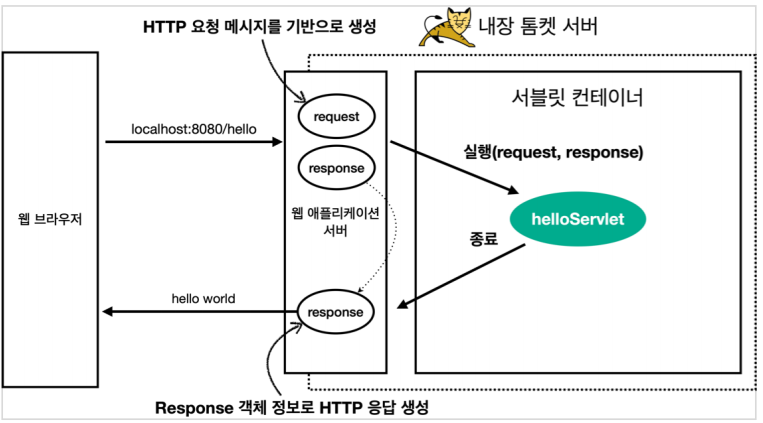
3. 서블릿 컨테이너 동작 방식 설명
-
내장 톰켓 서버 생성
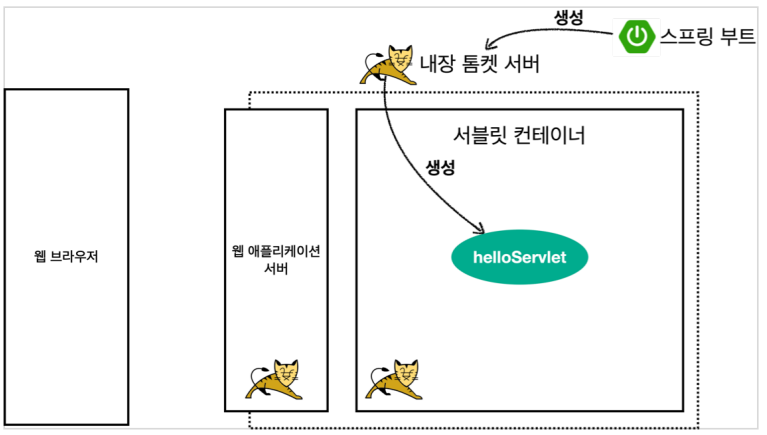
-
HTTP 요청, HTTP 응답 메시지

-
웹 애플리케이션 서버의 요청 응답 구조
4. welcomePage 추가
- index.html
in/webapp/index.html
<!DOCTYPE html>
<html>
<head>
 <meta charset="UTF-8">
 <title>Title</title>
</head>
<body>
<ul>
 <li><a href="basic.html">서블릿 basic</a></li>
</ul>
</body>
</html>- basic.html
<!DOCTYPE html>
<html>
<head>
    <meta charset="UTF-8">
    <title>Title</title>
</head>
<body>
<ul>
    <li>hello 서블릿 <ul>
        <li><a href="/hello?username=servlet">hello 서블릿 호출</a></li>
    </ul>
    </li>
    <li>HttpServletRequest
        <ul>
            <li><a href="/request-header">기본 사용법, Header 조회</a></li>
            <li>HTTP 요청 메시지 바디 조회
                <ul>
                    <li><a href="/request-param?username=hello&age=20">GET -
                        쿼리 파라미터</a></li>
                    <li><a href="/basic/hello-form.html">POST - HTML Form</a></
                    li>
                    <li>HTTP API - MessageBody -> Postman 테스트</li>
                </ul>
            </li>
        </ul>
    </li>
    <li>HttpServletResponse
        <ul>
            <li><a href="/response-header">기본 사용법, Header 조회</a></li>
            <li>HTTP 요청 메시지 바디 조회
                <ul>
                    <li><a href="/response-html">HTML 응답</a></li>
                    <li><a href="/response-json">HTTP API JSON 응답</a></li>
                </ul>
            </li>
        </ul>
    </li>
</ul>
</body>
</html>
(2) HttpServletReuqest - 개요
1. HttpServletRequest 역할
- HTTP 요청 메시지를 개발자가 직접 파싱해서 사용해도 되지만, 매우 불편할 것이다.
- 서블릿은 개발자가 HTTP 요청 메시지를 편리하게 사용할 수 있도록 개발자 대신에 HTTP 요청 메시지를 파싱한다.
- 그리고 그 결과를 HttpServletRequest 객체에 담아서 제공한다.
2. HttpServletRequest 객체의 여러가지 부가 기능
-
임시 저장소 기능
-> 해당 HTTP 요청이 시작부터 끝날 떄 까지 유지되는 임시 저장소 기능
--> 저장 : request.setAttribyte(name, value)
--> 조회 : request.getAttribute(name) -
세션 관리 기능
-> request.getSession(create: true)
[중요]
HttpServletRequest, HttpServletResponse를 사용할 때 가장 중요한 점은 이 객체들이 HTTP 요청 메시지, HTTP 응답 메시지를 편리하게 사용하도록 도와주는 객체이다. 따라서 이 기능을 깊이 있게 이해하려면 HTTP 스펙이 제공하는 요청, 응답 메시지 자체를 이해 해야 한다.
(3) HttpServletRequest - 기본 사용법
1. HttpServletRequest를 통해 HTTP 메시지의 start-line, header 정보 조회하기
- RequestHeaderServlet.java
package hellp.servlet.basic.request;

import javax.servlet.ServletException;
import javax.servlet.annotation.WebServlet;
import javax.servlet.http.Cookie;
import javax.servlet.http.HttpServlet;
import javax.servlet.http.HttpServletRequest;
import javax.servlet.http.HttpServletResponse;
import java.io.IOException;
import java.util.Enumeration;

@WebServlet(name = "requestHeaderServlet", urlPatterns = "/request-header")
public class RequestHeaderServlet extends HttpServlet {

    @Override
    protected void service(HttpServletRequest request, HttpServletResponse respspnse) throws ServletException, IOException {
        printStartLine(request);
        printHeaders(request);
        printHeaderUtils(request);
        printEtc(request);
       // response.getWriter().write("ok");
    }

    //start line 정보
    private void printStartLine(HttpServletRequest request) {
        System.out.println("--- REQUEST-LINE - start ---");
        System.out.println("request.getMethod() = " + request.getMethod()); //GET
        System.out.println("request.getProtocal() = " + request.getProtocol()); //

        System.out.println("request.getScheme() = " + request.getScheme()); //http
        // http://localhost:8080/request-header
        System.out.println("request.getRequestURL() = " + request.getRequestURL());
        // /request-test
        System.out.println("request.getRequestURI() = " + request.getRequestURI());
        //username=hi
        System.out.println("request.getQueryString() = " +
                request.getQueryString());
        System.out.println("request.isSecure() = " + request.isSecure()); //https

        System.out.println("--- REQUEST-LINE - end ---");
        System.out.println();
    }

    //Header 모든 정보
    private void printHeaders(HttpServletRequest request) {
        System.out.println("--- Headers - start ---");
        request.getHeaderNames().asIterator()
                .forEachRemaining(headerName -> System.out.println(headerName + ":" + request.getHeader(headerName)));
        System.out.println("--- Headers - end ---");
        System.out.println();
    }

    //Header 편리한 조회
    private void printHeaderUtils(HttpServletRequest request) {
        System.out.println("--- Header 편의 조회 start ---");
        System.out.println("[Host 편의 조회]");
        System.out.println("request.getServerName() = " +
                request.getServerName()); //Host 헤더
        System.out.println("request.getServerPort() = " +
                request.getServerPort()); //Host 헤더
        System.out.println();
        System.out.println("[Accept-Language 편의 조회]");
        request.getLocales().asIterator()
                .forEachRemaining(locale -> System.out.println("locale = " +
                        locale));
        System.out.println("request.getLocale() = " + request.getLocale());
        System.out.println();
        System.out.println("[cookie 편의 조회]");
        if (request.getCookies() != null) {
            for (Cookie cookie : request.getCookies()) {
                System.out.println(cookie.getName() + ": " + cookie.getValue());
            }
        }
        System.out.println();
        System.out.println("[Content 편의 조회]");
        System.out.println("request.getContentType() = " +
                request.getContentType());
        System.out.println("request.getContentLength() = " + request.getContentLength());
        System.out.println("request.getCharacterEncoding() = " +
                request.getCharacterEncoding());
        System.out.println("--- Header 편의 조회 end ---");
        System.out.println();
    }

    private void printEtc(HttpServletRequest request) {
        System.out.println("--- 기타 조회 start ---");
        System.out.println("[Remote 정보]");
        System.out.println("request.getRemoteHost() = " +
                request.getRemoteHost()); //
        System.out.println("request.getRemoteAddr() = " +
                request.getRemoteAddr()); //
        System.out.println("request.getRemotePort() = " +
                request.getRemotePort()); //
        System.out.println();
        System.out.println("[Local 정보]");
        System.out.println("request.getLocalName() = " +
                request.getLocalName()); //
        System.out.println("request.getLocalAddr() = " +
                request.getLocalAddr()); //
        System.out.println("request.getLocalPort() = " +
                request.getLocalPort()); //
        System.out.println("--- 기타 조회 end ---");
        System.out.println();
    }
}
- 결과
--- REQUEST-LINE - start ---
request.getMethod() = GET
request.getProtocal() = HTTP/1.1
request.getScheme() = http
request.getRequestURL() = http://localhost:8080/request-header
request.getRequestURI() = /request-header
request.getQueryString() = null
request.isSecure() = false
--- REQUEST-LINE - end ---

--- Headers - start ---
host:localhost:8080
connection:keep-alive
cache-control:max-age=0
sec-ch-ua:" Not;A Brand";v="99", "Google Chrome";v="91", "Chromium";v="91"
sec-ch-ua-mobile:?0
dnt:1
upgrade-insecure-requests:1
user-agent:Mozilla/5.0 (Windows NT 10.0; Win64; x64) AppleWebKit/537.36 (KHTML, like Gecko) Chrome/91.0.4472.124 Safari/537.36
accept:text/html,application/xhtml+xml,application/xml;q=0.9,image/avif,image/webp,image/apng,*/*;q=0.8,application/signed-exchange;v=b3;q=0.9
sec-fetch-site:none
sec-fetch-mode:navigate
sec-fetch-user:?1
sec-fetch-dest:document
accept-encoding:gzip, deflate, br
accept-language:ko-KR,ko;q=0.9,en-US;q=0.8,en;q=0.7
cookie:SESSION=NDkyZWYxZjgtMGQyMS00NzI5LWFkNDQtNTU2Mzc4NDI3MTFh
--- Headers - end ---

--- Header 편의 조회 start ---
[Host 편의 조회]
request.getServerName() = localhost
request.getServerPort() = 8080

[Accept-Language 편의 조회]
locale = ko_KR
locale = ko
locale = en_US
locale = en
request.getLocale() = ko_KR

[cookie 편의 조회]
SESSION: NDkyZWYxZjgtMGQyMS00NzI5LWFkNDQtNTU2Mzc4NDI3MTFh

[Content 편의 조회]
request.getContentType() = null
request.getContentLength() = -1
request.getCharacterEncoding() = UTF-8
--- Header 편의 조회 end ---

--- 기타 조회 start ---
[Remote 정보]
request.getRemoteHost() = 0:0:0:0:0:0:0:1
request.getRemoteAddr() = 0:0:0:0:0:0:0:1
request.getRemotePort() = 56920

[Local 정보]
request.getLocalName() = 0:0:0:0:0:0:0:1
request.getLocalAddr() = 0:0:0:0:0:0:0:1
request.getLocalPort() = 8080
--- 기타 조회 end ---
(4) HTTP 요청 데이터 개요
HTTP 요청 메시지를 통해 클라이언트에서 서버로 데이터를 전달하는 방법
1. GET - 쿼리 파라미터
- /URL?username=hello&age=20
- 메시지 바디 없이, URL의 쿼리 파라미터에 데이터를 포함해서 전달
- 예) 검색, 필터, 페이징 등에서 많이 사용하는 방식
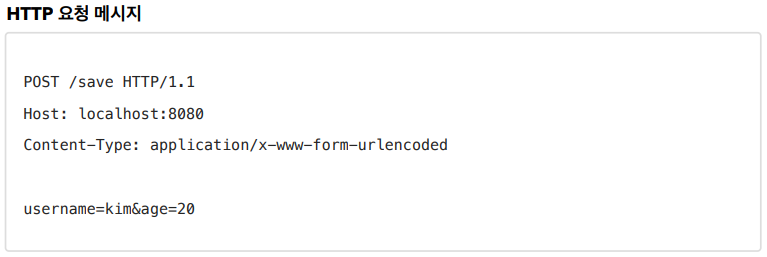
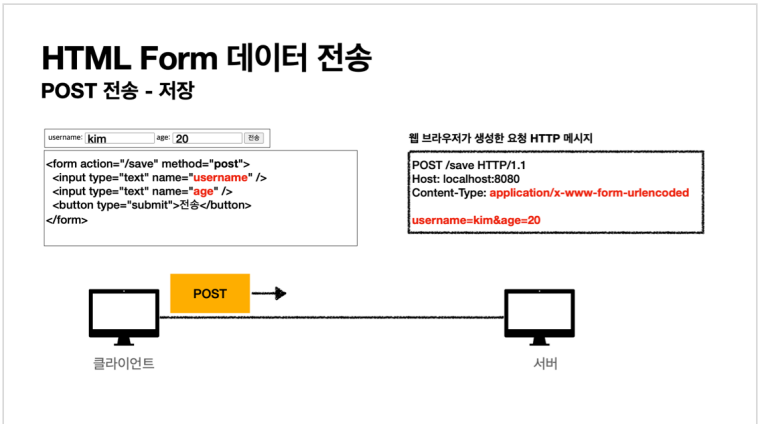
2. POST - HTML Form
- content-type : application/x-www-form-urlencoded
- 메시지 바디에 쿼리 파라미터 형식으로 전달 username=hello&age=20
- 메시지 바디에 쿼리 파라미터 형식으로 전달 username=hello&age=20
- 예) 회원가입, 상품주문, HTML Form 사용
3. HTTP message body에 데이터를 직접 담아서 요청
- HTTP API에서 주로 사용, JSON, XML, TEXT
- 데이터 형식은 주로 JSON 사용
- POST, PUT, PATCH
(5) HTTP 요청 데이터 - GET 쿼리 파라미터
1. 클라이언트에서 서버로 데이터 전송하기
-
전달 데이터
-username=hello
-age=20 -
메시지 바디 없이 URL의 "쿼리파라미터"를 사용해서 전달
-> 검색, 필터, 페이징 등에서 많이 사용 -
URL에서 ?로 시작, 추가파라미터는 &로 구분
-> http://localhost:8080/request-param?username=hello&age=20
2. RequestParamServlet과 결과
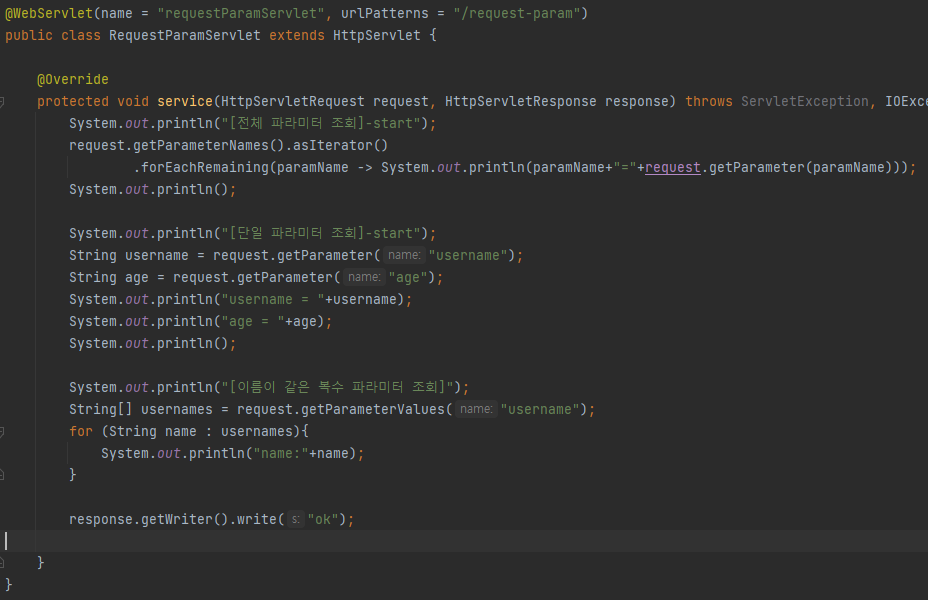
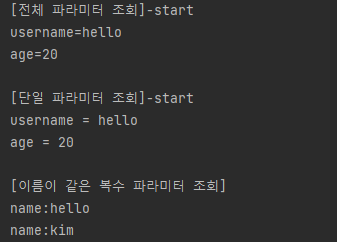
[전체파라미터조회]
        request.getParameterNames().asIterator()
                .forEachRemaining(paramName -> System.out.println(paramName+"="+request.getParameter(paramName)));

[단일 파라미터 조회]

        String username = request.getParameter("username");

[이름이 같은 복수 파라미터 조회]
        String[] usernames = request.getParameterValues("username");
        for (String name : usernames){
            System.out.println("name:"+name);
        }
(6) HTTP 요청 데이터 - POST HTML Form
1. HTML의 Form을 사용해서 클라이언트에서 서버로 데이터 전송
- 회원가입, 상품주문 등에서 사용
- 특징
-> Content-type : 'application/x-www-form-urlencoded'
-> 메시지 바디에 쿼리 파라미터 형식으로 데이터를 전달함. 'username=kim&age=20;
2. hello-form.html 에서 form 방식으로 전송
- hello-form.html
<!DOCTYPE html>
<html>
<head>
    <meta charset="UTF-8">
    <title>Title</title>
</head>
<body>
<form action="/request-param" method="post">
    username: <input type="text" name="username" />
    age: <input type="text" name="age" />
    <button type="submit">전송</button>
</form>
</body>
</html>- 전송 및 결과

3. 정리
- 'application/x-www-form-urlencoded' 형식은 앞서 GET에서 살펴본 쿼리 파라미터 형식과 같다. 따라서 쿼리파라미터 조회 메서드를 그대로 사용하면 된다.
- 클라이언트(웹브라우저) 이밪ㅇ에서는 두 방식에 차이가 있지만, 서버입장에서는 둘의 형식이 동일하므로, request.getParameter 로 편리하게 조회할 수 있다.
- content-type은 HTTP 메시지 바디의 데이터 형식을 지정한다.
- "GET URL 쿼리 파라미터 형식"으로 클라이언트에서 서버로 데이터를 전달할 때는 HTTP 메시지 바디를 사용하지 않기 때문에 content-type이 없다.
- "POST HTML Form 형식"으로 데이터를 전달하면 HTTP 메시지 바디에 해당 데이터를 포함해서 보내기 때문에 바디에 포홤된 데이터가 어떤 형식인지 content-type을 꼭 지정해야 한다. 이렇게 폼으로 데이터를 전송하는 형식을 'application/x-www-form-urlencoded'라 한다.
(7) HTTP 요청 데이터 - API 메시지 바디 - 단순 텍스트
1. HTTP message body
- HTTP message body에 데이터를 직접 담아서 요청
-> HTTP API에서 주로 사용, JSON, XML, TEXT
-> 데이터 형식은 주로 JSON 사용
-> POST, PUT, PATCH
2. RequestBodyStringServlet으로 POST 전송
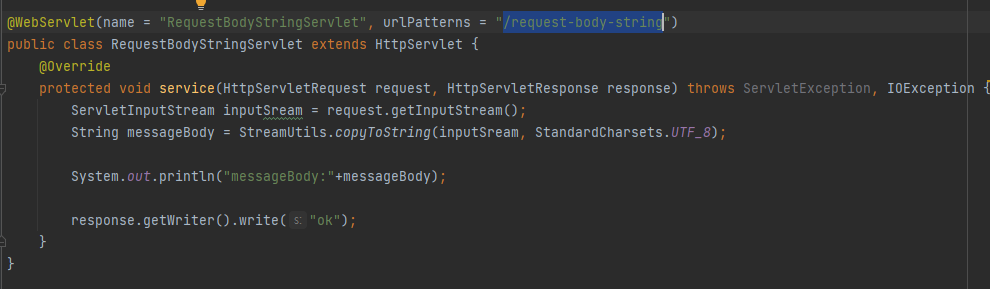
-> inputStream은 byte코드를 반환한다.
-> byte코드를 우리가 읽을 수 있는 문자(String)로 보려면 문자표(Charset)을 지정해 주어야 한다. 여기서는 URF_8로 지정
(8) HTTP 요청 데이터 - API 메시지 바디 - JSON
1. JSON 형식 전송
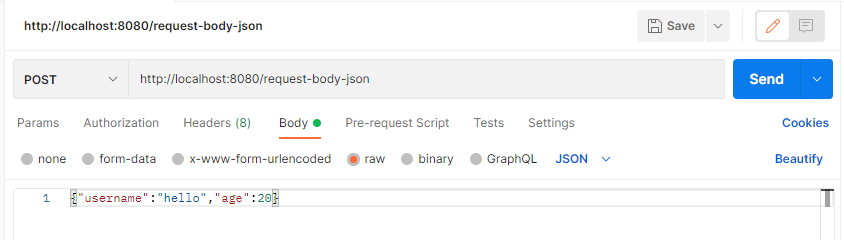
- POST http://localhost:8080/request-body-json
- content-type: application/json
- message body : {"username":"hello","age":20}
2. JSON 형식 파싱 추가
-
JSON 형식으로 파싱할 수 있게 객체 하나 생성함
-
HelloData.java
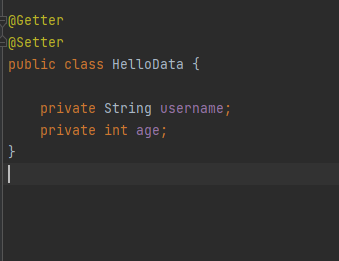 -> lombok @Getter @Setter 이용
 -
RequestBodyJsonServlet.java
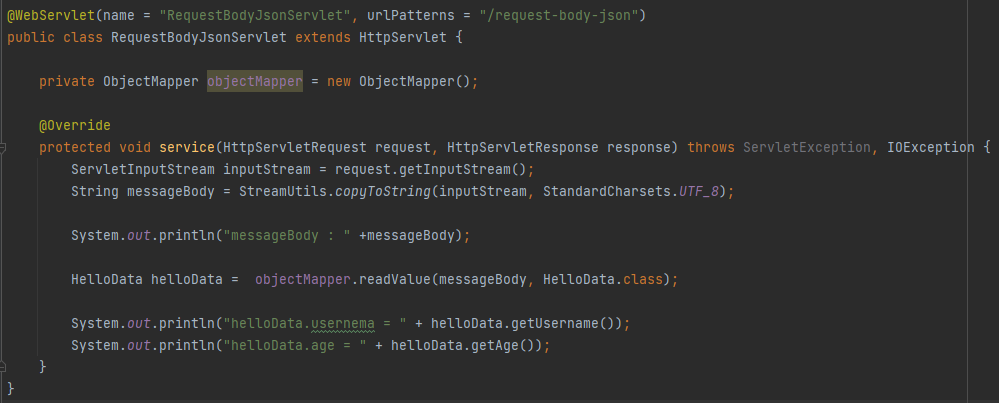
-
POSTMAN 실행 및 결과

- JSON결과를 파싱해서 사용할 수 있는 자바 객체로 변환하려면 Jackson, Gson같은 JSON 변환 라이브러리 추가 사용 필요
-> 스프링부트 Spring MVC 선택 시 Jackson라이브러리(objectMapper) 기본 제공- HTML form 데이터도 메시지 바디를 통해 전송되므로 직접 읽을 수 있음
(9) HttpServletResponse 기본 사용법
1. HttpServletResponse 역할
-
HTTP 응답 메시지 생성
-> HTTP 응답코드 지정
-> 헤더 생성
-> 바디 생성 -
편의기능 제공
-> Content-Type, 쿠키, Redirect
2. HTTP ServletResponse - 기본 사용법
- ResponseHeaderServlet.java
package hellp.servlet.basic.response;


import javax.servlet.ServletException;
import javax.servlet.annotation.WebServlet;
import javax.servlet.http.Cookie;
import javax.servlet.http.HttpServlet;
import javax.servlet.http.HttpServletRequest;
import javax.servlet.http.HttpServletResponse;
import java.io.IOException;
import java.io.PrintWriter;

@WebServlet(name = "responseHeaderServlet", urlPatterns = "/response-header")
public class ResponseHeaderServlet extends HttpServlet {
    @Override
    protected void service(HttpServletRequest request, HttpServletResponse response) throws ServletException, IOException {
        //[status-line]
        response.setStatus(HttpServletResponse.SC_OK);

        //[status-headers]
        response.setHeader("Contest-type", "text/plain;charset=utf-8");
        response.setHeader("Cache-Control", "no-cache, no-store, must-revalidate");
        response.setHeader("Pragma", "no-cache");
        response.setHeader("my-header","hello");

        //[Header 편의 메서드]
        content(response);
        cookie(response);
        redirect(response);
        PrintWriter writer =response.getWriter();
        writer.print("ok");
    }
- content편의 메소드
    private void content(HttpServletResponse response) {
        //Content-Type: text/plain;charset=utf-8
        //Content-Length: 2
        //response.setHeader("Content-Type", "text/plain;charset=utf-8");
        response.setContentType("text/plain");
        response.setCharacterEncoding("utf-8");
        //response.setContentLength(2); //(생략시 자동 생성)
}- cookie 편의 메소드
    private void cookie(HttpServletResponse response) {
        //Set-Cookie: myCookie=good; Max-Age=600;
        //response.setHeader("Set-Cookie", "myCookie=good; Max-Age=600");
        Cookie cookie = new Cookie("myCookie", "good");
        cookie.setMaxAge(600); //600초
        response.addCookie(cookie);
}- redirect 편의 메소드
    private void redirect(HttpServletResponse response) throws IOException {
        //Status Code 302
        //Location: /basic/hello-form.html

        //response.setStatus(HttpServletResponse.SC_FOUND); //302
        //response.setHeader("Location", "/basic/hello-form.html");
        response.sendRedirect("/basic/hello-form.html");
    }
(10) Http 응답 데이터 - 단순 텍스트_HTML
1. HTTP 응답 방법
- 단순 텍스트 응답
-> writer.print("ok")- HTML 응답
- HTML API - MessageBody JSON응답
2. HTML 응답
- ResponseHtmlServlet.java

-> HTTP 응답으로 HTML을 반환할 때는 content-type을 text/html로 지정해야 한다.
(11) Http 응답 데이터 - API JSON
- ResponseJsonServlet.java
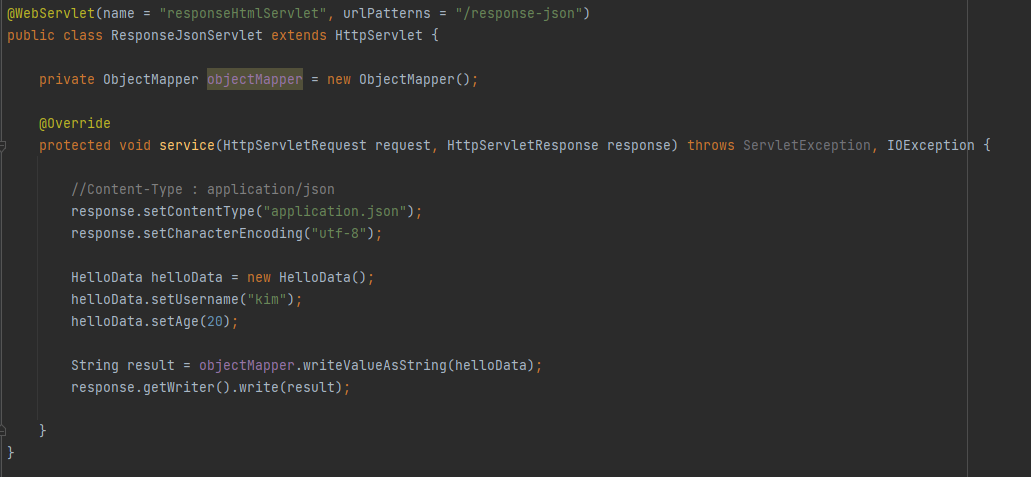
-> HTTP응답으로 JSON을 반환할 시 content-type을 application/json으로 지정
